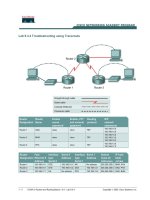
Lab 9.3.4 Troubleshooting using Traceroute
Bạn đang xem bản rút gọn của tài liệu. Xem và tải ngay bản đầy đủ của tài liệu tại đây (238.19 KB, 3 trang )
1 - 3 CCNA 2: Routers and Routing Basics v 3.0 - Lab 9.3.4 Copyright 2003, Cisco Systems, Inc.
Lab 9.3.4 Troubleshooting using Traceroute
2 - 3 CCNA 2: Routers and Routing Basics v 3.0 - Lab 9.3.4 Copyright 2003, Cisco Systems, Inc.
Objective
Use the traceroute Cisco IOS command from source router to destination router. Use the
tracert MS-DOS command from source workstation to destination router. Verify that the network-
layer between source, destination and each router along the way is working properly. Retrieve
information to evaluate the end-to-end path reliability.
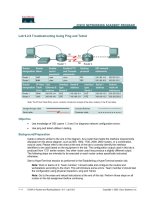
Cable the network in the diagram. Any router that meets the interface requirements displayed on the
above diagram such as 800, 1600, 1700, 2500, 2600 routers, or a combination, may be used.
Please refer to the chart at the end of the lab to correctly identify the interface identifiers to be used
based on the equipment in the lab. The configuration output used in this lab is produced from 1721
series routers. Any other router used may produce slightly different output. The following steps are
intended to be executed on each router unless specifically instructed otherwise.
Start a HyperTerminal session as performed in the Establishing a HyperTerminal session lab.
Erase and reload all routers in this lab assignment before continuing. If there are problems in
accomplishing this, go to lab 4.2.6 and use those erase and reload instructions.
Step 1 Configure the Gadsden and Birmingham routers
a. On the routers, enter the global configuration mode and configure the hostname as shown in the
chart. Then configure the console, virtual terminal and enable passwords. If there are problems
doing this, refer to the Configuring router passwords lab. Next configure the interfaces and
routing according to the chart. If there are problems doing this, refer to the Configuring Host
Tables lab and the Configuring RIP lab. Make sure to copy the running-config to the
startup-config on each router so the configuration will not be lost if the router is power
recycled.
b. This lab requires that IP hostnames are configured.
c. Verify the routers configurations by performing a show running-config on each router. If not
correct, fix any configuration errors and verify.
Step 2 Configure the workstations with appropriate IP address subnet mask and default
gateway
Step 3 Ping from the workstations
a. From a Windows host click on Start > Programs > Accessories> MS-DOS. This will open a
Command Prompt window. (If this not the correct location see the instructor for the proper
location on this computer.)
b. To test that the TCP/IP stack and default gateway on the workstation are configured and working
properly, use the MS DOS window to ping the routers by issuing the following commands:
C:\>ping 192.168.14.1
The ping should respond with successful results. If not, check the configurations on the host and
directly connected router.
Step 4 Test Layer 3 connectivity
Using the command prompt enter ping and the IP address of all routers interfaces.
This will test Layer 3 connectivity between the workstation and the routers.
a. Is the output from the workstation ping command the same as the output from the ping
command from a router?
__________________________________________________________________________
3 - 3 CCNA 2: Routers and Routing Basics v 3.0 - Lab 9.3.4 Copyright 2003, Cisco Systems, Inc.
Step 5 Login to the router in user mode
a. Login to the Gadsden router, stay at the user exec prompt.
Step 6 Discover the trace options.
a. Enter trace at the router prompt.
b. What did the router respond with?
_____________________________________
Step 7 Use the traceroute command
a. Enter traceroute ip xxx.xxx.xxx.xxx where xxx.xxx.xxx.xxx is the IP address of the
target destination.
Note: Use one of the end routers and trace IP to the other end host. The router will
respond with:
GAD#traceroute 192.168.16.2
Type escape sequence to abort.
Tracing the route to 192.168.16.2
1 BHM (192.168.15.2) 16 msec 16 msec 16 msec
2 192.168.16.2 16 msec 16 msec 12 msec
GAD#
If the output is not successful, check the router and host configurations.
Step 8 Continue using traceroute
Repeat Step 5 with all other routers on the network.
Step 9 Use the trace command from a workstation.
a. From the console workstation click on Start > Programs > Command Prompt. An MS-DOS
Command Prompt window will open up.
b. Enter tracert and the same IP address used in Step 5.
c. The first hop is the default gateway or the near side router interface on the LAN that the
workstation is connected to. List the host name and IP address of the router that the ICMP
packet was routed through.
Host Name IP Address
d. There is one more entry in the output of the tracert command when the trace is from the
computer command prompt to the target host.
Why?
__________________________________________________________________
Upon completion of the previous steps logoff by typing exit and turn the router off.