Oracle RMAN 11g Backup and Recovery- P11
Bạn đang xem bản rút gọn của tài liệu. Xem và tải ngay bản đầy đủ của tài liệu tại đây (1001.12 KB, 50 trang )
468
Part IV:
RMAN in the Oracle Ecosystem
Different Types of RMAN Duplication
Oracle 11g offers multiple ways to perform database cloning using RMAN. In the past, you always
needed a few critical things to perform duplication: access to the target database (the one you
want to copy) and access to existing backups. In different situations, both of these dependencies
have been stripped, allowing for more flexibility in how you plan and execute a clone operation
with RMAN.
Duplicate Using RMAN Backups and with Access to the Target Database
This is the “traditional” RMAN duplication from versions 9i and 10g: we leverage our existing
RMAN backups to create a copy of an existing target database to a new location. To understand
how far, and what, to duplicate, RMAN connects to the existing database’s control file throughout
the duplication operation.
Duplicate Using RMAN Backups and No Access to the Target
New to 11g, now you have the option of performing a duplication when the target is not available.
This is useful in situations where the target database is in a different incarnation, is in an inaccessible
network location, or is simply not at your disposal for the duplication. In this case, RMAN can
pull what it needs from the recovery catalog, a few additional parameters you will pass to the
duplicate command. We cover this near the end of the chapter, in the section “Target-Less
Duplication in 11g.”
Duplicate an Active Database Without Using Backups
Duplicating an active database sounds new, but this operation was actually introduced in Enterprise
Manager in the 10g timeframe. At that time, Enterprise Manager would clone a database by calling
the package dbms_backup_restore directly, instead of using the RMAN client command syntax, and
it would make a live copy of each datafile in the database in real time, and then would move that
datafile to the new location.
Now, in 11g, this is codified in the RMAN command syntax, but it’s the same operation.
Instead of relying on an existing RMAN backup, RMAN simply connects to the target database,
runs a backup operation directly against the database in real time, and writes the file to the
specified location. So, nothing all that special, other than a syntactic difference in what you
call the operation.
All three of these duplication types rely on the same underlying architecture. We will walk
through the operations for the backup-based, target database–connected duplication so that the
underlying principles can be observed.
The Duplication Architecture
Here’s how duplication works. RMAN connects to your target database or to the catalog, if you
use one. This connection is necessary to gain access to the target database control file for details
about where to locate backups. After you connect to the target or catalog, you must connect to
your auxiliary instance (the instance that will house your cloned database). Before duplication
starts, you must have already built an init.ora file for the auxiliary instance, and have started it in
NOMOUNT mode. This way, the memory segment has been initialized, and therefore RMAN can
make a SYSDBA connection to it. The auxiliary instance does not have a control file yet (duplication
will take care of that), so you cannot mount the auxiliary instance, even if you want to.
Please purchase PDF Split-Merge on www.verypdf.com to remove this watermark.
Chapter 19:
Duplication: Cloning the Target Database
469
With these connections made, you can issue your duplicate command. It can look as simple
as this:
duplicate target database to aux1;
or it can be complicated, depending on where the auxiliary instance is
run {
set until time
'08-JUL-2002:16:30:00';
duplicate target database to aux1 pfile /u02/oracle/admin/aux1/pfile/init.ora
nofilenamecheck
device type sbt parms "env (nb ora serv rmsrv)"
logfile
'/u04/oracle/oradata/aux1/redo01.log' size 100m,
'/u05/oracle/oradata/aux1/redo02.log' size 100m,
'/u06/oracle/oradata/aux1/redo03.log' size 100m;}
The duplication process can be broken down into its distinct phases:
1. RMAN determines the nature and location of the backups.
2. RMAN allocates an auxiliary channel at the auxiliary instance.
3. RMAN restores the datafiles to the auxiliary instance.
4. RMAN builds a new auxiliary control file.
5. RMAN restores archive logs from backup (if necessary) and performs any necessary
recovery.
6. RMAN resets the DBID for the auxiliary instance and opens the auxiliary database with
open resetlogs.
First, RMAN sets any runtime parameters, such as an until time clause on the duplicate
command. Then, based on these parameters, it checks the target database control file (or recovery
catalog) for the appropriate backups. It then builds the RPCs for how to access the backups, and
which ones to access, but it does not execute the code at the target. Instead, RMAN creates a
channel process at the auxiliary instance, referred to as the auxiliary channel, and to this channel,
RMAN passes the call to DBMS_BACKUP_RESTORE. The auxiliary instance, then, accesses the
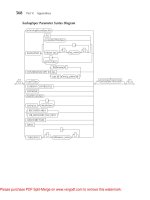
backups and restores all necessary datafiles. Figure 19-1 illustrates how this takes place for both
disk backups and tape backups.
Auxiliary Channel Configuration
For duplication to work, RMAN must allocate one or more channel processes at the auxiliary
instance. From Oracle9i onward, you do not need to manually allocate an auxiliary channel at
the time of duplication, because one will automatically be created using permanent configuration
parameters stored in the target control file. The makeup of the auxiliary channel mainly comes
from parameters you established for target channels: the default device type and the degree
of parallelism both get set using the same persistent parameters that set the target channels.
Therefore, if you are duplicating using backups taken to disk, you need not do anything to
configure your auxiliary channels. However, if you are duplicating your database using backups
Please purchase PDF Split-Merge on www.verypdf.com to remove this watermark.
470
Part IV:
RMAN in the Oracle Ecosystem
FIGURE 19-1
A bird’s-eye view of duplication
taken to tape, you need to configure your auxiliary channels to contain any media manager
environment parameters that your target channels have. For example, the following code sets
the default device type to tape, sets the default level of parallelism to 2, and then configures two
auxiliary channels with the correct parameters:
configure default device type to sbt;
configure device type sbt parallelism 2;
configure auxiliary channel 1 device type
"env (nb ora serv mgtserv, nb ora class
configure auxiliary channel 2 device type
"env (nb ora serv mgtserv, nb ora class
sbt parms
oracle)";
sbt parms
oracle)";
Please purchase PDF Split-Merge on www.verypdf.com to remove this watermark.
Chapter 19:
Duplication: Cloning the Target Database
471
Restoring Datafiles to a Different File Location
After mounting the new control file, RMAN moves forward with the datafile restore. If you are
duplicating your database to the same server that your target resides on, it is obviously necessary
to change the location to which the files will be restored.
Even when restoring to a different server, differences in mount points and directory structures
can require a new file location. The datafile restore step of the duplication process can be modified
to point to a new file location in three ways.
First, you can use the configure command to configure the auxname for any (or all) datafiles
that need a new location. These configurations are stored in the target database control file.
configure auxname for datafile 1 to '/u04/oradata/aux1/system01.dbf';
configure auxname for datafile 2 to '/u04/oradata/aux1/undo01.dbf';
...
Second, you can specify the new datafile names in a run command, as you would in previous
versions:
run {allocate channel c1 type 'sbt tape';
set newname for datafile 1 to '/u04/oradata/aux1/system01.dbf';
set newname for datafile 2 to '/u04/oradata/aux1/undo01.dbf';
duplicate target database to aux1;}
Finally, you can use a parameter in your auxiliary database’s init.ora file to set a new location
for the files. The parameter is DB_FILE_NAME_CONVERT, and you pass two strings to it: first, the
old location of the file on the target, and second, the new location for the file in your auxiliary
instance. You can do this in matched file pairs, like this:
db file name convert (
'/u02/oradata/prod/system01.dbf', '/u02/oradata/aux1/system01.dbf',
'/u03/oradata/prod/prd data 01.dbf', '/u03/oradata/aux1/prd data 01.dbf')
NOTE
In 11gR2, the SET NEWNAME function has been
significantly improved to make scripting even simpler.
Now you can do a SET NEWNAME for an entire
tablespace, or for the entire database. For instance:
SET NEWNAME for tablespace USERS01 to '/u01/%U';
This will rename all datafiles to the new location, with unique naming as defined by the
variable %U. This greatly simplifies the duplication scripting in situations where the new
location will have a different, but consistent, file location.
In addition, there is a Metalink note for those with Oracle Support access that provides
methods for dynamic SQL to generate the SET NEWNAME commands for user-managed files,
or for converting files to Oracle’s Automatic Storage Manager (ASM) and Oracle Managed
Files (OMF) infrastructure. This is Note 549972.1, “RMAN: SET NEWNAME Command SQL.”
Please purchase PDF Split-Merge on www.verypdf.com to remove this watermark.
472
Part IV:
RMAN in the Oracle Ecosystem
This is a simple string conversion parameter, so you can simply pass a single directory name
to be changed. For instance, let’s say you have your files spread over four mount points, but they
all have prod in the directory structure, so that a select from V$DATAFILE looks like this:
Select name from v$datafile;
----------------------------------------------------------/u02/oradata/prod/system01.dbf
/u03/oradata/prod/prd data 01.dbf
/u04/oradata/prod/indx prd01.dbf
/u05/oradata/prod/temp01.dbf
Instead of pairing up each file, you can simply do the following:
db file name convert ('prod' , 'aux1')
This works, so long as everything else about the file location is the same for your auxiliary
database, such as the mount point.
Creating the New Control File
The new control file is created for the auxiliary instance after all the files have been restored.
RMAN just issues a create controlfile command at the auxiliary instance, using the parameters
you outlined in your duplicate command. After creating the control file, the auxiliary database is
mounted. Now, RMAN performs a switch operation to switch to the new files. The switch is the
means by which RMAN modifies the new control file at the auxiliary site to point to the new
location of the datafiles.
Recovery and Archive Logs
After the files are restored and switched, it is time to perform recovery on the database, either to
bring it to the current point in time or to bring it to the time specified in the until time clause.
To perform recovery, RMAN needs access to the archive logs. If they have been backed up by
RMAN, then RMAN can simply restore them from the backup location to the LOG_ARCHIVE_
DEST specified in the init.ora file of the auxiliary database. You can also manually move archive
logs to the location required by the new instance so that they are found on disk by RMAN and
no restore is required. If you are duplicating to the same server as the one that the target currently
resides on, RMAN can find the archive logs in the LOG_ARCHIVE_DEST of the target.
Once the archive logs are restored, RMAN performs the required amount of recovery. If you
did not specify a point in time to end the recovery, RMAN restores up to the last available archive
log (as found in the view V$ARCHIVED_LOG) and then stops. During duplication, RMAN cannot
check the online redo log files for further recovery information. After it hits the end of the archive
logs, it stops recovery. After recovery has completed, if RMAN restored any archive logs from
backup, they are deleted.
Changing the Database ID (DBID)
After media recovery is complete, the database is in a consistent state, and it is time for RMAN
to change the database ID of the new clone. RMAN has to wait until all other activity in the
database has completed, as all operations to this point required the clone database to have the
same DBID as the target. The archive logs would not apply to the clone during media recovery
if the control file had a different DBID.
Please purchase PDF Split-Merge on www.verypdf.com to remove this watermark.
Chapter 19:
Duplication: Cloning the Target Database
473
The process of changing the DBID is simple. RMAN has at its disposal a little procedure
called dbms_backup_restore.zerodbid( ). With the database in a mounted state (not open), this
package goes into the file headers and zeros out the DBID in each file header. Then, RMAN shuts
down the database and re-creates the auxiliary control file again. When the control file is rebuilt,
Oracle checks the file headers for the DBID. When it does not find one, Oracle generates a new
one and broadcasts it to every file header.
Log File Creation at the Auxiliary Site
When RMAN issues the final open resetlogs command at the completion of the duplication
process, it must build brand-new log files for the auxiliary database. This always happens when
you issue a resetlogs command, but with a duplicate command, you need to take into consideration
what you want the new redo log files to look like. If you are duplicating to the same system as
your target, at a minimum you will have to rename your log files.
The zerodbid Procedure: Warning! Achtung!
As you can imagine, the following is a very vulnerable state for a database to be in: shut
down without a DBID in the file headers and with a control file that is being rebuilt. In the
RMAN duplication process, however, elements that could go wrong are tightly controlled, so
you don’t have to worry too much. We point this out because it is possible to execute this
package against any database to generate a new DBID. You just mount the database and run
the following code:
execute sys.dbms backup restore.zerodbid(0);
Then, you shut down the database and rebuild the control file using the set parameter:
create controlfile SET database <db name> resetlogs…
And voilà! You have a new DBID. Seems simple enough, doesn’t it?
However, a lot can go wrong if you are trying to do this without the complete control over
the environment that RMAN has during duplication. For instance, if you did not get a clean
shutdown and you need to perform media recovery before you can open reset logs, you are
out of luck. The archive logs have a different DBID. There is no way you will be able to open
the database—it is stuck in an inconsistent state, and you cannot fix it. The same thing can
happen if a file was accidentally left offline—it won’t get the new DBID when you do an
open resetlogs command, and therefore you will not be able to bring it online. Ever. You will
get the following error:
ORA-01190: control file or datafile <name> is from before the last RESETLOGS
The moral of the story is to be very careful if you decide to use this procedure manually.
There is a better way. As of Oracle9i Release 2, Oracle has a utility called DBNEWID, which
is a safe and secure way of generating a new ID for a database without making a manual call
to the DBMS_BACKUP_RESTORE package. We talk about DBNEWID at the end of this chapter
in the section “Incomplete Duplication: Using the DBNEWID Utility.”
Please purchase PDF Split-Merge on www.verypdf.com to remove this watermark.
474
Part IV:
RMAN in the Oracle Ecosystem
You can specify completely new redo log file definitions when you issue the duplicate
command. Do this if you want to change the size, number, and/or location of the redo logs for
the new database. This would look something like the following:
duplicate target database to aux1
pfile /u02/oracle/admin/aux1/init.ora
logfile
'/u04/oracle/oradata/aux1/redo01.log' size 100m,
'/u05/oracle/oradata/aux1/redo02.log' size 100m,
'/u06/oracle/oradata/aux1/redo03.log' size 100m;
Alternatively, you can use the existing log file definitions from your target and simply move
them to a new location using the init.ora parameter LOG_FILE_NAME_CONVERT. This parameter
acts exactly like DB_FILE_NAME_CONVERT, so you can convert the log files in coupled pairs, or
you can simply use string conversion to change a single directory name:
log file name convert ('/u02/oracle/oradata/redo01a.dbf',
'/u03/auxiliary/redo01a.dbf',…)
Duplication: Location Considerations
So far, we’ve completely glossed over one of the biggest stumbling blocks to understanding
duplication. You must account for the location of your auxiliary instance in relation to the
location of your target instance. Duplicating to the same server is very different from duplicating
to a remote server. There are elements unique to each that you must understand before you
proceed with duplication.
Duplication to the Same Server: An Overview
You must tread lightly when duplicating to the same server, so that you don’t walk all over your
existing target database. If you were to simply make a copy of your target init.ora file and then run
the following code:
duplicate target database to aux1;
you would run into a series of problems and errors. These errors would be related to the fact
that you already have an instance running with the same name and have the same file locations
for two databases.
Memory Considerations
The first memory consideration is the database name. Oracle references memory segments on the
server based on the value of the init.ora parameter DB_NAME. Therefore, Oracle cannot allow
two instances with the same DB_NAME to run on the same system. If you try to startup mount a
second instance with the same name, you will get the following error:
ORA-01102: cannot mount database in EXCLUSIVE mode
Therefore, when duplicating to the same system, you need to change the DB_NAME
parameter in the auxiliary init.ora file to be different from the database name of your target:
db name 'aux1'
instance name 'aux1'
Please purchase PDF Split-Merge on www.verypdf.com to remove this watermark.
Chapter 19:
Duplication: Cloning the Target Database
475
File Location Considerations
Okay, you’ve squared away your memory problems, but you still have two databases that are
trying to write to the same file locations. In fact, you have three different types of files that are all
competing for the same name. If you don’t account for file locations, duplication will fail at the
step of trying to rebuild the control file:
RMAN-00571:
RMAN-00569:
ERROR MESSAGE STACK FOLLOWS
RMAN-00571:
RMAN-03002: failure of Duplicate Db command at 07/02/2009 13:52:14
RMAN-06136: ORACLE error from auxiliary database:
ORA-01503: CREATE CONTROLFILE failed
ORA-00200: controlfile could not be created
ORA-00202: controlfile:
'/space/oracle user/OraHome1/oradata/sun92/control01.ctl'
ORA-27086: skgfglk: unable to lock file - already in use
SVR4 Error: 11: Resource temporarily unavailable
This is good news for you, because otherwise you would have overwritten your production
control file. You must change the auxiliary init.ora parameter CONTROL_FILES to point to a new
location on disk, as this is the means by which RMAN determines where to restore the control
files to.
After we change the location of the control files, we must change the location of the datafiles.
We talked about this previously: your three choices are to use the configure command, use the
DB_FILE_NAME_CONVERT parameter, or use a run block, Oracle8i-style. If you fail to change
the datafile locations when duplicating to the same server, you will get an error very similar to the
preceding control file error, telling you that the files are currently in use and cannot be overwritten.
Finally, you must change the redo log file location. We talked about this previously, when we
discussed the different steps that duplication walks through. You can use the logfile keyword as
part of the duplicate command to build completely different redo files, with different sizes,
number of groups, and number of members. This option essentially rewrites the similar logfile
parameter of the create controlfile stage of duplication. Alternatively, you can simply use the
LOG_FILE_NAME_CONVERT parameter in the auxiliary init.ora file.
Duplication to the Same Server, Different ORACLE_HOME
It is common practice to clone the production database from its location to a different location
on the same server but to have it be hosted by a different Oracle software installation. When you
have a different ORACLE_HOME for the auxiliary instance, slightly different rules apply. All the
rules about hosting on the same system apply as outlined previously. However, you must also
consider the location of the backup pieces. If you are duplicating from disk backups, this won’t
be a problem—just make sure you have your OS permissions worked out ahead of time. If you
are duplicating from tape backups, however, you need to make sure that you have your MML file
appropriately linked with the auxiliary ORACLE_HOME in the same way as it is linked in your
target’s ORACLE_HOME. Otherwise, your tape backups will be inaccessible by the auxiliary
instance, and duplication will fail because the media manager will be inaccessible.
Duplication to a Remote Server: An Overview
A successful duplication to an auxiliary instance on a different server from the target is no more or
less complicated than duplication to the same server. It’s just complicated in different ways.
Please purchase PDF Split-Merge on www.verypdf.com to remove this watermark.
476
Part IV:
RMAN in the Oracle Ecosystem
Memory Considerations
Unlike duplication to the same server, you do not have to worry about the DB_NAME parameter
in the init.ora file. Because we are on a different server, Oracle has no hang-ups about the LOCK_
NAME used for memory.
Of course, it is good operational procedure to always be mindful of the DB_NAME parameter
during a duplication process, and crosscheck all other instances running on the same server
before beginning the duplication. That way you have no unexpected errors down the road. In
addition, from a management perspective, it makes the most sense to always have every database
in your ecosystem with a unique name.
File Location Considerations
Again, because we are on a new server, there is not quite the urgency to change any of the file
location specifications for your auxiliary instance. No database already is running with the same
files, so we can leave all file specifications the same as for the target instance, and thus avoid any
possible errors in the configuration. Again, we can simplify much of this process when we are on
a different system. If you do not change the location of the files, you must specify nofilenamecheck
in the duplicate command. This tells duplication not to confirm that the filenames are different
before performing the restore. If this is not specified, RMAN will give you an error.
The one caveat to this simplicity is if the auxiliary host does not have the same file structure
and mount point setup that the target host has. If you have different mount points or drive
configurations, you still need to change your file specifications for the auxiliary instance so
that RMAN can restore to a location that actually exists.
The Backup Location: Disk
The complicating factor for restoring to a different server comes from providing the auxiliary
channel process access to backups that were taken at a different server. You must account for
whether you backed up to disk or to tape.
If you are duplicating from disk backups, your choices are limited. Remember that RMAN
passes the calls to DBMS_BACKUP_RESTORE to a channel process at the auxiliary instance, but
it cannot take into account any file system differences. It must look for the backup pieces in the
exact location and format that was recorded in the target database control file. For example,
suppose you took a full database backup at your target system using the following command:
backup database format
'/u04/backup/prod/%U.full.PROD';
This created your backup piece as a file called 01DSGVLT_1_1 in the directory /u04/backup/
prod. This is recorded in the target control file. Then, during duplication, RMAN passes the file
restore command to the auxiliary instance and tells it to restore from /u04/backup/prod/
01DSGVLT_1_1. That means your auxiliary instance must have a mount point named /u04, and
there must be a directory named backup/prod in which a file called 01DSGVLT_1_1 resides. If
not, the duplication will fail with an error:
RMAN-03002: failure of Duplicate Db command at 07/02/2002 14:49:55
RMAN-03015: error occurred in stored script Memory Script
ORA-19505: failed to identify file "/u04/backup/prod/01dsgvlt 1 1"
ORA-27037: unable to obtain file status
SVR4 Error: 2: No such file or directory
Additional information: 3
Please purchase PDF Split-Merge on www.verypdf.com to remove this watermark.
Chapter 19:
Duplication: Cloning the Target Database
477
You can make duplication from disk work in three ways. The first, and most straightforward,
is to simply copy the backups from your target host to the auxiliary host, and place them in the
same location. Obviously, this involves a huge transfer of files across your network.
The second way to proceed is to NFS mount the backup location on the target host from the
auxiliary host. This works only if you can mount the target location with the same mount point
name as RMAN will use (in the preceding example, you would have to NFS mount /u04/backup/
prod as /u04/backup/prod). For example, you would need to do the following from your auxiliary
instance:
mount cervantes:/u04/backup/prod /u04/backup/prod
That way, from your auxiliary node, you should be able to do the following:
cd /u04/backup/prod
ls –l
touch testfile
ls –l
If you get an error when you try to change directories, or when you try to touch a file, you
need to sort out your NFS and permissions issues before you proceed with duplication. Figure
19-2 illustrates the mounted file system approach to duplicating to a different server using disk
backups.
If you are on a Windows platform instead of NFS, you will be mounting a network drive. The
same rule applies: the drive specification must be the same on the auxiliary as it is on the target.
So if the backup was written to F:\backup, then you must be able to use F: as a network drive, or
duplication will fail. In addition, you will have to set up your auxiliary service (oracleserviceaux1)
and your listener service (oracleOraHome92tnslistener) to log on as a domain administrator that
FIGURE 19-2
Duplication to a different server using disk backups
Please purchase PDF Split-Merge on www.verypdf.com to remove this watermark.
478
Part IV:
RMAN in the Oracle Ecosystem
has read/write privileges at both the auxiliary host and the target host. Otherwise, you will not be
able to access the backups over the networked drive.
As you may have already noticed, it could be difficult to make a network file system operation
be successful. If you have the same file systems on both the target and the auxiliary servers, you
would not be able to use a straight NFS mount from the auxiliary node to the target location of the
backups on disk. Therefore, your only option would be to copy the backup pieces from one node
to the other.
The source of these types of headaches, of course, is the fact that RMAN hard-codes the
backup location when we back up to disk, and this location cannot be changed. In Oracle
Database 10g, however, there are now two options for us to change the backup location: the
backup backupset command and the catalog backupset command.
With the backup backupset command, we can back up a previous backup set that was on
disk and move it to a different disk location. This gives us considerable flexibility. Now, we can
move the backup pieces from /u04/backup/prod to, say, /u06/backup/prod, which could then be
NFS mounted from our auxiliary system. Or, from the target host, we could NFS mount a drive at
the auxiliary host and then use the backup backupset command to move the backups to the
auxiliary host. For more information on this command, see Chapter 11.
The catalog backupset (and catalog datafilecopy) command offers another, simpler means
of relocating backup sets on a new server. To make RMAN aware that a backup set exists in any
location, you need only tell RMAN to catalog a certain file (or a certain directory), and it will look
for any valid backups in that location and generate metadata for them. For more details on the
catalog command, see Chapter 16.
The Backup Location: Tape
By all estimations, duplicating to a remote server using tape backups is far less complicated or
demanding than using disk backups, because a tape backup does not have a location, per se, just
a file handle. This file handle is all that RMAN knows or cares about; how that file handle relates
to a location on a specific tape is completely controlled by the media manager. Therefore, all
configuration steps that occur for duplication from tape come from the media management layer.
First, you must configure your MML file at the auxiliary site in the same way as at the target
site. Because an auxiliary channel is doing the restore operations, it must be able to initialize the
MML, as outlined in Chapter 4. So, make sure you’ve linked your MML at the auxiliary site.
Next, you need to make sure that your media management server is configured correctly. This
means that your auxiliary node must be registered as a client in the same media management
server that your target node is registered in, and it must have the necessary privileges to access
the tapes for restore purposes. In particular, you must enable the auxiliary node to restore backups
that were taken from a different server. This functionality is usually disabled by default in most
media management software, because allowing files to be restored from one client to another is
a potential security hole. The steps for enabling clients to restore files from a different client are
outlined in each of our four media management chapters (Chapters 5, 6, 7, and 8), depending on
your software vendor.
After configuring your media management server, your final configuration step is to set up
your auxiliary channels. As mentioned earlier, RMAN allocates one or more channels at the
auxiliary instance to perform the restore and recovery steps of duplication. You configure these
channels via the configure command when you are connected to your target database from
RMAN. The parms parameter for the auxiliary channels must contain the usual media
management environment control variables. In particular, it needs to specify the client from
which the backups were taken. For instance, let’s say your target node is named cervantes, and
Please purchase PDF Split-Merge on www.verypdf.com to remove this watermark.
Chapter 19:
Duplication: Cloning the Target Database
479
your auxiliary node is named quixote. Because you have been backing up from cervantes, this
client name is encoded with your RMAN backups at the media management server. So, to be
able to access these backups from the client quixote, you must specify from within RMAN that the
client name is cervantes. Your auxiliary channel configuration command, then, would look
something like this (given a NetBackup media management system):
RMAN> configure auxiliary channel 1 device type sbt parms
2>
"env (nb ora serv mgtserv, nb_ora_client=cervantes)";
new RMAN configuration parameters:
CONFIGURE AUXILIARY CHANNEL 1 DEVICE TYPE 'SBT TAPE' PARMS
"env (nb ora serv mgtserv, nb_ora_client=cervantes)";
new RMAN configuration parameters are successfully stored
Then, when the auxiliary channel makes its sbt( ) calls to the MML, it is telling the media
management server to access backups that were taken using the client cervantes, instead of
checking for backups made by quixote.
Duplication and the Network
Take a deep breath; we’re almost through explaining all the intricacies of duplication and are
about to walk you through the steps themselves. There’s one more area that you need to prepare
prior to running a duplicate command from RMAN: the network. By network, we mostly mean
configuring your Oracle Net files—tnsnames.ora and listener.ora. However, take this opportunity
to consider your overall network as well. Make sure that the target node, auxiliary node, and
media management server can all access each other okay and that you have plenty of bandwidth.
From an Oracle perspective, we have to configure the Oracle Net files. As discussed in
Chapter 2, RMAN must make a SYSDBA connection to the target database. If you are connecting
remotely, you have to configure a password file for the target node. In addition, you need a tns
alias that uses a dedicated server process instead of a shared server process. For duplication, this
still holds true, but you must also be able to connect to the auxiliary instance as SYSDBA using
only dedicated servers.
This means that, no matter what, you have to create a password file for either your target or
your auxiliary machine. You may have been forgoing this step until now by always making a local
connection to the target database. But you cannot simultaneously make a local connection to
both the target and the auxiliary instance. So now, if you haven’t done so already, it’s time to
build a password file.
RMAN Workshop: Build a Password File
Workshop Notes
On Unix platforms, the name of the password file must be orapw<sid>, where <sid> is the value
of the ORACLE_SID to which the password is giving access. In this workshop, the ORACLE_SID =
prod. On Windows, the filename must be in the format pwd<sid>.ora. The locations given in this
workshop must be used; the password file cannot be created anywhere else or it will be unusable.
Step 1. Edit the init.ora file and add the following parameter:
remote login passwordfile exclusive
Please purchase PDF Split-Merge on www.verypdf.com to remove this watermark.
480
Part IV:
RMAN in the Oracle Ecosystem
If you are using an SPFILE, you need to execute the following:
alter system set remote login passwordfile exclusive scope spfile;
Both operations require a database restart to take effect.
Step 2. Decide what your password will be, and then navigate to your ORACLE_HOME/dbs
directory (ORACLE_HOME/database on Windows) and type the following:
orapwd file orapwprod password <OraclE4ever>
Step 3. Check that the file was created successfully, and then test it by making a remote
connection as SYSDBA.
After your password file has been created for your auxiliary instance, you need to configure
the listener to route incoming connections to the auxiliary instance. As you may have already
noticed, there is no need in 10g or 11g for a listener.ora file if you will be connecting only to
open databases. This is because the database PMON process automatically registers the database
with a running listener daemon on the system. So, you will often see that after a default 11gR2
installation, a listener is running, and it is listening for your database, even though you’ve done
no configuration.
While this is excellent news, it does nothing for us in a duplication environment, because we
must be able to make a remote connection to an auxiliary instance that is started (in NOMOUNT
mode) but not open. Because it is not open, there is no PMON process to register the auxiliary
instance with the listener, so the listener has no idea the auxiliary instance exists. To get past this,
you must set up an old-fashioned listener.ora file, with a manual entry for the auxiliary database.
We recommend using the Oracle Net Manager utility, shown here, to build this entry:
Please purchase PDF Split-Merge on www.verypdf.com to remove this watermark.
Chapter 19:
Duplication: Cloning the Target Database
481
After you have configured the listener.ora at your auxiliary instance location, you must also
build a tnsnames.ora entry at the site from which you will be running RMAN. This is the same as
almost any other entry, except that when you build it, you must specify the auxiliary SID_NAME
instead of the SERVICE_NAME. From the Net Manager, you fire up the Net Service Name Wizard
by clicking Service Naming and then going to the menu and choosing Edit | Create. After you give
the Net Service Name (Step 1), then provide the protocol (Step 2), provide the hostname and port
number (Step 3), and finish with specifying the Service Name.
Duplication to the Same Server
Okay, so enough of the explanations, it’s time to run through the duplication itself. First, we give
a detailed step-by-step workshop for duplicating to the same server on which the target resides,
using disk backups. Then, we briefly explain what you would need to do the same thing with tape
backups.
Setting an until Clause When Duplicating
When performing duplication, you sometimes will encounter a situation that requires you
to specify an until clause when duplicating. If you have ever used RMAN to restore your
database using a backup control file, and you are now attempting to duplicate that database,
you will be required to set an until clause. It is recommended to determine the most recent
archive log available to duplication and then to use it as the ending point during duplication:
run { set until sequence n thread 1;
duplicate target database… }
Or, as a fix-all, you can set the SCN to an impossibly high value:
set until scn
281474976710655;
Please purchase PDF Split-Merge on www.verypdf.com to remove this watermark.
482
Part IV:
RMAN in the Oracle Ecosystem
RMAN Workshop: Duplication to the Same Server, Using
Disk Backups
Workshop Notes
Make sure that your OS has been configured to handle another Oracle instance and that adequate
memory and disk space exists. In the following example, our target database, v112, has all of its
datafiles, control files, and redo log files located at /u01/app/oracle/product/oradata/v112. All
backups have been going to the local flash recovery area (FRA) at /u01/app/oracle/product/flash_
recovery_area. We will set the ORACLE_SID for the auxiliary instance to be aux1.
Step 1. Build your auxiliary database directory structures:
$ pwd
/u01/app/oracle/product/oradata
$ mkdir aux1
$ mkdir aux1/arch
$ cd ../admin
$ mkdir aux1
$ cd aux1
$ mkdir pfile bdump udump cdump
$ ls
bdump cdump pfile udump
Step 2. Copy the target init.ora file to the auxiliary location. If your target database uses an
SPFILE, you need to create a PFILE from the SPFILE to capture parameters to move over.
If you use an SPFILE at your target, enter the following:
SQL> connect / as sysdba
Connected.
SQL> create pfile '/u01/app/oracle/product/admin/aux1/pfile/init.ora'
from spfile;
If you use an init.ora file at your target, enter the following:
cp u01/app/oracle/product/admin/v112/pfile/init.ora
u01/app/oracle/product/admin/aux1/pfile/init.ora
Step 3. Make all necessary changes to your aux1 init.ora file:
audit file dest '/u01/app/oracle/product/admin/aux1/adump'
background dump dest '/u01/app/oracle/product/admin/aux1/bdump'
compatible '11.2.0.1.0'
control files '/u01/app/oracle/product/oradata/aux1/control01.ctl',
'/u01/app/oracle/product/oradata/aux1/control02.ctl',
'/u01/app/oracle/product/oradata/aux1/control03.ctl'
core dump dest '/u01/app/oracle/product/admin/aux1/cdump'
db block size 8192
db file multiblock read count 16
db name 'aux1'
db recovery file dest '/u01/app/oracle/product/flash recovery area'
Please purchase PDF Split-Merge on www.verypdf.com to remove this watermark.
Chapter 19:
Duplication: Cloning the Target Database
483
db recovery file dest size 4294967296
dispatchers '(PROTOCOL TCP) (SERVICE aux1XDB)'
job queue processes 10
open cursors 300
pga aggregate target 93323264
processes 150
remote login passwordfile 'EXCLUSIVE'
sga target 279969792
undo management 'AUTO'
undo tablespace 'UNDOTBS1'
user dump dest '/u01/app/oracle/product/admin/aux1/udump'
db file name convert ('v112','aux1')
instance name 'aux1'
Step 4. Build your aux1 password file. See the “Build a Password File” RMAN Workshop earlier
in this chapter.
Step 5. Start up the aux1 instance in NOMOUNT mode:
ORACLE SID aux1
export ORACLE SID
sqlplus /nolog
sql>connect / as sysdba
SQL> startup nomount
pfile /u01/app/oracle/product/admin/aux1/pfile/init.ora
Step 6. Configure your network files for connection to aux1. After making any changes to your
listener.ora file, be sure that you bounce your listener, or the change will not take effect.
$ lsnrctl reload
The tnsnames.ora file should have an entry like this:
AUX1
(DESCRIPTION
(ADDRESS LIST
(ADDRESS
(PROTOCOL
TCP)(HOST
)
(CONNECT DATA
(SID
aux1)
(SERVER
DEDICATED)
)
)
horatio)(PORT
1521))
The listener.ora file should have an entry like this:
SID LIST LISTENER
(SID LIST
(SID DESC
(GLOBAL DBNAME
aux1)
(ORACLE HOME
/u01/app/oracle/product/11.2.0/dbhome 1)
(SID NAME
aux1)
)
)
Please purchase PDF Split-Merge on www.verypdf.com to remove this watermark.
484
Part IV:
RMAN in the Oracle Ecosystem
Step 7. From RMAN, connect to the target and auxiliary instance and run the duplicate
command:
$ ORACLE SID aux1;export ORACLE SID
$ rman target /
RMAN> connect auxiliary sys/ora10g@aux1
RMAN> duplicate target database to aux1
pfile /u01/app/oracle/product/admin/aux1/pfile/init.ora
logfile
'/u01/app/oracle/product/oradata/aux1/redo01.dbf' size 100m,
'/u01/app/oracle/product/oradata/aux1/redo02.dbf' size 100m,
'/u01/app/oracle/product/oradata/aux1/redo03.dbf' size 100m;
Using Tape Backups
If you were to perform the preceding exercises but with your backups on tape, little would
change. In fact, none of the code itself would change; you would simply insert an additional step
prior to running the duplicate command itself. That step would be to configure your auxiliary
channel(s) to resemble the channels that the backups were taken with. In other words, do a show
command:
RMAN> show channel;
RMAN configuration parameters are:
CONFIGURE CHANNEL 1 DEVICE TYPE 'SBT TAPE' PARMS
"env (nb ora serv mgtserv)";
CONFIGURE CHANNEL 2 DEVICE TYPE 'SBT TAPE' PARMS
"env (nb ora serv mgtserv)";
Then, simply create the auxiliary channels to match:
CONFIGURE AUXILIARY CHANNEL 1 DEVICE TYPE 'SBT TAPE' PARMS
"env (nb ora serv mgtserv)";
CONFIGURE AUXILIARY CHANNEL 2 DEVICE TYPE 'SBT TAPE' PARMS
"env (nb ora serv mgtserv)";
Duplication to a Remote Server
Duplication to a remote server has many of the same configuration steps as duplication to the
same server. In particular, if you are duplicating remotely but will use disk backups, the steps
would be identical, although you could forgo all file-renaming steps. In addition, you would have
to either copy your backups to the remote server or use NFS to mount the backups at the remote
site. Covering NFS is outside the scope of this book, so we assume in the following RMAN
Workshop that you have the same file systems on both the target and auxiliary servers and have
copied the backups to the auxiliary system.
Please purchase PDF Split-Merge on www.verypdf.com to remove this watermark.
Chapter 19:
Duplication: Cloning the Target Database
485
RMAN Workshop: Duplication to a Remote Server, Using
Disk Backups
Workshop Notes
This workshop assumes the use of two servers: dex, the target, and horatio, the auxiliary. It
assumes that you have the same file system on both nodes and have copied your backups from
dex to horatio. The most important thing to note here is that we maintain the v112 database SID
throughout the process (instead of changing it to aux1, which we do when duplicating to the
same server).
Step 1. At horatio (the auxiliary server), build your auxiliary database directory structures:
$> pwd
/u01/app/oracle/oradata
$> mkdir v112
$> cd ../admin
$> pwd
/u01/app/oracle/admin
$> mkdir v112
$> cd v112
$> mkdir pfile bdump udump cdump adump
$> ls
adump bdump cdump pfile udump
Step 2. At dex (the source server), make a copy of the target init.ora file so that it can be moved
to the auxiliary server. If your target database uses an SPFILE, you need to create a PFILE from the
SPFILE in order to capture parameters to move over.
If you use an SPFILE at your target, enter the following:
SQL> connect / as sysdba
Connected.
SQL> create pfile '/home/oracle/scratchpad/init.ora'
from spfile;
If you use an init.ora file at your target, enter the following:
cp /u01/app/oracle/admin/v112/pfile/init.ora*
/home/oracle/scratchpad/init.ora
Step 3. Move the target init.ora file to the auxiliary site:
cd /home/oracle/scratchpad/
ftp horatio.hadba.com
username: oracle
password:
cd /u01/app/oracle/admin/v112/pfile
put init.ora
exit
Please purchase PDF Split-Merge on www.verypdf.com to remove this watermark.
486
Part IV:
RMAN in the Oracle Ecosystem
You also need a local copy of the init.ora file at the target server dex, for reference by RMAN
in the duplicate command itself. We will reference the copy that we left in /home/oracle/
scratchpad/init.ora when we run the duplicate command in Step 9.
Step 4. Start the auxiliary instance in NOMOUNT mode at quixote:
ORACLE SID v112; export ORACLE SID
sqlplus /nolog
SQL>connect / as sysdba
SQL>startup nomount
pfile /u01/app/oracle/admin/v112/pfile/init.ora
Step 5. Configure the listener.ora at the auxiliary site (proto):
SID LIST LISTENER
(SID LIST
(SID DESC
(GLOBAL DBNAME
v112)
(ORACLE HOME
/u01/app/oracle/product/11.2.0/dbhome 1)
(SID NAME
v112)
)
)
Step 6. Configure the tnsnames.ora file at the target site (dex):
V112 HORATIO
(DESCRIPTION
(ADDRESS LIST
(ADDRESS
(PROTOCOL
)
(CONNECT DATA
(SERVICE NAME
v112)
)
TCP)(HOST
horatio)(PORT
1522))
Step 7. Create a password file at the remote server (proto). Follow the instructions from the
earlier RMAN Workshop, “Build a Password File.”
Step 8. Move the FRA files from dex to horatio.
Step 9. From the target system (dex), run your duplicate command:
ORACLE SID v112; export ORACLE SID
rman target /
RMAN> connect auxiliary sys/password@v112 horatio
duplicate target database to v112
pfile /home/oracle/scratchpad/init.ora
logfile
'/u01/app/oracle/11.2.0/oradata/v102/redo01.dbf' size 100m,
'/u01/app/oracle/11.2.0/oradata/v102/redo02.dbf' size 100m,
'/u01/app/oracle/11.2.0/oradata/v102/redo03.dbf' size 100m;
Please purchase PDF Split-Merge on www.verypdf.com to remove this watermark.
Chapter 19:
Duplication: Cloning the Target Database
487
Using Tape Backups for Remote Server Duplication
All the steps in the preceding RMAN Workshop apply if you are using tape backups instead of
disk backups; again, the only difference is that you would also have to configure your auxiliary
channels to reflect the needs of your media manager. In addition to specifying the media
management server, and any classes or pools that you have for your regular channels, you
also need to specify the target client name:
RMAN> configure auxiliary channel 1 device type sbt parms
2>
"env (nb ora serv mgtserv, nb_ora_client=dex)";
Target-Less Duplication in 11g
Starting in 11gR2, RMAN has been innovated to break some of the dependencies that made the
duplication process complex in previous versions. Primarily, it is now possible to duplicate a
database from RMAN backups without making a connection to the target database. While
providing access to the active target database makes some aspects of duplication simpler, it
sometimes simply isn’t possible. In fact, we’ve been involved in “fake target database” operations
where we have pulled a backup control file from an inaccessible target database, mounted the
control file, and pointed RMAN at this “instance” long enough to kick off duplication. Perhaps
Oracle heard our cries of anguish.
To duplicate without a target, the next best thing is a connection to your recovery catalog,
where the requisite target database metadata can be extracted with little effort. The primary
element to be concerned with in this situation is to care for the database ID (DBID) when
performing the duplication. When you are connected to the target database, RMAN has no
difficulty understanding what “prod” means. But if you have multiple “prod” databases in your
catalog, you may run into ambiguity issues. Therefore, you should dig into the recovery catalog
and get your DBID:
SQL> select dbid, name, resetlogs time from rc database;
DBID NAME
RESETLOGS
---------- -------- --------2203908660 V112
20-JUN-09
Once the DBID is known, you can kick off your nontarget duplication in much the same way
as our previous workshops:
RMAN> connect auxiliary sys/password@v112 horatio
Connect catalog rman2/rman2@rcv cat
duplicate database v112 to aux1
dbid 2203908660
until time "to date('2009-07-08', 'YYYY-MM-DD')"
pfile /home/oracle/scratchpad/init.ora
logfile
'/u01/app/oracle/11.2.0/oradata/v102/redo01.dbf' size 100m,
'/u01/app/oracle/11.2.0/oradata/v102/redo02.dbf' size 100m,
'/u01/app/oracle/11.2.0/oradata/v102/redo03.dbf' size 100m;
Please purchase PDF Split-Merge on www.verypdf.com to remove this watermark.