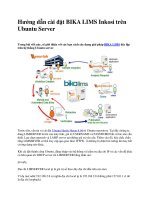
Hướng dẫn cài đặt SharePoint Server 2007
Bạn đang xem bản rút gọn của tài liệu. Xem và tải ngay bản đầy đủ của tài liệu tại đây (6.33 MB, 179 trang )
Part 1: Getting Started, Installing IIS, and Installing .NET Framework
2.0
Start by building a VPC “base image” with a clean installation of Windows Server 2003
VPC settings:
Memory: set a value which is at least half of the physical memory on your host
machine
Networking: 1 adapter, mapped to a network adapter on your local machine
Install Virtual Machine Additions:
VPC Actions menu > Install or Update Virtual Machine Additions
Perform Windows Update inside the virtual machine
Select Start > All Programs > Windows Update
Follow the instructions and install all available updates, including Internet Explorer 7
Install IIS with .NET Framework 2.0
Select Start > Control Panel > Add or Remove Programs:
In the Add or Remove Programs dialog box, click the Add / Remove Windows
Components button on the left side:
In the Windows Components Wizard dialog box, highlight the Application Server
option, then click the Details button:
In the Application Server dialog box, highlight the Internet Information Services
(IIS) option, then click the Details button:
In the Internet Information Services (IIS) dialog box, highlight the World Wide
Web Service option, then click the Details button:
In the World Wide Web Service dialog box, select the Active Server Pages option,
the Server Side Includes option, and the World Wide Web Service option, then click
the OK button:
Click OK twice more to close the dialog boxes and return to the Windows Components
Wizard dialog box:
Scrolling down the list of options, locate and deselect the Internet Explorer
Enhanced Security Configuration option:
Scrolling a bit further down the list of options, locate and select the Microsoft .NET
Framework 2.0 option:
Click the Next button to begin the IIS installation; you may be asked to insert the
Windows Server installation media.
When the installation is complete, click the Finish button:
You should now have a fully-functional IIS web server installed inside your VPC image.
In Part 2, we'll look at how to install and configure POP3 email service inside the VPC image.
Part 2: Installing and Configuring POP3 Email
Select Start > Control Panel > Add or Remove Programs:
In the Add or Remove Programs dialog box, click the Add / Remove Windows
Components button on the left side:
In the Windows Components Wizard dialog box, highlight the E-mail Services
option, then click the Details button:
In the E-Mail Services dialog box, select the POP3 Service option, then click the OK
button:
In the Windows Components Wizard dialog box, click the Next button to begin the
POP3 e-mail installation; you may be asked to insert the Windows Server installation
media.
When the installation is complete, click the Finish button:
Select Start > Administrative Tools > POP3 Service:
Select the server name in the right pane, then click the Server Properties link:
In the Properties dialog box, select Local Windows Accounts for the authentication
method, select None for the logging level, deselect Secure Password Authentication,
deselect Always create an associated user for new mailboxes, then click the OK
button:
When prompted to restart the SMTP service, click the Yes button:
Select the server name in the right pane, then click the Start POP3 Service link:
Select the server name in the left pane, then click the New Domain link:
In the Add Domain dialog box, enter a local domain name, such as mycompany.loc,
then click the OK button:
In the left pane, expand the server name branch to display the new domain name, select
the domain name, then click the Add Mailbox link:
In the Add Mailbox dialog box, enter the server administrator account, then click the
OK button:
When the mailbox setup is complete, click the OK button:
You should now have a fully-functional POP3 email service installed inside your VPC image.
In Part 3, we’ll look at how to install and configure the Outlook 2007 client inside the VPC image
for sending and receiving emails.
Part 3: Installing and Configuring Outlook 2007
Insert the Office 2007 installation media, start the installation, enter the Product Key,
then click the Continue button:
Read the license agreement very carefully, select the I accept checkbox, then click the
Continue button:
On the Choose the installation you want screen, select the Customize button:
Deselect all of the listed applications except Microsoft Office Outlook, then click the
Install Now button:
When the installation is complete, click the Close button:
Select Start > All Programs > Microsoft Office > Microsoft Office Outlook 2007,
then click the Next button to begin the Outlook 2007 Startup wizard:
On the E-mail Accounts screen, select Yes, then click the Next button:
On the Auto Account Setup screen, select the Manually configure server settings
or additional server types option, then click the Next button:
On the Choose E-mail Service screen, select Internet E-mail, then click the Next
button:
On the Internet E-mail Settings screen, enter the following information:
Your Name: Administrator
E-mail Address: (replace mycompany.loc with the
domain entered during the POP3 e-mail setup)
Account Type: POP3
Incoming mail server: vpc02 (replace vpc02 with the name of your virtual server)
Outgoing mail server (SMTP): vpc02 (replace vpc02 with the name of your virtual
server)
User Name: Administrator
Password: enter the Administrator’s password
Require logon using SPA: no
After the settings are entered, click the Test Account Settings button to test the
settings: