Microsoft ADO .NET Step by Step
Bạn đang xem bản rút gọn của tài liệu. Xem và tải ngay bản đầy đủ của tài liệu tại đây (15.58 MB, 409 trang )
Microsoft ADO .NET Step by Step
by Rebecca M. Riordan
ISBN: 0735612366
Microsoft Press © 2002 (512 pages)
Learn to use the ADO.NET model to expand on data-bound Windows and
Web Forms, as well as how XML and ADO.NET intermingle.
Table of Contents
Microsoft ADO.NET Step by Step
Introduction
Part I - Getting Started with ADO.NET
Chapter 1 - Getting Started with ADO.NET
Part II - Data Providers
Chapter 2 - Creating Connections
Chapter 3 - Data Commands and the DataReader
Chapter 4 - The DataAdapter
Chapter 5 - Transaction Processing in ADO.NET
Part III - Manipulating Data
Chapter 6 - The DataSet
Chapter 7 - The DataTable
Chapter 8 - The DataView
Part IV - Using the ADO.NET Objects
Chapter 9 - Editing and Updating Data
Chapter 10 - ADO.NET Data-Binding in Windows Forms
Chapter 11 - Using ADO.NET in Windows Forms
Chapter 12 - Data-Binding in Web Forms
Chapter 13 - Using ADO.NET in Web Forms
Part V - ADO.NET and XML
Chapter 14 - Using the XML Designer
Chapter 15 - Reading and Writing XML
Chapter 16 - Using ADO in the .NET Framework
Index
List of Tables
List of Sidebars
Microsoft ADO.NET Step by Step
PUBLISHED BY
Microsoft Press
A Division of Microsoft Corporation
One Microsoft Way
Redmond, Washington 98052-6399
Copyright © 2002 by Rebecca M. Riordan
All rights reserved. No part of the contents of this book may be reproduced or transmitted
in any form
or by any means without the written permission of the publisher.
Library of Congress Cataloging-in-Publication Data
Riordan, Rebecca.
Microsoft ADO.NET Step by Step / Rebecca M. Riordan.
p. cm.
Includes index.
ISBN 0-7356-1236-6
1. Database design. 2. Object oriented programming (Computer
science) 3. ActiveX. I.
Title.
QA76.9.D26 R56 2002
005.75’85—dc21 2001054641
Printed and bound in the United States of America.
1 2 3 4 5 6 7 8 9 QWE 7 6 5 4 3 2
Distributed in Canada by Penguin Books Canada Limited.
A CIP catalogue record for this book is available from the British Library.
Microsoft Press books are available through booksellers and distributors worldwide. For
further information about international editions, contact your local Microsoft Corporation
office or contact Microsoft Press International directly at fax (425) 936-7329. Visit our
Web site at www.microsoft.com/mspress. Send comments to
ActiveX, IntelliSense, Internet Explorer, Microsoft, Microsoft Press, the .NET logo, Visual
Basic, Visual C#, and Visual Studio are either registered trademarks or trademarks of
Microsoft Corporation in the United States and/or other countries. Other product and
company names mentioned herein may be the trademarks of their respective owners.
The example companies, organizations, products, domain names, e-mail addresses,
logos, people, places, and events depicted herein are fictitious. No association with any
real company, organization, product, domain name, e-mail address, logo, person, place,
or event is intended or should be inferred.
Acquisitions Editor: Danielle Bird
Project Editor: Rebecca McKay
Body Part No. X08-05018
To my very dear friend, Stephen Jeffries
About the Author
Rebecca M. Riordan
With almost 20 years’ experience in software design, Rebecca M. Riordan has earned
an international reputation as an analyst, systems architect, and designer of database
and work-support systems.
She works as an independent consultant, providing systems design and consulting
expertise to an international client base. In 1998, she was awarded MVP status by
Microsoft in recognition of her work in Internet newsgroups. Microsoft ADO.NET Step by
Step is her third book for Microsoft Press.
Rebecca currently resides in New Mexico. She can be reached at
Introduction
Overview
ADO.NET is the data access component of Microsoft’s new .NET Framework. Microsoft
bills ADO.NET as “an evolutionary improvement” over previous versions of ADO, a claim
that has been hotly debated since its announcement. It is certainly true that the
ADO.NET object model bears very little relationship to earlier versions of ADO.
In fact, whether you decide to love it or hate it, one fact about the .NET Framework
seems undeniable: it levels the playing ground. Whether you’ve been at this computer
game longer than you care to talk about or you’re still sorting out your heaps and stacks,
learning the .NET Framework will require a major investment. We’re all beginners now.
So welcome to Microsoft ADO.NET Step by Step. Through the exercises in this book, I
will introduce you to the ADO.NET object model, and you’ll learn how to use that model
in developing data-bound Windows Forms and Web Forms. In later topics, we’ll look at
how ADO.NET interacts with XML and how to access older versions of ADO from the
.NET environment.
Since we’re all beginners, an exhaustive treatment would be, well, exhausting, so this
book is necessarily limited in scope. My goal is to provide you with an understanding of
the ADO.NET objects—what they are and how they work together. So fair warning: this
book will not make you an expert in ADO.NET. (How I wish it were that simple!)
What this book will give you is a road map, a fundamental understanding of the
environment, from which you will be able to build expertise. You’ll know what you need to
do to start building data applications. The rest will come with time and experience. This
book is a place to start.
Although I’ve pointed out language differences where they might be confusing, in order
to keep the book within manageable proportions I’ve assumed that you are already
familiar with Visual Basic .NET or Visual C# .NET. If you’re completely new to the .NET
environment, you might want to start with Microsoft Visual Basic .NET Step by Step by
Michael Halvorson (Microsoft Press, 2002) or Microsoft Visual C# .NET Step by Step by
John Sharp and Jon Jagger (Microsoft Press, 2002), depending on your language of
choice.
The exercises that include programming are provided in both Microsoft Visual Basic and
Microsoft C#. The two versions are identical (except for the difference between the
languages), so simply choose the exercise in the language of your choice and skip the
other version.
Conventions and Features in This Book
You’ll save time by understanding, before you start the lessons, how this book displays
instructions, keys to press, and so on. In addition, the book provides helpful features that
you might want to use.
§ Numbered lists of steps (1, 2, and so on) indicate hands-on exercises. A
rounded bullet indicates an exercise that has only one step.
§ Text that you are to type appears in bold.
§ Terms are displayed in italic the first time they are defined.
§ A plus sign (+) between two key names means that you must press those
keys at the same time. For example, “Press Alt+Tab” means that you hold down
the Alt key while you press Tab.
§ Notes labeled “tip” provide additional information or alternative methods for a
step.
§ Notes labeled “important” alert you to essential information that you should
check before continuing with the lesson.
§ Notes labeled “ADO” point out similarities and differences between ADO and
ADO.NET.
§ Notes labeled “Roadmap” refer to places where topics are discussed in depth.
§ You can learn special techniques, background information, or features related
to the information being discussed by reading the shaded sidebars that appear
throughout the lessons. These sidebars often highlight difficult terminology or
suggest future areas for exploration.
§ You can get a quick reminder of how to perform the tasks you learned by
reading the Quick Reference at the end of a lesson.
Using the ADO.NET Step by Step CD-ROM
The Microsoft ADO.NET Step by Step CD-ROM inside the back cover contains practice
files that you'll use as you complete the exercises in the book. By using the files, you
won't need to waste time creating databases and entering sample data. Instead, you can
concentrate on how to use ADO.NET. With the files and the step-by-step instructions in
the lessons, you'll also learn by doing, which is an easy and effective way to acquire and
remember new skills.
System Requirements
In order to complete the exercises in this book, you will need the following software:
§ Microsoft Windows 2000 or Microsoft Windows XP
§ Microsoft Visual Studio .NET
§ Microsoft SQL Server Desktop Engine (included with Visual Studio .NET)
or Microsoft SQL Server 2000
This book and practice files were tested primarily using Windows 2000 and Visual Studio
.NET Professional; however, other editions of Visual Studio .NET, such as Visual Basic
.NET Standard and Visual C# .NET Standard, should also work.
Since Windows XP Home Edition does not include Internet Information Services (IIS),
you won't be able to create local ASP.NET Web applications (discussed in chapters 12
and 13) using Windows XP Home Edition. Windows 2000 and Windows XP Professional
do include IIS.
Installing the Practice Files
Follow these steps to install the practice files on your computer so that you can use them
with the exercises in this book.
1. Insert the CD in your CD-ROM drive.
A Start menu should appear automatically. If this menu does not appear,
double-click StartCD.exe at the root of the CD.
2. Click the Getting Started option.
3. Follow the instructions in the Getting Started document to install the
practice files and setup SQL Server 2000 or the Microsoft SQL Server
Desktop Engine (MSDE).
Using the Practice Files
The practice files contain the projects and completed solutions for the ADO.NET Step by
Step book. Folders marked 'Finish' contain working solutions. Folders marked 'Start'
contain the files needed to perform the exercises in the book.
Uninstalling the Practice Files
Follow these steps to remove the practice files from your computer.
1. Insert the CD in your CD-ROM drive.
A Start menu should appear automatically. If this menu does not appear,
double-click StartCD.exe at the root of the CD.
2. Click the Uninstall Practice Files option.
3. Follow the steps in the Uninstall Practice Files document to remove
the practice files.
Need Help with the Practice Files?
Every effort has been made to ensure the accuracy of the book and the contents of this
CD-ROM. As corrections or changes are collected for this book, they will be placed on a
Web page and any errata will also be integrated into the Microsoft online Help tool
known as the Knowledge Base. To view the list of known corrections for this book, visit
the following page:
To search the Knowledge Base and review your support options for the book or CD-
ROM, visit the Microsoft Press Support site:
If you have comments, questions, or ideas regarding the book or this CD-ROM, or
questions that are not answered by searching the Knowledge Base, please send them to
Microsoft Press via e-mail to:
or by postal mail to:
Microsoft Press
Attn: Microsoft ADO.NET Step by Step Editor
One Microsoft Way
Redmond, WA 98052-6399
Please note that product support is not offered through the above addresses.
Part I: Getting Started with ADO.NET
Chapter List
Chapter 1: Getting Started with ADO.NET
Chapter 1: Getting Started with ADO.NET
Overview
In this chapter, you'll learn how to:
§ Identify the primary objects that make up Microsoft ADO.NET are and how
they interact
§ Create Connection and DataAdapter objects by using the DataAdapter
Configuration Wizard
§ Automatically generate a DataSet
§ Bind control properties to a DataSet
§ Load data into a DataSet at run time
Like other components of the .NET Framework, ADO.NET consists of a set of objects
that interact to provide the required functionality. Unfortunately, this can make learning to
use the object model frustrating—you feel like you need to learn all of it before you can
understand any of it.
The solution to this problem is to start by building a conceptual framework. In other
words, before you try to learn the details of how any particular object functions, you need
to have a general understanding of what each object does and how the objects interact.
That's what we'll do in this chapter. We'll start by looking at the main ADO.NET objects
and how they work together to get data from a physical data store, to the user, and back
again. Then, just to whet your appetite, we'll work through building a set of objects and
binding them to a simple data form.
On the Fundamental Interconnectedness of All Things
In later chapters in this section, we’ll examine each object in the ADO.NET object model
in turn. At least in theory. In reality, because the objects are so closely interlinked, it’s
impossible to look at any single object in isolation.
Roadmap A roadmap note like this will point you to the discussion of a
property or method that hasn’t yet been introduced.
Where it’s necessary to use a method or property that we haven’t yet examined, I’ll use
roadmap notes, like the one in the margin next to this paragraph, to point you to the
chapter where they are discussed.
The ADO.NET Object Model
The figure below shows a simplified view of the primary objects in the ADO.NET object
model. Of course, the reality of the class library is more complicated, but we’ll deal with
the intricacies later. For now, it’s enough to understand what the primary objects are and
how they typically interact.
The ADO.NET classes are divided into two components: the Data Providers (sometimes
called Managed Providers), which handle communication with a physical data store, and
the DataSet, which represents the actual data. Either component can communicate with
data consumers such as WebForms and WinForms.
Data Providers
The Data Provider components are specific to a data source. The .NET Framework
includes two Data Providers: a generic provider that can communicate with any OLE DB
data source, and a SQL Server provider that has been optimized for Microsoft SQL
Server versions 7.0 and later. Data Providers for other databases such as Oracle and
DB2 are expected to become available, or you can write your own. (You may be relieved
to know that we won’t be covering the creation of Data Providers in this book.)
The two Data Providers included in the .NET Framework contain the same objects,
although their names and some of their properties and methods are different. To
illustrate, the SQL Server provider objects begin with SQL (for example,
SQLConnection), while the OLE DB objects begin with OleDB (for example,
OleDbConnection).
The Connection object represents the physical connection to a data source. Its
properties determine the data provider (in the case of the OLE DB Data Provider), the
data source and database to which it will connect, and the string to be used during
connecting. Its methods are fairly simple: You can open and close the connection,
change the database, and manage transactions.
The Command object represents a SQL statement or stored procedure to be executed at
the data source. Command objects can be created and executed independently against
a Connection object, and they are used by DataAdapter objects to handle
communications from a DataSet back to a data source. Command objects can support
SQL statements and stored procedures that return single values, one or more sets of
rows, or no values at all.
A DataReader is a fast, low-overhead object for obtaining a forward-only, read-only
stream of data from a data source. They cannot be created directly in code; they are
created only by calling the ExecuteReader method of a Command.
The DataAdapter is functionally the most complex object in a Data Provider. It provides
the bridge between a Connection and a DataSet. The DataAdapter contains four
Command objects: the SelectCommand, UpdateCommand, InsertCommand, and
DeleteCommand. The DataAdapter uses the SelectCommand to fill a DataSet and uses
the remaining three commands to transmit changes back to the data source, as required.
Microsoft ActiveX
Data Objects
(ADO)
In functional terms, the Connection and Command
objects are roughly equivalent to their ADO
counterparts (the major difference being the lack of
support for server-side cursors), while the
DataReader functions like a firehose cursor. The
DataAdapter and DataSet have no real equivalent in
ADO.
DataSets
The DataSet is a memory-resident representation of data. Its structure is shown in the
figure below. The DataSet can be considered a somewhat simplified relational database,
consisting of tables and their relations. It’s important to understand, however, that the
DataSet is always disconnected from the data source—it doesn’t “know” where the data
it contains came from, and in fact, it can contain data from multiple sources.
The DataSet is composed of two primary objects: the DataTableCollection and the
DataRelationCollection. The DataTableCollection contains zero or more DataTable
objects, which are in turn made up of three collections: Columns, Rows, and Constraints.
The DataRelationCollection contains zero or more DataRelations.
The DataTable’s Columns collection defines the columns that compose the DataTable.
In addition to ColumnName and DataType properties, a DataColumn’s properties allow
you to define such things as whether or not it allows nulls (AllowDBNull), its maximum
length (MaxLength), and even an expression that is used to calculate its value
(Expression).
The DataTable’s Rows collection, which may be empty, contains the actual data as
defined by the Columns collection. For each Row, the DataTable maintains its original,
current, and proposed values. As we’ll see, this ability greatly simplifies certain kinds of
programming tasks.
ADO The ADO.NET DataTable provides essentially the same
functionality as the ADO Recordset object, although it obviously
plays a very different role in the object model.
The DataTable’s Constraints collection contains zero or more Constraints. Just as in a
relational database, Constraints are used to maintain the integrity of the data. ADO.NET
supports two types of constraints: ForeignKeyConstraints, which maintain relational
integrity (that is, they ensure that a child row cannot be orphaned), and
UniqueConstraints, which maintain data integrity (that is, they ensure that duplicate rows
cannot be added to the table). In addition, the PrimaryKey property of the DataTable
ensures entity integrity (that is, it enforces the uniqueness of each row).
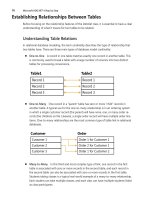
Finally, the DataSet’s DataRelationCollection contains zero or more DataRelations.
DataRelations provide a simple programmatic interface for navigating from a master row
in one table to the related rows in another. For example, given an Order, a DataRelation
allows you to easily extract the related OrderDetails rows. (Note, however, that the
DataRelation itself doesn’t enforce relational integrity. A Constraint is used for that.)
Binding Data to a Simple Windows Form
The process of connecting data to a form is called data binding. Data binding can be
performed in code, but the Microsoft Visual Studio .NET designers make the process
very simple. In this chapter, we’ll use the designers and the wizards to quickly create a
simple data bound Windows form.
Important If you have not yet installed this book’s practice files, work
through “Installing and Using the Practice Files” in the
Introduction, and then return to this chapter.
Adding a Connection and DataAdapter to a Form
Roadmap We’ll examine the Connection object in Chapter 2 and the
DataAdapter in Chapter 4.
The first step in binding data is to create the Data Provider objects. Visual Studio
provides a DataAdapter Configuration Wizard to make this process simple. Once the
DataAdapter has been added, you can check that its configuration is correct by using the
DataAdapter Preview window within Visual Studio.
Add a Connection to a Windows Form
1. Open the EmployeesForm project from the Visual Studio Start Page.
2. Double-click Employees.vb (or Employees.cs if you’re using C#) in the
Solution Explorer to open the form.
Visual Studio displays the form in the form designer.
3. Drag a SQLDataAdapter onto the form from the Data tab of the
Toolbox.
Visual Studio displays the first page of the DataAdapter Configuration Wizard.
4. Click Next.
The DataAdapter Configuration Wizard displays a page asking you to choose
a connection.
5. Click New Connection.
The Data Link Properties dialog box opens.
6. Specify the name of your server, the appropriate logon information,
select the Northwind database, and then click Test Connection.
The DataAdapter Configuration Wizard displays a message indicating that the
connection was successful.
Tip
If you’re unsure how to complete step 6, check with your system
administrator.
7. Click OK to close the message, click OK to close the Data Link
Properties dialog box, and then click Next to display the next page of
the DataAdapter Configuration Wizard.
The DataAdapter Configuration Wizard displays a page requesting that you
choose a query type.
8. Verify that the Use SQL statements option is selected, and then click
Next.
The DataAdapter Configuration Wizard displays a page requesting the SQL
statement(s) to be used.
9. Click Query Builder.
The DataAdapter Configuration Wizard opens the Query Builder and displays
the Add Table dialog box.
10. Select the Employees table, click Add, and then click Close.
The Add Table dialog box closes, and the Employees table is added to the
Query Builder.
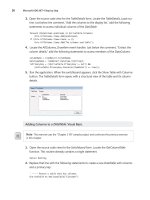
11. Add the following fields to the query by selecting the check box next to
the field name in the top pane: EmployeeID, LastName, FirstName,
Title, TitleOfCourtesy, HireDate, Notes.
The Query Builder creates the SQL command.
12. Click OK to close the Query Builder, and then click Next.
The DataAdapter Configuration Wizard displays a page showing the results of
adding the Connection and DataAdapter objects to the form.
13. Click Finish to close the DataAdapter Configuration Wizard.
The DataAdapter Configuration Wizard creates and configures a
SQLDataAdapter and a SQLConnection, and then adds them to the
Component Designer.
Creating DataSets
Roadmap We’ll examine the DataSet in Chapter 6.
The Connection and DataAdapter objects handle the physical communication with the
data store, but you must also create a memory-resident representation of the actual data
that will be bound to the form. You can bind a control to almost any structure that
contains data, including arrays and collections, but you’ll typically use a DataSet.
As with the Data Provider objects, Visual Studio provides a mechanism for automating
this process. In fact, it can be done with a simple menu choice, although because Visual
Studio exposes the code it creates, you can further modify the basic DataSet
functionality that Visual Studio provides.
Create a DataSet
1. On the Data menu, choose Generate Dataset.
The Generate Dataset dialog box opens.
2. In the New text box, type dsEmployees.
3. Click OK.
Visual Studio creates the DataSet class and adds an instance of it to the
bottom pane of the forms designer.
Simple Binding Controls to a DataSet
The .NET Framework supports two kinds of binding: simple and complex. Simple binding
occurs when a single data element, such as a date, is bound to a control. Complex
binding occurs when a control is bound to multiple data values, for example, binding a
list box to a DataSet that contains a list of Order Numbers.
Roadmap We’ll examine simple and complex data binding in more
detail in Chapters 10 and 11.
Almost any property of a control can support simple binding, but only a subset of
Windows and WebForms controls (such as DataGrids and ListBoxes) can support
complex binding.
Bind the Text Property of a Control to a DataSet
1. Click the txtTitle text box in the forms designer to select it.
2. Click the plus sign next to DataBindings to expand the DataBindings
properties.
3. Click the drop-down arrow for the Text property.
Visual Studio displays a list of available data sources.
4. In the list of available data sources for the Text property, click the plus
sign next to the DsEmployees1 data source, and then click the plus
sign next to the Employees DataTable.
5. Click the TitleOfCourtesy column to select it.
6. Repeat steps 1 through 5 to bind the Text property of the remaining
controls to the columns of the Employees DataTable, as shown in the
following table.
Control DataTable
Column
lblEmployeeID EmployeeID
txtGivenName FirstName
txtSurname LastName
txtHireDate HireDate
txtPosition Title
txtNotes Notes
Loading Data into the DataSet
We now have all the components in place for manipulating the data from our data
source, but we have one task remaining: We must actually load the data into the
DataSet.
If you’re used to working with data bound forms in environments such as Microsoft
Access, it may come as a surprise that you need to do this manually. Remember,
however, that the ADO.NET architecture has been designed to operate without a
permanent connection to the database. In a disconnected environment, it’s appropriate,
and indeed necessary, that the management of the connection be under programmatic
control.
Roadmap The DataAdapter’s Fill method is discussed in Chapter 4.
The DataAdapter’s Fill method is used to load data into the DataSet. The DataAdapter
provides several versions of the Fill method. The simplest version takes the name of a
DataSet as a parameter, and that’s the one we’ll use in the exercise below.
Load Data into the DataSet
Visual Basic .NET
1. Press F7 to view the code for the form.
2. Expand the region labeled “Windows Form Designer generated code”
and navigate to the New Sub.
3. Add the following line of code just before the end of the procedure:
SqlDataAdapter1.Fill(DsEmployees1)
Roadmap
The DataAdapter’s Fill method is discussed in Chapter 4.
This line calls the DataAdapter’s Fill method, passing the name of the
DataSet to be filled.
4. Press F5 to build and run the program.
Visual Studio displays the form with the first row displayed.
5. Admire your data bound form for a few minutes (see, that wasn’t so
hard!), and then close the form.
Visual C# .NET
1. Press F7 to view the code for the form.
2. Add the following line of code to the end of the Employees procedure:
sqlDataAdapter1.Fill(dsEmployees1);
Roadmap
The DataAdapter’s Fill method is discussed in Chapter 4.
This line calls the DataAdapter’s Fill method, passing the name of the
DataSet to be filled.
3. Press F5 to build and run the program.
Visual Studio displays the form with the first row displayed.
4. Admire your data bound form for a few minutes (see, that wasn’t so
hard!), and then close the form.
Chapter 1 Quick Reference
To Do this
Add a Connection and DataAdapter to a
form by using the DataAdapter
Configuration Wizard
Drag a DataAdapter object onto the
form and follow the wizard
instructions
Use Visual Studio to automatically
generate a typed DataSet
Select Create DataSet from the
Data menu, complete the Generate
Dataset dialog box as required, and
then click OK
Simple bind properties of a control to a
data source
In the Properties window
DataBindings section, select the
data source, DataTable, and
column
Load data into a DataSet
Use the Fill method of the
DataAdapter. For example:
myDataAdapter.Fill(myDataS
et)
Part II: Data Providers
Chapter 2: Creating Connections
Chapter 3: Data Commands and the DataReader
Chapter 4: The DataAdapter
Chapter 5: Transaction Processing in ADO.NET
Chapter 2: Creating Connections
Overview
In this chapter, you'll learn how to:
§ Add an instance of a Server Explorer Connection to a form
§ Create a Connection using code
§ Use Connection properties
§ Use an intermediary variable to reference multiple types of Connections
§ Bind Connection properties to form controls
§ Open and close Connections
§ Respond to a Connection.StateChange event
In the previous chapter, we took a brief tour through the ADO.NET object model. In this
chapter, we'll begin to examine the objects in detail, starting with the lowest level object,
the Connection.
Understanding Connections
Connections are responsible for handling the physical communication between a data
store and a .NET application. Because the Connection object is part of a Data Provider,
each Data Provider implements its own version. The two Data Providers supported by
the .NET Framework implement the OleDbConnection in the System.Data.OleDB
namespace and the SqlConnection in the System.Data.SqlClient namespace,
respectively.
Note It’s important to understand that if you’re using a Connection
object implemented by another Data Provider, the details of the
implementation may vary from those described here.
The OleDbConnection, not surprisingly, uses OLE DB and can be used with any OLE DB
provider, including Microsoft SQL Server. The SqlConnection goes directly to SQL
Server without going through the OLE DB provider and so is more efficient.
Microsoft
ActiveX
Data
Objects
(ADO)
Since ADO.NET merges the ADO object model with OLE
DB, it is rarely necessary to go directly to OLE DB for
performance reasons. You might still need to use OLE DB
directly if you need specific functionality that isn’t exposed
by ADO.NET, but again, these situations are likely to be
rarer than when using ADO.
Creating Connections
In the previous chapter, we created a Connection object by using the DataAdapter
Configuration Wizard. The Data Form Wizard, accessed by clicking Add Windows Form
on the Project menu, also creates a Connection automatically. In this chapter, we'll look
at several other methods for creating Connections in Microsoft Visual Studio .NET.
Design Time Connections
Visual Studio's Server Explorer provides the ability, at design time, to view and maintain
connections to a number of different system services, including event logs, message
queues, and, most important for our purposes, data connections.
Important If you have not yet installed this book's practice files, work
through 'Installing and Using the Practice Files' in the
Introduction and then return to this chapter.
Add a Design Time Connection to the Server Explorer
1. Open the Connection project from the Visual Studio start page or from
the Project menu.
2. Double-click ConnectionProperties.vb (or ConnectionProperties.cs, if
you're using C#) in the Solution Explorer to open the form.
Visual Studio displays the form in the form designer.
3. Open the Server Explorer.
4. Click the Connect to Database button.
Visual Studio displays the Data Link Properties dialog box.
Tip
You can also display the Data Link Properties dialog box by choosing
Connect to Database on the Tools menu.
5. Click the Provider tab and then select Microsoft Jet 4.0 OLE DB
Provider.
6. Click Next.
Visual Studio displays the Connection tab of the dialog box.
7. Click the ellipsis button after Select or enter a database name,
navigate to the folder containing the sample files, and then select the
nwind sample database.
8. Click Open.
Visual Studio creates a Connection string for the database.
9. Click OK.
Visual Studio adds the Connection to the Server Explorer.
10. Right-click the Connection in the Server Explorer, click Rename from
the context menu, and then rename the Connection Access nwind.
Database References
In addition to Database Connections in the Server Explorer, Visual Studio also
supports Database References. Database References are set as part of a Database
Project, which is a special type of project used to store SQL scripts, Data Commands,
and Data Connections.
Database References are created in the Solution Explorer (rather than the Server
Explorer) and, unlike Database Connections defined in the Server Explorer, they are
stored along with the project.
Data connections defined through the Server Explorer become part of your Visual
Studio environment—they will persist as you open and close projects. Database
references, on the other hand, exist as part of a specific project and are only available
as part of the project.
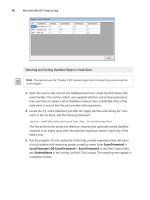
Design time connections aren't automatically included in any project, but you can drag a
design time connection from the Server Explorer to a form, and Visual Studio will create
a pre-configured Connection object for you.
Add an Instance of a Design Time Connection to a Form
§ Select the Access nwind Connection in the Server Explorer and drag it
onto the Connection Properties form.
Visual Studio adds a pre-configured OleDbConnection to the Component
Designer.
Creating a Connection at Run Time
Using Visual Studio to create form-level Connections is by far the easiest method, but if
you need a Connection that isn't attached to a form, you can create one at run time in
code.
Note You wouldn't ordinarily create a form-level Connection object in
code because the Visual Studio designers are easier and just as
effective.
The Connection object provides two overloaded versions of its constructor, giving you
the option of passing in the ConnectionString, as shown in Table 2-1.
Table 2-1: Connection Constructors
Method Description
New() Creates a
Connection
with the
ConnectionSt
ring property
set to an
empty string
New(ConnectionString) Creates a
Connection
with the
ConnectionSt
ring property
specified
The ConnectionString is used by the Connection object to connect to the data source.
We'll explore it in detail in the next section of this chapter.
Create a Connection in Code
Visual Basic .NET
1. Display the code for the ConnectionProperties form by pressing F7.
2. Add the following lines after the Inherits statement:
3. Friend WithEvents SqlDbConnection1 As New _
System.Data.SqlClient.SqlConnection()
This code creates the new Connection object using the default values.
Visual C# .NET
1. Display the code for the ConnectionProperties form by pressing F7.
2. Add the following lines after the opening bracket of the class
declaration:
3. internal System.Data.SqlClient.SqlConnection
SqlDbConnection1;
This code creates the new Connection object. (For the time being, ignore the
warning that the variable is never assigned to.)
Using Connection Properties
The significant properties of the OleDbConnection and SqlDbConnection objects are
shown in Table 2-2 and Table 2-3, respectively.
Table 2-2: OleDbConnection Properties
Property Meaning Default
ConnectionString
The string
used to
connect to
the data
source when
the Open
method is
executed
Empty
ConnectionTimeout The
maximum
time the
Connection
object will
continue
attempting to
make the
connection
before
throwing an
exception
15
second
s
Database The name of
the database
to be opened
once a
connection is
opened
Empty
DataSource The location
and file
containing
the database
Empty
Provider The name of
the OLE DB
Data
Provider
Empty
ServerVersion The version
of the server,
Empty