Windows 7 Step by Step- P3
Bạn đang xem bản rút gọn của tài liệu. Xem và tải ngay bản đầy đủ của tài liệu tại đây (2.94 MB, 50 trang )
If you have administrator credentials, you can change these properties for any user account.
You can also change the account type from administrator to standard user (provided at
least one administrator account remains on the computer) or vice versa.
Windows 7 comes with many user account pictures, depicting a variety of animals, sports,
and interests. You can personalize your user account by selecting the picture that most
closely matches your personality or interests. If you don’t like any of the pictures provided,
you can use one of your own. You can use .bmp, .gif, .jpg, or .png files as user account pic-
tures. The original graphic can be any size, but the user account picture is always displayed
as a square. If you select a graphic whose height and width are not the same, the graphic
will be stretched or cropped to a square shape when displayed.
In this exercise, you’ll change the type of the account you created in the previous exercise.
You’ll change the account picture first to one provided by Windows 7 and then to a custom
image. Finally, you’ll assign a password to the account.
SET UP You need the Angel account you created in the previous exercise and the
Angelic image located in your Documents\Microsoft Press\Windows7SBS\Accounts
folder to complete this exercise. You also need administrator account credentials.
Display the Manage Accounts window of Control Panel, and then follow the steps.
1.
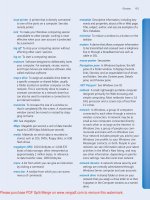
In the Manage Accounts window, click Angel.
The Change An Account window opens.
The Change An Account window displays the options for changing the selected account.
Tip The user account picture assigned to your Angel account might be different than
ours because pictures are randomly assigned.
2.
Click Change the account type.
Managing a User Account
51
Please purchase PDF Split-Merge on www.verypdf.com to remove this watermark.
52
Chapter 2 Manage User Accounts
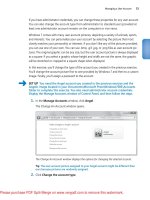
The Change Account Type window opens.
You can change a user account from Standard User to Administrator and vice versa.
3.
With Standard user selected, click Change Account Type.
In the Change An Account window, Standard user now appears under Angel’s user
account name.
4.
Click Change the picture.
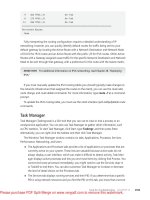
The Choose Picture window opens.
The Choose Picture window displays the user account pictures that come with Windows 7,
and any custom images you’ve used.
Please purchase PDF Split-Merge on www.verypdf.com to remove this watermark.
5.
Click any picture that you want, and then click Change Picture.
In the Change An Account window, the picture has changed.
6.
In the Change an Account window, click Change the picture. Then below the
thumbnails in the Choose Picture window, click Browse for more pictures.
7.
In the left pane of the Open dialog box, click Libraries. Then in the center
pane, double-click Documents, double-click Microsoft Press, double-click
Windows7SBS, and then double-click Accounts.
8.
Click the Angelic image, and then click Open to switch to that picture.
The Change An Account window displays the selected user account picture for
Angel’s account.
9.
Click Create a password.
The Create Password window opens.
You can enter the password and a hint to remind you if you forget it.
10.
In the New password box, type wOOfw00f! (with two capital letter Os and two
zeros). Then press the Tab key to move to the next field.
To ensure the secrecy of the password, the characters are displayed as dots as
you type.
Managing a User Account
53
Please purchase PDF Split-Merge on www.verypdf.com to remove this watermark.
54
Chapter 2 Manage User Accounts
11.
In the Confirm new password box, retype wOOfw00f!
12.
In the Type a password hint box, type What does Angel say?
13.
Click Create password to save the password as part of Angel’s user account
profile.
In the Change An Account window, Password protected appears under Angel’s user
account type.
CLEAN UP Close the Change An Account window.
Limiting Computer Access
Many children have access to computers. Some of these computers, such as those located
at a school or library, are regulated by network domain controls or by the oversight of a
teacher, librarian, or other concerned adult. Other computers, especially those located in
private homes, might not be regulated.
If you have a child in your home, that child has access to your computer. The child’s
level of interest is a function of his or her age and of the computing behavior you
model. The pretty lights on the computer case make it an object of fascination for a
very young child. (Note to computer manufacturers: please stop putting pretty lights
on the power button! They attract two-year olds who don’t care whether you’ve
recently saved your work.) If you are a member of the ever-increasing population of
“information workers” and your computer consumes your attention for several hours a
day, your child might assume that he or she should also have access to it. Older children
are attracted more by what they can do with the computer than by the machine itself.
Many excellent computer-based educational programs are available for children of all
ages, as are a plethora of entertainment options that are free if you don’t count the price
of the Internet connection. Unfortunately, there is also a massive amount of easily
available content that is inappropriate for children. You can control the functionality
and content available to your child by setting up a restricted user account specifically
for him or her.
Please purchase PDF Split-Merge on www.verypdf.com to remove this watermark.
If you want to allow or encourage your child to use the computer but also want to
ensure that his or her computer use meets certain criteria, you can create a standard
user account for the child’s use and apply restrictions to that account. By using the
Parental Controls feature of Windows 7, you can limit the computer access of a user
account in the following ways:
l
Time limits You can specify the time period during which the user account can
be logged on to the computer. At the end of the designated time period, Parental
Controls will cause the account to log off of Windows, and the account will be
unavailable until the next designated time period.
l
Game restrictions You can restrict the user from playing specific games or games
with ratings that fall into specific age or content categories.
l
Program restrictions You can restrict the user from using any installed program
other than those you specifically permit access to.
The Parental Controls feature is similar to User Account Control, in that a password
can be entered to bypass the limits you set. For example, when a user attempts to
start a program that is restricted by Parental Controls, a dialog box appears. You can
allow one-time access to the program by clicking a link in the dialog box and entering
your password.
You can apply Parental Controls to any standard user account.
Important Anyone with an administrator account on your computer can set up, alter, or
remove Parental Controls. For the controls to be fully effective, ensure that all administrator
accounts are protected with a password.
See Also For information about restricting Windows Internet Explorer from displaying
certain types of content and limiting access to objectionable Web content, see “Restricting
Objectionable Content” in Chapter 8, “Manage Internet Explorer.”
Limiting Computer Access
55
Please purchase PDF Split-Merge on www.verypdf.com to remove this watermark.
56
Chapter 2 Manage User Accounts
In this exercise, you’ll specify the hours during which a specific user account can be used
to log on to your computer.
Important Administrator account credentials are necessary to complete this exercise.
SET UP You don’t need any practice files to complete this exercise. Use the Angel
account you modified in the previous exercise. Display Control Panel in Category
view, and then follow the steps.
1.
In Control Panel, under User Accounts and Family Safety, click Set up parental
controls for any user.
The Parental Controls window opens.
You can select the user account to which you want to apply Parental Controls.
Tip To limit a user’s computer access in additional ways or to view reports of computer
activity, click How Do I Install Additional Controls? at the bottom of the window.
2.
Click the Angel user account you created earlier in the chapter, and then in the
User Controls window, click On, enforce current settings.
After you turn on Parental Controls, the restriction options become available in the
User Controls window.
Please purchase PDF Split-Merge on www.verypdf.com to remove this watermark.
You can specify the time period in which the computer may be used and whether games and
specific programs can be accessed.
3.
On the left side of the User Controls window, under Windows Settings, click Time
limits. Then in the Time Restrictions window, drag diagonally from the Sunday 12
Midnight box to the Saturday 5 PM box.
The selected time is designated in the window as blocked.
During the blocked time, Windows 7 will deny access to the account and display a message
that the user account is blocked.
Limiting Computer Access
57
Please purchase PDF Split-Merge on www.verypdf.com to remove this watermark.
58
Chapter 2 Manage User Accounts
4.
Drag from the Sunday 12 Noon box to the Sunday 5 PM box to unblock
those times.
5.
In the Time Restrictions window, click OK.
6.
In the User Controls window, click Games.
The Game Controls window opens.
You can block all games, block games based on their rating, or block specific games.
7.
Click Set game ratings, and then scroll the window, noticing that you can select
an age/maturity level or select check boxes to block specific types of content.
Tip By default, the age/maturity ratings of the Entertainment Software Rating Board
are used. You can select a different rating system by clicking Game Rating Systems in
the left pane of the Parental Controls window.
8.
At the left end of the Address bar, click the Back button to redisplay the Game
Controls window. Then click Block or Allow specific games, and scroll the
window to see the status of all the installed games.
9.
Click Cancel to return to the Game Controls window, and then click OK to return
to the User Controls window without blocking any games.
Please purchase PDF Split-Merge on www.verypdf.com to remove this watermark.
10.
In the User Controls window, click Allow and block specific programs. Then in the
Application Restrictions window, click Angel can only use the programs I allow.
Windows searches your computer and displays a list of programs you might want
to block.
Windows 7 will deny access to the listed programs unless you select their check boxes.
Tip You can add programs to the blocked list by clicking Browse and navigating to the
program’s file.
11.
Click Cancel to return to the User Controls window without blocking any
programs.
12.
In the User Controls window, click OK.
CLEAN UP Turn off the Parental Controls if you don’t want to use them, and close
the Parental Controls window.
Limiting Computer Access
59
Please purchase PDF Split-Merge on www.verypdf.com to remove this watermark.
60
Chapter 2 Manage User Accounts
Playing Safely
Windows 7 recognizes game ratings such as those assigned by the Entertainment
Software Rating Board (ESRB), which indicate the minimum age recommendation
for the game. Content ratings include those listed in the following table.
Rating symbol Recommended for Description
EC
(Early Childhood)
Ages 3 and older Contains no material that parents would
find inappropriate.
E
(Everyone)
Ages 6 and older May contain minimal cartoon, fantasy,
or mild violence; and/or infrequent use
of mild language.
E10+
(Everyone 10+)
Ages 10 and older May contain more cartoon, fantasy, or
mild violence; mild language; and/or
minimal suggestive themes.
T
(Teen)
Ages 13 and older May contain violence, suggestive
themes, crude humor, minimal blood,
simulated gambling, and/or infrequent
use of strong language.
M
(Mature)
Ages 17 and older May contain intense violence, blood
and gore, sexual content, and/or strong
language.
AO
(Adults Only)
Ages 18 and older May include prolonged scenes of intense
violence and/or graphic sexual content
and nudity.
See Also For more information about software and game ratings, visit www.esrb.org.
Additional content descriptors may indicate the specific reason or reasons for
the rating. The ESRB employs many descriptors, including Alcohol And Tobacco
Reference, Blood And Gore, Cartoon Violence, Crude Humor, Nudity, Real Gambling,
Sexual Violence, and Strong Language. These descriptors can help you to determine
whether a specific game is suitable.
Please purchase PDF Split-Merge on www.verypdf.com to remove this watermark.
Disabling or Deleting a User Account
If you no longer need one of the user accounts that are set up on your computer, you
have two options:
l
You can disable the account. A disabled account is not available, but all of its settings,
folders, and files remain in place.
Tip The ability to disable an account might be unavailable in some versions of Windows 7.
l
You can delete the account. All settings are permanently removed and cannot
be restored. You can choose during the deletion process whether to retain the
account’s folders and files.
To disable a user account:
1. On the Start menu, right-click Computer, and then click Manage.
2. In the left pane of the Computer Management window, click Local Users And
Groups.
3. In the center pane, double-click the Users folder.
4. Double-click the user name of the account you want to disable.
5. In the Properties dialog box, select the Account Is Disabled check box, and then
click OK.
6. Close the Computer Management window.
The account no longer appears in the Manage Accounts window of Control Panel.
To enable a disabled user account:
1. Perform steps 1 through 4 of the preceding procedure.
2. In the Properties dialog box, clear the Account Is Disabled check box, and then
click OK.
3. Close the Computer Management window.
The account reappears in the Manage Accounts window of Control Panel.
Disabling or Deleting a User Account
61
Please purchase PDF Split-Merge on www.verypdf.com to remove this watermark.
62
Chapter 2 Manage User Accounts
In this exercise, you’ll delete a user account and its folders and files from your
computer.
Important Administrator account credentials are necessary to complete this exercise.
SET UP You don’t need any practice files to complete this exercise. Display Control
Panel in Category view, and then follow the steps.
1.
In Control Panel, under User Accounts and Family Safety, click Add or remove
user accounts.
The Manage Accounts window opens, showing all the accounts set up on your
computer.
2.
In the Manage Accounts window, click Angel.
Troubleshooting You cannot delete a user account that is logged on to the computer.
You must switch to that account and log off before you can delete it.
3.
In the Change an Account window, click Delete the account.
The Delete Account window opens.
When you delete a user account, you can choose to delete or keep the content of the account’s
personal folders.
4.
Angel has not created any files that you care about, so click Delete Files.
5.
In the Confirm Deletion window, click Delete Account.
Angel’s account no longer appears among the active accounts.
CLEAN UP Close the Manage Accounts window.
Please purchase PDF Split-Merge on www.verypdf.com to remove this watermark.
Key Points
l
User Account Control helps ensure that your computer is protected from unwanted
and potentially destructive changes.
l
It’s a good idea to create a password-protected, standard user account for every-
day use so that an administrator password has to be supplied for any actions that
affect your computer or Windows settings.
l
A standard user can modify certain aspects of his or her account. An administrator
can also modify other users’ accounts, including using Parental Controls to limit
when and what users can access.
l
When you no longer need an account, you can delete or disable it.
Key Points
63
Please purchase PDF Split-Merge on www.verypdf.com to remove this watermark.
Chapter at a Glance
Connect to a network,
page 66
Create a homegroup,
page 74
Share files on your network,
page 85
Please purchase PDF Split-Merge on www.verypdf.com to remove this watermark.
65
3
Manage Your
Network
In this chapter, you will learn how to
4 Connect to a network.
4 Create a homegroup.
4 Work with a homegroup.
4 Share files on your network.
4 Manage a network connection.
In the early days of Microsoft, Bill Gates envisioned a future with “a computer on every
desk and in every home.” Today, the business world couldn't function without computers,
and new terms such as “information worker” and “knowledge worker” have been coined
to describe people who spend most of the day working with information on a computer
screen. Computers make it possible for an increasing number of people to successfully
run small businesses with large presences, or to maximize productivity by working from
home. And on the home front, it’s not uncommon for there to be two, three, four, or
more computers in a home.
Whether you are an information worker or only a home computer user, your computer is
probably connected to the Internet. But it’s also becoming increasingly necessary to be
connected to other computers in your work or home environment. When you establish a
connection from a Windows 7 computer to a wired or wireless network, you designate the
network as one of three types: Home, Work, or Public. The network type you choose gov-
erns the way your computer interacts with other computers and devices on the network.
When you designate a network type as Home, you can choose to join the computer to a
homegroup—a password-protected security group that enables you to easily and securely
share information and devices with other homegroup member computers.
Important If your computer is connected to a domain, as is frequently the case in a large
business environment, the network type is set by the network administrator to Domain and
can’t be changed. The information in this chapter pertains specifically to non-domain networks.
Contents
3 Manage Your
Network 65
Connecting to a Network. . . . . . . . . . . . . . . . . . . . . . . . . . . . . . . . . . . . . . . . . . . . . . . . . . 66
Home and Work Network Settings. . . . . . . . . . . . . . . . . . . . . . . . . . . . . . . . . . . . . 69
Public Network Settings . . . . . . . . . . . . . . . . . . . . . . . . . . . . . . . . . . . . . . . . . . . . . . 69
Network Information . . . . . . . . . . . . . . . . . . . . . . . . . . . . . . . . . . . . . . . . . . . . . . . . 72
Creating a Homegroup. . . . . . . . . . . . . . . . . . . . . . . . . . . . . . . . . . . . . . . . . . . . . . . . . . . . 74
Working with a Homegroup . . . . . . . . . . . . . . . . . . . . . . . . . . . . . . . . . . . . . . . . . . . . . . . 79
Joining an Existing Homegroup . . . . . . . . . . . . . . . . . . . . . . . . . . . . . . . . . . . . . . . 79
Homegroup Settings for Shared Computers . . . . . . . . . . . . . . . . . . . . . . . . . . . . 79
Leaving a Homegroup . . . . . . . . . . . . . . . . . . . . . . . . . . . . . . . . . . . . . . . . . . . . . . .80
Sharing Files on Your Network . . . . . . . . . . . . . . . . . . . . . . . . . . . . . . . . . . . . . . . . . . . . . 85
Public Folders . . . . . . . . . . . . . . . . . . . . . . . . . . . . . . . . . . . . . . . . . . . . . . . . . . . . . . .86
Homegroup Resources . . . . . . . . . . . . . . . . . . . . . . . . . . . . . . . . . . . . . . . . . . . . . . . 88
Individual Files, Folders, and Libraries . . . . . . . . . . . . . . . . . . . . . . . . . . . . . . . . . . 89
Storage Drives . . . . . . . . . . . . . . . . . . . . . . . . . . . . . . . . . . . . . . . . . . . . . . . . . . . . . . 91
Managing a Network Connection . . . . . . . . . . . . . . . . . . . . . . . . . . . . . . . . . . . . . . . . . . 97
Key Points . . . . . . . . . . . . . . . . . . . . . . . . . . . . . . . . . . . . . . . . . . . . . . . . . . . . . . . . . . . . . .103
Please purchase PDF Split-Merge on www.verypdf.com to remove this watermark.
66
Chapter 3 Manage Your Network
In this chapter, you’ll first learn how to connect your computer to an existing network in
a home, work, or public environment. You’ll learn about the Windows 7 tools you can
use to find information about a network and the computers and devices connected to
it. You’ll learn how to create a homegroup and work with an existing homegroup. You’ll
also learn how to find information about the connection from your network to the
Internet, and learn some basic network connection troubleshooting skills. Finally, you’ll
explore ways to share information stored on your computer with other users on your
network and how to access information that other users share with you.
Important This chapter assumes that you are connecting to an existing, functioning network.
This chapter does not include instructions for setting up or configuring networking hardware.
When setting up a network infrastructure, be sure to follow the instructions provided by the
hardware manufacturer.
Practice Files Before you can complete the exercises in this chapter, you need to install
the practice file specified in “Using the Practice Files” at the beginning of this book to its
default location. The practice file you will use to complete the exercises in this chapter is in
the Networking practice file folder.
Connecting to a Network
A network is a group of computers that communicate with each other through a wired
or wireless connection. A network can be as small as two computers or as large as the
Internet. In the context of this book, we primarily use the term network to mean the
connection between computers in one physical location that are connected to each
other, and to the Internet, through a network router.
If your computer has an enabled network adapter, whether or not it is actively connected
to a network, a connection icon appears in the notification area at the right end of
the Windows Taskbar. The connection icon indicates whether your network adapter is
an Ethernet adapter or a wireless adapter (the wireless connection icon depicts signal
strength bars). When the computer is not connected to a network, a red X appears on
the connection icon. If a wireless connection is available, a yellow starburst appears
on the wireless connection icon.
A disconnected Ethernet connection
The connection icon indicates the adapter type and connection status.
Please purchase PDF Split-Merge on www.verypdf.com to remove this watermark.
Pointing to or clicking the connection icon displays information about the current net-
work connection status. When the computer is not connected to a network, pointing
to the connection icon displays information about whether a network connection is
currently available. Right-clicking the connection icon displays a shortcut menu with
links to the Network And Sharing Center and troubleshooting tools.
If your computer is a desktop computer you’ll probably connect it to only one net-
work. If your computer is a portable computer, you might connect it to networks in
many locations: at home, at work, at a friend’s or relative’s house, at the library, at
a coffee shop…wherever you want to connect to the Internet you will first need to
connect to a network. Each time you connect your computer to a network that you
haven’t previously connected to, Windows 7 creates a network profile with the net-
work name specified by the network router, and prompts you to specify whether
that network is a home network, a work network, or a public network.
When you physically connect your computer to a network by using an Ethernet cable,
Windows 7 automatically creates the network connection. To connect to a wireless
network for the first time, you need to make the connection.
To connect to an available wireless network:
1. Click the available wireless connection icon in the notification area of the taskbar.
A list of available connections appears.
The connection icon adjacent to each available connection indicates its signal strength.
Connecting to a Network
67
Please purchase PDF Split-Merge on www.verypdf.com to remove this watermark.
68
Chapter 3 Manage Your Network
2. In the Wireless Network Connection area, point to any network connection.
A ScreenTip displays information about the connection.
To learn the security type of a network, point to the network in the connection list.
3. Click the connection you want to connect to, and then click the Connect button
that appears.
Windows 7 connects to the selected network. If additional information is required,
such as a WEP key or WPA password, Windows prompts you to enter it.
Tip If you work in an organization that uses Active Directory Domain Services to authen ticate
(confirm the credentials of) users on a Windows Server domain and your computer is connected
to the domain, the network connection type will automatically be Domain, and you will not be
able to change it. Instead, you will log on to the domain by using your domain user name and
password.
When you select the connection type, Windows creates a network profile for that con-
nection and applies the settings specific to that connection type to your computer. Each
network profile includes the following settings:
l
Network discovery Determines whether the computer can see and be seen by
other computers connected to the network.
l
File and printer sharing Determines whether network users can access files and
printers that you have shared.
l
Public folder sharing Determines whether network users can access files stored in
the public folders on your computer.
l
Media streaming Determines whether network users can access music, videos, and
pictures stored in your media library.
l
File sharing connections Determines the security requirements for devices that
connect to your computer’s file sharing connections.
Please purchase PDF Split-Merge on www.verypdf.com to remove this watermark.
l
Password-protected sharing Determines whether shared files are available to any
network user or only to those users with user accounts on your computer.
l
HomeGroup connections Determines whether user account credentials are
necessary to connect to computers joined to your homegroup. Available only
for network profiles associated with the Home Network and Work Network
connection types.
Tip Computers running Windows 7 can co-exist on a network with computers running earlier
versions of Windows. Other computers and devices on the network do not affect the available
network connection types or their settings. However, at the time of this writing, network
connection types and homegroups weren’t available on a computer running a version of
Windows earlier than Windows 7.
Home and Work Network Settings
Selecting the Home Network or Work Network connection type connects your computer
to the network and configures the network profile to include network discovery, file and
printer sharing, public folder sharing, media streaming, and password-protected sharing.
Your computer is visible to other computers on the network. You don’t necessarily have
permission to access these computers or devices, but you can see that they are connected
to the network and other network members can see that you are.
When your computer is connected to a home network, you can choose to join it to a
homegroup. When your computer is connected to a work network, you can choose to
join it to a custom workgroup or to a domain. (Ask your network administrator about
these options.)
See Also For more information about homegroups, see “Creating a Homegroup” and
“Working with a Homegroup” later in this chapter.
Public Network Settings
You’ll probably connect to a public network only when you want to connect to the
Internet from a portable computer. (Individual computers cannot connect directly
to the Internet; they have to connect to an intermediary network that provides the
Internet connection.) For example, you might connect to a free, pay-per-use, or
subscription-based public network at an airport, restaurant, library, hotel, or other
location. (I was at a highway rest stop last month that offered free Internet access
from the picnic area!) If the network is provided free of charge, you might have
immediate Internet access. Frequently, though, you will need to provide information,
credentials, or payment in order to connect from the public network to the Internet.
Connecting to a Network
69
Please purchase PDF Split-Merge on www.verypdf.com to remove this watermark.
70
Chapter 3 Manage Your Network
When you connect to any network that you don’t explicitly trust, choose the Public
Network connection type to protect your privacy. Selecting the Public Network con-
nection type connects your computer to the network without it being visible to other
network users.
Public Network settings.
Please purchase PDF Split-Merge on www.verypdf.com to remove this watermark.