Beginning Direct 3D Game Programming P2
Bạn đang xem bản rút gọn của tài liệu. Xem và tải ngay bản đầy đủ của tài liệu tại đây (955.8 KB, 20 trang )
After you have configured Visual C/C++ 6, make sure it is configured correctly by compiling
one of the examples in the C:\DXSDK\Samples\C++\Direct3D directory. You might see
something like the following message if you haven’t configured the include path properly:
d:\book\source\part 1\chapter6\animated objects\objects.cpp(68) : error C2146: syntax
error : missing ‘;’ before ‘g_Keyboard_pDI’
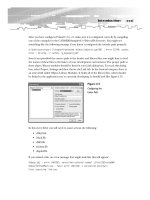
Even if you provided the correct path to the header and library files, you might have to feed
the names of these files to the linker of your development environment. The proper path to
these object/library modules should be listed in your Link dialog box. To reach this dialog
box, select Project, Settings and then choose the Link tab. In the General category, there is
an entry field called Object/Library Modules. It holds all of the library files, which should
be linked to the application you’re currently developing. It should look like Figure I.15.
In this entry field, you will need to name at least the following:
• d3dx9.lib
• 3dxof.lib
• d3d9.lib
• winmm.lib
• dxguid.lib
If you missed a file, an error message that might look like this will appear:
d3dapp.obj : error LNK2001: unresolved external symbol _Direct3DCreate9@4
Debug/SkinnedMesh.exe : fatal error LNK1120: 1 unresolved externals
Error executing link.exe.
xxxi
Introduction
Figure I.15
Configuring the
Linker Path
Here, d3d9.lib is missing. The unresolved external symbols are part of the COM
(Component Object Model ) interfaces of Direct3D. (I will explain COM in detail later
in the book.)
You should also check another include path, the one that holds the path to the directories
of the common include files for the C/C++ compiler. If you change your machine or you
are working on another machine with a different DirectX directory, normally you have to
add the common files using Project, Add Files to Project, Files.
Now let’s compile our first project.
1. Fire up your Visual C++ configured development environment.
2. Click on Open Workspace.
3. Choose basics.dsp.
4. Check whether you’ve configured the paths to the directories as described previously.
5. Choose the Build/basics.exe build.
6. When everything works correctly, choose run basics.exe.
That’s it. If something went wrong, reread the sections on installing the DirectX SDK and
Visual C++, and consult the provided documentation.
Setting Up Visual C++ .NET
Similar to Visual C/C++ 6, the DirectX 9 SDK will set all paths for you if you install it after you
install Visual C++ .NET. Nevertheless, in case anything went wrong, this section tells you what
you have to do if you need to configure DirectX 9 in the Visual C++ .NET IDE manually.
You start by clicking on Tools, Options in the Visual C++ .NET IDE, as shown in Figure I.16.
There is a project section that holds all the paths to the relevant directories, as shown in
Figure I.17.
If you have seen the dialog box that is used by Visual C/C++ 6 Studio, you should feel com-
fortable because this dialog box uses the same logic. You can see that at the top-right of the
dialog box, the Show Directories For drop-down menu offers the different kinds of files
that you can reference (see Figure I.18).
xxxii
Introduction
xxxiii
Introduction
Figure I.16
Choose the Options
menu item
Figure I.17
Choose the Project,
VC++ Directories
section
After you choose a type of file, the referenced directories will appear in the large area in
the middle of the dialog box.
The include file directories are C:\dxsdk\include and C:\DXSDK9\Samples\C++\Common\
Include. You should point your Visual C++ .NET IDE to these directories by clicking on the
New button and then on the ellipsis button. A default dialog box will open, allowing you to
choose a directory (see Figure I.19).
xxxiv
Introduction
Figure I.18
Choose the type of
file to reference
Figure I.19
Choose a directory
Now put this directory at the top of the list by using the arrow buttons.
After you have referenced the directories to the include files, choose the path to C:\dxsdk\lib
to reference the library files correctly. Don’t forget to bring them to the top of the list using
the arrow buttons.
The proper path to the additional dependencies files should be listed in the Additional
Dependencies field at Project, Properties, Linker, Input. In this entry field, you will need to
name at least the following (see Figure I.20):
• d3dx9.lib
• d3dxof.lib
• d3d9.lib
• winmm.lib
• dxguid.lib
If any problem occurs, check out the end of the “Setting Up Visual C++ 6.0” section for
solutions to common problems. The solutions are the same for Visual C++ .NET.
Now let’s compile our first project.
1. Fire up your Visual C++ .NET configured development environment.
2. Click on Open Solution.
3. Choose basics.sln.
4. Check whether you’ve configured the paths to the directories as described previously.
5. Choose Debug, Start Without Debugging.
6. When everything works correctly, basics.exe will start.
xxxv
Introduction
Figure I.20
Choose additional
dependencies
That’s it. If something went wrong, reread the sections on installing the DirectX SDK and
Visual C++ .NET, and study the provided documentation.
DirectX Shader Debugger
To debug vertex and pixel shaders, you need to install the DirectX shader debugger.
This debugger is only provided for Visual C++ .NET. You can find it in the dialog box of
the DirectX installation routine, as shown in Figure I.21.
By default, the shader debugger is not selected, so you have to choose it explicitly. If the
computer only hosts a Visual C/C++ 6 installation, you don’t get this choice at all. The
dialog box will look like Figure I.22.
Please note that only Visual C++ .NET users can use the shader debugger.
xxxvi
Introduction
Figure I.21
Choose the shader
debugger by
clicking on DirectX
Extensions for
Visual Studio 7
Figure I.22
Installable DirectX
utilities under
Visual C/C++ 6
Other Tools
Two plug-and-play compilers (provided by Intel and Codeplay) can be switched into
the Visual C/C++ 6 or Visual C++ .NET IDE. They offer higher performance for game
programmers than the compilers provided with these IDEs. However, I don’t recommend
that beginners use these compilers because they overcomplicate some things. You can
find more information at and at
. While on Intel’s Web site, don’t forget to check out VTune, a
profiler that helps you to optimize your game. These and the Visual C++ compilers from
Microsoft are the fundamental development tools that the majority of PC game program-
mers use nowadays.
Additional Resources
The CD-ROM provided with this book includes a directory called Movies. These movies inter-
actively show you how to configure the default paths of Visual C/C++ 6 and Visual C++ .NET.
You should visit the Microsoft MSDN site for DirectX ( />at regular intervals, and also the mailing list at />WA-MSD.EXE?S1=DIRECTXDEV. You can find daily news about the game developer com-
munity at or . I’ll also provide additional
information on o.
xxxvii
Introduction
PA RT ONE
DirectX
Graphics:
Don’t
Hurt Me