The Complete Aquarium Guide - Part 6
Bạn đang xem bản rút gọn của tài liệu. Xem và tải ngay bản đầy đủ của tài liệu tại đây (3.15 MB, 64 trang )
EQUIPMENT AND ACCESSORIES
An aquarium can only function properly with reliable equipment. It must be easy to put
into place and to use and it must offer every possible guarantee of safety, paying particular
attention to the potentially dangerous combination of water and electricity. There is
sufficient variety in the aquarium trade to supply hobbyists with a reasonable choice, on the
basis of their particular needs and means. It is pointless (and expensive) to think big;
besides, simplicity is often the byword for efficiency and success.
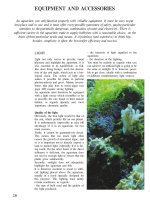
LIGHT
Light not only serves to provide visual
pleasure and highlight the aquarium, it is
also essential to its equilibrium, as fish,
like most living beings, need the alterna-
tion of day and night, which acts as a bio-
logical clock. The action of light also
makes it possible for plants to perform
photosynthesis and grow. Marine inverte-
brates that play host to micro-algae (see
page 169) require strong lighting.
An aquarium must therefore be equipped
with a light source which resembles as far
as possible the one found in their natural
habitat, as regards quantity and, most
important, chromatic quality.
Quality of the light
Obviously, the best light would be that of
the sun, which permits life on our planet.
It is unfortunately impossible to take full
advantage of it in an aquarium, for two
main reasons.
Firstly, it cannot be quantitatively dosed.
This means that too much light often
causes the growth of unwanted algae, and
so it is important not to directly expose a
tank to natural light, especially if it is fac-
ing south. On the other hand, if the direct
influence is deficient, the aquarium does
not receive enough light to ensure that the
plants grow satisfactorily.
Secondly, sunlight does not adequately
highlight the aquarium and fish.
It is therefore essential to resort to artifi-
cial lighting placed above the aquarium,
usually in a hood specially designed for
this purpose. This lighting must satisfy
certain conditions, as regards:
- the type of bulb used and the quality of
the light produced;
- the intensity of light supplied to the
aquarium;
- the duration of the lighting.
You must be realistic as regards what you
can achieve: no artificial light is going to be
the same as sunlight. It is, however, possi-
ble to get close, ideally with a combination
of different complementary light sources.
226
EQUIPMENT AND ACCESSORIES
Intensity of the light
The total intensity provided by the light-
ing is an extremely important factor, as
plants must be provided the amount of
light they need to grow in this artificial
environment.
It is inevitable, however, that some light is
lost, particularly if the beams have to
travel long distances. The importance of
the intensity of light (expressed, for the
sake of simplicity, in watts) is often under-
estimated, and as a result many aquariums
are under-lit. It is unusual to find cases of
overlighting.
The tables on the following pages give the
indications required for obtaining an opti-
mum amount of light for your aquarium.
As a general rule, the use of fluorescent
tubes is generally recommended for water
up to a height of 0.5 m.
Loss of light
The further away the light source, the
greater the loss in:
- the lighting hood;
- the glass lid covering the aquarium;
- the water.
Part of the light is reflected by the surface
of the water, another part is absorbed (the
deeper the aquarium, the greater the
importance of the absorbed light), and a
final part is diffused by suspended sedi-
ment. It is estimated that the bed only
receives 20-30% of the total light, which
can be detrimental to the growth of small
plants.
In order to reduce the loss of light, you
must:
- recover as much as you can in the hood
through reflection;
- keep the aquarium lid spotless;
Light is
recognized as
being important
for plants, and
also for marine
invertebrates. It
must be
sufficiently strong
to reach the
bottom of the
aquarium.
227
TECHNIQUES
Some blue
fluorescent tubes
can compensate
the dominant
yellow of HQI
bulbs, resulting in
a balanced
lighting which is
as pleasing to the
inhabitants of the
aquarium as it is
to the eye of the
beholder. •
- make sure that the water is clear;
- maintain the depth of the water below
0.5 m if you are using fluorescent tubes.
Light sources
A whole host of light sources, each with
its own distinguishing features, is avail-
able to aquarists.
• Incandescent lamps
These are what we use from day to day in
our homes, but they are absolutely out of
the question in aquariums: the quality of
light is poor, and this type of bulb gives
off too much heat.
• Fluorescent tubes
Incorrectly known as neons, these tubes
contain a gas that turns fluorescent under
the action of an electrical discharge. They
give off little heat and are available in var-
ious lengths and intensities. They last for
3,000-4,000 hours, or around a year. The
quality of the illumination decreases over
the course of time, however, and this can
be clearly seen if an old tube is replaced
by a new one. For this reason, never
change all the tubes in a tank at the same
time, as plants may be traumatized by this
abrupt change in the intensity of the light.
A used tube can be recognized by its
black or dark ends. Fluorescent tubes
come in various colors: firstly, the cold
white or industrial white tubes, which are
to be avoided, and the daylight tubes. The
latter approximate sunlight the most
closely and provide well-balanced light-
ing. Also available are colored tubes with
a variety of dominants, including the
tubes with a pink dominant used in horti-
culture, which are particularly effective for
the growth of plants, as they mainly emit
blue and red rays, which are trapped by
plants and used in the photosynthesis pro-
cess. Some aquarists do not appreciate
their somewhat unnatural color, which
tends to exaggerate the red and blue
tones of fish. Sometimes tubes with a blue
dominant are combined with white to cre-
ate a light reminiscent of that found in
deep waters. Such tubes are beneficial for
corals and other animals from the same
group, and have therefore acquired the
name of actinia tubes.
Other colors are available, but they are
less common. It is sometimes possible to
find tubes with a yellow dominant, which
are combined with blue tubes to achieve
a more balanced light.
A fluorescent tube is not plugged directly
into the mains: you must insert a trans-
former, the ballast, and a starter which
produces the electrical discharges
required. If you buy a well equipped
aquarium, or one with a lighting hood, the
tubes will be provided. This does not
always mean that you can rest easy, as the
intensity of the pre-installed tubes is
sometimes insufficient.
• Halogen lamps
The tungsten filament of incandescent
bulbs is here replaced by another metal,
which prevents them from turning black.
These lamps can be equipped with a
rheostat, but they are generally little used
by hobbyists.
• Discharge lamps
An electrical discharge between two elec-
trodes vaporizes a gas, such as mercury or
sodium vapor - which emits an intense
light. These lamps have a slight yellow
dominant, imperceptible to the human
eye, which is compensated by a blue flu-
orescent tube. They heat up and consume
more electricity than fluorescent tubes.
Some, known as HQI daylight, are prized
by aquarists, but they are expensive and
impractical for normal tanks. They are
mainly used in seawater aquariums over
0.5 m in height, as they help to acclima-
tize Anthozoans with Zooxanthellae (see
page 169).
228
TECHNIQUES
Watertight caps are available to protect the ends of the tubes and to
avoid any electricital accidents. The ballast gives off heat, so it should
not be installed in the hood, although
unfortunately this does occur in some
commercial equipment.
Several different lengths of tube, with
the wattage adjusted proportionally,
are available.
• The hood
Whatever type of light source you choose,
it requires a support: this is the hood. Flu-
orescent tubes must be included in a
hood, out of reach of splashed water. It is
often protected by a pane of glass but. if
this is not the case, the aquarium lid
serves the same function. To avoid any
loss of light, any partition between the
lighting and the water must maintain its
shape when exposed to heat, as well as
being transparent and. above all, clean.
Glass is therefore the ideal material. Loss
of light in the hood can be substantial,
sometimes up to 20-30%. There are a
few tricks which can resolve this prob-
lem, the main principle being to reflect
as much light as possible towards the
water. You can, therefore, line the inside
of the hood with the smoothest possible
aluminum foil, coat it with white or metal-
lic paint, or make one or several semicir-
cular metallic reflectors to fit round the
Some, generally small, aquariums, include basic
equipment. The lighting is therefore incorporated into
a hood which cannot get splashed by the water.. •
230
tubes. Some galleries on the market use
one of the last two techniques. As the
intensity of the light decreases when it
gets further away from its source, it is
important for the latter to be as close to
the water as possible. It should not be any
closer than 5-8 cm, for technical and
safety reasons, but even with these restric-
tions the illumination can be satisfactory.
(This reduction in intensity has been
taken into account in the calculations for
the strength of the lighting and the num-
ber of fluorescent tubes.)
Duration of lighting
High-quality lighting serves no purpose if
it is switched on only for a few hours a
day; by contrast, there is no sense in pro-
viding illumination for 15 hours a day if
the lighting is inappropriate. One will not
compensate the other under any circum-
stances. Once the lighting is suitable, both
qualitatively and quantitatively, you must
decide for how long you are going to
switch it on.
In tropical regions, the day lasts for
approximately 11 to 13 hours, and this is
what wild plants and fish are accustomed
to. The situation is different for plants and
animals raised in captivity, which can tol-
erate different lighting, but always within
the bounds of reason. An aquarium can
be lit for 13 hours a day, but some hob-
byists exceed these limits, as they get
used to turning the aquarium on when
they get up and switching it off late at
night. In this way the lighting can be on
EQUIPMENT AND ACCESSORIES
A blue tube can
be added to
daylight lamps to
recreate the
lighting in reef
areas.
WHICH TUBES FOR WHICH AQUARIUM?
The following examples all assume a maximum water depth of 0.5 m and a minimum of three tubes.
Type of tank
Classic freshwater tank, average
number or few plants
Freshwater tank with abundant
vegetation
Regional East African tank
Marine tank, without any plants or
invertebrates
Marine tank with plants but without
any invertebrates
Marine tank with invertebrates
(particularly Anthozoans)
Type and combination
of tubes
- A pink tube, combined with daylight
lamps
- At least 50% pink tubes, combined
with daylight lamps
A blue tube (for example, TLD 18 or
Bluemoon), combined with daylight
lamps
- Daylight lamps, possibly with a blue
tube
- A pink tube, combined with daylight
lamps
- An actinic blue tube (the TL03, for
example), combined with daylight
lamps.
Observations
This respects the balance of the colors,
with the pink enhancing the growth of
plants. Low to medium intensity.
This encourages the growth of plants,
but at the expense of natural-looking
light. High intensity.
This attempts to recreate the natural
lighting of these waters. Medium to
high intensity.
This attempts to recreate the natural
lighting of clear reef waters. Low to
medium intensity.
Balance between a natural-looking
light and a light to enhance plant
growth. Medium intensity.
For enhancing the maintenance and
growth of invertebrates playing host to
Zooxanthellae. High intensity.
231
TECHNIQUES
GOOD LIGHTING REQUIRES GOOD INSTALLATION
The positioning of fluorescent tubes in a hood
The fluorescent tubes must be distributed with, optimally, a distance of 8-10 cm between them (diagram 1). In the fitted
aquariums that are commercially available, the length of the tubes matches that of the aquarium, although it is notice-
able that the sides of the aquarium receive a little less light than the center or the front and back. Problems arise when
the tubes are markedly shorter than the tank, which can occur in
commercial aquariums with unusual dimensions, or in homemade
ones. If the tubes are all centered, then there is a space on both
sides, which may disadvantage plants on the sides of the tank. A
partial solution to this problem is alternating the position of the
tubes along the sides (diagram 2).
Another option is the use of tubes of different lengths, making
sure that they are arranged to cover the whole surface of the tank
and that their total intensity is
sufficient.
How many fluorescent tubes are needed for good illumination?
• The number of tubes required depends on their intensity and the size of the aquarium. Here are some indications for
water of a maximum depth of 0.5 m:
Normally planted freshwater tank, marine tank with plants
Densely planted freshwater tank (Dutch aquarium, for example),
regional East African tank
Sparsely planted freshwater tank, sea water without invertebrates
or plants
Sea water with Anthozoans (corals, anemones) and plants
1 W/2 liters of water/ normal intensity
1 W/liter of water/ high intensity
1 W/3 liters of water/ fairly low intensity
1 W/liter water/high intensity
These are the data, according to some standard dimensions, for a normally planted tank:
Dimensions of tank
(L x w x h in cm)
80 x 30 x 40
100x40x50
120x45x 50
150x50x50
Volume
(in liters)
96
200
270
375
Length of tube
(in cm)
60
90
90
120
Power
(in W)
20
30
30
40
Number
of tubes
2
3
4
4 or 5
for stretches of 16 or 17 hours, which is
far too much. It does not especially harm
the fish, but it nevertheless changes the
balance of the aquarium, and is particu-
larly conducive to the development of
algae. It is advisable to keep the lighting
on for about 10 hours and switch it off at
around 10 or 11 o'clock at night. The use
of programmed electrical clocks facilitates
this operation, and particularly avoids any
abrupt and unnatural transition from dark
to light, which can be harmful to some
fish in the aquarium. In this way, the
aquarium will receive the light of the new
232
EQUIPMENT AND ACCESSORIES
day first, followed by
its own lighting. Once
the artificial lighting
has been switched off
at night, the tank will
still be able to take
advantage of the ambi-
ent lighting.
It is also possible to
create a program that
switches the fluores-
cent tubes on and off,
one after the other,
using several timers,
thereby recreating, to
a certain extent, sun-
rise and sunset.
The ideal lighting pro-
gram would therefore
switch on the room's
ambient lighting in the
morning, or allow the
dawn light to exert its influence, then turn
on one tube about 1 hour later, and finally
switch on the other tubes a little later. At
night, it would first turn off some of the
tubes - with just one remaining lit - then,
a short while later, the final tube. and.
finally, the ambient lighting in the room.
Last but not least: do not interrupt a day-
time light. Several hours of darkness,
whether total or partial, unbalances the
growth of plants and the behavior of fish.
HEATING
After the vital matter of lighting, there fol-
lows a second issue, which is no less
important: heating. You must first estab-
lish your requirements. The aquatic ani-
mals and plants in tropical regions live in
warm water in which the temperature
hardly varies over the course of the year.
Tropical aquariums must therefore be
heated, with the temperature guaranteed
at around 25-26°C, or even 27°C for sea
water. These temperatures can be main-
tained with a watertight electrical heater
connected to an adjustable thermostat that
switches itself off once the desired tem-
perature has been achieved. When the lat-
ter goes down by 1°C or less, the
thermostat reconnects the current and the
heater starts to heat up again. Classic ther-
Good lighting
must both cover
the needs of
plants and satisfy
the visual sense of
onlookers.
mostats for aquariums allow the tempera-
ture to be regulated with some precision,
to around 0.5°C.
More precise electronic thermostats are
also available. These react to variations of
the order of 0.1°C, but unfortunately they
are more expensive.
Heating equipment
Once you have established your require-
ments, the next step is to choose the
problem of the heating equipment. There
are independent elements available,
attached to a thermostat, but they have
HEATING FOR BEGINNERS
A heater-thermostat is the most practical solution for
beginners. Make sure to choose a model in which the temperature
readings are clearly visible. They often have a small light which
indicates when the element is heating up. The power depends on
the volume of water the aquarium will hold: calculate around
1 W/liter, which means that a 100 liter tank requires a heater-
thermostat of 100 W.
A heater-thermostat
must always be totally
submerged. •
233
TECHNIQUES
• Independent
thermostat and
heater: practical,
if you want to
modulate the
power of the
heating, but
unwieldy as
regards electrical
cables.
A heater-
thermostat
comprises both
thermostat and
heater. It is
therefore easier to
hide than the two
separate elements.
•
the disadvantage of multiplying the
number of electrical connections
and cables to be hidden.
Another option is a heater-thermo-
stat - combining both a thermostat
and a heater - which is completely
watertight and submergible. This
system is becoming increasingly
popular as it is so easy to use.
Finally, a less common type of
element consists of a heating
cable sealed inside a flexible
tube, which is placed in the sed-
iment. Some aquarists, however,
think that the diffusion of heat via
the bed damages the roots of plants.
Furthermore, there is a danger that the
cable may be partially unearthed by a bur-
rowing animal in the tank.
The heating power level
The temperature in an inhabited
room - a lounge or bedroom -
rarely falls below 17°C. If an
aquarium is installed, the heating
must be sufficiently powerful to go
from this room temperature, which
will be the same as that of the
unheated tank, to one of around
25-26°C.
A power level of 1 W/liter is generally
sufficient to ensure this increase in
temperature. Therefore, 100 W will be
required for a 100 liter aquarium, and
this will also suffice for a 150 liter tank.
In an uninhabited, and usually
unheated, setting, such as a garage,
cellar, or loft, a tank sometimes
requires up to 2 W/liter, but rarely
more than this.
There is a sufficiently wide range
of heating devices and power
levels to cover all your needs
for volumes up to 500 liters
(25, 50, 75, 100, 150, 200, and
500 W). Beyond that, it is
cheaper and easier to
heat the entire premises
(as in the case of clubs
and public aquari-
ums) than to heat
tanks individually.
• The thermostat must be placed some distance
away from the heater for an adequate control of
the temperature.
• A reliable thermometer is necessary for
monitoring the temperature.
Installing the heating equipment in the
aquarium
It is important that the heat dis-
charged by the heater is spread
throughout the aquarium, in order
for the temperature to be relatively
uniform. Therefore, put the heater-
thermostat in a turbulent spot, to help
spread the heat and prevent any areas
being warmer than others. Another
alternative is to distribute the heat by
dividing the overall intensity - two heat
sources of 100 W instead of a single
one of 200 W, for example - but this
entails more cables to hide, both inside
and outside the aquarium. The ther-
mometer must be kept away from the
heat source, to avoid being directly
affected by it.
Possible problems
Sometimes, the glass protecting a heating
apparatus may break, especially when
234
EQUIPMENT AND ACCESSORIES
• A diffuser placed under the heater-thermostat
distributes heat throughout the aquarium.
you are handling it, and so it must be
replaced. However, before plunging your
hand into the aquarium, it is essential to
unplug the heating system, as there is a
risk, however minimal, of getting an elec-
tric shock - water, particularly salt water,
is an excellent conductor of electricity.
The heater's heating wire can break,
meaning that the water is no longer being
heated and gradually cools. In this case,
an internal black deposit appears in the
heater, or on the heater component of the
heater-thermostat.
Another common problem is the blocking
of the thermostat in the heating position:
the metal strip "sticks" to its contact, the
element continues heating, and in a few
hours the temperature of the tank can soar
above 30°C. This can occur with well-used
thermostats, although the problem can be
avoided with a second thermostat, inserted
as a safety measure between the first and
the mains supply. If in doubt, consult a
qualified electrician who has experience in
dealing with domestic aquariums or your
local supplier.
AERATION
Here a question arises: should we speak
of aeration or oxygenation? The two terms
lead to confusion, and it is sometimes
thought that aerating the water means
introducing oxygen. In fact, when a vol-
ume of water is circulated, the agitation of
the surface facilitates both the penetration
of atmospheric oxygen into the water and
the elimination of the carbon dioxide dis-
solved in the water. It is not therefore the
bubbles produced that directly oxygenate
the water, but the movement they create.
Circulating also allows the heat given off
by the heating apparatus to be diffused
and thereby distributed evenly over the
whole tank. The water expelled from the
filter
can also
help to stir
the water in
the tank.
Obviously, if an
aquarium is well
balanced, there is
no need to aerate it:
this is often the case in
small, normally planted,
and quite densely populated
tanks. However, gentle aeration
does provide a degree of security.
For large aquariums, in contrast, aeration
is recommended, especially when they
house fish with high oxygen require-
ments, such as the large freshwater Cich-
lids. Strong aeration is similarly necessary
in marine tanks, in the form of vigorous
stirring of the water, to recreate the con-
ditions of the natural setting.
Aeration equipment
• The pump
A small pump, connected to the mains,
draws in the atmospheric air surrounding
it and pushes it along a narrow pipe to a
diffuser. This forms the bubbles that will
break on the surface of the water. There
are several models of pump, of varying
degrees of output, according to the vol-
ume of air required; the smallest are suffi-
cient for aquariums of a maximum volume
of 100-150 liters. Pumps make a certain
• There are
several types of air
pumps; some have
controls to
regulate their
intensity.
235
TECHNIQUES
• A single pump
can feed several
diffusers, through
the use of shunts,
or also a filter-
plate.
amount of noise, which may
seem a nuisance, as an
aquarium is generally appre-
ciated for the impression of
silence and serenity that it
creates. The output of
some pumps can be
regulated, making it
possible to increase or
decrease the volume
of air produced.
• The air distribution
pipe
There are several
types of air distribu-
tion pipes, of varying
degrees of rigidity, of
which the most com-
mon diameters are 4-6
mm. It is best to
choose one that is fairly
stiff, as. if it happens to
get jammed, it will not
be completely flattened
and will still allow a lit-
tle air to pass through.
Always buy a piece of
tube longer than you
need, to avoid any
unpleasant surprises.
• The diffuser
There is a wide range
of diffusers on the market: rectangular or
cylindrical, in natural or artificial materi-
als. The most practical ones are made of
REDUCING THE NOISE OF THE AIR PUMP
Some pumps are noisier than others, and this can sometimes be irri-
tating when the aquarium is situated in a bedroom or other inhab-
ited room. There are several ways of reducing this noise:
- make a support for the pump, using a small wooden board on a
block of foam;
- enclose the pump, in a cupboard, for example;
- place the pump away from the tank, with a sufficiently long aera-
tion pipe (an air pump often goes unnoticed in a kitchen, where its
noise blends in with other household appliances);
- if the output of the pump cannot be regulated, make a shunt with
a faucet on the end, to allow a slight controlled escape of air (this
solution is effective only in some pumps).
• There is such a huge range of aeration
accessories that no aquarist will have any problem
finding equipment suited to his or her individual
requirements.
microporous or ceramic materials. These
produce very fine bubbles and can be
cleaned easily when they get clogged up.
Do not forget that diffusers will become
encrusted with calcium, salt, or algae after
they have been in use for a while. They
have the disadvantage of floating, so they
must be held down, with a stone, for
example. Be aware that diffusers that pro-
duce fine bubbles require stronger air
pressure to maintain the flow.
• Small accessories
Various small accessories complement the
main items. Connectors, shaped in the
form of a T, Y, or X, make it possible for
a single pump to supply several diffusers.
in the same tank or in different ones.
HOW MANY DIFFUSERS IN AN
AQUARIUM?
This depends on the volume and type of
aquarium.
- For a tank of 100-150 liters, normally
planted, a single diffuser with a moderate out-
put is sufficient;
- beyond that, in fresh water, calculate one
diffuser for every 100-150 liters (one for every
100 liters, if the tank is sparsely planted, or
not planted at all);
- in sea water, use one diffuser for every
75-100 liters, at top intensity.
236
EQUIPMENT AND ACCESSORIES
Faucets regulate the flow when there are
several channels. There is a variety of
models, in plastic or metal, single or in
sets for large installations.
• Positioning the aeration equipment
It is best to place the pump above water
level; this eliminates the possibility of
water flowing back down the air pipe
when the current is switched off.
A pump can sometimes be found below
water level, especially in built-in aquari-
ums, and so a small valve must be
inserted to reduce the above risk.
Perfectionists place the air pump outside
the room containing their aquarium, to
avoid any possible diffusion inside the
aquarium of toxic products, such as
aerosol sprays or cigarette smoke.
Small filters are able partially to purify the
air. These consist of active carbon that
absorbs smells and fumes, which is placed
in the air circuit after it leaves the pump.
Many aquarists consider that bubbles in a
tank provide a somewhat unnatural
appearance, so they hide their diffusers
and pipes in the decor, and the bubbles
are only noticeable when they break the
surface of the water.
For the reasons mentioned above, the
ideal position for a diffuser is close to a
heating apparatus. However, make sure
that no pipe comes into direct contact
with an element.
Since a diffuser stirs the water, sometimes
vigorously, it is possible that it also puts
AERATION FOR BEGINNERS
One of the smaller pumps on the
market is sufficient, along with a few meters
of pipe and a diffuser in microporous plastic.
If the pump is placed below the water level
of the aquarium, it is vital to acquire a valve
to prevent the water flowing back.
back into suspension various pieces of
debris, such as excreta, uneaten food, and
pieces of vegetation. If the suction of the
filtration system is nearby, this is not a
serious problem; if this is not the case,
there is a risk that this debris will spread
over the tank, with all the unappealing
visual results that may be expected. To
avoid this annoyance, do not put the dif-
fuser on the bed, but to place it halfway
up the aquarium. It is
advisable to check that the
lid fits properly at the
point where the bubbles
reach the surface, in order
to avoid any splashing of
water onto the lighting
hood. The faucets regulat-
ing the air must obviously
be placed outside the
aquarium. Often, in the
case of well planted
aquariums, no aeration
equipment is used, as the
plants themselves produce
enough oxygen.
It is not the
bubbles from the
diffusers that
oxygenate the
water, but the
movement that
they create.
237
TECHNIQUES
FILTRATION
Why filter the water?
Once an aquarium is put into
operation, the characteristics of the
water change fairly rapidly. These
modifications are a result of the
biological activity of living beings -
plants, fish, and invertebrates - as
well as various chemical reactions
that occur in the water and sedi-
ment. In this way the water gradu-
ally becomes loaded with
suspended matter - animal excre-
ment, vegetable debris, surplus
food, sometimes even dead bodies -
and suspended solids produced by the
activity of the occupants.
Of these, the most significant are the
nitrogenous products released by animals'
liquid excretion. These substances are
very toxic, and so their accumulation is a
cause for concern.
The suspended matter remains in open
water, or ends up as sediment. In either
case, it is visible. The suspended solids.
External filter with several filtration
compartments.
on the other hand, are not
visible, and therein lies the
danger. It is however, possi-
ble to ob-serve a slow mod-
ification of the water color;
in the long term, it
takes on a yellowish
color. This alteration
can be detected very
early on by immersing a
white object.
Filtration therefore aims to trap
the suspended matter, in order to
attain clear water that is more receptive to
the penetration of light and avoid any risk
of intoxicating the residents of the tank.
As we have already pointed out, filtration
also contributes to good oxygenation. You
must not, however, neglect to remove the
biggest scraps yourself.
Principle of filtration
Several filters function by retaining sus-
pended matter: this is mechanical filtra-
tion. The filtering media gradually become
clogged and must be cleaned or changed.
In order to transform nitrogenous sub-
stances and encourage the nitrogen cycle
(see page 19), oxygen and good bacteria
are required: this is biological or bacterial
filtration. The biological filter therefore
comprises a support that will be colonized
by bacteria, with circulation of water to
provide oxygen. The medium in mechan-
ical filtration serves the same function as a
biological filter once it has been colonized
by bacteria.
The various filtration systems
• The under-gravel filter
The water travels from top to bottom
through the sand and is taken back in
under a platform that is slightly raised
from the bottom of the tank. The water is
then pushed out into the aquarium by
means of an air-lift (see panel on page
239) fed by an air pump. Here, it is the
sand which acts as the filtering medium,
via a double action: first mechanical, as it
retains the particles that are in suspension,
and secondly biological, as the nitro-
238
Advantages
- Inexpensive;
-easy to install;
- little or no maintenance;
- easy to camouflage;
- fed by an air pump (often the
same as the one used by a
diffuser);
- the water clears quickly
Disadvantages
- It must be put in before the bed, when the aquarium is being built;
- it can only, therefore, be removed by taking out all the decor, vegetation, and bed
(which means reconstructing the aquarium);
- the sand builds up rapidly, according to its density, and must be cleaned (taking us
back to the point above);
- draining the bed is not beneficial to most plants with roots;
- the base of the air-lift may become blocked if it is narrow (under 1 cm); it can be
cleared by blowing down it, or by using a long thin rod;
- when the filter is inactive for a while, there is a risk of deoxygenating the bed, which
can cause the development of toxic products.
THE AIR-LIFT
This ingenious system allows water to be raised to a certain height and also helps to stir, and therefore oxygenate it. As a
rough guide, an air-lift with a diameter of 3 cm, fed by an air pump, has a flow of several hundred liters per hour, with a
water depth of 40 cm.
The air-lift makes it possible to use an under-gravel filter or a drip filter, or send water from a box filter into the aquarium.
In order to reduce the noise of the bubbles and enhance the circulation of the water, its top section can be bent to be flush
with the surface.
This type of air-lift is available in the aquarium trade. It can also be made at home, using a pipe
and a PVC bend (2-3 cm in diameter). It is attached to the tank with suction pads.
THE UNDER-GRAVEL FILTER
TECHNIQUES
• This under-
gravel filter is used
with a thick
sediment that
serves as a filtering
medium
gen cycle is created by the bacteria and
the oxygen supplied by the circulation of
the water. The size of the grains of sand is
therefore important (for more detail, see
Choosing the Bed, page 260), as it must
allow both the water to pass through and
the particles to be retained. This is why
you should avoid sand that is too fine
and, at the other extreme, sediment that is
too thick.
The under-gravel filter used to be
extremely popular, but these days it has
given way to other techniques. However,
it can be used in small temporary tanks or
in a community tank, but with a slow and
continuous flow, as a complement to
another filtration system.
• Small internal filters fed by air
These also work with an air pump, but a
small filtering medium, often made up of
foam, replaces the sand. They are only
effective in small aquariums with a capac-
ity of 50 liters or less.
You can make this type of filter at home.
Take a PVC receptacle that is easy to cut,
ideally a bottle with a capacity of 1.5-2
liters. The use of foam tends to make the
apparatus float to the surface, so you must
insert a ballast to weigh it down. The
upper part of the foam can be covered by
coarse, heavy material, such as gravel or
sand, serving not only as ballast but also
as a pre-filtration element (see box
below).
• Small internal filters with an electric motor
The motor makes it possible to draw up
the water through a thick grid that blocks
the passage of the larger pieces of debris.
The water is then guided towards a filter-
ing medium, such as foam or Perlon,
before being expelled into the aquarium.
This system works well but is insufficient
for an aquarium with a volume of over 100
liters, although there are models available
that can be adjusted according to the vol-
ume of water being treated and that will
prove effective.
A QUICK WAY TO MAKE A SMALL
INTERNAL FILTER
1. Diffuser
2. PVC pipe, with incisions all down one side,
which will be set into the block of foam
3. Block of foam hollowed out in the center to
allow room for the air-lift
4. Gravel (pre-filtration and ballast)
-> Direction of water
1. Diffuser
2. Air-lift
3. Block of foam
4. Water recovery chamber
5. PVC bottle
6. Gravel (pre-filtration and ballast)
-> Direction of water
240
EQUIPMENT AND ACCESSORIES
• External filters
The water siphoned into the aquarium
passes into a filtration bay containing sev-
For a small tank, a small internal filter, using
either an air-lift (left) or an electric motor (right) is
sufficient.
eral filtering media and is sent back into
the tank by means of an electric pump.
There is a variety of models available,
depending on the power of the pump and
the volume of the filtration bay. It is even
possible to find filters for garden ponds.
These filters are highly efficient; their
main disadvantage lies in the amount of
SMALL SUBMERGED FILTERS WITH AN ELECTRIC MOTOR
The outflow of the motor is sometimes excessive for the volume of
the filtering medium. The latter must be cleaned regularly as it gets
blocked up - it can be inspected through the PVC of the filtration
compartment.
EXTERNAL FILTERS WITH AN ELECTRIC MOTOR
These are suitable for large aquariums - some have a flow of 1 mVhour - and contain materials with various particle sizes
in the filtration compartment. They must be placed at the bottom of the tank to avoid any possible draining.
These filters are more expensive than those already described, but, though they are mechan-
ically very efficient, they are not effective in biological terms. The
use of particles of different sizes prevents the apparatus from
getting blocked up too quickly. It is easier to clean if you
have the foresight to install faucets on the pipes.
1. Strainer to prevent small fish or bits of debris getting
sucked up and blocking the pipes
2. Semi-rigid pipes
3. Filtering media that get finer as the water advances
4. Motor compartment
5. Perforated rigid pipe which allows the water to be
expelled at or above surface level, to enhance the
exchange of gases
6. Faucets
Direction of the water
241
TECHNIQUES
Pumps for box filters.
space taken up by the equip-
ment, with the pump and filtra-
tion bay outside the aquarium,
and the pipes for sucking in and
expelling the water inside.
• Box filters
These are sometimes built into some
aquariums on the market, but they can
also be added afterwards. In the latter
case, they must be hidden by exterior fit-
tings. The use of this type of filter is
• A box filter integrated into an aquarium.
becoming more widespread, as it is easy
to put into operation and maintain. In a
large aquarium, however, its mechanism -
the retention of particles - can prove
insufficient, and so a complementary
external filter must also be used.
BOX FILTER
1. Entrance for water through a hole in the glass, protected by a grid. A siphon
with a strainer on the end (la) can also be used. The grid or strainer prevents
fish passing through, apart from the smallest fry, which can sometimes be
recovered in the box (2). Both must be maintained regularly, as various bits of
debris, particularly vegetal matter, build up there, slowing down or even
preventing the circulation of the water.
2. Box. This can contain a pre-filtration material, such as Perlon (page 248). In
sea water, it is an ideal replacement for the protein skimmer (page 250).
3. Filtration foam (page 248). This retains fine particles and is the medium for
the biological filtration. It is easier to maintain if it is divided into two
approximately equal parts.
4. Sump for keeping water before it is sent back into the aquarium by a pump
or air-lift. This part of the box filter can receive heating and aeration.
There is a variation on this system: the double box filter.
Double box filter
242
EQUIPMENT AND ACCESSORIES
Box filter in
central position,
built into
artificial decor
recreating a cliff
or rocky slope.
•
The box filter is normally placed on one
of the sides of the aquarium. Wherever it
is put, it is vital that the volume of the fil-
ter is equal to at least 10% of the volume
of the aquarium. In the diagrams above,
the aquarium is seen from above, with the
front at the bottom of the drawing; the
foam is represented by hatching. The
decor can be artificial.
• Wet-dry filters
Here, the filtering media are not totally
submerged in the water, but are sprinkled
by it.
This means that they are in permanent
contact with the air, encouraging good
oxygenation of the water and effective
functioning of the nitrogen cycle. This
technique is particularly popular among
experienced fishkeepers with large fresh-
water or marine tanks.
There are two systems: the gutter filter,
which has long been in use, and is easy to
set up, and the more recent wet-dry filter,
placed under the aquarium, which
requires more space. In both of these
cases, coarse pre-filtration media are
desirable.
- Gutter filter: the water is pushed up
from the aquarium by an electric pump or
an air-lift to a horizontal gutter equipped
with filtration material.
The water then passes
along the gutter and falls
as 'rain' into the tank,
thereby enhancing the
oxygenation. Chicanes can
increase the time taken by
the water's journey and,
therefore, its oxygenation.
Two box filters
in the rear corners.
- Wet-dry filter under the aquarium: this is
considered the ultimate filtration system
by some aquarists. The main problem in
setting it up lies in the incorporation of an
outlet for excess water in a side wall or
the back of the tank. The water descends
into another tank and drains through the
Gutter filter
equipped with
thick filtering
media (left) and
finer ones (right).
V
243
GUTTER FILTER
EQUIPMENT AND ACCESSORIES
PRINCIPLE OF WET-DRY FILTER PLACED UNDER THE AQUARIUM
filtering medium, before being pumped
back into the aquarium.
Some manufacturers market small internal
wet-dry filters, which are intended for
aquariums of a maximum volume of
around 200 liters.
THE REAL POWER OF A PUMP
Here is an example based on a 1,000
liters/hour pump model, capable of reversing
the flow to a height of 1 m:
In fact, a very slight curve should be visible,
but the precision here is sufficient to see that
the pump has a flow of no more than 600
liters/hour for transporting water to a height
of 40 cm.
PUMPS
Pumps are used for box or wet-dry filters.
In the case of marine aquariums, they are
sometimes used merely to circulate the
water, or simply surrounded by a block of
foam.
• A pump's power
There are several brands of pump and
various levels of power. The power level
is calculated for the operation of a pump
that does not raise the water level: the
water is pumped and sent back to the
same level.
Manufacturers supply two figures for
every pump:
- the maximum flow, which corresponds
to a flow reversal height of 0;
- the maximum water height to which the
pump can take the water, corresponding
to a flow close to 0.
The real power of a
pump actually depends
on the height of the
water. •
245
TECHNIQUES
• The pre-
filtration material
is often coarse, in
order to trap the
bulkiest particles.
In some rare cases, the directions for use
will include a graph that makes it possible
to calculate the real power corresponding
to each height of flow reversal, but on
most occasions you will have to draw this
yourself.
Uses, advantages, and disadvantages of
the various filtering media
The filtering materials can be either natu-
ral - gravel, sand, clay, active carbon,
peat, crushed oyster shells, rocks - or arti-
ficial - PVC, foam, Perlon, and various
plastic materials.
Different materials correspond to specific
functions.
For a coarse filtration, use gravel, rocks,
sand, clay, or large pieces of PVC.
A fine filtration requires fine sand, foam,
or Perlon; a biological filtration, sand,
foam, cotton, or clay. Peat, active carbon,
crushed oyster shells, or calcareous rocks
are effective materials for exerting a
chemical action.
With the exception of the last category, a
filtering material must be chemically neu-
tral, i.e. it must not modify the main char-
acteristics of the water (pH, hardness, or
density).
All the filtering media of variable volume
(gravel, sand, earth, clay) are easier to
handle if they are placed in a fine-meshed
pouch (made from a net curtain or tights,
for example).
• Gravel and thick sand
These are used as pre-filtration media to
trap the largest pieces of debris, especially
in the external filters. They are being
increasingly replaced by artificial material,
but fairly thick sand (grains of 2-3 mm)
are still required in freshwater under-
gravel filters.
• Lava rocks
These rocks, broken into pieces of various
sizes, play a double role: mechanical, for
suspended matter, and biological.The
form and surface of the rocks encourage
the presence of bacteria, as well as good
water circulation of water.
• Oyster sheik and calcareous rocks
These play the same role, but also release
WHICH FILTER FOR WHICH AQUARIUM?
The type of filter depends on how the tank is being used, but also on the hobbyist's budget; you
must therefore look for the best quality/price ratio.
The use of two complementary techniques makes it possible to obtain the maximum efficiency in
biological filtration. Also, this reduces the risk if one filter is affected by a technical or biological
problem.
Type of aquarium
Rearing,
quarantine
Fresh water
Fresh water
Sea water
Volume
Under
100 liters
100-200 liters
Over
200 liters
Over 300 liters
Filtration system
Under-gravel filter, small
internal filter, powered
by air or electricity.
Box filter or
external filter
Box or external filter
Box filter, external filter,
wet-dry filter
Observations
The under-gravel filter is
not the most practical
solution.
If the tank does not have
an in-built box section,
choose the external filter.
The two systems can be
used together.
These three techniques
can be used together.
246
EQUIPMENT AND ACCESSORIES
• Lava rocks provide a good bacterial support.
moderate amounts of calcium carbonate
into the water going through them. They
are therefore used to maintain a high
degree of hardness in some types of
tanks, such as regional East African aquar-
iums, for instance.
They must be pounded and crushed, and
then rinsed carefully, in order to eliminate
the fine particles produced.
• Clay
Clay, in the form of balls of a few mm to
1 cm in diameter, provides a good bacte-
rial support. It is rarely used on its own,
but rather as a complement to another
material, to ensure pre-filtration.
• Peat
Peat (see page 16) is placed in a filter to
acidify the water passing through it; there-
fore, its main role is not filtration, although
it can trap some particles. It is used in
fresh water to obtain the low pH required
to keep and reproduce certain species (see
South American aquariums, page
35, and also Cyprodontidae, or
killies, page 95). Be
aware that peat turns
water an amber yel-
low color.
It is, therefore, not at
all advisable to apply
Perlon retains fine
particles. It is an easy
material to use. •
Balls of clay can be used for pre-filtration.
peat designed for horticultural use, as it
contains substances that can be dangerous
in an aquarium. Suitable peat is commer-
cially available, although you will have to
proceed by trial and error and do some
tests before finding the quantity needed to
maintain a specific pH.
• Active carbon
Active carbon is obtained by calcining
(burning) vegetable matter under very pre-
cise conditions. It is a very porous material
with properties useful to fishkeepers. It
fixes organic coloring substances, which
makes it possible to obtain really clear
water. It also fixes some medicines, espe-
cially those based on colorants. In this
case, a filter is only used to eliminate a
medicine, once the treatment has been
completed. What is more, active carbon
traps smells. Its main deficiency is that it
loses these distinguishing properties quite
quickly. It offers a good support for bacte-
ria, but no more so than other more prac-
tical filtering media.
To sum up, active carbon is a material with
very specific applications, to be used only
in fresh water and not in
sea water, and it must
be rinsed in warm
water before use.
• Perlon
This artificial material
comes in the form of inter-
twined filaments. Be careful: it
247
• There is a very
w/de range of
filtering materials;
often the most
desirable is the
one offering the
largest surface
area for trapping
bacteria.
• Polyester foam
comes in various
porosities, the
ideal one
corresponding to a
density of foam of
20 kg/m3.
must not be con-
fused with glass
wool, which is
highly unsuit-
able for aquari-
ums, as it can
release tiny
fragments into
the water. It is
generally used in
association with
foam as the first fil-
tering material, espe-
cially so in box and
wet-dry filters.
• Foam
This synthetic polyester foam has open
pores, like that found in mattresses or
cushions. This material is very fashionable
in the aquarium trade these days and it
seems to offer nothing but advantages: it is
light, neutral, easy to handle and cut, as
well as being cheap. Furthermore, it
provides a highly effective bacterial
support, and is also excellent for
mechanical filtration. The foam
generally used has a density
of 20 kg/m-\ and its poros-
ity is ideal both for
retaining suspended
particles and for
allowing bacteria
to develop. Gener-
ally speaking, the
experience of a great
many aquarists and public
aquariums has shown that a
thickness of 8 cm, divided into
two more or less equal parts for
easier upkeep, is usually sufficient
for filtration.lt is possible to find some
commercially available, or
else home-made, filters entirely composed
of foam - small internal filters or external
filters, both box and wet-dry - and these
are also completely satisfactory.
• Various plastic-based materials
Different types of plastic material, such as
PVC, can be used to make the filtration or
pre-filtration elements: small pieces of
pipe around 1 cm in diameter, balls, cubes
with an openwork design, etc. The list is
endless, and contains not only items
found in the aquarium trade but also recy-
cled domestic materials.
• Combinations of filtering media
When several filtering materials are found
in the same filter, the water must succes-
sively pass through materials decreasing
in grain size.
The coarsest materials serve as a pre-filter
for large pieces of debris, while the others
retain the finer particles. All these filtering
media enhance the development of bac-
terial colonies that convert nitroge-
nous products, with pride of place
being taken by foam and clay
balls.
Cleaning the filtering
media
The filtering media
progressively
accumulate parti-
cles, at a rate depen-
ding on granule size,
the speed at which the
water flows through them
and finally the amount of sus-
pended mat-
ter it contains.
When they are
saturated, they can
MAKING A FOAM FILTER IN AN EMERGENCY
The sucking nozzle of an electric pump is extended with a pipe -
PVC or semi-rigid plastic, such as a garden hose - with a series of slits down
the sides. This is inserted into a block of foam with the center already cut out
with a knife or blade. The water has to pass through the foam, before being
taken in through the slit pipe and returned to the aquarium. This quick and
easy filter works well when improvisation is called for to keep an aquarium
in operation.
248
EQUIPMENT AND ACCESSORIES
• A pump, a PVC pipe with slits down the sides,
and a block of foam make up a filter that can be
quickly put into operation.
be cleaned with warm tap water, without
any detergent or soap, until clear rinsing
water is hence obtained.
Aquarists who have several tanks wash
several pieces of foam together in a wash-
ing machine, though obviously without
any washing powder. It is unfortunate that
cleaning eliminates the large majority, or
indeed all, of the useful bacteria. The filter
will therefore be effective for particles but
will no longer be able to play any biologi-
cal role. To alleviate this problem, you can
clean only half the filtering media each
time: the bacteria living in the unwashed
part will be sufficient to purify the water
and will quickly recolonize the other half.
If you are using two filters, you can, of
course, clean one at a time. If the aquarium
has to remain empty, in the meantime the
filtering media can be put into the filter of
another aquarium, and in this way they will
still collect bacteria and can quickly be put
back into service. It is vital not to interrupt
the nitrogen cycle in a biological filter, as
this may give rise to toxic compounds.
FILTRATION OF SEA WATER
Filtration of sea water: special points
It is necessary to discuss separately certain
issues specific to sea water. The ideal solu-
tion would be to use two filters: one with
a moderate flow, mainly for the conversion
of nitrogenous matter (a box or wet-dry fil-
ter), the other with a stronger flow, pri-
marily serving a mechanical function. An
under-gravel filter can also be used to en-
hance the circulation of water in the gen-
erally fairly thick sediment, but it must not
be used on its own. One effective combi-
nation consists of a reverse-flow under-
gravel filter coupled with an external filter
(see box).
The filtration flow must be 3-5 times the
volume of the tank per hour for fish, and
up to 10 times the volume for inverte-
brates, especially Anthozoans. Once again,
foam is the perfect material, providing it is
no more than 6-8 cm thick. If thick mate-
rials, such as crushed oyster shells or PVC
materials, are used, then the foam can be
thicker. Never use peat or active carbon.
Equipment specific to sea water
Marine fish are more sensitive to the qual-
ity of the water than freshwater species.
This calls for the use of equipment to
complement the filtration system, in order
to obtain water of the highest quality.
REVERSE-FLOW UNDER-GRAVEL FILTER
The water passes through the substrate from the bottom to the top,
more for oxygenation than filtration. There are no particles to form sed-
iment, as these are sent back in suspension into the water, which is fil-
tered by an exterior system before being propelled under the sediment.
1. Strainer
2. Suction of water
3. External filter with electric motor
4. Return of water under the filter
5. Under-gravel filter
6. Passage of water from bottom to top
This type of filtration is sometimes used in large marine aquariums
containing fish, thereby avoiding any possible problems resulting
from a lack of oxygen in the bed.
249
TECHNIQUES
The agitation of
the water with a
protein skimmer
precipitates a
foam made up of
substances to be
eliminated. •
The protein
skimmer, specific
to sea water,
eliminates certain
dissolved
substances and
helps purify the
water. •
• The protein skimmer
This system enables the aquarist to carry
out partial chemical purification of the
water by eliminating certain dissolved
substances, such as proteins.
The principle is simple: the water is agi-
tated in a confined space, leading to the
precipitation of a number of substances. A
frothy foam, often yellow-colored, is pro-
duced, and this is then eliminated via the
overflow.
The protein skimmer is an independent
element that can be placed anywhere in
the tank. It can also complement the fil-
tration system, reducing the burden of a
box filter when it is installed in its first
section.
Also very often employed as a preventive
measure in tanks containing fish, the pro-
tein skimmer is not used if the tank is not
overloaded, and if a biological filter is
already working effectively.
The protein skimmer is recommended for
an invertebrate tank, especially one with
corals and anemones, although it does
eliminate some substances that are
absorbed by invertebrates.
Aquariums of up to 300 liters use a pro-
tein skimmer fed by a fine-
bubble diffuser, and
therefore supported by an
air pump. Beyond these
volumes, plan on installing
two protein skimmers, or
invest in one fed by an
electric injection pump.
• The purifying action of UV
rays
Ultraviolet rays are lumi-
nous, but invisible to the
human eye. Some of them
are responsible for tanning
(UV A and B), while others,
with a shorter wavelength
(UV C), have germicidal
properties and kill a large number of bac-
teria and viruses.
These UV rays are used for the bacterio-
logical purification of water, especially as
their action is selective, as they do not
destroy the "good" bacteria of the nitro-
gen cycle.
The field of action of these rays is limited
- somewhere in the order of a few cen-
timeters. The water must therefore pass
close to the source of the rays, at a speed
which allows it to receive sufficient
amounts of their luminosity. In order for
the rays to exert their maximum effect, the
water must be clear, and therefore well fil-
tered.
UV sterilizers are commercially available.
Again, the principle is simple: a lamp,
usually a tube, sends out rays, and the
water is pumped around it. The power of
a UV system and the flow of the water
around the lamp vary according to the
volume of water being treated. The lamp
is completely watertight, thanks to a
quartz sheath that allows this type of ray
to pass through. The blue-violet color
given off by the lamp only serves to show
that it is functioning. Do not look directly
at the source of the UV rays, as they are
dangerous for the eyes — this is why the
sterilizer usually has an opaque covering.
The lifespan of a lamp operating for 24
hours a day is around 5 or 6 months.
However, the quality of the rays usually
deteriorates after 4 months, and so they
should be replaced three times a year.
250