The organic chem lab survival manual by james w zubrick pdf
Bạn đang xem bản rút gọn của tài liệu. Xem và tải ngay bản đầy đủ của tài liệu tại đây (5.49 MB, 370 trang )
NINTH EDITION
THE ORGANIC
CHEM LAB
SURVIVAL MANUAL
A Student’s Guide to Techniques
JAMES W. ZUBRICK
Hudson Valley Community College
For Zoë and Anne,
who make it all worth the effort.
VP & Executive Publisher
Associate Publisher
Sponsoring Editor
Editorial Assistant
Marketing Manager
Marketing Assistant
Designer
Associate Production Manager
Production Editor
Kaye Pace
Petra Recter
Joan Kalkut
Ashley Gayle
Kristine Ruff
Andrew Ginsberg
Seng Ping Ngieng
Joyce Poh
Jolene Ling
This book was set in 10/12 Times by Aptara®, Inc. and printed and bound by
Courier Westford. The cover was printed by Courier Westford.
This book is printed on acid free paper.
Founded in 1807, John Wiley & Sons, Inc. has been a valued source of knowledge and understanding
for more than 200 years, helping people around the world meet their needs and fulfill their aspirations.
Our company is built on a foundation of principles that include responsibility to the communities we
serve and where we live and work. In 2008, we launched a Corporate Citizenship Initiative, a global
effort to address the environmental, social, economic, and ethical challenges we face in our business.
Among the issues we are addressing are carbon impact, paper specifications and procurement, ethical
conduct within our business and among our vendors, and community and charitable support. For more
information, please visit our website: www.wiley.com/go/citizenship.
Copyright © 2014, 2011, 2008, 2004 John Wiley & Sons, Inc. All rights reserved. No part of this
publication may be reproduced, stored in a retrieval system or transmitted in any form or by any means,
electronic, mechanical, photocopying, recording, scanning or otherwise, except as permitted under
Sections 107 or 108 of the 1976 United States Copyright Act, without either the prior written
permission of the Publisher, or authorization through payment of the appropriate per-copy fee
to the Copyright Clearance Center, Inc. 222 Rosewood Drive, Danvers, MA 01923, website
www.copyright.com. Requests to the Publisher for permission should be addressed to the Permissions
Department, John Wiley & Sons, Inc., 111 River Street, Hoboken, NJ 07030-5774, (201)748-6011,
fax (201)748-6008, website />Evaluation copies are provided to qualified academics and professionals for review purposes only, for use in
their courses during the next academic year. These copies are licensed and may not be sold or transferred
to a third party. Upon completion of the review period, please return the evaluation copy to Wiley. Return
instructions and a free of charge return mailing label are available at www.wiley.com/go/returnlabel. If you
have chosen to adopt this textbook for use in your course, please accept this book as your complimentary
desk copy. Outside of the United States, please contact your local sales representative.
Library of Congress Cataloging-in-Publication Data
Zubrick, James W.
The organic chem lab survival manual a student’s guide to techniques/James W. Zubrick, Hudson Valley
Community College.—Ninth ed.
p. cm.
Includes index.
ISBN 978-1-118-08339-0 (pbk. : alk. paper)
1. Chemistry, Organic—Laboratory manuals.
QD261.Z83 2012
547.0078—dc23
I. Title.
2012020179
Printed in the United States of America
10 9 8 7 6 5 4 3 2 1
PREFACE TO THE
NINTH EDITION
This Survival Manual again presents the basic techniques of the organic chemistry
laboratory, with the usual emphasis on doing the work correctly the first time. And
once again, I have relied on the comments of users and reviewers in guiding the
changes and additions that have been made.
Safety in the laboratory, always a primary concern, now has to consider the
addition of such technology as the iPad, the Nook, the Kindle, and even text messaging, where applicable. Microscale, also where applicable, has been reviewed and
updated as well. And while currently resisting the deletion of double-beam spectrophotometers altogether, a discussion of the technique of Attenuated Total Reflectance
and associated practices has been added to the section on Infrared Spectroscopy
(Chapter 32).
The discussion and presentation of the section on Nuclear Magnetic Resonance (Chapter 33) has been re-worked such that the different methods of sample
preparation, and instrument operation for continuous-wave and FT-NMR have been
made to contrast more sharply. A number of NMR spectra, with suggestions on presentation of the data, and basic interpretation have also been added.
Presentation of a more modern outline of the instrumentation of HPLC
(Chapter 31) includes discussion of automatic injectors, yet there is a bit of a loss
as this instrument, now highly computer-controlled, no longer has visible pumps,
valves, and miles of tubing and fittings, just a series of fairly quiet, putty-colored
boxes that produce excellent data with ease and a bit of boredom.
This kind of transition has put this edition of the Survival Manual into a bit of
an “equilibrium mode,” as now, at the urging of reviewers, some older techniques
have been removed as newer information has been included. The actual making of
TLC plates on microscope slides, which apparently needs not be done anymore, has
been removed, and comments about handling and cutting pre-prepared plates have
been updated and expanded (Chapter 27).
I’d like to thank my reviewers, Sean O’Connor, Clemson University;
Lucy Moses, Virginia Commonwealth University; Christine Rich, University of
Louisville; Sean O’Connor, University of New Orleans; Jeffrey Hugdahl, Mercer
University; Kathleen Peterson, University of Notre Dame; Chavonda Mills, Georgia
College & State University; Beatrix Aukszi, Nova Southeastern University; Robert
Stockland, Bucknell University; Jennifer Krumper, UNC-Chapel Hill; Rui Zhang,
Western Kentucky University; Holly Sebahar, University of Utah; Adam List,
Vanderbilt University for their comments and suggestions, most of which have been
iii
iv
PREFACE TO THE NINTH EDITION
incorporated in this work. Finally, I’d like to thank Petra Recter, Associate Publisher,
Chemistry and Physics, for the chance to perform this update, and Joan Kalkut,
Sponsoring Editor, for her tremendous patience and support during a personally
difficult time.
J. W. Zubrick
Hudson Valley Community College
CONTENTS
CHAPTER 1
SAFETY FIRST, LAST, AND ALWAYS
Accidents Will Not Happen 5
Disposing of Waste 5
Mixed Waste 7
Material Safety Data Sheet (MSDS) 8
Green Chemistry and Planning an Organic Synthesis
An iBag for Your iThing 10
Exercises 10
KEEPING A NOTEBOOK
11
A Technique Experiment 12
Notebook Notes 13
A Synthesis Experiment 13
Notebook Notes 13
Calculation of Percent Yield (Not Yeild!)
Estimation Is Your Friend 25
The Acid Test 25
Notebook Mortal Sin 25
Exercises 26
23
CHAPTER 2
CHAPTER 3
INTERPRETING A HANDBOOK
1
9
27
CRC Handbook 28
Entry: 1-Bromobutane 28
Entry: Benzoic Acid 29
Lange’s 31
Entry: 1-Bromobutane 31
Entry: Benzoic Acid 31
Merck Index 31
Entry: 1-Bromobutane 33
Entry: Benzoic Acid 34
There’s a CD 34
The Aldrich Catalog 35
Entry: 1-Bromobutane 35
Entry: Benzoic Acid 36
Not Clear–Clear? 36
Info on the Internet 37
Exercises 37
v
vi
CONTENTS
CHAPTER 4
JOINTWARE
38
Stoppers with Only One Number 39
Another Episode of Love of Laboratory 40
Hall of Blunders and Things Not Quite Right
Round-Bottom Flasks 42
Columns and Condensers 43
The Adapter with Lots of Names 43
Forgetting the Glass 45
Inserting Adapter Upside Down 45
Inserting Adapter Upside Down sans Glass
The O-Ring and Cap Branch Out 46
Greasing the Joints 46
To Grease or Not to Grease 47
Preparation of the Joints 47
Into the Grease Pit 47
Storing Stuff and Sticking Stoppers 48
Corking a Vessel 48
CHAPTER 5
MICROSCALE JOINTWARE
42
46
50
Microscale: A Few Words 51
Uh-Oh Rings 51
The O-Ring Cap Seal 51
Skinny Apparatus 51
Not-So-Skinny Apparatus 52
Sizing Up the Situation 52
Why I Don’t Really Know How Vacuum-Tight These Seals Are
The Comical Vial (That’s Conical!) 54
The Conical Vial as Vial 55
Packaging Oops 55
Tare to the Analytical Balance 55
The Electronic Analytical Balance 56
Heating These Vials 56
The Microscale Drying Tube 57
Gas Collection Apparatus 58
Generating the Gas 59
Isolating the Product 61
CHAPTER 6
OTHER INTERESTING EQUIPMENT
Funnels, and Beakers, and Flasks—Oh My! 63
The Flexible Double-Ended Stainless Steel Spatula
62
63
54
CONTENTS
CHAPTER 7
PIPET TIPS
66
Pre-Preparing Pasteur Pipets
Calibration 68
Operation 68
Amelioration 68
Pipet Cutting 70
Pipet Filtering—Liquids 70
Pipet Filtering—Solids 71
CHAPTER 8
SYRINGES, NEEDLES, AND SEPTA
The Rubber Septum
CHAPTER 9
67
73
75
CLEAN AND DRY
77
Drying Your Glassware When You Don’t Need To 78
Drying Your Glassware When You Do Need To 79
CHAPTER 10
DRYING AGENTS
80
Typical Drying Agents 81
Using a Drying Agent 82
Following Directions and Losing Product Anyway 82
Drying Agents: Microscale 83
Drying in Stages: The Capacity and Efficiency of Drying Agents
Exercises 83
CHAPTER 11
ON PRODUCTS
Solid Product Problems 85
Liquid Product Problems 85
The Sample Vial 85
Hold It! Don’t Touch That Vial
CHAPTER 12
84
86
THE MELTING-POINT EXPERIMENT
Sample Preparation 88
Loading the Melting-Point Tube 89
Closing Off Melting-Point Tubes 90
Melting-Point Hints 90
The Mel-Temp Apparatus 91
Operation of the Mel-Temp Apparatus 92
The Fisher-Johns Apparatus 93
Operation of the Fisher-Johns Apparatus 94
The Thomas-Hoover Apparatus 95
Operation of the Thomas-Hoover Apparatus
97
87
83
vii
viii
CONTENTS
Using the Thiele Tube 99
Cleaning the Tube 100
Getting the Sample Ready 101
Dunking the Melting-Point Tube
Heating the Sample 103
Exercises 103
CHAPTER 13
102
RECRYSTALLIZATION
104
Finding a Good Solvent 105
General Guidelines for a Recrystallization 106
My Product Disappeared 107
Gravity Filtration 107
The Buchner Funnel and Filter Flask 110
Just a Note 113
The Hirsch Funnel and Friends 113
Activated Charcoal 114
The Water Aspirator: A Vacuum Source 114
The Water Trap 115
Working with a Mixed-Solvent System—The Good Part
The Ethanol–Water System 116
A Mixed-Solvent System—The Bad Part 116
Salting Out 117
World-Famous Fan-Folded Fluted Paper 118
Exercises 119
CHAPTER 14
RECRYSTALLIZATION: MICROSCALE
Isolating the Crystals 121
Craig Tube Filtration 122
Centrifuging the Craig Tube
Getting the Crystals Out
CHAPTER 15
124
125
EXTRACTION AND WASHING
127
Never-Ever Land 128
Starting an Extraction 129
Dutch Uncle Advice 130
The Separatory Funnel 131
The Stopper 131
The Glass Stopcock 131
The Teflon Stopcock 132
How to Extract and Wash What 134
The Road to Recovery—Back-Extraction 135
A Sample Extraction 136
Performing an Extraction or Washing 137
Extraction Hints 139
Exercises 140
115
120
CONTENTS
CHAPTER 16
EXTRACTION AND WASHING: MICROSCALE
Mixing 142
Separation: Removing the Bottom Layer 142
Separation: Removing the Top Layer 143
Separation: Removing Both Layers 144
CHAPTER 17
SOURCES OF HEAT
145
Boiling Stones 146
The Steam Bath 146
The Bunsen Burner 147
Burner Hints 149
The Heating Mantle 150
Proportional Heaters and Stepless Controllers
Exercise 153
CHAPTER 18
CLAMPS AND CLAMPING
Clamping a Distillation Setup
Clipping a Distillation Setup
CHAPTER 19
152
154
157
161
DISTILLATION
164
Distillation Notes 165
Class 1: Simple Distillation 166
Sources of Heat 166
The Three-Way Adapter 167
The Distilling Flask 167
The Thermometer Adapter 168
The Ubiquitous Clamp 168
The Thermometer 168
The Condenser 168
The Vacuum Adapter 168
The Receiving Flask 169
The Ice Bath 169
The Distillation Example 169
The Distillation Mistake 170
Class 2: Vacuum Distillation 170
Pressure Measurement 171
Manometer Hints 173
Leaks 173
Pressure and Temperature Corrections
Vacuum Distillation Notes 177
Class 3: Fractional Distillation 178
How This Works 178
Fractional Distillation Notes 180
173
141
ix
x
CONTENTS
Azeotropes 183
Class 4: Steam Distillation 183
External Steam Distillation 184
Internal Steam Distillation 185
Steam Distillation Notes 185
Simulated Bulb-to-Bulb Distillation: Fakelrohr
Exercises 189
CHAPTER 20
MICROSCALE DISTILLATION
Like the Big Guy 191
Class 1: Simple Distillation 191
Class 2: Vacuum Distillation 191
Class 3: Fractional Distillation 191
Class 4: Steam Distillation 191
Microscale Distillation II: The Hickman Still
The Hickman Still Setup 192
Hickman Still Heating 193
Recovering Your Product 193
A Port in a Storm 194
CHAPTER 21
Exercises
187
190
192
THE ROTARY EVAPORATOR
195
199
CHAPTER 22
REFLUX AND ADDITION
200
Standard Reflux 201
A Dry Reflux 202
Addition and Reflux 204
Funnel Fun 204
How to Set Up 205
Exercise 207
CHAPTER 23
REFLUX: MICROSCALE
Addition and Reflux: Microscale
208
209
CHAPTER 24
SUBLIMATION
CHAPTER 25
MICROSCALE BOILING POINT
Microscale Boiling Point 215
Ultramicroscale Boiling Point
211
216
214
CONTENTS
CHAPTER 26
CHROMATOGRAPHY: SOME GENERALITIES
Adsorbents 219
Separation or Development
The Eluatropic Series 219
CHAPTER 27
219
THIN-LAYER CHROMATOGRAPHY: TLC
We Don’t Make Our Own TLC Plates Any More, But…
Pre-prepared TLC Plates 223
The Plate Spotter 223
Spotting the Plates 224
Developing a Plate 225
Visualization 227
Interpretation 228
Multiple Spotting 230
Cospotting 230
Other TLC Problems 231
Preparative TLC 232
Exercises 233
CHAPTER 28
WET-COLUMN CHROMATOGRAPHY
Preparing the Column 235
Compounds on the Column 237
Visualization and Collection 238
Wet-Column Chromatography: Microscale
Flash Chromatography 241
Microscale Flash Chromatography 241
Exercises 241
CHAPTER 29
REFRACTOMETRY
234
242
GAS CHROMATOGRAPHY
The Mobile Phase: Gas 249
GC Sample Preparation 250
GC Sample Introduction 250
Sample in the Column 252
223
239
The Abbé Refractometer 243
Before Using the Abbé Refractometer: A Little Practice
Using the Abbé Refractometer 245
Refractometry Hints 247
CHAPTER 30
222
248
245
218
xi
xii
CONTENTS
Sample at the Detector 252
Electronic Interlude 254
Sample on the Computer 255
Parameters, Parameters 256
Gas Flow Rate 256
Temperature 256
Exercises 257
CHAPTER 31
HP LIQUID CHROMATOGRAPHY
The Mobile Phase: Liquid 259
A Bubble Trap 259
The Pump and Pulse Dampener Module
HPLC Sample Preparation 262
HPLC Sample Introduction 263
Sample in the Column 264
Sample at the Detector 265
Sample on the Computer 266
Parameters, Parameters 266
Eluent Flow Rate 266
Temperature 266
Eluent Composition 267
Exercises 267
CHAPTER 32
258
261
INFRARED SPECTROSCOPY (AND A BIT OF UV-VIS, TOO)
Molecules as Balls on Springs 269
Ah, Quantum Mechanics 270
The Dissonant Oscillator 271
But Wait! There’s More 271
More Complicated Molecules 272
Correlation Tables to the Rescue 272
Troughs and Reciprocal Centimeters 272
Some Functional Group Analysis 278
A Systematic Interpretation 278
Infrared Sample Preparation 281
Liquid Samples 281
Solid Samples 282
Running the Spectrum 287
The Perkin-Elmer 710B IR 289
Using the Perkin-Elmer 710B 290
The 100% Control: An Important Aside
Calibration of the Spectrum 293
IR Spectra: The Finishing Touches 294
Interpreting IR Spectra—Finishing Touches
291
295
268
CONTENTS
The Fourier Transform Infrared (FTIR) 296
The Optical System 296
A Reflectance Attachment: Something to Think About
And UV-VIS Too! 300
Electrons Get to Jump 300
Instrument Configuration 301
Source 301
Sample (and Reference) Cells 302
Solvents 303
Exercises 303
CHAPTER 33
NUCLEAR MAGNETIC RESONANCE
300
304
Nuclei Have Spin, Too 305
The Magnetic Catch 305
Everybody Line Up, Flip, and Relax 306
A More Sensitive Census 306
The Chemical Shift 307
T for One and Two 307
Be It Better Resolved . . . 308
Incredibly Basic FT-NMR 308
NMR Sample Preparation 309
Some NMR Terms and Interpretations 312
The Chemical Shift and TMS Zero 312
Integration and Labeling 314
Threaded Interpretations: Spectrum #1 (t-butyl alcohol) 315
Threaded Interpretations: Spectrum #2 (Toluene) and Spectrum #3
(p-Dichlorobenzene) 315
Threaded Interpretations: Spectrum #4 (Ethylbenzene) and Spectrum #5
(A Double Resonance Experiment) 319
Use a Correlation Chart 320
Exercises 323
CHAPTER 34
THEORY OF DISTILLATION
324
Class 1: Simple Distillation 325
Clausius and Clapeyron 327
Class 3: Fractional Distillation 328
A Hint from Dalton 328
Dalton and Raoult 329
A Little Algebra 329
Clausius and Clapeyron Meet Dalton and Raoult
Dalton Again 331
What Does It All Mean? 332
Reality Intrudes I: Changing Composition 335
330
xiii
xiv
CONTENTS
Reality Intrudes II: Nonequilibrium Conditions
Reality Intrudes III: Azeotropes 336
Other Deviations 338
Class 4: Steam Distillation 339
CHAPTER 35
INDEX
345
THEORY OF EXTRACTION
342
336
SAFETY FIRST, LAST, AND ALWAYS
2
3
4
5
6
7
8
9 10 11 12 13 14 15 16 17 18 19 20 21 22 23 24 25 26 27 28 29 30 31 32 33 34 35
chapter
1
■
Wear your goggles over your
eyes.
■
If you don’t know where a waste
product goes—ASK!
■
Careful reading can prevent failure.
The organic chemistry laboratory is potentially one of the most dangerous of undergraduate laboratories. That is why you must have a set of safety guidelines. It is a very
good idea to pay close attention to these rules, for one very good reason:
The penalties are only too real.
Disobeying safety rules is not at all like flouting many other rules. You can get
seriously hurt. No appeal. No bargaining for another 12 points so you can get into
medical school. Perhaps as a patient, but certainly not as a student. So, go ahead.
Ignore these guidelines. But remember—
You have been warned!
1. Wear your goggles. Eye injuries are extremely serious but can be mitigated
or eliminated if you keep your goggles on at all times. And I mean over your
eyes, not on top of your head or around your neck. There are several types
of eye protection available, some of them acceptable, some not, according
to local, state, and federal laws. I like the clear plastic goggles that leave an
unbroken red line on your face when you remove them. Sure, they fog up a bit,
but the protection is superb. Also, think about getting chemicals or chemical
fumes trapped under your contact lenses before you wear them to lab. Then
don’t wear them to lab. Ever.
2. Touch not thyself. Not a Biblical injunction, but a bit of advice. You may have
just gotten chemicals on your hands in a concentration that is not noticeable, and,
sure enough, up go the goggles for an eye wipe with the fingers. Enough said.
3. There is no “away”. Getting rid of chemicals is a very big problem. You throw
them out from here, and they wind up poisoning someone else. Now there are
some laws to stop that from happening. The rules were really designed for
industrial waste, where there are hundreds of gallons of waste that all has the
same composition. In a semester of organic lab, there will be much smaller
amounts of different materials. Waste containers could be provided for everything, but this is not practical. If you don’t see the waste can you need, ask
your instructor. When in doubt, ask.
4. Bring a friend. You must never work alone. If you have a serious accident and
you are all by yourself, you might not be able to get help before you die. Don’t
work alone, and don’t work at unauthorized times.
5. Don’t fool around. Chemistry is serious business. Don’t be careless or clown
around in lab. You can hurt yourself or other people. You don’t have to be somber about it—just serious.
6. Drive defensively. Work in the lab as if someone else were going to have an
accident that might affect you. Keep the goggles on because someone else is
going to point a loaded, boiling test tube at you. Someone else is going to spill
hot, concentrated acid on your body. Get the idea?
7. Eating, drinking, or smoking in lab. Are you kidding? Eat in a chem lab??
Drink in a chem lab??? Smoke, and blow yourself up????
2
SAFETY FIRST, LAST, AND ALWAYS
3
8. The iceman stayeth, alone. No food in the ice machine. “It’s in a plastic bag,
and besides, nobody’s spilled their product onto the ice yet.” No products cooling in the ice machine, all ready to tip over, either. Use the scoop, and nothing
but the scoop, to take ice out of the machine. And don’t put the scoop in the
machine for storage, either.
9. Keep it clean. Work neatly. You don’t have to make a fetish out of it, but try
to be neat. Clean up spills. Turn off burners or water or electrical equipment
when you’re through with them. Close all chemical containers after you use
them. Don’t leave a mess for someone else.
10. Where it’s at. Learn the locations and proper use of the fire extinguishers, fire
blankets, safety showers, and eyewash stations.
11. Making the best-dressed list. Keep yourself covered from the neck to the
toes—no matter what the weather. That might include long-sleeved tops that
also cover the midsection. Is that too uncomfortable for you? How about a
chemical burn to accompany your belly button, or an oddly shaped scar on
your arm in lieu of a tattoo? Pants that come down to the shoes and cover any
exposed ankles are probably a good idea as well. No open-toed shoes, sandals,
or canvas-covered footwear. No loose-fitting cuffs on the pants or the shirts.
Nor are dresses appropriate for lab. Keep the midsection covered. Tie back
that long hair. And a small investment in a lab coat can pay off, projecting that
extra professional touch. It gives a lot of protection, too. Consider wearing
disposable gloves. Clear polyethylene ones are inexpensive, but the smooth
plastic is slippery, and there’s a tendency for the seams to rip open when you
least expect it. Latex examination gloves keep their grip and don’t have seams,
but they cost more. Gloves are not perfect protectors. Reagents like bromine
can get through and cause severe burns. They’ll buy you some time, though,
and can help mitigate or prevent severe burns. Oh, yes—laboratory aprons:
They only cover the front, so your exposed legs are still at risk from behind.
12. Hot under the collar. Many times you’ll be asked or told to heat something.
Don’t just automatically go for the Bunsen burner. That way lies fire. Usually—
No flames!
Try a hot plate, try a heating mantle (see Chapter 17, “Sources of Heat”), but
try to stay away from flames. Most of the fires I’ve had to put out started when
some bozo decided to heat some flammable solvent in an open beaker. Sure,
there are times when you’ll have to use a flame, but use it away from all flammables and in a hood (Fig. 1.1), and only with the permission of your instructor.
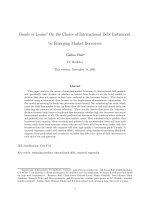
13. Work in the hood. A hood is a specially constructed workplace that has, at
the least, a powered vent to suck noxious fumes outside. There’s also a safety
glass or plastic panel you can pull down as protection from exploding apparatus (Fig. 1.1). If it is at all possible, treat every chemical (even solids) as if
toxic or bad-smelling fumes can come from it, and carry out as many of the
operations in the organic lab as you can inside a hood, unless told otherwise.
4
CHAPTER 1
SAFETY FIRST, LAST, AND ALWAYS
Air flow meter
and alarm
Light switch
Safety shield
(pull down in
case of disaster)
Handles for
services, air
Gas
Steam
Cold water
(front)
Cold water
(in back)
Forced air flow
FIGURE 1.1
A typical hood.
14. Keep your fingers to yourself. Ever practiced “finger chemistry”? You’re unprepared so you have a lab book out, and your finger points to the start of a sentence. You move your finger to the end of the first line and do that operation—
“Add this solution to the beaker containing the ice-water mixture”
And WHOOSH! Clouds of smoke. What happened? The next line reads—
“very carefully as the reaction is highly exothermic.”
But you didn’t read that line, or the next, or the next. So you are a danger to
yourself and everyone else. Read and take notes on any experiment before you
come to the lab (see Chapter 2, “Keeping a Notebook”).
15. Let your eyes roam. Not over to another person’s exam paper, but all over the
entire label of any reagent bottle. You might have both calcium carbonate and
calcium chloride in the laboratory, and if your eyes stop reading after the word
“calcium,” you have a good chance of picking up and using the wrong reagent.
At the very least, your experiment fails quietly. You don’t really want to have
a more exciting exothermic outcome. Read the entire label and be sure you’ve
got the right stuff.
16. What you don’t know can hurt you. If you are not sure about an operation,
or you have any question about handling anything, please ask your instructor
before you go on. Get rid of the notion that asking questions will make you
look foolish. Following this safety rule may be the most difficult of all. Grow
up. Be responsible for yourself and your own education.
17. Blue Cross or Blue Shield? Find out how you can get medical help if you
need it. Sometimes, during a summer session, the school infirmary is closed,
and you would have to be transported to the nearest hospital.
DISPOSING OF WASTE
5
18. What’s made in Vegas, stays in Vegas. You’re preparing a compound, and you
have a question about what to do next. Perhaps your instructor is in the instrument room, or getting materials from the stockroom, or even just at the next
bench with another student. Don’t carry your intermediate products around;
go a capella (without accompaniment of beakers, flasks, or separatory funnels
filled with substances) to your instructor and ask that she come over and see
what you’re talking about. Do not ever carry this stuff out of the main lab, or
across or down a hallway—ever. A small vial of purified product to be analyzed in the instrument room, sure. But nothing else.
19.
20.
A-a-a-a-a-a-c-h-o-o-o-o-o-o! Allergies. Let your instructor know if you have
any allergies to specific compounds or classes of compounds before you start
the lab. It’s a bit difficult to bring these things up while you’re scratching a
rash. Or worse.
Do you know where the benchtops have been? You put your backpack down
on the benchtop for a while. Then, you pick it up and put it somewhere else.
Did you just transfer some substance from the benchtop with your backpack?
Perhaps your pens were rolling around on the benchtop and picked up a
substance themselves and you didn’t know it? Often wearing protection
doesn’t help; gloves can transfer chemicals to your pen (and you can’t tell
because your hands are covered), and that pen might go where? Behind the
ear? In the mouth?
These are a few of the safety guidelines for an organic chemistry laboratory.
You may have others particular to your own situation.
ACCIDENTS WILL NOT HAPPEN
That’s an attitude you might hold while working in the laboratory. You are not going to do anything or get anything done to you that will require medical attention. If
you do get cut, and the cut is not serious, wash the area with water. If there’s serious
bleeding, apply direct pressure with a clean, preferably sterile, dressing. For a minor
burn, let cold water run over the burned area. For chemical burns to the eyes or skin,
flush the area with lots of water. In every case, get to a physician if at all possible.
If you have an accident, tell your instructor immediately. Get help! This is
no time to worry about your grade in lab. If you put grades ahead of your personal
safety, be sure to see a psychiatrist after the internist finishes.
DISPOSING OF WASTE
Once you do your reaction, since your mother probably doesn’t take organic lab with
you, you’ll have to clean up after yourself. I hesitated to write this section for a very
long time because the rules for cleaning up vary greatly according to, but not limited to, federal, state, and local laws, as well as individual practices at individual
6
CHAPTER 1
SAFETY FIRST, LAST, AND ALWAYS
colleges. There are even differences—legally—if you or your instructor do the cleaning up. And, as always, things do seem to run to money—the more money you have
to spend, the more you can throw away. So there’s not much point in even trying to
be authoritative about waste disposal in this little manual, but there are a few things I
have picked up that you should pay attention to. Remember, my classification scheme
may not be the same as the one you’ll be using. When in doubt, ask! Don’t just throw
everything into the sink. Think.
Note to the picky: The word nonhazardous, as applied here, means relatively
benign, as far as organic laboratory chemicals go. After all, even pure water,
carelessly handled, can kill you.
How you handle laboratory waste will depend upon what it is. Here are some
classifications you might find useful:
1. Nonhazardous insoluble waste. Paper, corks, sand, alumina, silica gel, sodium
sulfate, magnesium sulfate, and so on can probably go into the ordinary wastebaskets in the lab. Unfortunately, these things can be contaminated with hazardous waste (see the following items), and then they need special handling.
2. Nonhazardous soluble solid waste. Some organics, such as benzoic acid, are
relatively benign and can be dissolved with a lot of tap water and flushed down
the drains. But if the solid is that benign, it might just as well go out with the
nonhazardous insoluble solid waste, no? Check with your instructor; watch
out for contamination with more hazardous materials.
3. Nonhazardous soluble liquid waste. Plain water can go down the drains, as
well as water-soluble substances not otherwise covered below. Ethanol can
probably be sent down the drains, but butanol? It’s not that water soluble, so it
probably should go into the general organic waste container. Check with your
instructor; watch out for contamination with more hazardous materials.
4. Nonhazardous insoluble liquid waste. These are compounds such as 1-butanol
(previously discussed), diethyl ether, and most other solvents and compounds
not covered otherwise. In short, this is the traditional “organic waste” category.
5. Generic hazardous waste. This includes pretty much all else not listed separately. Hydrocarbon solvents (hexane, toluene), amines (aniline, triethylamine),
amides, esters, acid chlorides, and on and on. Again, traditional “organic waste.”
Watch out for incompatibilities, though, before you throw just anything in any
waste bucket. If the first substance in the waste bucket was acetyl chloride and
the second is diethylamine (both hazardous liquid wastes), the reaction may be
quite spectacular. You may have to use separate hazardous waste containers for
these special circumstances.
6. Halogenated organic compounds. 1-Bromobutane and tert-butyl chloride,
undergraduate laboratory favorites, should go into their own waste containers as “halogenated hydrocarbons.” There’s a lot of agreement on this procedure for these simple compounds. But what about your organic unknown,
DISPOSING OF WASTE
7
4-bromobenzoic acid? I’d have you put it and any other organic with a
halogen in the “halogenated hydrocarbon” container and not flush it down
the drain as a harmless organic acid, as you might do with benzoic acid.
7. Strong inorganic acids and bases. Neutralize them, dilute them, and flush
them down the sink. At least as of this writing.
8. Oxidizing and reducing agents. Reduce the oxidants and oxidize the reductants before disposal. Be careful! Such reactions can be highly exothermic.
Check with your instructor before proceeding.
9. Toxic heavy metals. Convert to a more benign form, minimize the bulk, and
put in a separate container. If you do a chromic acid oxidation, you might reduce the more hazardous C6ϩ to Cr3ϩ in solution and then precipitate the Cr3ϩ
as the hydroxide, making lots of expensive-to-dispose-of chromium solution
into a tiny amount of solid precipitate. There are some gray areas, though.
Solid manganese dioxide waste from a permanganate oxidation should probably be considered a hazardous waste. It can be converted to a soluble Mn2ϩ
form, but should Mn2ϩ go down the sewer system? I don’t know the effect of
Mn2ϩ (if any) on the environment. But do we want it out there?
Mixed Waste
Mixed waste has its own special problems and raises even more questions. Here are
some examples:
1. Preparation of acetaminophen (Tylenol): a multistep synthesis. You’ve just
recrystallized 4-nitroaniline on the way to acetaminophen, and washed and
collected the product on your Buchner funnel. So you have about 30–40 mL of
this really orange solution of 4-nitroaniline and by-products. The nitroaniline
is very highly colored, the by-products probably more so, so there isn’t really
a lot of solid organic waste in this solution, not more than perhaps 100 milligrams or so. Does this go down the sink, or is it treated as organic waste? Remember, you have to package, label, and transport to a secure disposal facility
what amounts to 99.9% perfectly safe water. Check with your instructor.
2. Preparation of 1-bromobutane. You’ve just finished the experiment and
you’re going to clean out your distillation apparatus. There is a residue of
1-bromobutane coating the three-way adapter, the thermometer, the inside of
the condenser, and the adapter at the end. Do you wash the equipment in the
sink and let this minuscule amount of a halogenated hydrocarbon go down the
drain? Or do you rinse everything with a little acetone into yet another beaker
and pour that residue into the “halogenated hydrocarbon” bucket, fully aware
that most of the liquid is acetone and doesn’t need special halide treatment?
Check with your instructor.
3. The isolation and purification of caffeine. You’ve dried a methylene chloride extract of caffeine and are left with methylene chloride–saturated drying
agent. Normally a nonhazardous solid waste, no? Yes. But where do you put
8
CHAPTER 1
SAFETY FIRST, LAST, AND ALWAYS
this waste while the methylene chloride is on it? Some would have you put
it in a bucket in a hood and let the methylene chloride evaporate into the
atmosphere. Then the drying agent is nonhazardous solid waste. But you’ve
merely transferred the problem somewhere else. Why not just put the whole
mess in with the “halogenated hydrocarbons”? Usually, halogenated hydrocarbons go to a special incinerator equipped with traps to remove HCl or
HBr produced by burning. Drying agents don’t burn very well, and the cost
of shipping the drying agent part of this waste is very high. What should you
do? Again, ask your instructor.
In these cases, as in many other questionable situations, I tend to err on the
side of caution and consider that the bulk of the waste has the attributes of its most
hazardous component. This is, unfortunately, the most expensive way to look at the
matter. In the absence of guidelines,
1. Don’t make a lot of waste in the first place.
2. Make it as benign as possible. (Remember, though, that such reactions can be
highly exothermic, so proceed with caution.)
3. Reduce the volume as much as possible.
Oh: Try to remember that sink drains can be tied together, and if you pour
a sodium sulfide solution down one sink while someone else is diluting an acid in
another sink, toxic, gagging, rotten-egg-smelling hydrogen sulfide can back up the
drains in your entire lab, and maybe even the whole building.
MATERIAL SAFETY DATA SHEET (MSDS)
The MSDS for any substance is chock-full of information, including but not
limited to the manufacturer, composition (for mixtures), PEL (Permissible Exposure Limit), TLV (Threshold Limit Value), boiling point, melting point, vapor
pressure, flash point, and on and on and on. These data sheets are very complete, very thorough, and very irrelevant to working in the undergraduate organic
chemistry laboratory. Period.
Don’t take my word for it. One outfit, Interactive Learning Paradigms Incorporated (www.ilpi.com/msds.index.html), clearly states: “An MSDS reflects
the hazards of working with the material in an occupational fashion. For example,
an MSDS for paint is not highly pertinent to someone who uses a can of paint
once a year, but is extremely important to someone who does this in a confined
space 40 hours a week.”
And probably less pertinent, if that’s even possible, to someone who will work
with 1-bromobutane once in a lifetime.
So if you’re teaching organic lab, that’s one thing. If you’re taking organic
lab, well, stick to hazard data and references in the other handbooks and you’ll be
knowledgeable enough.
GREEN CHEMISTRY AND PLANNING AN ORGANIC SYNTHESIS
9
GREEN CHEMISTRY AND PLANNING
AN ORGANIC SYNTHESIS
While it is always good to “reduce, reuse, recycle,” unless you’re developing new
experiments you don’t really have any control over these things. But if you have to
plan an organic synthesis from the ground up, might as well do it right.
1. Eschew the older literature! ’Fraid so. Many places will initially steer you to
Organic Syntheses, which runs from 1932 to the present, as the syntheses there
have been checked and will work as advertised. Unfortunately, for the early work
there, and in many other places, being green just wasn’t even thought about. So
be careful. A historical collection of techniques in a reference with a current
copyright date can detail reactions that would not be considered green today.
2. Teaching over research. A better place to look is The Journal of Chemical Education, rather than the traditional research resources. While a large research
group at a large university can have the resources (read money) to have toxic
materials disposed of properly, “one-man shops” at community colleges are
under greater pressure to reduce the costs of waste disposal, and, while they
may not be the ones to originally develop a greener method from the highpowered research lab, they certainly exploit it, often in an inspired fashion.
3. Make what you want, but use what you make. You’ll have to decide on just
how much product you’ll need to synthesize. And it depends upon the scale of
your apparatus.
• Microscale. For a solid product, target at least 200 mg. This should be
enough for a melting point, an IR, and an NMR, plus some to hand in to
show you made it. If you have to, you can easily recover your product from
the NMR solvent; IR might be too problematic to bother about. For a liquid
product, besides the tests, there might be drying and distillation, so about
2 mL might be your target. Don’t forget to use the density of the liquid to
calculate the mass you’ll need to use for your stoichiometric calculations.
• Miniscale. About 5 g for a solid; about 10 mL of a liquid. Just guidelines,
now. The consequences of losing product at any stage are greatly reduced.
Doesn’t mean you should be sloppy with your technique, though.
4. Plan to lose. Now that you know how much you’re planning to make, assume
you won’t be making it in a perfect yield. For first-time-this-has-ever-beendone reactions, you might get 40%; if the reaction has been done before, and
you have a published procedure with a posted yield, but you’ve never done this
before, add a 10% penalty. Then calculate back to get the amount of starting
materials you’ll need based on this lower yield.
5. Timing is everything. Generally, the reaction times shouldn’t be reduced. Paradoxically, if you have the time, you can take the time to find out by running
the experiment over and over again using different reaction times to find the
best time. If the published procedure uses half-molar quantities (large-scale