Tài liệu Nghệ thuật xếp hình Nhật Bản:jonathon_2 pptx
Bạn đang xem bản rút gọn của tài liệu. Xem và tải ngay bản đầy đủ của tài liệu tại đây (18.39 KB, 5 trang )
Jonathon Jump Ant
By Perry Bailey c 1999
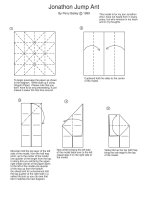
To begin precrease the paper as shown
in the diagram. White side up if using
Origami Paper. Please note that you
don’t have to do any precreasing, it just
makes it easier the first time around.
This model is for my son Jonathon
who I have not heard from in many
years, but who remains in my heart
and in my thoughts.
1
2
3
4
Cupboard fold the sides to the center
of the model.
Mountain fold the top layer of the left
side of the model, from the half way
point, up to the center of the model
one quarter of the length from the top.
In doing this you will bring the upper
right inside corner of the paper down
to the left of the model one quarter
of the way up from the bottom.
Go ahead and for convenience fold
the top quarter of the right side in a
valley fold just so you can see that
flat it matches the next diagram.
Now while bringing the left side
of the model back over to the left
repeat step 3 on the right side of
the model.
Valley fold up the top (left) flap
bring the raw edge to the top
of the model.
5
Valley fold all the upper layers
to the right.
Valley fold the flap up to the
top of the model.
Mountain fold the bottom
2 Layers of the model under
to the left.
Perform an Inside reverse fold
on both sides (flaps). This will
give you three points, and a good
start on half of the legs.
Valley fold top layer down so
the raw edge is even with the
bottom edge of the flap, then
unfold.
Inside reverse fold the flap
along the lines of the crease
made in the previous step.
Valley fold down the flap created
by the reverse fold.
6
7 8
9
10
11
12
13
Repeat step 10 through 12
on the other side of the
model.
Reverse fold the flap
sticking up on each side
into the model.
14
Perform an open sink on the
center flap making it even with the
side flaps, you will need to open up
the top of the model to do this.
(Unless you are a masochist and
then feel free to make it as hard to do
as you like, things like, not precreasing
the sink, and so on.)
At this point the view looking
down at the model from above
should slightly resemble This,
in a vague sort of way.
15
16
16a
At this point half of the
legs are made, you may
pat yourself on the back.
Bring the back 2 layers from behind.
17
18
Now repeat step 3 through 17 on the
bottom of the model.
Valley fold the top flap to the right of
the model. There are many layers at
this point and it becomes a little more
difficult to work with.
Valley fold the top half of the model
down, this will make it easier to work
with.
19
20
First of all, I have enlarged the diagram to
make it easier to read and easier for me to
draw. Take the top leg or flap of the 3 on
the side facing up and do an inside
reverse fold.
Now to show this next step I am going to separate
the top leg from the rest of the model to make it
less confusing visually.
Fold over the top layer
of the leg to the left, this opens up
the leg so we can lock it into place.
Now to lock the leg in place lift up
the flap or top layer of the leg and
tuck the right half of the leg into the
left half. On the center leg of each
side there will be more than one layer
to lift.
Repeat steps 23 - 25 on all of the legs.
21
22
23
24
25
26
This is how the individual
legs should look.
Now to finish the model, you make an accordion fold on the
front of the Jump Ant to form the head. Then just a mountain
fold on each side of the back of the model to form it’s body.
I suggest that you spread the legs by holding the center Leg
and then spread the legs on the sides out.
Now to make Jonathon Jump Ant jump, just tap him where the lines converge and
watch him jump!!
27