Tài liệu Nghệ thuật xếp hình Nhật Bản:katana_2 docx
Bạn đang xem bản rút gọn của tài liệu. Xem và tải ngay bản đầy đủ của tài liệu tại đây (12.98 KB, 4 trang )
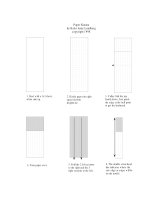
Paper Katana
by Kalei Anne Lundberg
copyright 1998
1. Start with a 1x3 sheet,
white side up.
2. Divide paper int eight
equal sections
lengthwise.
3. V a lle y fold the top
fourth down. Just pinch
the edge at the half point
to get the landmark.
4. Turn paper over.
5. Fold the 2 left sections
to the right and the 3
right sections to the left.
6. The double arrowhead
line indicates where the
ra w e dge or e dge s w ill be
on the model.
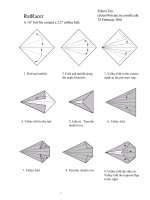
Paper Katana -- Page 2
7. Slip the 2 sections
underneath into the top
section. Note where the
raw edges lay.
8. Roll the tube over one
section at a time and
sharply crease. Twice.
9. Fold the right section
to the left on top and the
left section the right
behind.
11. Unfold to step 8.
Crease the two lines
shown by aligning ab
along bd and then cd
along bd.
N ote : T his is
w ha t it w ill
look like when
viewed ftom
the top..
10. Fold top section in
half. Crease sharply.
Repeat behind.
Top view.
Note: The center
section, front and
ba c k w ill be c om e
the outside
surfaces. The
divided sections will
be c olla pse d into the
m ode l. T his is the
tricky part.
Paper K atana -- Page 3
12. This fold involves spreading, sinking and colapsing all in one step. Don't panic.
W ork c a re fully a nd it w ill fa ll into place. Start by folding the colored section (the
hilt/guard) at a right angle to the white (blade) section and opening the tube. Pinch
the corners to spread along the creases made in step 11 to the center (undivided)
se c tions. M a ke sure it w ill la y fla t on e ithe r s ide of the bla de . T he re st of the fold
w ill ha ve to be c om ple te d off the ta ble .
Beginning at the top collapse the hilt accordian style. (not all the folds will be going
the right way. Just ease them in gently, following existing creases.) When it won't
flatten easily, start to sink the blade upward into the hilt. This is accomplished by
small rocking motions and alternate pinches at the outside corners until the guard is
formed and falls flat and evenly over both sides of the blade. Note how the center
section lies. If your model looks like the finished diagram...You have done it!!!
Congratulations.
Top view
of the
collapse.
start
Finished
Two side views, one
during the collapse ,
one after, showing the
blade sunk into the hilt.
13. Fold the guard section
upwards on both sides.
Make the diagonal
creases as in step 11.
14. Fold the guard down
to form a platform at a
right angle to the blade.
Be careful to keep the
paper inside the tube lined
up and collapse the blade
jus t like the hilt. N o
sinking motion this time.
15. There should now
be two guard platforms.
One white and one
c olore d. S lip the w hite
under the layer of
colored paper one side
at a time to create a
single colored guard.
16. Under views of the
guard. Fold the outside
points to the edge of the
blade and hide the folds
under the top layer to round.
17. Close up of the blade
tip. Fold a ll la ye rs up
along line and crease.
18. After preforming an
asymmertrical inside
reverse a small flag will
be pushed to the outside.*
Paper Katana -- Page 4
* Basically what needs to be done is to fold the tip to the inside along the crease mande in 17. There
w ill be m ore pa pe r on one side of the fold tha n the othe r a nd w he n it c om es through on the back it
w ill pus h a s m a ll bit of pa pe r outw a rd in one of the tw o se c tions . F old this fla g ove r a nd into the
valley of the other section to lock the tip closed.
19. Pinch the front and back sections of the hilt together
to form a star shaped handle. You are done. A small
dot of glue (Yes, I did use the G-word) inside the hilt
w ill he lp to hold the s ta r sha pe but isn't re a lly necessary.
Sta rting w ith a 10" pa pe r c ut into thirds the m ode l w ill be a bout 6 inches.