Tài liệu Nghệ thuật xếp hình Nhật Bản: MARTINI pptx
Bạn đang xem bản rút gọn của tài liệu. Xem và tải ngay bản đầy đủ của tài liệu tại đây (25.7 KB, 3 trang )
Martini Glass (or Birdbath)
Copyright 1998-99 Stephen Hecht. All Rights Reserved
Begin with a rectangle of proportions 7 x 3. A rectangle 248mm x 106mm yields a model 65mm tall, with a 43mm
base diameter and a 68mm top diameter. Although I designed the model for a dollar bill, I don’t recommend using
one, as the process is unpleasant, and the product is small and ugly.
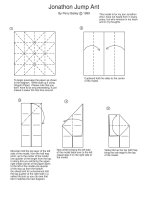
1. Begin with white side up. Divide
into 1/12ths with valley-creases.
(After the 1/3 lines, it’s pretty easy.)
2. Soft valley-fold.
Repeat at right end.
3. Mountain-fold all the way
across the bottom. Unfold
completely.
4. Valley-fold on same
crease. Unfold.
5. Valley top edge to
a little bit below the
crease. Unfold.
6. Mountain on
same crease.
Unfold.
7. Add mountain-
creases, bisecting the
little rectangles.
8. Add mountain-
creases (see next
step for technique).
1
2
3
3
8a. Technique: grab a
pleat, swing bottom
under until perpendicular,
then spread bottom of
pleat, pinching the
mountain-fold.
9. Add more
mountain-creases
(see next step for
technique).
1
2
3
3
9a. Technique: similar to 8a.
Martini Glass (continued)
Copyright 1998-99 Stephen Hecht. All Rights Reserved
10. Add mountain and valley
creases (see next 2 steps for
technique).
10a. (other side!) Technique:
grab a pleat...
10b. ...and valley through
both layers of the pleat, and
unfold.
1
2
3
5
6
8
9
11
12
4
7
10
11. Back to white side. Extend middle
mountain crease to bottom edge in
sectors 4, 7, and 10.
12. Roll into a tube on the 1/12 valley creases.
Two segments will overlap (doesn’t matter
which are on top).
13. Pinch the middle region,
using the 1/12 creases and
their bisectors. Keep the two
overlapped sectors together as
a single layer.
14. Distribute the middle ridges
cylindrically, then spread and
flatten the base, while rounding
the top into a 10-sided cone.
No new creases!
buckled
edges
two-ply
overlapped
edges
4
7
10
15. View from below. Form
a septagon, using the
extended mountain-creases
in sectors 4, 7, and 10 to
buckle three of the triangles.
Martini Glass (continued)
Copyright 1998-99 Stephen Hecht. All Rights Reserved
16. (Enlarged) Pleat each
loose flap in thirds.
17. Tuck pleated flap into
the pocket. Repeat with
other two flaps. Some
shifting needed.
18. Trim corners.
19. This is a single vertical ridge of the “stem”, with
attached section of base and bowl.
Using existing creases (from step 10), fold in half, but
only until perpendicular. Note valley fold at base. Also
note mountain folds at the top, which don’t flatten.
Repeat all the way around the stem, keeping overlap
together, and treating some edges two-at-a-time. Gradually
tighten up the structure, bit-by-bit. Patience!
20. Top of the “bowl”.
Flip over tiny rim.
21. Stretch pleats all the
way around, adjust,
flatten, sharpen.
22. Finished.