Tài liệu Getting Started With ASP.NET (P2) docx
Bạn đang xem bản rút gọn của tài liệu. Xem và tải ngay bản đầy đủ của tài liệu tại đây (283.79 KB, 20 trang )
Getting Started With ASP.NET
37
q Write – If the write permission on a virtual directory is enabled, then users will be able to create or
modify files within the directory, and change the properties of these files. This is not normally
turned on, for reasons of security and we don't recommend you alter it.
q Directory Browsing If you want to allow people to view the contents of the directory (that is, to see
a list of all the files that are contained in that directory), then you can allow this by checking the
Directory Browsing option.
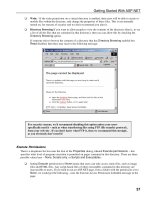
If someone tries to browse the contents of a directory that has Directory Browsing enabled but
Read disabled, then they may receive the following message:
For security reasons, we'd recommend disabling this option unless your users
specifically need it – such as when transferring files using FTP (file transfer protocol),
from your web site . If you don't know what FTP is, then we recommend this strongly,
as you obviously don't need it!
Execute Permissions
There's a dropdown list box near the foot of the Properties dialog, labeled Execute permissions – this
specifies what level of program execution is permitted on pages contained in this directory. There are three
possible values here – None, Scripts only, or Scripts and Executables:
q Setting Execute permissions to None means that users can only access static files, such as image
files and HTML files. Any script-based files of other executables contained in this directory are
inaccessible to users. If you tried to run an ASP.NET page, from a folder with the permission set to
None, we would get the following – note the Execute Access Permission forbidden message in the
page:
Chapter 1
38
q Setting Execute permissions to Scripts Only means that users can also access any script-based
pages, such as ASP.NET pages. So if the user requests an ASP.NET page that's contained in this
directory, the web server will allow the ASP.NET code to be executed, and the resulting HTML to
be sent to the browser.
q Setting Execute permissions to Scripts and Executables means that users can execute any type of
file type that's contained in the directory. It's generally a good idea to avoid using this setting, in
order to prohibit users from executing potentially damaging applications on your web server.
For any directory containing ASP.NET files that you're publishing, the appropriate setting for the Execute
permissions is Scripts Only. Now you've started to familiarize yourself with IIS, you're ready to prepare your
machine for the installation of ASP.NET itself.
Prerequisites for installing ASP.NET
Before you can install ASP.NET or the .NET Framework you will need to install the Microsoft Data Access
Components (MDAC) version 2.7 or later. This is a set of components that will enable you to use ASP.NET to
communicate with databases and display the contents of your database on a web page. Without these
components installed you won't be able to run any of the database examples in this book. This will affect
examples as early as Chapter 2, so please don't skip this stage! Although you might already have an earlier
version of MDAC installed (such as 2.5 if you're using Windows 2000), unless you have specifically
upgraded, in all likelihood you won't have the most up to date version and will still need to upgrade.
The Microsoft Data Access Components is a small download (roughly 5 or 6 MB) available for free from
Microsoft's site at .
Getting Started With ASP.NET
39
As of writing, Microsoft hadn't yet placed 2.7 at the above URL, as it was still in beta. If you
can only find version 2.6 at this location, we suggest trying
Alternatively you
can look at for a list of the latest .NET resources.
The installation for MDAC 2.7 is pretty straightforward, but we'll run through it quickly just to make sure that
everything is clear.
Try It Out – Installing MDAC 2.7
1. MDAC 2.7 comes as file MDAC_typ_dnld.exe that you will need to run. Once you have run it, it will
ask you for a location where you wish to download the files. Type in an appropriate location:
2. In fact rather confusingly, it seems only to download one file, MDAC_TYPE.EXE to the pre-
specified location. If you run this EXE file, then it will begin the installation process.
3. After agreeing to the terms of the license, there's a good chance that you will be asked to reboot our
system, it will tell you this in advance.
4. Then the installation process will continue without requiring further intervention, although you
might have to wait for a system reboot, if one was specified earlier.
You're now ready to install ASP.NET.
Chapter 1
40
Installing ASP.NET and the .NET Framework SDK
We're almost ready to install ASP.NET, but there are two important points to be made beforehand.
First, there are two different types of installation available from Microsoft's site, the .NET Framework SDK
and ASP.NET. The .NET Framework SDK already contains ASP.NET, so you do not need to download both
separately. You only need to download one. Both downloads contain ASP.NET, VB.NET, and the .NET
Framework.
The ASP.NET Premium Edition download is a smaller, streamlined download that only contains the bare
bones needed for you to run ASP.NET and the .NET framework. None of the extra documentation or samples
will be included. The size differential between the two is pretty big (ASP.NET is 18MB while the .NET
Framework SDK is a staggering 123MB), so unless you have the .NET Framework SDK on CD (which you
can order from the Microsoft site) or broadband high-speed Internet access, you'll probably want to download
the ASP.NET version.
Don't worry, this won't affect your ability to run the examples in this book – everything's been written so that
it will run on the ASP.NET Premium Edition. While you won't have direct access to the help files, all support
materials are available online at Microsoft's site.
Don't worry about replacing an existing Classic ASP installation, since ASP.NET will be installed alongside
ASP and they will both continue to work with no action from us.
We'll now walk you through a typical installation of both ASP.NET Premium Edition and the .NET
Framework SDK. The installation process is the same for Windows 2000 and Windows XP, so once again
we're only going to detail the installation process on the former. Although the wizard looks a bit different on
XP, it asks for exactly the same things .
Try It Out – Installing ASP.NET
1. Click on setup.exe and after confirming that you do want to install ASP.NET Premium, and
after a short interval, you are propelled into the setup wizard:
Getting Started With ASP.NET
41
2. Click on Next and accept the License agreement to continue. The next dialog after the license
agreement will ask you where you wish to install ASP.NET:
3. Unless you have good reason to, we suggest leaving the location as the one specified by the setup
wizard, and then click on Next. ASP.NET will now install without further intervention:
4. You will be notified when installation has finished, and unlike with the MDAC 2.7, you probably
won't have to reboot. We can now go to the testing section and check everything is working.
Chapter 1
42
Installing the .NET Framework SDK
1. Click on setup.exe and after confirming that you do want to install the NET Framework SDK
package, and after an interval of a few minutes, you are propelled into the setup wizard:
2. Click on Next and accept the License agreement to continue. The next dialog after the license
agreement will ask you which different pieces of the SDK you need to install. You should check all
of them, although if you're short of hard drive space, you could choose to omit the SDK_Samples
or documentation. The Software Development Kit is essential:
3. After clicking on Next you get to a dialog that specifies the destination folder for the different .NET
Framework SDK samples and bits and pieces. You can choose to install these wherever you want.
More importantly there is a checkbox at the foot of the dialog, which asks you to register
environment variables. This checkbox should be checked, as we will use the environment variables
in later chapters:
Getting Started With ASP.NET
43
Click on Next and the .NET Framework SDK will install without further ado. It shouldn't require a reboot.
Troubleshooting Hints and Tips
The installation process is very straightforward, and will work on the majority of machines. However,
sometimes the particular configuration of your machine will prevent it from installing. Unfortunately we can't
cover all of the possible eventualities, but if it doesn't work on yours, you should check that you have enough
hard disk space, as this is the most common cause of problems. Also try to ensure that the installation process
isn't curtailed half way, as no installer is completely foolproof at removing all the different bits and pieces of
the aborted install and it can cause problems when you try to reinstall, and leave you needing to reformat your
hard drive to get it to work correctly. Other than that, check the list of newsgroups and resources later in this
chapter.
Chapter 1
44
ASP.NET Test Example
Ok, we've now reached the crux of the chapter, checking to see if everything is working correctly. Do you
remember the punctual web server code that we talked about earlier in the chapter – in which we wanted to write
a web page that displays the current time? We'll return to that example now. As you'll see it's quite a simple bit of
code, but it should be more than enough to check that ASP.NET is working Okay.
Try It Out – Your first ASP.NET web page
1. Open up a text editor and type in the following code:
<script language="vb" runat="server">
Sub Page_Load()
time.text=Hour(Now) & ":" & Minute(Now) & ":" & Second(Now)
End Sub
</script>
<html>
<head><title>The Punctual Web Server</title></head>
<body>
<h1>Welcome</h1>
In WebServerLand the time is currently:
<asp:label id="time" runat="server" />
</body>
</html>
We strongly suggest (and will assume throughout) that you use Notepad to code all the examples in this book,
since it will always do precisely what you ask it to and no more. It's therefore a lot easier to track down any
problems you're having, and is a great deal easier than troubleshooting problems caused by FrontPage or
similar web page editors.
2. Save this page as punctual.aspx. Make sure that you save it in the physical folder you created
earlier C:\BegASPNET\Ch01\.
When you save the file, you should double-check that your new file has the correct suffix. It should
be .aspx, since this is how you tell the web server that the page contains ASP.NET code. Be aware
that Notepad (and many other text editors) consider .txt to be the default. So in the Save or Save
As dialog, make sure that you change the Save As type to read All Files, or All Files(*.*),or
enclose the path and filename in quotes.
3. Now start up your browser and type in the following: http://localhost/5040/punctual.aspx


