Tài liệu Troubleshooting Aids phần 2 docx
Bạn đang xem bản rút gọn của tài liệu. Xem và tải ngay bản đầy đủ của tài liệu tại đây (37.39 KB, 8 trang )
Using Group Policy to Automate the EFS Disable Process
If you would like to add the ability to push the disabled setting through Group Policy on a
Windows XP systems joined to a Windows 2000 domain, you can do so by editing the
Sceregvl.inf file. This file resides in the %Windir%\inf folder and represents a list of
registry settings that are exposed in the Local Policy | Security Options section of
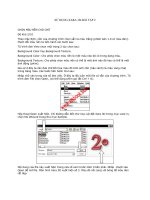
security templates (Fig. 13.13
).
Figure 13.13: The Local Policy | Security Options section of security templates
By adding registry information to the file, you can expose additional entries. This extends
your ability to manage settings through security configuration and analysis or through
Group Policy. The file has two sections: one lists registry keys, [Register Registry
Values], and one details what will appear in the security template, [Strings].
First, add the registry information to the file. The following line should be placed within
the other registry settings in the [Register Registry Values] section:
MACHINE\Software\Microsoft\Windows
NT\CurrentVersion\EFS\EfsConfiguration,4,%EfsConfiguration%,0
The syntax for the entries in the [Register Registry Values] section is:
RegistryPath, RegistryType, DisplayName, DisplayType, Options
The parameters listed above are briefly explained in Table 13.1
.
Table 13.1: Parameters Used in the [Register Registry Values] Section of the Sceregvl.inf
File
Parameter Explanation
RegistryPath
Defines the full path to the registry key and value entry that you want to
expose in the Group Policy Editor user interface (UI). Only values that
exist under the HKEY_LOCAL_MACHINE root key can be configured.
Notice that in the command syntax this root key is referenced by the
MACHINE keyword.
RegistryType
Specifies a number that defines the data type of the registry value to be
created. The following values are acceptable:
1 - REG_SZ
2 - REG_EXPAND_SZ
3 - REG_BINARY
4 - REG_DWORD
7 - REG_MULTI_SZ
DisplayName
Specifies the string that appears in the Security Options section of the
Group Policy Editor UI. This is usually a replaceable parameter that refers
to an entry in the [strings] section of the Sceregvl.inf file.
DisplayName
Indicates the type of dialog that should be displayed to allow the user to
configure a specific setting. The following values are acceptable:
0 - Boolean: Causes the UI to render two radio buttons, which "enable" or
"disable" the registry value. If the Enabled option is selected, the registry
value is set to 1. If the Disabled radio button is chosen, the registry value
is set to 0.
DisplayName1
1 - Numeric: Causes the UI to render a numeric control that allows the
user to type in or select a numeric value in the range of 0 to 99999.
Numeric display types can specify "unit" strings, such as "minutes" or
"seconds", that appear next to the spin control in the UI. These "unit"
strings are defined in the Options field described below. The registry
value is set to the number entered by the user.
2 - String: Causes the UI to render a text box. The registry value is set to
the string entered by the user.
3 - List: Causes the UI to render a list box from which the user can select
an option. The registry value is set to the numeric value associated with
the option chosen by the user. The options presented to the user are
defined in the Options field described below.
Table 13.1: Parameters Used in the [Register Registry Values] Section of the Sceregvl.inf
File
Parameter Explanation
4 - Multivalued (unavailable on Windows 2000): Causes the UI to render
an edit control that allows the user to enter multiple lines of text. This
display type should be used to define values for MULTI_SZ types. The
registry value is set to the strings entered by the user; each line is
separated by a NULL byte.
DisplayName
5 - Bitmask (unavailable on Windows 2000): Causes the UI to render a
series of checkboxes. Each checkbox corresponds to a numeric value
defined in the Options field described below. The registry value is set to
the bitwise OR of the selected values.
Options
Qualifies different DisplayTypes as follows:
If DisplayType=1 (Numeric), the options field may contain a string that
defines the units for the numeric value. The unit string is displayed next to
the spin control in the UI. The unit string has no affect on the value set in
the registry.
If DisplayType=3 (List), the options field defines the list options that are
available to the user. Each option consists of a numeric value separated by
the "pipe" character '|' followed by the text for the choice. The registry
value is set to the numeric value associated with the choice made by the
user.
If DisplayType=5 (Bitmask), the options field defines the choices that are
available to the user. Each choice consists of a numeric value separated by
the "pipe" character '|' followed by the text for the choice. The registry
value is set to the bitwise OR of the choices selected by the user.
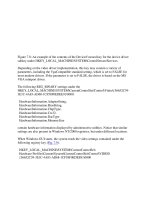
Thus, the command that we have added to the [Register Registry Values] Section
(MACHINE\Software\Microsoft\Windows
NT\CurrentVersion\EFS\EfsConfiguration,4,%EfsConfiguration%, 0) can be explained
as follows:
RegistryPath = MACHINE\Software\Microsoft\Window
NT\CurrentVersion\EFS\EfsConfiguration - This adds the EfsConfiguration value
to the HKEY_LOCAL_MACHINE\Software\Microsoft\Windows
NT\CurrentVersion\EFS registry key.
RegistryType = 4 - The added value must be of the REG_DWORD data type.
DisplayName = %EfsConfiguration% - This references the string value in the
[Strings] section of the Sceregvl.inf file.
Display type = 0 - The dialog represented by the Group Policy Editor UI must
have two radio buttons: Enabled and Disabled.
Now, it is necessary to add a string for display in the GUI to the [strings] section of the
Sceregvl.inf file, for example:
EfsConfiguration = "Public Key Infrastructure: Users cannot encrypt files"
After the required modifications have been introduced into the Sceregvl.inf file, save it
and run the following command at the command prompt:
Regsvr32 scecli.dll
This command is required to register the changes. If the command is accomplished
successfully, a pop-up window will appear.
The list of security options available in the security template now should include your
option; your options also should be found in Group Policy Objects (GPOs) examined on
this machine. To use the security template, set its value to Enabled. Save the template
and import it into a Group Policy linked to the organizational unit (OU) in which
Windows XP computer accounts reside.
Troubleshooting Windows Installer Issues
In Chapter 11
, we considered Windows Installer technology and its relationship to the
system registry. As outlined in that chapter, the executable file that comprises the
Windows Installer service (and is installed on every Windows 2000, Windows XP, or
Windows Server 2003 computer by default) is the Msiexec.exe file. By default, the
Installer service runs in the LocalSystem security context and can perform any system
changes. Besides this, the Installer service can install MSI packages on behalf of the user
logged on to the system. The Installer service can determine if the application installation
is broken or corrupt and can attempt to fix it. Finally, the Installer service can roll back an
application installation if it fails before completion.
Note While an application installation is in progress, Windows Installer creates
temporary files (located in the %SystemDrive%\config.msi folder). During a
rollback, these files are used to undo steps taken before the failure.
Despite the advantages of Windows Installer, you can encounter problems when
installing applications with the technology. In this section, we will briefly consider the
most important problems and discuss some troubleshooting techniques.
Using MSIEXEC from the Command Line
As outlined in Chapter 11
, Windows Installer is a system service. It also can be invoked
interactively by the Msiexec.exe command-line tool, which provides powerful
capabilities for managing your *.msi packages.
The syntax used by the Msiexec.exe command-line tool is:
msiexec.exe /command line option <argument>
Here, argument must be the path and name of the file. The most common command-line
options used with the Msiexec.exe command are:
/i <argument>: Install a product
/f <MSI file name>: Repair a product (*)
/a <MSI file name>: Install a product in "Run from Network" or Administrative
mode
/x <MSI file name>: Uninstall a product
/j <MSI file name>: Assign a product (immediately places a shortcut on the
desktop or Start menu)
/jm <MSI file name>: Assign a product per machine
/ju <MSI file name>: Assign a product per user
/j [u | m] <MSI file name> /t <MST Transform file>: Assign a product and apply a
transform
/l <log file name>: Use in conjunction with one of the above operations to log
install (or repair) information to <log file name> (*)
/p <Patch Package Name>: Apply a patch to a product
/q [n, b, r, f]: Sets the verbosity of the Install interface to
/qn = No UI at all
/qb = Basic UI
/qr = Reduced UI
/qf = Full UI
/qn+ = No UI except for completion dialog
/qb+ = Basic UI with completion dialog
Note
Actually, the list of command-line options for the Msiexec.exe tool is significantly
larger. The options marked here with asterisks (*) have additional suboptions
available. A complete list of these options and detailed information about their
usage can be found in Microsoft's MSDN Online Library
(
). Furthermore, Microsoft has published a detailed FAQ
on Windows Installer, which can be found at
/>sp.