Tài liệu Introducing Visual Studio .NET pptx
Bạn đang xem bản rút gọn của tài liệu. Xem và tải ngay bản đầy đủ của tài liệu tại đây (53.43 KB, 7 trang )
Introducing Visual Studio .NET
In the previous sections, you saw programs that connect to various databases, retrieve a
row from a table, and display the column values for that row on your computer screen.
This type of program is known as a console application because it displays output
directly on the screen on which the program is running.
You can use Visual Studio .NET (VS .NET) to create console applications, as well as the
following types of applications:
•
Windows Applications These take advantage of the visual controls offered by the
Windows operating system, such as menus, buttons, and editable text boxes.
Windows Explorer, which you use to navigate the file system of your computer, is
one example. You'll learn about Windows programming in Chapter 6
,
"Introducing Windows Applications and ADO.NET."
•
ASP.NET Applications These run over the Internet. You access an ASP.NET
application using a Web browser, such as Internet Explorer. Examples of
ASP.NET applications would be online banking, stock trading, or auction systems.
You'll learn about ASP.NET programming in Chapter 15
, "Introducing Web
Applications: ASP.NET."
•
ASP.NET Web Services These also run over the Internet. Also known as XML
Web services, the difference is that you can use them to offer a service that could
be used in a distributed system of interconnected services. For example,
Microsoft's Passport Web service offers identification and authentication of Web
users you could then use in your own Web application. You'll learn about Web
services in Chapter 17
, "Web Services."
This is not an exhaustive list of the types of applications you can develop with VS .NET,
but it does give you flavor for the broad range of VS .NET's capabilities.
In the rest of this section, you'll see how to develop and run a console application using
VS .NET. If you've installed VS .NET on your computer, you'll be able to follow along
with the example. If you don't have VS .NET, don't worry; you'll still be able to see
what's going on from the figures provided.
Starting Visual Studio .NET and Creating a Project
All of your work in VS .NET is organized into projects. Projects contain the source and
executable files for your program, among other items. If you have VS .NET installed,
start it by selecting Start ➣ Programs ➣ Microsoft Visual Studio .NET ➣ Microsoft
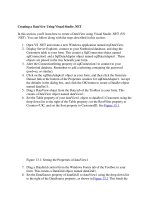
Visual Studio .NET. Once VS .NET has started, you'll see the Start page (see Figure 1.1
).
Figure 1.1: The Start page
From the Start page, you can see any existing projects you've created. You can open and
create projects using the Open Project and New Project buttons, respectively. You'll
create a new project shortly.
Using the VS .NET Links
As you can see from Figure 1.1
, VS .NET contains a number of links on the left of the
Start page. Some of these links provide access to useful information on the Internet about
.NET; the links are as follows:
•
Get Started Open the Start page.
•
What's New View any updates for VS .NET or Windows. You can also view
upcoming training events and conferences.
•
Online Community Get in touch with other members of the .NET community.
Includes links to Web sites and newsgroups.
•
Headlines View the latest news on .NET.
•
Search Online Search the MSDN Online Library for technical material such as
published articles on .NET.
•
Downloads Download trial applications and example programs from the Web
sites featured here.
•
XML Web Services Find registered XML Web services that you can then use in
your own programs. XML Web services are also known as ASP.NET Web
services. You'll learn more about Web services in Chapter 17
.
•
Web Hosting A Web hosting company can take your program and run it for you.
It takes care of the computers on which your program runs. Use the Web Hosting
link to view companies that provide these services.
•
My Profile Set items such as your required keyboard scheme and window layout.
Click these links and explore the information provided. As you'll see, there's a lot of
information about .NET on the Internet.
Creating a New Project
When you're finished examining the information in the previous links, create a new
project by clicking the New Project button on the Get Started page.
Note
You can also create a new project by selecting File ➣ New ➣ Project, or by
pressing Ctrl+Shift+N on your keyboard.
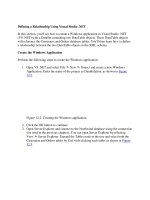
When you create a new project, VS .NET displays the New Project dialog box, which
you use to select the type of project you want to create. You also enter the name and
location of your new project; the location is the directory where you want to store the
files for your project.
Because you're going to be creating a C# console application, select Visual C# Projects
from the Project Types section on the left of the New Project dialog box, and select
Console Application from the Templates section on the right. Enter
MyConsoleApplication in the Name field, and keep the default directory in the Location
field. Figure 1.2
shows the completed New Project dialog box with these settings.
Figure 1.2: The New Project dialog box with the appropriate settings for a C# console
application
Click the OK button to create the new project.
Working in the VS .NET Environment
Once you've created a new project, the main development screen is displayed (see Figure
1.3). This screen is the environment in which you'll develop your project. As you can see,
VS .NET has already created some starting code for you. This code is a skeleton for your
program; you'll see how to modify it shortly. In this section, I'll give you a brief
description of the different parts of the VS .NET environment.
Figure 1.3: The VS .NET environment
Note Depending on your settings for VS .NET, your screen might look slightly different
from that shown in Figure 1.3
.
The VS .NET menu contains the following items:
•
File Open, close, and save project files.
•
Edit Cut, copy, and paste text from the Clipboard. The Clipboard is a temporary
storage area.
•
View Hide and show different windows such as the Solution Explorer (which lets
you see the files that make up your project), Class View (which lets you see the
classes and objects in your project), Server Explorer (which lets you explore items
such as databases), and the Properties window (which lets you set the properties of
objects, such as the size of a button). You can also use the View menu to select the
toolbars you want to display.
•
Project Add class files to your project and add Windows forms and controls.
•
Build Compile the source files in your project.
•
Debug Start your program with or without debugging. Debugging lets you step
through your program line by line, looking for errors.
•
Tools Connect to a database and customize your settings for VS .NET. For
example, set the colors used for different parts of your program lines or set the
initial page displayed by VS .NET when you start it.
•
Window Switch between files you've opened and hide windows.
•
Help Open the documentation on .NET. You'll learn how to use this
documentation later in this chapter in the section "Using the .NET
Documentation."
The VS .NET toolbar contains a series of buttons that act as shortcuts to some of the
menu options. For example, you can save a file or all files, cut and paste text from the
Clipboard, and start a program using the debugger. You'll learn how to use some of these
features later in this chapter.
The code shown in the window (below the toolbar) with the title Class1.cs is code that is
automatically generated by VS .NET, and in the next section
you'll modify this code.
Modifying the VS .NET-Generated Code
Once VS .NET has created your project, it will display some starting code for the console
application with a class name of Class1.cs. You can use this code as the beginning for
your own program. Figure 1.3
, shown earlier, shows the starting code created by VS
.NET.
The Main() method created by VS .NET is as follows:
static void Main(string[] args)
{
//
// TODO: Add code to start application here
//
}
As you can see, this code contains comments that indicate where you add your own code.
Replace the Main() method with the following code taken from the Main() method in
FirstExample.cs, shown earlier in Listing 1.1
:
public static void Main()
{
try
{
// step 1: create a SqlConnection object to connect to the
// SQL Server Northwind database
SqlConnection mySqlConnection =
new SqlConnection(
"server=localhost;database=Northwind;uid=sa;pwd=sa"
);
// step 2: create a SqlCommand object
SqlCommand mySqlCommand = mySqlConnection.CreateCommand();
// step 3: set the CommandText property of the SqlCommand object to