Tài liệu Creating Cool Web Sites with HTML, XHTML, and CSS- P2 docx
Bạn đang xem bản rút gọn của tài liệu. Xem và tải ngay bản đầy đủ của tài liệu tại đây (2.06 MB, 50 trang )
557386 Ch02.qxd 4/2/04 9:52 AM Page 24
Ł
Ł
24
Creating Cool Web Sites with HTML, XHTML, and CSS
tip
Develop the habit of closing any tag that you open.
What do you think would happen if you included quotation marks around a tag—suppose, for
example, that you used
“<html>”
at the beginning of your document rather than
<html>
. If
you guessed that only the quotes would be displayed, you’re right. Let me say it one more
time: Web browsers are very simple-minded in their interpretation of HTML. Any tags that
vary from the specific characters in the HTML-language specification result in something
other than what you were expecting, or your formatting requests are ignored completely.
Breaking at Paragraphs and Lines
The most helpful markup tags—and probably the tags that you’ll use most often—specify
that you want a paragraph break or a line break. Several variants of these tags exist, but you
can create readable and useful Web documents by using only the tags
<p></p>
and
<br />
.
To specify that you want a paragraph break, use the
<p>
tag. (Many HTML tags are
mnemonic: p for paragraph.) The following example adds some
<p>
tag pairs to the
not-
yet.html
file shown in Figure 2-1 and also wraps the file in the
<html>
and
</html>
tags.
Notice that the
<p>
tag is a container: The open tag appears before the passage to be
affected, and the close tag appears at the end of the passage:
<html>
Dave’s Desk
Somewhere in Cyberspace
<p>
Dear Reader,
</p><p>
Thank you for connecting to my Web server, but I
regret to tell you
that things aren’t up and running yet!
They will be _soon_, but they aren’t today.
</p><p>
Sincerely,
</p><p>
Dave Taylor
</p></html>
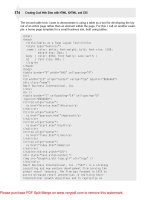
Figure 2-2 shows what this HTML text looks like in a browser.
Please purchase PDF Split-Merge on www.verypdf.com to remove this watermark.
557386 Ch02.qxd 4/2/04 9:52 AM Page 25
25
Ł
Chapter 2: Building Your First Web Page: HTML Basics
Figure 2-2: Paragraph breaks in not-yet.html.
The version of the file in Figure 2-2 is a huge improvement over Figure 2-1, but some prob
lems still exist, not the least of which is that the first few lines don’t look right. In their zeal to
organize the text neatly, Web browsers, by default, fill as many words into each line as they
can manage. Filling the lines works well for the main paragraph of the file, but the first few
lines display more appropriately if you indicate that the browser should break the line
between items.
Ł
Paragraph tags have a somewhat checkered history in HTML. Although they were
always intended to be used as containers (that is, a paired tag), for many years
note
people recommended that they be used as stand-alone tags instead, with a
<p>
wherever a break was desired. As HTML has become more sophisticated, using the
<p>
tags as a proper container has become more important, and it’s a very good
habit—worth learning and sticking with—as you’ll see when we talk about XHTML
later in this chapter.
To break lines in HTML, use the break tag,
<br />
. Like any tag, the break tag can appear
anywhere in the text, including at the end of the line you want to break. HTML tags are also
case insensitive, meaning that
<BR />
,
<br />
, and
<bR />
all mean exactly the same thing.
Having said that, however, good form is to use all lowercase in your HTML tags as consis
tently as possible because that’s required for the XHTML standard. (More about that at the
end of this chapter.) Now is the time to develop good habits—while you’re just figuring this
stuff out—so you don’t have to break bad habits later!
Ł
Because I’m following XHTML standards in this book, all stand-alone tags have a
slightly odd appearance, with a
/>
sequence at the end rather than the more com
note
mon
>
by itself. You can use
<br>
for a break, but
<br />
(with a space before the
slash) is our goal here. As I said in the note above, learning good habits now will
ensure that your pages work properly in the future as HTML and the Web evolve.
Please purchase PDF Split-Merge on www.verypdf.com to remove this watermark.
557386 Ch02.qxd 4/2/04 9:52 AM Page 26
Ł
26
Creating Cool Web Sites with HTML, XHTML, and CSS
Here is the HTML file when the break tag is used:
<html>
Dave’s Desk <br />
Somewhere in Cyberspace
<p>
Dear Reader,
</p><p>
Thank you for connecting to my Web server, but I
regret to tell you
that things aren’t up and running yet!
They will be _soon_, but they aren’t today.
</p><p>
Sincerely,
</p><p>
Dave Taylor
</p></html>
From a stylistic perspective, you should try to have a consistent scheme for your tags, espe
cially because, in case of a problem, you may have to go into fairly complex files and figure
out what’s wrong. I suggest that you place all line breaks at the end of text lines and all para
graph marks on their own lines. This book uses that style throughout.
Figure 2-3 shows the output of the
not-yet.html
file when
<br />
is used.
Figure 2-3: The break tag in not-yet.html.
Please purchase PDF Split-Merge on www.verypdf.com to remove this watermark.
557386 Ch02.qxd 4/2/04 9:52 AM Page 27
27
Ł
Chapter 2: Building Your First Web Page: HTML Basics
One remaining problem with the layout is that I intended for the signature information to be
shifted to the right a few inches, as in a standard business letter. In the browser, however, you
can see that it stays at the left edge of the document.
To remedy this problem, you can use the preformatted information tag,
<pre>
. The
<pre>
tag is also a paired tag (a container), so it works across as many lines as needed, without
any fuss, and ends with
</pre>
. The following example shows how
<pre>
preserves all char
acter and line spacing; in this case,
<pre>
preserves the tabs I used to indent the closing and
signature lines. I’ve changed the last few lines of the
not-yet.html
file to reflect the use of
this tag:
<html>
Dave’s Desk <br />
Somewhere in Cyberspace
<p>
Dear Reader,
</p><p>
Thank you for connecting to my Web server, but I
regret to tell you
that things aren’t up and running yet!
They will be _soon_, but they aren’t today.
</p><pre>
Sincerely,
Dave Taylor
</pre>
</html>
By adding the
<pre>
tags, you achieve the desired formatting, but now another problem has
cropped up: The text in the preformatted block (the stuff between
<pre>
and
</pre>
) appears
in a different, monospace typeface! You can see the difference in Figure 2-4, if you look
closely.
Ł
Typeface refers to a particular style of letters in a variety of sizes. A font, by con
trast, is a typeface in a specific size and style. Helvetica is a typeface, but 12-point
note
Helvetica italic is a font. A monospace typeface is one in which every letter has
exactly the same width. Ten lowercase i characters (iiiiiiiiii), for example, end up
exactly as wide as 10 lowercase m characters (mmmmmmmmmm). In this book,
I use a proportional typeface rather than monospace for this note so that you
can clearly see that the ten i characters are considerably narrower than the ten m
characters.
The browser changed the typeface in Figure 2-4 because the browser assumed that the pre-
formatted text was a code listing or other technical information. That’s the most common
context for the
<pre>
tag. So it worked, sort of, but it’s not quite what you wanted. (You can
use
<pre>
to your advantage in other situations, however, as you see later in this chapter.)
Please purchase PDF Split-Merge on www.verypdf.com to remove this watermark.
557386 Ch02.qxd 4/2/04 9:52 AM Page 28
Ł
28
Creating Cool Web Sites with HTML, XHTML, and CSS
Figure 2-4: The format is correct, but the typeface is wrong.
Building Your First Web Page
Now that you’ve gotten a tiny taste of the world of HTML markup, take a slight time-out and
go through the steps necessary to duplicate this on your own computer. I’m going to assume
here that you’re running Windows 98, Windows XP, or some other version of Windows, but
the steps are very similar if you’re on a Macintosh or Linux/Unix machine.
Launching your HTML editor
To start, I suggest you use NotePad, a terrific—albeit simple—text editor included with the
Windows operating system. It’s free and ready for you to start up, even if you didn’t realize
you had it!
Ł
Mac users should use TextEdit; it’s a very similar sort of plaintext editor found in
tip
your Applications folder, and Linux/Unix users can choose between
vi
,
emacs
,
pico
, and many other text editors, all accessible from a Terminal command line.
In just about every Windows configuration I’ve ever seen, NotePad is accessible by clicking
the Start button on the bottom-left corner of the window, and then choosing Programs ➪
Accessories. You should see a list of choices similar to Figure 2-5; NotePad is about half way
down the list.
Please purchase PDF Split-Merge on www.verypdf.com to remove this watermark.
557386 Ch02.qxd 4/2/04 9:52 AM Page 29
29
Ł
Chapter 2: Building Your First Web Page: HTML Basics
Figure 2-5: Pick NotePad out of the many accessory choices in Windows.
After NotePad launches, it shows you a blank page where you can type the HTML. As an
example, type the simple page shown earlier in Figure 2-4. The result looks like Figure 2-6.
Figure 2-6: You can type HTML directly into a blank NotePad file.
Saving your file as HTML
After you type an adequate amount of material in your HTML, it’s time to save the file to
disk. Then you can open it in your favorite Web browser and see how it looks when the HTML
is rendered (interpreted by the browser). Choose File ➪ Save, which pops up the Save As dia
log box shown in Figure 2-7.
Please purchase PDF Split-Merge on www.verypdf.com to remove this watermark.
557386 Ch02.qxd 4/2/04 9:52 AM Page 30
Ł
30
Creating Cool Web Sites with HTML, XHTML, and CSS
Figure 2-7: The Save As dialog box.
When you save this new HTML document, it’s critical that you append either the
.htm
or
.html
filename suffix to ensure that the Web browser properly recognizes it as an HTML
document. You can do this by explicitly typing
.html
as the suffix in the File Name box. Give
this file a name, such as firstpage.html, and type that name directly into the File Name box.
Ł
If you don’t specify a filename suffix, by default NotePad uses
.txt
. Saving the file
with this extension causes problems! When you look at the page later in your Web
caution
browser, you see the HTML itself rather than having it interpreted. If that happens,
and you find that you’ve already saved the file with a
.txt
or another extension,
simply open the file again in NotePad, choose File ➪ Save As, and resave the file
with the
.html
suffix.
There’s one more decision you must make before the file is ready to save: Where do you
want to put it? I save this example to the desktop because it’s easy to find the desktop. But
you can save it someplace else on your hard drive if you want. Simply use the drop-down
arrow in the Save In field of the Save As dialog box and browse to the folder where you want
to store the file.
Now you’re ready: You have named the file, remembered the
.html
suffix, made sure that it’s
stored in the directory you want, and clicked Save. Voilà! You’ve created your first Web page.
Notice that after you save this file, the title bar of the NotePad program changes to the name
of the file—a helpful reminder that you’ve named the file.
Please purchase PDF Split-Merge on www.verypdf.com to remove this watermark.
557386 Ch02.qxd 4/2/04 9:52 AM Page 31
31
Ł
Chapter 2: Building Your First Web Page: HTML Basics
Opening the file in Internet Explorer
Now it’s time to launch a Web browser and have a look. I launch Internet Explorer because I
have the icon right on my desktop. I double-click the blue e icon, and the Web browser opens
to the Creating Cool Web Sites home page. To open a different page—the Web page you just
created—choose File ➪ Open. The Open dialog box appears, as shown in Figure 2-8.
Figure 2-8: The Open dialog box, ready for you to enter a URL or browse to a file.
To open the Web page you just created, click Browse. The dialog box shown in Figure 2-9
opens.
Figure 2-9: Browse to the Web page file you saved earlier and choose the file.
When you find the file, click Open and then OK. You should be looking at your HTML page
(see Figure 2-10).
Please purchase PDF Split-Merge on www.verypdf.com to remove this watermark.
557386 Ch02.qxd 4/2/04 9:52 AM Page 32
Ł
32
Creating Cool Web Sites with HTML, XHTML, and CSS
Figure 2-10: Finally, your Web page in a Web browser!
Pretty cool, eh?
Improving the HTML and viewing it in the browser
With both NotePad and the Web browser running, it’s a simple matter to make changes in the
editor and then preview the changes in the browser. Type any changes you want to make in
NotePad, and then make sure you choose File ➪ Save to update the copy stored on your
hard drive.
Then, one more step: Click the Refresh button in the Web browser (the button with the two
green curving arrows pointing at each other) and you should see the results of your efforts
instantly!
And now, back to your HTML. . . .
Breaking Your Document into Sections
If you take a close look at a fully specified HTML document, you’ll find that it’s divided into
two sections: what I call the stationery section (the information that would be preprinted on
the pad if the file were a physical note) and the body of the message. Think of the informa
tion you typically find at the top of a memo:
Please purchase PDF Split-Merge on www.verypdf.com to remove this watermark.
557386 Ch02.qxd 4/2/04 9:52 AM Page 33
33
Ł
Chapter 2: Building Your First Web Page: HTML Basics
M E M O R A N D U M
To: Date:
From: Subject:
These common items of information come at the beginning of a memo, usually followed by a
rule (a line) and then by blank space in which you write the actual content of the memo.
Similarly, for the sake of organization, HTML files are commonly broken into two sections:
the header, which contains the introductory page-formatting information, and the body. You
use the paired tags
<head> </head>
and
<body> </body>
to surround each section. The fol
lowing example shows how the
not-yet.html
file looks when you add these tags:
<html>
<head>
</head>
<body>
Dave’s Desk <br />
Somewhere in Cyberspace
<p>
Dear Reader,
</p><p>
Thank you for connecting to my Web server, but I
regret to tell you
that things aren’t up and running yet!
They will be _soon_, but they aren’t today.
</p><pre>
Sincerely,
Dave Taylor
</pre>
</body>
</html>
The
<head> </head>
and
<body> </body>
formatting information doesn’t add anything to
the display, I admit. The document also doesn’t contain any introductory HTML-formatting
information yet, so the head area is empty. If you were to view the preceding HTML text in a
Web browser, it would look identical to Figure 2-3. Later, when you start learning some of
the more complex parts of HTML, you will see why section-block notation such as
<head>
</head>
can be helpful.
What do you think would happen if I fed the following information to a Web browser?
<html><head></head><body>
Dave’s Desk <br />Somewhere in Cyberspace<p>Dear Reader,
</p><p> Thank you for connecting to my Web server, but I
regret to tell you that things aren’t up and running yet!
They will be _soon_, but they aren’t today.</p><pre>
Sincerely,
Dave Taylor</pre></body></html>
Please purchase PDF Split-Merge on www.verypdf.com to remove this watermark.
557386 Ch02.qxd 4/2/04 9:52 AM Page 34
Ł
34
Creating Cool Web Sites with HTML, XHTML, and CSS
If you guessed that the screen output of the preceding example would look exactly like the
carefully spaced material shown earlier (see Figure 2-4), you’re correct.
Remember that Web browsers ignore carriage returns, tabs, and multiple spaces
Ł
when the document is reformatted for display. That suggests that you can save a
tip
great deal of space, and display a great deal more of your document source (the
HTML tag information) on-screen, simply by skipping all the extra returns; but I
strongly recommend against such a strategy. Why? In a nutshell, writing your Web
documents with the markup tags in logical places makes the document easier to
work with later. I’ve written and had to debug more than a thousand HTML docu
ments, and I can assure you that the more things are jammed together, the less
sense they make a few weeks later when you find you have to add information or
modify the content.
Adding a Title to Your Page
One of the subtle (but quite important) things you can do to make your Web page look smart
is to give it a good title with the
<title>
tag. The title usually appears in the top border (title
bar) of the window displayed on the user’s computer. Go back and look at the information in
the header of Figure 2-4: The browser shows the name of the file, which is remarkably dull:
ch2-4.html
.
The
<title>
tag enables you to define the exact title you want in the document. It is a paired
tag and appears within the
<head> </head>
block of information, as follows:
<head>
<title>This is the title</title>
</head>
For the document you’ve been developing in this chapter,
not-yet.html
, a nice title is one
that reinforces the message in the file itself, as in the following example:
<html>
<head>
<title>This page is not yet ready for prime time</title>
</head>
Figure 2-11 shows how the new title text looks within Internet Explorer. Notice the change in
the title bar.
Ł
The text in the
<title>
tag is also used as the link information when a user saves a
Web document into a bookmark or hotlist—compiled URLs for sites you’ve visited
x-ref
and want to remember. So, a meaningful title for each page you create can be very
helpful to your readers. Furthermore, titles add to the searchability of the page, as
you find out in Chapter 17.
Please purchase PDF Split-Merge on www.verypdf.com to remove this watermark.
557386 Ch02.qxd 4/2/04 9:52 AM Page 35
35
Ł
Chapter 2: Building Your First Web Page: HTML Basics
Figure 2-11: The <title> tag produces an appropriate title for the browser window.
Adding Footer Material
Just as you commonly see certain information, such as the title, used in the header of a Web
document, certain other information is commonly placed at the foot of the document. On the
Web, you usually find copyright information and contact data for the creator of the page at
the bottom of documents.
The tag I use for this contact information is
<blockquote>
. It’s a paired tag (
<blockquote>
information
</blockquote>
). The following example shows this tag added to the
not-
yet.html
document:
<html>
<head>
<title>This page is not yet ready for prime time</title>
</head>
<body>
Dave’s Desk <br />
Somewhere in Cyberspace
<p>
Dear Reader,
</p><p>
Thank you for connecting to my Web server, but I
regret to tell you
that things aren’t up and running yet!
Continued
Please purchase PDF Split-Merge on www.verypdf.com to remove this watermark.
557386 Ch02.qxd 4/2/04 9:52 AM Page 36
Ł
36
Creating Cool Web Sites with HTML, XHTML, and CSS
Continued
They will be _soon_, but they aren’t today.
</p><pre>
Sincerely,
Dave Taylor
</pre>
<blockquote>
Page Design by Dave Taylor ()
</blockquote>
</body>
</html>
Do you have to use the
<blockquote>
tag and include this information on your page? Nope.
Like various other items that appear in HTML pages, it can be used or skipped. (In Web
pages I create, I tend not to include address information, but many people like to have that
information at the bottom of each page.) As you can see in Figure 2-12, the address infor
mation is presented with an indent, which can look quite attractive on certain Web pages.
Figure 2-12: <blockquote> information added to the Web page.
Please purchase PDF Split-Merge on www.verypdf.com to remove this watermark.
557386 Ch02.qxd 4/2/04 9:52 AM Page 37
37
Ł
Chapter 2: Building Your First Web Page: HTML Basics
Defining Section Heads
The formatting information discussed so far in this chapter enables you to create attractive
text. But what if you want to organize your Web page with sections or subsections? The vari
ous levels of header-format tags enable you to handle just such a situation.
Each header-format level has an open and close tag. The highest-level header-format tag is
h1
; the lowest is
h6
. To specify a top-level header, use
<h1>First Header</h1>
Header-format tags are best illustrated in an HTML page other than
not-yet.html
, because
that document doesn’t need headers. The following code shows the beginning of a table of
contents for a movie information Web site:
<html>
<head>
<title>The Cool Web Movie Database</title>
</head>
<body>
Welcome to the Cool Web Movie Database. So far we offer
information on the many brilliant films of David Lean:
soon, a lot more will be online.
<h1>Films with Sam Spiegel Productions</h1>
<h2>The Bridge on the River Kwai (1957)</h2>
<h2>Lawrence of Arabia (1962)</h2>
<h1>The Later Years</h1>
<h2>Doctor Zhivago (1965)</h2>
<h2>Ryan’s Daughter (1970)</h2>
<blockquote>
This information maintained by Dave Taylor
</blockquote>
</body>
</html>
Figure 2-13 shows how the preceding HTML appears in a Web browser.
Most Web pages that you design probably won’t have quite as many headers as the example
in Figure 2-13.
Please purchase PDF Split-Merge on www.verypdf.com to remove this watermark.
557386 Ch02.qxd 4/2/04 9:52 AM Page 38
Ł
38
Creating Cool Web Sites with HTML, XHTML, and CSS
Figure 2-13: Examples of <h1> and <h2> headings.
The following example adds a little more information about some of the films to show the
value of using various header sizes:
<html>
<head>
<title>The Cool Web Movie Database</title>
</head>
<body>
Welcome to the Cool Web Movie Database. So far we offer
information on the many brilliant films of David Lean:
soon, a lot more will be online.
<h1>Films with Sam Spiegel Productions</h1>
<h2>The Bridge on the River Kwai (1957)</h2>
Produced by Sam Spiegel, this film was the first of the
Lean blockbuster movies, and featured a young Alec
Guinness, William Holden, and a brilliant performance
from Sessue Hayakawa.<h2>Lawrence of Arabia (1962)</h2>
One of my all-time favorite movies, this epic
adventure starring Peter O’Toole established Lean as
a director who could truly envision film on a grand scale.
<h1>The Later Years</h1>
<h2>Doctor Zhivago (1965)</h2>
Please purchase PDF Split-Merge on www.verypdf.com to remove this watermark.
557386 Ch02.qxd 4/2/04 9:52 AM Page 39
39
Ł
Chapter 2: Building Your First Web Page: HTML Basics
<h2>Ryan’s Daughter (1970)</h2>
<blockquote>
This information maintained by Dave Taylor
</blockquote>
</body>
</html>
When the preceding example is viewed in a browser, the different headers appear in different
size type, and information that is not part of the header appears in a nonbold, roman type
face (see Figure 2-14).
Ł
One thing to remember about HTML is that users can alter the actual fonts, sizes,
and layout of the final presentation based on the preferences they set in their
note
browsers. I contend, however, that precious few people actually alter their prefer
ence settings, so if your page looks good with the default values, you should be
okay. If the default values look a little weird, as may well be the case with Explorer
in particular, by all means experiment with the settings. Just remember what you’ve
changed. You’ll see why as you proceed through the book.
Figure 2-14: Larger titles and smaller descriptive text demonstrate the value of different header levels.
Please purchase PDF Split-Merge on www.verypdf.com to remove this watermark.
557386 Ch02.qxd 4/2/04 9:52 AM Page 40
Ł
40
Creating Cool Web Sites with HTML, XHTML, and CSS
Using the Horizontal Rule
A very useful tag for organizing your document visually is the horizontal rule tag:
<hr />
.
Dropped anywhere in a Web document, it produces a skinny line across the page. The fol
lowing example shows the movie information page with the
<hr />
tag added:
<head>
<title>The Cool Web Movie Database</title>
</head>
<body>
Welcome to the Cool Web Movie Database. So far we offer
information on the many brilliant films of David Lean:
soon, a lot more will be online.
<hr />
<h1>Films with Sam Spiegel Productions</h1>
<h2>The Bridge on the River Kwai (1957)</h2>
Produced by Sam Spiegel, this film was the first of the
Lean blockbuster movies, and featured a young Alec
Guinness, William Holden, and a brilliant performance
from Sessue Hayakawa.
<h2>Lawrence of Arabia (1962)</h2>
One of my all-time favorite movies, this epic
adventure starring Peter O’Toole established Lean as
a director who could truly envision film on a grand scale.
<hr />
<h1>The Later Years</h1>
<h2>Doctor Zhivago (1965)</h2>
<h2>Ryan’s Daughter (1970)</h2>
<hr />
<blockquote>
This information maintained by Dave Taylor
</blockquote>
</body>
</html>
Ł
Remember to use the XHTML style (
<hr />
) to close the stand-alone rule tag, as
tip
illustrated here.
As with any other formatting or design element in a Web page, you can overuse the horizon
tal rule. Used judiciously, however, the
<hr>
tag is tremendously helpful in creating cool
pages. Figure 2-15 shows the browser view of the preceding HTML code.
Please purchase PDF Split-Merge on www.verypdf.com to remove this watermark.
557386 Ch02.qxd 4/2/04 9:52 AM Page 41
41
Ł
Chapter 2: Building Your First Web Page: HTML Basics
Figure 2-15: Use horizontal rules to help divide your Web pages into easy-to-read sections.
Introducing XHTML
One of the biggest recent changes in the world of HTML is the emergence of XML, the
eXstensible Markup Language. Because it allows site designers to designate what things are
(for example, album titles, book publication dates, and other database-field-like identifiers),
rather than how to present them (that is, italics, bold, green text), XML looks vaguely like
HTML; but it is a completely different beast. Fortunately, you don’t have to worry about XML
in this book!
One way that XML has influenced HTML is through the growth of XHTML, a variation of HTML
inspired by the formal structure of XML. The best way to think about XHTML is that it’s a for
malized version of HTML. Gone are the sloppy mixed case tags of yesteryear and the random
differences between tag usage. Instead, XHTML insists that
• All tags are paired or have a
/>
ending.
• All attributes are quoted.
• All attributes must be presented as
name=value
pairs.
• All tags and attributes must be in lowercase only.
Please purchase PDF Split-Merge on www.verypdf.com to remove this watermark.
557386 Ch02.qxd 4/2/04 9:52 AM Page 42
Ł
42
Creating Cool Web Sites with HTML, XHTML, and CSS
What’s an attribute? That’s something I explore in Chapter 3, but here’s a sneak preview:
Just about every HTML tag allows you to change its behavior by adding specific attributes.
For example, you can change the width of a horizontal rule by adding a width value to the
<hr>
tag, as in
<hr width=”60%” />
.
Fortunately, after you get the hang of it, writing XHTML is no more difficult than writing regu-
lar HTML. In this book, I write XHTML exclusively. By the end of the book, you’ll think that
regular HTML looks slightly weird and that everything should be written in XHTML. You’ll see!
Ł
Even though I write XHTML code exclusively throughout the rest of this book,
XHTML and HTML are very similar. So don’t be confused if I sometimes refer to
note
HTML when I’m contrasting a particular block of code with code written for
Cascading Style Sheets (CSS), which you learn about in Chapter 4.
Meaning
<blockquote> </blockquote>
<body> </body>
<br /> Signifies a line break
<head> </head>
<hn> </hn> Indicates the document header level (n = 1–6)
<hr />
<html> </html>
<p> </p> Blocks a paragraph
<pre> </pre> Indicates preformatted information
Table 2-1: HTML Tags Covered in This Chapter
HTML Tag Close Tag
Indicates indentation block
Indicates the body of the HTML page
Provides HTML-formatting information
Inserts a horizontal rule
Defines a Web-formatted file
tion (like this chapter of this book, to pick the most immediate example) in
how to add other types of emphasis to text, and how to make various other
changes within sentences and paragraphs.
Ł
Summary
A great deal of information was presented here. You learned many of the
basic HTML tags, and you created your first Web page. With the basics you
learned in this chapter, you should be able to reproduce formatted informa-
an attractive format for users on the World Wide Web. Chapter 3 continues
to explore HTML by explaining how to use boldface and italic formatting,
Please purchase PDF Split-Merge on www.verypdf.com to remove this watermark.
557386 Ch03.qxd 4/2/04 9:51 AM Page 43
Ł
3
Attractively
chapter
Presenting Text
alignment, and other styles
Applying font sizes, colors, and faces
Ł
In This Chapter
Using bold and italics for navigation
Changing text with underlining,
Working with styles
T
his chapter explores some of the nuts and bolts of text presentation and infor
mation layout. When I talk about text styles, I mean the specification of bold
face, italics, and other changes that you can make to text. The preceding chapter
showed you, in the proverbial one fell swoop, the basics of HTML document lay
out. But, as you’ve probably figured out, there’s much more to creating cool
Web pages.
When you were given your first box of crayons, you probably went wild and tried
to use all the colors for each picture you colored. Eventually, however, it dawned
on you (unless you were a young Peter Max) that a subset of colors can be much
more useful and attractive. The same holds true for the various formatting com
mands in HTML. It is possible to use all the commands everywhere, but a better
strategy is to use them only when they are most appropriate. Many Web pages
already tend to be cluttered, and using too much italic or boldface typeface
makes the clutter even worse.
Nevertheless, at times you want to highlight certain words, phrases, titles, names,
or other information. In this chapter, you learn how to do that using HTML. A
quick warning, however: In the next chapter you learn a completely different, and
more modern, approach to formatting text using something called Cascading
Style Sheets, or CSS. Although more complex, CSS offers dramatically greater
control over the presentation of text (and much more). Purists lobby for CSS-only
pages, but I’m not that hard core. I use a mélange of HTML and CSS to achieve
the page results I seek, and I bet you will, too.
Please purchase PDF Split-Merge on www.verypdf.com to remove this watermark.