Tài liệu Windows 7 Step by Step- P8 doc
Bạn đang xem bản rút gọn của tài liệu. Xem và tải ngay bản đầy đủ của tài liệu tại đây (2.39 MB, 50 trang )
Modifying a Theme
You can customize a theme by changing any of its four elements. If you save the
customized theme, you can switch to it at any time. In this section, we discuss three
theme elements you can change: the desktop background, the window color, and the
sound scheme.
See Also For information about screen savers, see “Implementing a Screen Saver” later in
this chapter.
Desktop Background
You can easily change the background image displayed on the Windows desktop. To
display the desktop background options, open the Personalization window of Control
Panel, and then click Desktop Background.
In the Desktop Background window, you can select from a variety of backgrounds.
Modifying a Theme
301
Please purchase PDF Split-Merge on www.verypdf.com to remove this watermark.
302
Chapter 9 Change Visual Elements
Your choice of desktop background usually reflects your personal taste—what you like
to see when your program windows are minimized or closed. Some people prefer simple
backgrounds that don’t obscure their desktop icons, and others prefer photos of family
members, pets, or favorite places.
Windows 7 comes with many desktop background images to choose from, including
photographs and abstract art. You can use any of the photos that come with Windows,
or a digital image of your own. Or, if you want to keep things simple, you can opt for a
plain, colored background. You can preview each background on your desktop before
actually applying it.
Within any particular theme, you can use some or all of the associated desktop background
images as a slide show, or you can select only one image.
When displaying an image as your desktop background, you can specify the position of
the image as follows:
l
Fill One copy of the image is centered on the screen. The image fills the screen
horizontally and vertically, and maintains its original aspect ratio. Parts of the
image may overrun the left and right sides or the top and bottom edges (but
not both).
l
Fit One copy of the image is centered on the screen. The image fills the screen
horizontally or vertically, and maintains its original aspect ratio. Parts of the image
may not fill the left and right sides or the top and bottom edges.
l
Stretch One copy of the image is centered on the screen. The image fills the screen
horizontally and vertically, but does not maintain its original aspect ratio. No part
of the image overruns the screen.
Please purchase PDF Split-Merge on www.verypdf.com to remove this watermark.
l
Tile The image appears on the screen at its original size. One copy of the image
is anchored in the upper-left corner of the screen, followed by as many copies as
are necessary to fill the screen. Parts of the image may run past the right side or
bottom edge of the screen.
l
Center One copy of the image is centered on the screen at its original size.
Because Fit and Centered images can expose the desktop background, you also specify a
desktop background color to appear behind the image.
You can change the way a picture is positioned on the desktop.
For themes that include multiple desktop background images, you can specify whether
Windows displays the pictures in a random or specific order, and how often the image
changes—from once every 10 seconds to once each day.
Modifying a Theme
303
Please purchase PDF Split-Merge on www.verypdf.com to remove this watermark.
304
Chapter 9 Change Visual Elements
Window Color
From the Window Color And Appearance window of Control Panel, you can change the
color used for window frames, the Start menu, and the taskbar. You can also change or
turn off the transparent glass effect.
The options in the Window Color And Appearance window control the appearance of window
frames, the Start menu, and the taskbar.
Troubleshooting The transparency effects are available only on hardware that supports
Windows Aero technology, and only when an Aero theme is selected. Under other
circumstances, the Windows Color and Appearance dialog box opens. From this dialog box,
you can set properties for basic desktop elements..
Windows 7 offers 16 standard colors, but you can pick any color by displaying the color
mixer and adjusting the Hue, Saturation, and Brightness settings. You can even vary the
color’s intensity until you get exactly the effect you want.
Tip If you have selected one of the Basic or High Contrast themes (or if your computer’s
hardware does not support advanced graphics) and you want to change the color assigned
to a particular screen element, click Advanced Appearance Settings at the bottom of the
Window Color And Appearance window. You can then change the color assignments in
the Window Color And Appearance dialog box.
Please purchase PDF Split-Merge on www.verypdf.com to remove this watermark.
Sounds
The themes that come with Windows 7 all include a sound scheme that assigns specific
sounds to some, but not all, program events. Some use the default Windows sound
scheme and others have sound schemes specifically chosen to reflect the theme. You
can change the sound options from the Sound dialog box, which you open by clicking
Sounds in the Personalization window of Control Panel.
The theme’s sound scheme controls the sounds assigned to program events.
You can switch to a different scheme by clicking it in the Sound Scheme list. You can turn
off sounds altogether by clicking No Sounds in this list. You can modify any scheme by
clicking an event in the Program Events list and then clicking a sound in the Sounds list.
When you finish assigning new sounds, you can save the customized scheme by clicking
Save As and assigning the scheme a name. The scheme is then applied to the theme and
is also available in the Sound Scheme list for use with any other theme.
Modifying a Theme
305
Please purchase PDF Split-Merge on www.verypdf.com to remove this watermark.
306
Chapter 9 Change Visual Elements
Custom Themes
When you make an adjustment to a theme, the new combination appears in the My
Themes section of the Personalization window with the name Unsaved Theme. The
Unsaved Theme remains available if you switch to a different theme, and it remains
available from computing session to session.
However, you can have only one Unsaved Theme. If you want to create a variety of
themes—for example, to suit your moods or to celebrate different holidays—you must
explicitly save them with different names. When you first create a custom theme, you
can click Save Theme in the My Themes section to save the file. You can then apply the
theme at any time.
Tip If you close the Personalization window before saving the custom theme, the Save Theme
option does not appear the next time you open the window. To save the theme, first apply it,
and then right-click it in the My Themes list and click Save Theme.
If you no longer need a custom theme, you can delete it from the My Themes section of
the Personalization window regardless of whether you have saved it or not. You cannot
delete a built-in theme.
To delete a custom theme:
1. Make sure that the theme you want to delete is not applied.
2. In the My Themes section of the Personalization window, right-click the theme, and
then click Delete Theme.
3. In the Delete File message box, confirm the deletion by clicking Yes.
In this exercise, you’ll preview the built-in desktop background options. After switching
to a plain, solid-color background, you will specify a non-transparent color for borders,
the Start menu, and the taskbar. Then you’ll save the combination as a custom theme.
SET UP You don’t need any practice files to complete this exercise. Follow the steps
Apply the Nature theme (see the previous exercise), open Control Panel, and then
follow the steps.
1.
In the Appearance and Personalization category of Control Panel, click Change
desktop background.
The Desktop Background window opens.
Please purchase PDF Split-Merge on www.verypdf.com to remove this watermark.
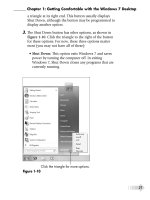
The check marks in the upper-left corners of six Nature images indicate that those images will
be displayed, rotating according to the Change Picture Every setting.
The Desktop Background window displays thumbnails of the images available when
Windows Desktop Backgrounds is selected in the Picture Location list. The thumb-
nails of the available images are grouped in themes, with the theme containing
your current desktop background displayed. Any images in the theme that will be
displayed as the desktop background are identified by a check mark in their upper-
left corner. In this case, all of the Nature images have check marks.
2.
With Windows Desktop Backgrounds selected in the Picture Location list, clear
the check boxes of all but two of the Nature images. Then select the check boxes
of two Landscapes images.
3.
In the Change picture every list, click 10 seconds, and then watch as a slide
show of the two Nature images and the two Landscapes images is displayed on
the desktop behind the window.
Tip To display the pictures in random order instead of sequentially, select the Shuffle
check box.
4.
In the Picture Location list, click Pictures Library.
The Desktop Background window changes to display the pictures in the Pictures
library.
Modifying a Theme
307
Please purchase PDF Split-Merge on www.verypdf.com to remove this watermark.
308
Chapter 9 Change Visual Elements
Any picture in your Pictures library can be used as a desktop background.
These photographs come with Windows 7 and are stored in the Public Pictures\
Sample Pictures folder. You can find a link to that folder in your personal Pictures
library. If you have stored any of your own pictures in this library, their thumbnails
are also available for display as your desktop background.
Tip To use pictures that are stored in a folder other than your Pictures library, click
Browse to the right of the Picture Location list, and then in the Browse For Folder
dialog box, navigate to that folder, and click OK. In the Desktop Background window,
the Picture Location box now shows the path of the selected folder, and thumbnails
of all the pictures stored in that folder are displayed so that you can click the pictures
you want to use as your desktop background.
5.
In the Picture Location list, click Top Rated Photos.
The list now displays a subset of photographs that have a rating of four or five stars.
Tip You can rate the pictures in your Pictures library to limit the desktop display to
your favorites. For information about rating files, see “Working with Folder and File
Properties” in Chapter 5, “Manage Folders and Files.”
6.
Point to each picture in turn to display information about it, including its rating.
Then clear the check boxes of all the images except Koala, Penguins, and Tulips.
Please purchase PDF Split-Merge on www.verypdf.com to remove this watermark.
7.
Below the thumbnails, in the Picture position list, click Center.
On your desktop, the picture changes to its actual dimensions. Depending on your
screen resolution, this might result in blank space above and below the picture or
on all four sides.
Troubleshooting Results can vary depending on your hardware.
8.
Below Picture position, click Change background color.
The Color dialog box opens.
You can select which color will surround the centered graphic.
9.
In the Color dialog box, click any color you like, and then click OK.
The blank space around the picture changes to the selected color.
10.
After waiting a few seconds to see the picture behind the window change, in the
Picture Location list, click Solid Colors.
The Desktop Background window changes to display a set of more than 30 basic
colors.
Modifying a Theme
309
Please purchase PDF Split-Merge on www.verypdf.com to remove this watermark.
310
Chapter 9 Change Visual Elements
If none of these colors suits your needs, you can click More to display the Color dialog box,
from which you can select any color.
11.
Click the second color in the first row (white), and then click Save changes to apply
your background selection and return to the Personalization window.
A thumbnail of the customized theme appears in the My Themes section.
12.
At the bottom of the Personalization window, click Window Color.
13.
In the Window Color and Appearance window, click the first color in the first
row (Sky), and then drag the window by its title bar to the lower-left corner of the
screen.
You can see the transparent glass effect through the taskbar.
When Enable Transparency is turned on, you can see through the taskbar, the frames of
windows, and the Start menu.
Please purchase PDF Split-Merge on www.verypdf.com to remove this watermark.
14.
Clear the Enable transparency check box to see the effect of a solid window
frame, and then reselect the check box.
15.
At the bottom of the Window Color and Appearance window, click Save
changes.
The Unsaved Theme thumbnail in the My Themes section shows that the theme
now has a light blue window color.
16.
To the right of the Unsaved Theme thumbnail in the My Themes section, click
Save theme.
The Save Theme As dialog box opens.
You can assign a name to a customized theme.
17.
In the Save Theme As dialog box, type Theme1 as the name of the custom theme,
and then click Save.
CLEAN UP Change the desktop background to suit your preferences, and then close
all open windows before moving on.
Implementing a Screen Saver
Screen savers are blank screens or moving images that are displayed on your monitor after
some period of inactivity. Originally, screen savers were used to prevent monitors from
being permanently “imprinted” with a static image that remained on the screen for too
long. Modern monitors are not susceptible to this kind of damage, but you might still
want to use a screen saver for the following reasons:
l
It hides the information on your screen when you are away from your desk.
l
It personalizes your work area.
Implementing a Screen Saver
311
Please purchase PDF Split-Merge on www.verypdf.com to remove this watermark.
312
Chapter 9 Change Visual Elements
By default, the themes that come with Windows 7 do not include screen savers. However,
you can customize any theme by adding one of the built-in screen savers, and you can
download other animated screen savers from the Internet. For all screen savers, you
can preview the effect, set the interval of inactivity before it will be displayed, and
specify whether your password must be entered to unlock the screen saver after it
is set in motion. For some screen savers, you can set options such as size, motion
pattern, and style.
In this exercise, you’ll preview the screen savers that come with Windows 7 and then
select a screen saver that consists of a slide show of photographs.
SET UP You need the images located in your Documents\Microsoft Press\Windows7SBS\
Visual folder to complete this exercise. Display the Appearance And Personalization
window of Control Panel in Category view, and then follow the steps.
1.
In the Appearance and Personalization window of Control Panel, under
Personalization, click Change screen saver.
The Screen Saver Settings dialog box opens.
You can activate a screen saver and control when and how it appears.
Please purchase PDF Split-Merge on www.verypdf.com to remove this watermark.
2.
In the Screen saver list, click Mystify, and then click Preview. Move the mouse to
redisplay the dialog box.
3.
In the Screen saver list, click 3D Text, and then click Settings.
The 3D Text Settings dialog box opens.
You can specify your own text and control its appearance.
Troubleshooting If your hardware does not support Aero, the 3D Text screen saver
might not be available. In that case, skip to step 6.
4.
In the Custom Text box, drag across Windows 7 to select it, and replace it with
My Screen Saver. Change any other settings you want, and click OK. Then click
Preview.
5.
Move the mouse to redisplay the dialog box. Then in the Screen saver list, click
other screen savers, and preview their effects.
6.
In the Screen saver list, click Photos.
The preview screen displays a slide show of the pictures in the Public Pictures\
Sample Pictures folder.
Troubleshooting If you have saved pictures in your personal Pictures folder, they will
also be part of the slide show.
Implementing a Screen Saver
313
Please purchase PDF Split-Merge on www.verypdf.com to remove this watermark.
314
Chapter 9 Change Visual Elements
7.
Click Settings.
The Photos Screen Saver Settings dialog box opens.
You can specify the location of the photos to be used in the slide show and set the speed of
the show.
8.
Click Browse. In the Browse For Folder dialog box, browse to your Documents\
Microsoft Press\Windows7SBS\Visual folder. Then click OK.
Tip If you have a folder of your own favorite photos on your computer, feel free to
browse to that folder instead.
9.
In the Photos Screen Saver Settings dialog box, in the Slide show speed list,
click Fast. Then select the Shuffle pictures check box, and click Save.
In the Screen Saver Settings dialog box, the slide show preview cycles through the
pictures in the selected folder. You can click Preview to see the full-screen slide
show as it will appear when in action; move the mouse or press the Esc key to
return to the dialog box.
Tip To require that a password be entered to unlock the screen saver and display the
information currently open on your desktop, select the On Resume, Display Logon
Screen check box.
10.
Change the Wait setting to 1 minute, either by repeatedly clicking the down arrow
or by selecting 10 and typing 1. Then click OK.
CLEAN UP Change the screen saver to suit your preferences, and then close
Control Panel.
Please purchase PDF Split-Merge on www.verypdf.com to remove this watermark.
Displaying More or Less Information
When you purchase a computer monitor, one of the things you consider is its size, or
display area, which is measured like a television screen: diagonally in inches. As impor-
tant as the physical size, though, is the screen resolution the monitor supports, which is
measured in pixels and is expressed as the number of pixels wide by the number of pixels
high. Pixels are the individual dots that make up the picture displayed on your screen.
Each pixel displays one color; depending on your screen resolution, the images you see
on screen might consist of 500,000 to several million individual dots of color.
When personal computers first became popular, most computer monitors were capable
of displaying only 640 pixels horizontally and 480 pixels vertically (a screen resolution
of 640 × 480). Now most display at 1024 × 768 pixels, and some can display at 2560 ×
1600 pixels (or perhaps by the time this book is published, even higher). In effect, as the
screen resolution increases, the size of each pixel decreases, and more information can
be shown in the same display area. In other words, as the screen resolution increases, so
does the amount of information you can see on the screen…but it all appears smaller.
Tip The maximum resolution is the highest resolution supported by your monitor or the
highest resolution supported by the graphics card installed in your computer, whichever
is lower.
Keyboard Shortcut To take a closer look at on-screen content you can use the Magnifier.
Press Windows logo key++ (the plus sign) to start Magnifier and zoom in on an area of the
screen. Press Windows logo key+- (the minus sign) to zoom out.
Most computer systems provide a choice of at least two screen resolutions, but you
might have many more choices. Some people prefer to work at a screen resolution of
1024 × 768 so that everything on the screen appears larger; others prefer to fit as much
information on the screen as they possibly can. Recent statistics indicate that more than
90 percent of Internet users have their screen resolution set to 1024 × 768 or greater—
up from 80 percent in 2007, 65 percent in 2005, and 46 percent in 2003.
Many monitors and portable computers have widescreen displays with resolutions such
as 1280 × 720, intended to improve the experience of viewing movies on the computer
by displaying them at the correct aspect ratio. These resolutions may be available on
your computer regardless of the aspect ratio of your actual monitor.
Displaying More or Less Information
315
Please purchase PDF Split-Merge on www.verypdf.com to remove this watermark.
316
Chapter 9 Change Visual Elements
In this exercise, you’ll change your screen resolution to the minimum and maximum sizes
supported by your computer.
Troubleshooting Screen resolution capabilities are hardware specific. The settings available
on your computer may be different from those shown or specified in this exercise.
SET UP You don’t need any practice files to complete this exercise. Open Control
Panel, and then follow the steps.
1.
In the Appearance and Personalization category, click Adjust screen
resolution.
The Screen Resolution window opens. You can also open this window directly by
right-clicking the Windows 7 desktop and then clicking Screen Resolution.
In the Screen Resolution window, you can change the appearance of your display.
Tip If you have more than one monitor installed, select the monitor you want to change
before proceeding with the next step. You can easily determine which monitor is which
by clicking the Identify button. A large number, corresponding to one of the numbers
displayed on the icons in the preview pane, flashes on each monitor.
See Also For information about setting up multiple monitors, see “Displaying Your
Desktop on Multiple Screens” in Chapter 12, “Set Up Hardware Devices.”
Please purchase PDF Split-Merge on www.verypdf.com to remove this watermark.
2.
Click the Resolution arrow to display its slider. Then drag the slider all the way
down to choose the minimum resolution.
The change is reflected in the thumbnail image of your monitor at the top of the
window, but not on your screen.
3.
Click away from the slider, and then click Apply.
4.
In the Display Settings message box, click Keep changes.
Tip You have 15 seconds to decide whether to retain the changed resolution. If you click
Keep Changes, the resolution is retained; if you click Revert or don’t click either button,
the resolution returns to its previous setting.
Unless your monitor was already set to the minimum resolution, your display
changes to the lowest resolution supported by your monitor and graphics card.
Tip When your display is set to the lowest resolution, Control Panel windows span the
width of the screen.
5.
In the Resolution list, drag the slider all the way to the top to choose the maximum
resolution.
You can either drag the slider to a marker or click above the marker you want.
6.
Click away from the slider, and click Apply. Then in the Display Settings message
box, click Keep changes.
Your screen resolution changes to the maximum supported by your monitor and
graphics card.
7.
Experiment with the available screen resolutions. Apply the one you like best, and
then in the Screen Resolution window, click OK.
CLEAN UP Close Control Panel.
Key Points
l
To personalize the Windows 7 user interface, you can easily apply a theme consisting
of a desktop background, window colors, sounds, and a screen saver.
l
You can customize a theme by changing any of its four elements, and save custom
themes for later use.
l
You can use a screen saver to hide information on your screen after a period of
inactivity.
l
To fit more or less information on your screen, you can change the resolution at
which your monitor displays information.
Key Points
317
Please purchase PDF Split-Merge on www.verypdf.com to remove this watermark.
Chapter at a Glance
Modify the taskbar,
page 326
Change the computer
name, page 341
Modify the Start menu,
page 320
Configure power options,
page 343
Manage the date and
time display, page 335
Please purchase PDF Split-Merge on www.verypdf.com to remove this watermark.
319
10
Change
System Settings
In this chapter, you will learn how to
4 Modify the Start menu and the taskbar.
4 Manage the date and time display.
4 Change the computer name.
4 Configure power options.
When Windows 7 was installed on your computer, the computer manufacturer or the per-
son performing the installation might have used the default system settings. Alternatively,
they might have customized visible system elements, such as the computer name and
drive names, which programs appear on the Start menu, and which icons appear on the
taskbar. They might also have changed other settings that run more in the background,
such as the available search providers and Accelerators, or the default programs for
working with certain types of files.
Whether you’re working with the default settings or with custom settings, you can easily
change the appearance and functionality of many of the basic Windows 7 system elements.
You might want to explore different configurations to see whether you can improve your
efficiency, or some changes might be necessary rather than optional. For example, when
you travel with a portable computer, you might need to change the computer’s time-zone
setting or power-management options.
In this chapter, you’ll learn how to customize the Start menu and the taskbar to suit the
way you work. You’ll manually change the system time and restore the local time by
synchronizing with an Internet time server, and then you’ll add a different time zone
to your clock’s display. Finally, you’ll see how to change your computer’s name and its
power settings.
Contents
10 Change
System Settings
319
Modifying the Start Menu . . . . . . . . . . . . . . . . . . . . . . . . . . . . . . . . . . . . . . . . . . . . . . . .320
Modifying the Taskbar . . . . . . . . . . . . . . . . . . . . . . . . . . . . . . . . . . . . . . . . . . . . . . . . . . .326
Position and Size . . . . . . . . . . . . . . . . . . . . . . . . . . . . . . . . . . . . . . . . . . . . . . . . . . .326
Taskbar Toolbars . . . . . . . . . . . . . . . . . . . . . . . . . . . . . . . . . . . . . . . . . . . . . . . . . . .327
Taskbar Properties . . . . . . . . . . . . . . . . . . . . . . . . . . . . . . . . . . . . . . . . . . . . . . . . . .328
Notification Area . . . . . . . . . . . . . . . . . . . . . . . . . . . . . . . . . . . . . . . . . . . . . . . . . . .329
Managing the Date and Time Display . . . . . . . . . . . . . . . . . . . . . . . . . . . . . . . . . . . . . . 335
Changing the Computer Name. . . . . . . . . . . . . . . . . . . . . . . . . . . . . . . . . . . . . . . . . . . .341
Configuring Power Options . . . . . . . . . . . . . . . . . . . . . . . . . . . . . . . . . . . . . . . . . . . . . . .343
Key Points . . . . . . . . . . . . . . . . . . . . . . . . . . . . . . . . . . . . . . . . . . . . . . . . . . . . . . . . . . . . . .347
Please purchase PDF Split-Merge on www.verypdf.com to remove this watermark.
320
Chapter 10 Change System Settings
See Also For information about changing the appearance and behavior of Windows Internet
Explorer 8, see “Personalizing Internet Explorer 8” in Chapter 8, “Manage Internet Explorer.”
For information about changing your computer’s security settings, see Windows 7 Step by
Step Deluxe Edition, by Joan Preppernau and Joyce Cox (Microsoft Press, 2010).
Practice Files You won’t need any practice files to complete the exercises in this chapter.
See “Using the Practice Files” at the beginning of this book for more information.
Modifying the Start Menu
The Start menu is your primary interface for starting programs, locating files, and
working with system utilities. You can customize the Start menu in many ways. For
example, you can:
l
Specify the maximum number of recently used programs shown in the left pane—
up to 30, depending on your screen resolution.
l
Specify the maximum number of files shown in program-specific jump lists and
in the Recent Items list, and control whether the Recent Items link appears in the
right pane of the Start menu.
See Also The maximum number of files you specify controls not only the files
that appear on Start menu jump lists, but also the number of items that appear
on taskbar-button shortcut menus. For more information about taskbar buttons,
see “Using the Windows Taskbar” in Chapter 1, “Explore Windows 7.”
l
Display or hide the Favorites menu, from which you can open the Web sites and
pages you save from Internet Explorer.
l
Display or hide links to the Computer, Control Panel, and Games windows, as
well as links to folder windows for your Documents, Downloads, Music, Pictures,
Recorded TV, and Videos folders and your personal Users subfolder. By default,
clicking a link displays the associated contents in a window or folder window. For
greater efficiency, you can display the contents as a menu from which you can
make a choice.
l
Display or hide links to the Connect To, Default Programs, Devices And Printers,
Help, Homegroup, Network, and Search windows. These links aren’t available as
menus because they don’t contain other groups or folders.
Please purchase PDF Split-Merge on www.verypdf.com to remove this watermark.