Tài liệu Teach Yourself PL/SQL in 21 Days- P6 docx
Bạn đang xem bản rút gọn của tài liệu. Xem và tải ngay bản đầy đủ của tài liệu tại đây (2.54 MB, 50 trang )
Using SQL 227
8
T
ABLE
8.1
The Employee Table After Inserting
emp_id emp_name supervised_by pay_rate pay_type
1 Jessica Loraine 2 8.50 H
2Kurt Roberts 5 100.00 S
This insert statement simply created two records in the employee table. The statement
provided the data to be used in the record creations.
Note that there were no
column_name
references in the
INSERT
statement. The reason is
that SQL will make a one-to-one match of the
column_name
to the data included in the
INSERT
statement. If you want, you can insert data into selected columns as shown in the
second example.
It is advisable to always include the column list to ensure clarity to others.
The column list will come in handy whenever you have to debug your code.
Likewise it is advisable to use a sequence number for any of the table’s pri-
mary key values.
Tip
Here’s the second example:
INSERT into employee (emp_id, emp_name) values
( 1, ‘ Jessica Loraine’,
2, ‘ Kurt Roberts’);
In the second example, you only placed data in the
emp_id
and
emp_name
columns. All other columns would be blank, as seen in Table 8.2.
T
ABLE
8.2
Inserting with Named Columns
emp_id emp_name supervised_by pay_rate pay_type
1 Jessica Loraine
2Kurt Roberts
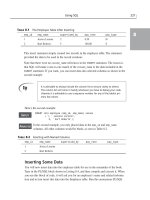
Inserting Some Data
You will now insert data into the employee table for use in the remainder of the book.
Type in the PL/SQL block shown in Listing 8.4, and then compile and execute it. When
you run this block of code, it will ask you for an employee’s name and related informa-
tion and in turn insert this data into the Employee table. Run this anonymous PL/SQL
I
NPUT
A
NALYSIS
12 7982 ch08 11/30/99 1:14 PM Page 227
Please purchase PDF Split-Merge on www.verypdf.com to remove this watermark.
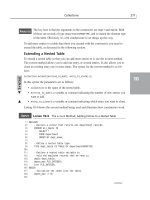
block multiple times in order to end up with roughly 10 employees’ worth of data
loaded. Your goal here is to input data that represents the typical organizational chart
shown in Figure 8.4. You want data loaded for all levels of the organizational chart.
While inserting data, feel free to use any names you like.
228 Day 8
F
IGURE
8.4
Organization chart.
Mike
3
Joe
3
Lauren
3
Jack
2
Andrew
2
William
3
Jenny
2
Richard
2
Melinda
2
Sarah
2
Jon
3
Matt
6
Tom
1
Department 2
Department 3
Department 1
Key: employee name
emp. number
Listing 8.4 shows the PL/SQL anonymous block that you can run to insert the necessary
data.
L
ISTING
8.4
Inserting Records with PL/SQL Code
DECLARE -- insert department data first
i_dept_id INTEGER,
i_dept_name,
BEGIN
INSERT into department values
(&i_dept_id,’&dept_name’);
END;
/
COMMIT; -- save the department data
DECLARE -- insert employee and emp_dept data
i_id INTEGER;
e_id INTEGER;
i_name VARCHAR2(32);
i_super INTEGER;
i_rate NUMBER(9,2);
i_type CHAR;
i_emp_dept INTEGER;
I
NPUT
12 7982 ch08 11/30/99 1:14 PM Page 228
Please purchase PDF Split-Merge on www.verypdf.com to remove this watermark.
Using SQL 229
8
e_emp_dept INTEGER;
BEGIN
e_id:=&employee_id;
e_emp_dept:=&employee_department_id;
INSERT into employee values
(e_id, ‘&i_name’,&i_super,&i_rate,’&i_type’);
INSERT into emp_dept values (e_id,e_emp_dept);
END;
/
COMMIT; -- save employee and emp_dept datadata
The code in Listing 8.4 is used to insert data first into the Department table, and
then the Employee table, and finally the
Emp_Dept
table.
Singleton
SELECT
Statement
The
SELECT
statement is one of the ways to get data out of the database. In order to use
the
SELECT
statement, you must have
SELECT
system privileges. Depending on how you
design and use the
SELECT
statement, you can retrieve a single (singleton) row or multi-
ple rows of data from the database. Sometimes you’ll only want a single row returned;
otherwise, you want your PL/SQL block to handle the multiple rows without terminating.
The syntax for the
SELECT
statement is as follows.
SELECT column_name
from table_name
WHERE condition
ORDER BY expression
In this syntax,
column_name
is the name of the column or columns from which you want
data.
table_name
is the name of the table or tables in which the previous columns
belong. The
condition
statement is used to specify the criteria to retrieve specific rows.
The
ORDER BY
clause enables you to define the order in which to display the retrieved
rows. For example, you might want to display the rows in alphabetical order or in numer-
ic sequence. Both the
WHERE
and the
ORDER BY
clauses are optional.
Some
SELECT
Command Examples
The first example is a simple
SELECT
statement to retrieve all the rows from the
Employee table:
SELECT emp_id, emp_name, supervised_by, pay_rate, pay_type
from employee
ORDER BY emp_name
A
NALYSIS
,
S
YNTAX
,
I
NPUT
12 7982 ch08 11/30/99 1:14 PM Page 229
Please purchase PDF Split-Merge on www.verypdf.com to remove this watermark.
This statement will return all rows from the Employee table sorted in ascending
order by the employee name. Because this statement grabs all columns and rows
from the table, you could use the wildcard
*
to achieve the same result.
The following example is synonymous with the previous example as it will select all
rows and columns from the Employee table.
SELECT * from employee ORDER BY emp_name
A more complex, but realistic, example would be
SELECT * from employee
WHERE pay_type = ‘S’
ORDER BY pay_rate desc
This
SELECT
statement will return all rows from the table that have the
pay_type
equal to
‘S’
. The returned rows will be in
pay_rate
descending order.
Finally, Listing 8.5 is an example of a singleton
SELECT
. An assumption is made here that
you only have one employee with the name of Jack Richards. You might want your pro-
gram to indicate to you if you have multiple occurrences of a specific employee. The
bottom line is that you don’t want processing to halt if this happens.
L
ISTING
8.5
Multiple-Row SELECT Command
DECLARE
v_emp_id INTEGER;
BEGIN
SELECT emp_id -- select statement
into v_emp_id
from employee
WHERE emp_name = ‘Jack Richards’; -- where clause
exception
when too_many_rows THEN -- type of exception
Null; --exception logic can go here as needed
END;
In this example, an exception is raised when more than one row is returned by
the
SELECT
statement.
Exploring the
UPDATE
and
DELETE
Statements
The next two SQL DML statements to cover are the
UPDATE
and the
DELETE
statements.
You can use these in any PL/SQL block as necessary. The purpose of these commands is
synonymous with their names. The
UPDATE
command enables the user to change the
230 Day 8
A
NALYSIS
I
NPUT
A
NALYSIS
I
NPUT
A
NALYSIS
12 7982 ch08 11/30/99 1:14 PM Page 230
Please purchase PDF Split-Merge on www.verypdf.com to remove this watermark.
Using SQL 231
8
values of an existing row. The
DELETE
command provides the means to remove or delete
a row from a table.
The Syntax for the
UPDATE
Command
UPDATE table_name
set (column_name = value)
WHERE statement
In this syntax,
table_name
is the table containing the row you want to update,
column_name
is the column you want to update, and the
WHERE
statement identifies the
row in the table to be identified.
The following is an example of the
UPDATE
command to change the values of the
Employee table. This statement will change the value of the employee name to Tim
Brandon for the table row which has the
EMP_ID
equal to 2.
UPDATE employee
SET (emp_name = ‘Timothy Brandon’)
WHERE emp_id = 2;
The Syntax for the
DELETE
Command
DELETE from table_name
WHERE statement
In this syntax,
table_name
is the table containing the row to be deleted, and the
WHERE
statement identifies the row to be deleted.
The following example will delete all records from the Department table where the
department name is equal to Accounting.
DELETE FROM department
WHERE dept_name = ‘ACCOUNTING’;
The example illustrates the deletion of all records from the Department table
where the department name is Accounting. All other records with department
names other than Accounting will remain in the table and untouched.
,
S
YNTAX
,
S
YNTAX
I
NPUT
A
NALYSIS
Once records are deleted from a table they remain unusable until a COMMIT
or a ROLLBACK command is issued. The COMMIT command will permanently
delete the records while the ROLLBACK command will restore the records.
Caution
Refer to the Oracle SQL Language Reference Manual for a more comprehensive syntax
diagram for these last two commands.
12 7982 ch08 11/30/99 1:14 PM Page 231
Please purchase PDF Split-Merge on www.verypdf.com to remove this watermark.
Handling Types of Exceptions
Exceptions are errors that occur during runtime processing. These exceptions can arise
due to different situations. Normally, PL/SQL processing will terminate as soon as it
encounters an exception. Fortunately, PL/SQL gives you several tools to handle these
exceptions so that processing does not terminate. After an exception is detected, process-
ing is transferred to your handling routine within the PL/SQL block. Refer to Day 7,
“Procedures, Packages, Errors, and Exceptions,” for additional information about
Oracle’s exception-handling capabilities.
The following are the more commonly used predefined exceptions that you can trap in
your exception-handling section of your PL/SQL block:
•
no_data_found
—Singleton
SELECT
statement returned no data.
•
too_many_rows
—Singleton
SELECT
statement returned more than one row of data.
•
invalid_cursor
—Illegal cursor operation occurred.
•
value_error
—Arithmetic, conversion, or truncation error occurred.
•
when others
—Used when no other exception is explicitly listed.
Listing 8.6 offers an enhancement to the code in Listing 8.5. In this example, I added
another exception to handle the case when no rows are returned from the database.
L
ISTING
8.6
Multiple-Row SELECT Command with Several Exception-
Handling Routines
DECLARE
v_emp_id INTEGER;
BEGIN
SELECT emp_id
into v_emp_id
from employee
WHERE emp_name = ‘Jack Richards’;
exception
when no_data_found THEN
v_emp_id := 888; -- 888 is just an example of any code you can use
➥ to indicate a specific error
when too_many_rows THEN
v_emp_id := 999; -- 999 is just an example of any code you can use
➥ to indicate a specific error
END;
In the example in Listing 8.6, one of several exceptions can be raised. An excep-
tion is raised when no rows are returned by the
SELECT
statement as well as
when more than one row is returned by the
SELECT
statement.
232 Day 8
I
NPUT
A
NALYSIS
12 7982 ch08 11/30/99 1:14 PM Page 232
Please purchase PDF Split-Merge on www.verypdf.com to remove this watermark.
Using SQL 233
8
Using the
LOCK TABLE
Statement
The final DML statement covered in this chapter is the
LOCK TABLE
statement. This SQL
statement will lock one or more tables during the execution of your session. Although
not typically thought of as a DML statement, it is indeed one. It is used primarily to
enhance the effects of the other four DML statements. The syntax for the
LOCK TABLE
statement is as follows.
LOCK TABLE table_name
IN lockmode MODE
{NOWAIT};
In this syntax,
•
table_name
is the name of the table to be locked
•
lockmode
represents the nature or extent of the lock. The following are the possible
values for the
lockmode
:
•
ROW SHARE
allows concurrent access to the locked table, but prohibits users
from locking the entire table for exclusive access.
ROW SHARE
is synonymous
with
SHARE UPDATE
, which is included for compatibility with earlier versions
of Oracle.
•
ROW EXCLUSIVE
is the same as
ROW SHARE
,but also prohibits locking in
SHARE
mode. Row Exclusive locks are automatically obtained when updating,
inserting, or deleting.
•
SHARE UPDATE
allows concurrent access to the locked table, but prohibits
users from locking the entire table for exclusive access.
•
SHARE
allows concurrent queries but prohibits updates to the locked table.
•
SHARE ROW EXCLUSIVE
is used to look at a whole table and to allow others to
look at rows in the table, but to prohibit others from locking the table in
SHARE
mode or updating rows.
•
EXCLUSIVE
allows queries on the locked table but prohibits any other activity
on it.
•
nowait
option is an optional parameter. This specifies that Oracle returns control to
you immediately if the specified table is already locked by another user. In this
case, Oracle returns a message indicating that the table, partition, or subpartition is
already locked by another user. If you omit this clause, Oracle waits until the table
is available, locks it, and returns control to you.
S
YNTAX
12 7982 ch08 11/30/99 1:14 PM Page 233
Please purchase PDF Split-Merge on www.verypdf.com to remove this watermark.
The following is an example of using the
LOCK TABLE
statement to lock the Department
table in exclusive mode, which means the lock command does not have to wait for other
locks to dissipate.
LOCK TABLE department
IN EXCLUSIVE MODE
NOWAIT;
The sample code will place a lock on the Department table. This lock will pre-
vent others from modifying the table while you have the lock on it.
Transaction Control Statements
Transaction control statements are the last set of SQL statement we will discuss in this
chapter. Transaction control statements help you manage the changes made by any of the
other DML statements. The four transaction control statements are
•
COMMIT
—makes permanent any changes to the database during this session.
•
ROLLBACK
—used to remove any changes since the last commit during this session.
This command will restore the data to where it was at the last commit.
•
SAVEPOINT
—a bookmark within or at the boundaries of a transaction. This book-
mark is referenced in other parts of your PL/SQL program when needed to roll-
back.
•
SET TRANSACTION
—defines the nature of the transaction and its behavior during
rollback processes.
Using Records
A record is a collection of individual values that are related somehow. Most often,
records are used to represent a row in a table, and thus the relationship is based on all the
values being from the same row. Each field in a record is unique and has its own values.
A record as a whole does not have a value.
By using records, you can group like data into one structure and then manipulate this
structure as one entity or logical unit. This helps reduce coding and keeps the code easier
to maintain and understand.
Declaring a Record Variable
In order to use a record, you must define the record by declaring a record type. Then,
you must declare one or more PL/SQL variables to be of that type.
234 Day 8
I
NPUT
A
NALYSIS
12 7982 ch08 11/30/99 1:14 PM Page 234
Please purchase PDF Split-Merge on www.verypdf.com to remove this watermark.
Using SQL 235
8
You declare a record type in the declaration portion of a PL/SQL block, subprogram, or
package. The following example declares a record type named
emp_pay_info
:
TYPE emp_pay_info IS RECORD --record declaration
(emp_id INTEGER,
emp_name VARCHAR2(32),
pay_rate NUMBER(9,2),
pay_type CHAR(1)
);
With the record type defined, you can then declare variables of that type, as in the fol-
lowing example:
DECLARE
...
emp emp_pay_info;
...
BEGIN
...
After you have a record variable declared, you can use dot notation to reference the indi-
vidual fields within the record. In the following example, the
pay_type
field in the
emp
record is referenced in an
IF
statement:
IF emp.pay_type = ‘S’ THEN...
Having related fields grouped together in a record allows you to more easily keep things
together when you are passing those values as parameters to other program units. This
example shows the declaration for a procedure that takes a record of type
emp_pay_info
as a parameter:
procedure calculate_check (emp IN emp_pay_info) IS
...
Passing related values as a record not only makes your code more readable, but it makes
it more maintainable as well. If you need to add another field to the
emp_pay_info
record, you only need to change the record definition, and that new value will be passed
around everywhere that the record goes. If you were dealing with separate variables, you
would have to change the header for every procedure and function that used the record.
Using the
%TYPE
Attribute
If you’re declaring a record, and you want some of the field definitions to match defini-
tions of columns in a database table, you can use the
%TYPE
attribute.
12 7982 ch08 11/30/99 1:14 PM Page 235
Please purchase PDF Split-Merge on www.verypdf.com to remove this watermark.
To declare a variable to match a column definition, place an entry such as this in the dec-
laration section of the PL/SQL block:
variable_name table_name.column_name%TYPE;
The
%TYPE
following the table and column name tells Oracle that you want the variable
being declared to inherit its datatype and length from the definition of the named col-
umn. The following example shows another way to define the
emp_pay_info
record
shown in the previous section:
TYPE emp_pay_info IS RECORD
(emp_id employee.emp_id%TYPE,
emp_name employee.emp_name%TYPE,
pay_rate employee.pay_rate%TYPE,
pay_type employee.pay_type%TYPE
);
Using
%TYPE
like this helps insulate your PL/SQL code from changes in the underlying
database columns. In the next section you’ll learn an even easier technique, using
%ROWTYPE
,that you can use when you want the record to contain fields for all columns in
a table.
Using Record Variables Based on Database Tables
If a record type variable is based on a table, it means that the fields in the record have
the exact same name and datatype as the columns in the specified table. You use the
%ROWTYPE
attribute to declare a record based on a table.
To declare a record variable that exactly matches the definition of a table—that is, that
contains one field for each column in the table—use the following syntax for the record
type:
table_name%ROWTYPE;
where
table_name
is the name of the table.
%ROWTYPE
is a keyword that tells Oracle that
the record should have one field for each column in the table, and that the datatypes of
the fields should exactly match the datatypes of the columns. The following example
declares the variable
dept
so that it matches the definition of the Department table:
DECLARE
dept department%ROWTYPE;
...
236 Day 8
%TYPE
can be used in any variable declaration, not just with records.
Note
12 7982 ch08 11/30/99 1:15 PM Page 236
Please purchase PDF Split-Merge on www.verypdf.com to remove this watermark.
Using SQL 237
8
The beauty of this is that a change to the table definition automatically ripples through to
your PL/SQL code. You don’t need to manually hunt down and change record defini-
tions.
Adding a column to a table would be transparent to your PL/SQL code, as
would certain types of datatype changes. However, if you drop a table col-
umn that your code is using, you need to visit that code and make some
changes.
Note
As with any other record, you use dot notation to reference a specific field. As far as
PL/SQL is concerned, using
department%ROWTYPE
has the same effect as if you had
declared the record like this:
DECLARE
TYPE dept_type IS RECORD
(
dept_id department.dept_id%type,
dept_name department.dept_name%type,
no_of_emps department.no_of_emps%type
);
dept dept_type;
If you’re working with all or most of the fields in a table, use
%ROWTYPE
to declare your
records. You’ll save typing, and you’ll insulate your code somewhat from changes to the
table.
Using Record Variables and
SELECT
Statements
If you have a record where all the fields in the record correspond exactly to the fields
being returned from a
SELECT
statement, you can retrieve the values directly into that
record. Here’s an example:
DECLARE
dept department%ROWTYPE;
BEGIN
SELECT * INTO dept
FROM department
WHERE dept_id = 502;
...
END;
/
12 7982 ch08 11/30/99 1:15 PM Page 237
Please purchase PDF Split-Merge on www.verypdf.com to remove this watermark.
You don’t have to use
%ROWTYPE
when you do this, and you don’t have to use
SELECT *
either. Listing 8.7 shows the
dept
record being declared without the use of
%ROWTYPE
,
and Listing 8.8 shows a
SELECT
statement other than
SELECT *
.
238 Day 8
Listing 8.7 selects for department 502. If you don’t have that department,
replace 502 with a valid number for your database.
Note
L
ISTING
8.7
Selecting Directly into a Record
1: DECLARE
2: TYPE dept_type IS RECORD
3: (
4: dept_id department.dept_id%type,
5: dept_name department.dept_name%type,
6: no_of_emps department.no_of_emps%type
7: );
8:
9: dept dept_type;
10: BEGIN
11: SELECT * INTO dept
12: FROM department
13: WHERE dept_id = 502;
14: END;
15: /
A record type named
dept_type
is defined in lines 2–7. The declaration in line 9
declares a variable named
dept
to be of type
dept_type
. Because the fields in the
dept_type
record match exactly the fields in the Department table, the
SELECT
statement
in lines 11–13 will work.
L
ISTING
8.8
Selecting a Specific List of Fields into a Record
1: DECLARE
2: TYPE dept_type IS RECORD
3: (
4: dept_id department.dept_id%type,
5: dept_name department.dept_name%type,
6: no_of_emps department.no_of_emps%type
7: );
8:
9: dept dept_type;
10: BEGIN
11: SELECT dept_id, dept_name, no_of_emps INTO dept
12: FROM department
13: WHERE dept_id = 502;
I
NPUT
A
NALYSIS
I
NPUT
12 7982 ch08 11/30/99 1:15 PM Page 238
Please purchase PDF Split-Merge on www.verypdf.com to remove this watermark.
Using SQL 239
8
14: END;
15: /
The three fields in the Department table are enumerated in the
SELECT
list.
Because the number of fields (and their datatypes) corresponds with the defini-
tion of the
dept_type
record, you are able to retrieve the data directly into a variable of
type
dept_type
.
The key thing to keep in mind when selecting data directly into a record is that the
columns and datatypes represented in the
SELECT
list must correspond exactly to the
fields and datatypes in the record definition. The column names and field names do not
need to match, as Oracle assigns column values to fields in a record based on position,
but the datatypes must match. If you are using
SELECT *
to retrieve values from a table,
you are safest using
%ROWTYPE
when declaring the record.
Using Record Variables Based on Cursor Definitions
Just as you can base a record on a table, you can also base a record definition on a cur-
sor. Records that are based on an Oracle cursor draw their structure from the
SELECT
statement used for the cursor. This type of record has the same number of columns, with
the same names and datatypes, as those in the cursor. The
%ROWTYPE
keyword is used to
declare the record that is based on a cursor. Listing 8.9 shows a cursor named
all_depts
, and a record named
dept
that is based on that cursor.
L
ISTING
8.9
Declaring a Record to Match a Cursor
1: DECLARE
2: CURSOR all_depts is
3: SELECT dept_id, dept_name
4: FROM department
5: ORDER BY dept_name;
6:
7: dept all_depts%ROWTYPE;
8: BEGIN
9: OPEN all_depts;
10:
11: LOOP
12: EXIT WHEN all_depts%NOTFOUND;
13: FETCH all_depts INTO dept;
14: DBMS_OUTPUT.PUT_LINE(dept.dept_name);
15: END LOOP;
16:
17: CLOSE all_depts;
18: END;
19: /
A
NALYSIS
I
NPUT
12 7982 ch08 11/30/99 1:15 PM Page 239
Please purchase PDF Split-Merge on www.verypdf.com to remove this watermark.
BOTTLING
BUILDING MAINTENANCE
DISTILLATION
EMPLOYEE NEWSLETTERS
FERMENTATION
FLEET REPAIR
GUTTING
PAYROLL
SCALE PROCESSING
SEWAGE
TECHNICAL WRITING
UNLOADING
UNLOADING
The cursor
all_depts
is declared in lines 2–5. In line 7, a record variable named
dept
is declared based on the definition of the cursor. Because the variable
dept
matches the cursor exactly, the
FETCH
statement in line 13 can fetch the results of the
SELECT
statement directly into the record. If at some point in the future you need to add
columns to the select list, that change will automatically ripple through to the record def-
inition, and the
FETCH
statement will continue to operate.
Declarations at the Package Level
Declaring a package has two parts: the package specification and the package body. The
package body defines all the functions, procedures, and other constructs that are declared
in the package specification. The package specification declares all variables, constants,
cursors, procedures, and functions. This section reviews the declarations of variables in
the package specification.
The package specification contains the declaration of all objects that will be used in the
package body. The following are several examples of a package specification that
declares a cursor, variable, constant, and record.
package emp_data is -- package specification
pay_raise constant real := 1.25;
high_rate INTEGER;
CURSOR salary_cur (emp_id INTEGER, pay_rate NUMBER (9,2));
TYPE sal_rec is record (emp_name VARCHAR2(32), pay_rate NUMBER (9,2));
emp_rec salary_cur%rowtype;
END emp_data;
One of the advantages of declaring items in a package is that they are global in
nature and accessible by all. This means that any program in your application can
use the variables, cursors, constants, and records declared in the package specification.
You treat these items (except constants) as if they were declared locally in that you can
240 Day 8
O
UTPUT
A
NALYSIS
I
NPUT
A
NALYSIS
12 7982 ch08 11/30/99 1:15 PM Page 240
Please purchase PDF Split-Merge on www.verypdf.com to remove this watermark.
Using SQL 241
8
change their values as needed. This global nature of the data is only within a session and
is not available across multiple sessions. This means, for example, that the variables run-
ning in one user’s applications are not accessible to a different user’s application unless
the
DBMS_PIPE
package is used.
Pseudocolumns
Pseudocolumns are not really columns in a table; they just have characteristics of
columns. These pseudocolumns will return values when referenced just like real
table columns. However, you cannot do any other DML or DDL statements on these
pseudocolumns. Pseudocolumns are primarily used to give the programmer more tools
to use in his code. They provide a convenient way to obtain information about different
aspects of the database. The following are the Pseudocolumns we will discuss:
CURRVAL
,
NEXTVAL
,
ROWID
, and
ROWNUM
.
CURRVAL
and
NEXTVAL
Pseudocolumns
The
CURRVAL
and
NEXTVAL
pseudocolumns are used in conjunction with sequences. The
CURRVAL
pseudocolumn returns the current value of the referenced sequence. The
NEXTVAL
pseudocolumn, when referenced, will increment the sequence value and then
return the new sequence value.
These pseudocolumns may only be used in the
SELECT VALUE
clause, and
SET
clause statements.
Note
To reference the
CURRVAL
and
NEXTVAL
pseudocolumns, the SQL dot notation must be
used. For example, the following statement will insert a new record into the Employee
table.
This insert statement will use the next increment of the
emp_id_seq
sequence for the
value to be inserted into the
emp_id
column.
INSERT into employee
VALUES (emp_id_seq.NEXTVAL,’Stanton Bernard’);
This sample code inserts a single record into the Employee table. The employee
id is created and provide by the
emp_id_seq
sequence number. The employee
name is hard coded and provide in the insert statement.
I
NPUT
A
NALYSIS
12 7982 ch08 11/30/99 1:15 PM Page 241
Please purchase PDF Split-Merge on www.verypdf.com to remove this watermark.
ROWID
Pseudocolumns
The
ROWID
pseudocolumn represents the binary address of a row in a table. You can use
variables of type
UROWID
to store rowids in a readable format. In the following example,
you declare a variable named emp_
row_id
for that purpose:
DECLARE
emp_row_id UROWID;
When you select or fetch a rowid into a
UROWID
variable, you can use the function
ROWIDTOCHAR
, which converts the binary value to an 18-byte character string. Then, you
can compare the
UROWID
variable to the
ROWID
pseudocolumn in the
WHERE
clause of an
UPDATE
or
DELETE
statement to identify the latest row fetched from a cursor.
ROWNUM
Pseudocolumns
The
ROWNUM
pseudocolumn refers to the order in which data was retrieved from a table.
For example,
ROWNUM
of 1 indicates that row was the first row retrieved from the table.
Likewise,
ROWNUM
of 2333 refers to 2333rd row retrieved from the table.
ROWNUM
values
are assigned when the fetch occurs and are not affected by the
ORDER BY
clause.
The most common usage of the
ROWNUM
pseudocolumn is in the
WHERE
clause statement.
For example, you may want to do an interactive select on a table until the
ROWNUM
is
equal to some constant.
In this example, the interaction will continue until the
ROWNUM
is greater than 100.
DECLARE
CURSOR c1 IS SELECT sal
FROM employee
WHERE sal > 500 AND ROWNUM < 100;
The above cursor declaration code uses the
ROWNUM
pseudocolumn in the
WHERE
clause. The
ROWNUM
is used to limit the number of records processed to the first
99 records in the table.
Summary
Today’s lesson presents you with a quick overview of using SQL statements within a
PL/SQL block. You learned how to insert and retrieve data from tables that you created
and how to prepare for runtime errors. You also learned about PL/SQL variables—how to
declare them; how to use them; and how to base them on other objects such as database
tables, columns, constants, and even other variables. The
%type
attribute enables you to
keep the variable declaration in synch with the datatypes in the database.
242 Day 8
A
NALYSIS
I
NPUT
12 7982 ch08 11/30/99 1:15 PM Page 242
Please purchase PDF Split-Merge on www.verypdf.com to remove this watermark.
Using SQL 243
8
Q&A
Q What happens if my SQL statement fails inside the PL/SQL block?
A The processing of your PL/SQL block will terminate unless you have code in place
to trap and handle the exception. PL/SQL allows for numerous predefined excep-
tions that make your coding easier.
Q What is a PL/SQL record?
A A PL/SQL record is a variable with the type record. It is a composite structure con-
taining fields with its own datatypes. Records can help the developer by reducing
the volume of code necessary. Records allow similar fields to be grouped and treat-
ed as one logical entity.
Q What is the difference between Data Manipulation Language statements and
Transaction control statements?
A The Transaction control statements ensure the integrity of the data while using
Data Manipulation Language statements. That is, while you use the
SELECT
,
UPDATE
,
INSERT
, and
DELETE
statements, the programmer will insert the appropriate
transaction control statements to ensure the data is accurate and does not become
corrupted.
Workshop
The following workshop will test your comprehension of this chapter and give you an
opportunity to practice what you have just learned. The answers to the quiz and exercises
are provided in Appendix A, “Answers.”
Quiz
1. Name some of the database objects that you can base a variable declaration on.
2. Name at least two of the exception types discussed in this chapter.
3. Do you need to list the table column names while inserting data into that table?
4. What are the five SQL DML statements permitted in a PL/SQL block?
Exercises
Evaluate each of the following three declarations and determine which ones are legal or
not legal. Explain your answer for those that are not legal.
1. Legal or not legal:
DECLARE
emp_rec emp_rec_type;
12 7982 ch08 11/30/99 1:15 PM Page 243
Please purchase PDF Split-Merge on www.verypdf.com to remove this watermark.
2. Legal or not legal:
DECLARE
emp_last_name %type;
3. Legal or not legal:
LOCK TABLE department
IN EXCLUSIVE MODE;
244 Day 8
12 7982 ch08 11/30/99 1:15 PM Page 244
Please purchase PDF Split-Merge on www.verypdf.com to remove this watermark.
D
AY
9
W
EEK
2
Manipulating Data with
Cursors
by Tom Luers
PL/SQL cursors provide a way for your program to select multiple rows of data
from the database and then process each row individually. Specifically, a cursor
is a name assigned by Oracle to every SQL statement processed. This name
provides Oracle a means to direct and control all phases of the SQL processing.
Today, you will learn
• Cursor creation
• Cursor processing
• Defining and using cursor attributes
What Is a Cursor?
Oracle uses two kinds of cursors: implicit and explicit. PL/SQL
implicitly declares a cursor for every SQL statement used, regardless
of the number of rows returned by the statement. It needs to do this to
N
EW
T
ERM
13 7982 CH09 11/30/99 1:14 PM Page 245
Please purchase PDF Split-Merge on www.verypdf.com to remove this watermark.
manage the processing of the SQL statement. Implicit cursors are declared by
Oracle for each
UPDATE
,
DELETE
, and
INSERT
SQL command. The user declares
and uses explicit cursors to process multiple rows returned by a
SELECT
state-
ment. Explicitly defined cursors are constructs that enable the user to name an
area of memory to hold a specific statement for access at a later time.
As you recall from earlier in this book,
SELECT
statements can return zero, one, or many
rows of data. When a PL/SQL cursor query returns multiple rows of data, the resulting
group of rows is called the active set. This active set is stored by Oracle in the explicitly
defined and named cursor that you create. The Oracle cursor is a mechanism used to
process multiple rows of data easily. Without cursors, the Oracle developer would have to
explicitly fetch and manage each individual row that is selected by the cursor query.
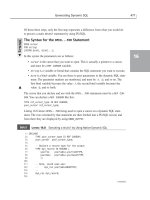
Another feature of the cursor is that it contains a pointer that keeps track of the current row
being accessed, which enables your program to process the rows one at a time. Figure 9.1
illustrates an Oracle cursor: It shows the active set, which is the row returned by the cursor’s
SELECT
statement and the pointer indicating the latest row fetched from the active set.
246 Day 9
Emp Id
Cathy
Karen
Linda
Patricia
1
3
3
2
1
4
3
2
Emp Name Emp Dept
Cursor
Current Row
Active Set
F
IGURE
9.1
An Oracle multirow
cursor.
Explicit Cursors
Explicit cursors are defined by the programmer to process a multiple-row active set one
record at a time. The following are the steps for using explicitly defined cursors within
PL/SQL:
1. Declare the cursor.
2. Open the cursor.
3. Fetch data from the cursor.
4. Close the cursor.
Declaring a Cursor
The first step is to declare the cursor for PL/SQL to reference the returned data. You
must do this in the declaration portion of your PL/SQL block. Declaring a cursor accom-
plishes two goals:
13 7982 CH09 11/30/99 1:14 PM Page 246
Please purchase PDF Split-Merge on www.verypdf.com to remove this watermark.