Tài liệu Teach Yourself PL/SQL in 21 Days- P7 ppt
Bạn đang xem bản rút gọn của tài liệu. Xem và tải ngay bản đầy đủ của tài liệu tại đây (2.58 MB, 50 trang )
Collections 277
10
The key here is that the arguments to the constructor are
dept1
and
dept2
. Both
of those are records of type
department%ROWTYPE
, and so match the element type
of the table. Obviously it’s a bit cumbersome to set things up this way.
To add more entries to a table than those you created with the constructor, you need to
extend the table, as discussed in the following section.
Extending a Nested Table
To extend a nested table so that you can add more entries to it, use the
extend
method.
The
extend
method allows you to add one entry, or several entries. It also allows you to
clone an existing entry one or more times. The syntax for the
extend
method is as fol-
lows.
collection.extend[(entries_to_add[, entry_to_clone])];
In this syntax the parameters are as follows:
•
collection
is the name of the nested table.
•
entries_to_add
is a variable or constant indicating the number of new entries you
want to add.
•
entry_to_clone
is a variable or constant indicating which entry you want to clone.
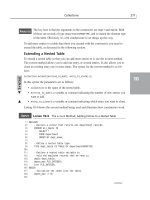
Listing 10.4 shows the
extend
method being used and illustrates how constructors work.
L
ISTING
10.4
The
extend
Method, Adding Entries to a Nested Table
1: DECLARE
2: --Declare a cursor that returns all department records.
3: CURSOR all_depts IS
4: SELECT *
5: FROM department
6: ORDER BY dept_name;
7:
8: --Define a nested table type.
9: TYPE dept_table IS TABLE OF department%ROWTYPE;
10:
11: --Declare a nested table variable to
12: --hold the employee records that we read in.
13: depts dept_table;
14: depts_max PLS_INTEGER;
15: inx1 PLS_INTEGER;
16: BEGIN
17: --Initialize the index into the table.
18: depts_max := 0;
19:
A
NALYSIS
,
S
YNTAX
,
I
NPUT
continues
14 7982 ch10 11/30/99 1:13 PM Page 277
Please purchase PDF Split-Merge on www.verypdf.com to remove this watermark.
20: --Initialize the table by creating one empty entry.
21: depts := dept_table ();
22:
23: FOR dept IN all_depts LOOP
24: depts_max := depts_max + 1;
25: depts.extend;
26: depts(depts_max).dept_id := dept.dept_id;
27: depts(depts_max).dept_name := dept.dept_name;
28: depts(depts_max).no_of_emps := dept.no_of_emps;
29: END LOOP;
30:
31: --Clone the first entry five times.
32: depts.extend(5,1);
33:
34: --Display the results.
35: FOR inx1 IN 1..depts_max+5 LOOP
36: DBMS_OUTPUT.PUT_LINE (
37: depts(inx1).dept_id ||
38: ‘ ‘ || depts(inx1).dept_name);
39: END LOOP;
40: END;
41: /
403 BOTTLING
402 DISTILLATION
501 Employee Newsletters
401 FERMENTATION
405 GUTTING
404 SCALE PROCESSING
502 Technical Writing
406 UNLOADING
403 BOTTLING
403 BOTTLING
403 BOTTLING
403 BOTTLING
403 BOTTLING
Line 8 declares the type for the nested table, and defines it to match the depart-
ment table. In line 13, the variable
depts
is declared, and becomes the nested
table. However, the table can’t be used until it is initialized, which happens in line 21,
with a call to the constructor. Because no values are passed to the constructor, the nested
table is created with zero entries.
The
FOR
loop in lines 23–29 reads the department records, and inserts them into the
table. Before each record is inserted, a call to
extend
is made in order to add space for
the new entry. After all the data has been read, another call to
extend
is made in line 32
278 Day 10
L
ISTING
10.4
continued
O
UTPUT
A
NALYSIS
14 7982 ch10 11/30/99 1:13 PM Page 278
Please purchase PDF Split-Merge on www.verypdf.com to remove this watermark.
Collections 279
10
to clone the first entry five times. The last
FOR
loop, in lines 35–39, dumps the contents
of the table to the screen (if you are using SQL*Plus) by using the
DBMS_OUTPUT
pack-
age. Sure enough, you can see that the first entry has been replicated five more times at
the end of the table.
Removing Entries from a Nested Table
You can remove entries from a nested table by using the
delete
method, just as you do
with index-by tables. The following example deletes entry 10 from the
depts
table:
depts.delete(10);
You can reuse entries after you delete them. The other entries in the table are not renum-
bered.
Another method of removing rows from a nested table is to invoke the
trim
method on
the table. The
trim
method removes a specified number of entries from the end of the
table.
nested_table.trim[(entries_to_trim)];
In this syntax the parameters are as follows:
•
nested_table
is the name of the nested table.
•
entries_to_trim
is the number of entries to remove from the end. The default
is
1
.
The trim method applies only to nested tables and variable-sized arrays. It cannot be
applied to index-by tables.
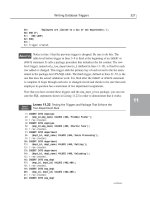
Listing 10.5 is an extension of Listing 10.4. This time, after the new entries are added to
the table and displayed, the
trim
method is used to remove them.
L
ISTING
10.5
The
trim
Method
1: DECLARE
2: --Declare a cursor that returns all department records.
3: CURSOR all_depts IS
4: SELECT *
5: FROM department
6: ORDER BY dept_name;
7:
8: --Define a nested table type.
9: TYPE dept_table IS TABLE OF department%ROWTYPE;
10:
11: --Declare a nested table variable to
,
S
YNTAX
,
I
NPUT
continues
14 7982 ch10 11/30/99 1:13 PM Page 279
Please purchase PDF Split-Merge on www.verypdf.com to remove this watermark.
12: --hold the employee records that we read in.
13: depts dept_table;
14: depts_max PLS_INTEGER;
15: inx1 PLS_INTEGER;
16: BEGIN
17: --Initialize the index into the table.
18: depts_max := 0;
19:
20: --Initialize the table by creating one empty entry.
21: depts := dept_table ();
22:
23: FOR dept IN all_depts LOOP
24: depts_max := depts_max + 1;
25: depts.extend;
26: depts(depts_max).dept_id := dept.dept_id;
27: depts(depts_max).dept_name := dept.dept_name;
28: depts(depts_max).no_of_emps := dept.no_of_emps;
29: END LOOP;
30:
31: --Clone the first entry five times.
32: depts.extend(5,1);
33:
34: --Display the results.
35: FOR inx1 IN 1..depts_max+5 LOOP
36: DBMS_OUTPUT.PUT_LINE (
37: depts(inx1).dept_id ||
38: ‘ ‘ || depts(inx1).dept_name);
39: END LOOP;
40: --Trim off the five clones of entry #1
41: depts.trim(5);
42:
43: --Delete the first entry.
44: depts.delete(1);
45:
46: --Display the new count.
47: DBMS_OUTPUT.PUT_LINE(depts.count);
48:
49: --Display the results.
50: FOR inx1 IN 1..depts_max+5 LOOP
51: IF depts.exists(inx1) THEN
52: DBMS_OUTPUT.PUT_LINE (
53: depts(inx1).dept_id ||
54: ‘ ‘ || depts(inx1).dept_name);
55: END IF;
56: END LOOP;
57:
58: END;
59: /
280 Day 10
L
ISTING
10.5
continued
14 7982 ch10 11/30/99 1:13 PM Page 280
Please purchase PDF Split-Merge on www.verypdf.com to remove this watermark.
Collections 281
10
403 BOTTLING
402 DISTILLATION
501 Employee Newsletters
401 FERMENTATION
405 GUTTING
404 SCALE PROCESSING
502 Technical Writing
406 UNLOADING
403 BOTTLING
403 BOTTLING
403 BOTTLING
403 BOTTLING
403 BOTTLING
7
402 DISTILLATION
501 Employee Newsletters
401 FERMENTATION
405 GUTTING
404 SCALE PROCESSING
502 Technical Writing
406 UNLOADING
Up through line 39, this listing is the same as Listing 10.4. Departments are read
from the database, the first one is cloned, and the results are displayed. After
that, in line 41, the
trim
method is used to remove the five clones of entry 1. Next, the
delete
method is called in line 44 to delete the first entry as well. Line 47 displays the
new count, telling how many entries are now in the table. It also serves a more interest-
ing purpose than that: PL/SQL doesn’t seem to recognize that you trimmed and deleted
entries until after you reference the table’s count, so line 47 is really a bug workaround.
Finally, lines 50–56 display the table entries that remain after the deleting and trimming.
O
UTPUT
A
NALYSIS
If you remove line 47 (which invokes the
count
method) from Listing 10.5,
and run it again, the second list of departments will match the first. In other
words, the
exists
method won’t recognize that you deleted some entries.
This is true with Oracle release 8.1.5, and is almost certainly a bug. The
workaround is to invoke the
count
method at least once.
Note
Using Variable-Sized Arrays
Like nested tables, variable-sized arrays or varrays also came into existence with
the release of Oracle8. Var rays are similar to nested tables, but they have a fixed
maximum size. They differ from nested tables in that when you store a varray into a data-
base column, the order of elements is preserved.
N
EW
T
ERM
14 7982 ch10 11/30/99 1:13 PM Page 281
Please purchase PDF Split-Merge on www.verypdf.com to remove this watermark.
Declaring and Initializing a Varray
To create a varray, you use the
VARRAY
keyword in a type declaration to create an array
type. Then you can use that type to declare one or more variables. The syntax for declar-
ing a varray type is as follows.
TYPE type_name IS {VARRAY|VARYING ARRAY} (size) OF entry_type [NOT NULL];
In this syntax the parameters are as follows:
•
type_name
is the name of the array type.
•
size
is the number of elements you want the array to hold.
•
entry_type
is the data type for elements of the array.
•
NOT NULL
prohibits array entries from being null.
Varrays need to be initialized just as nested tables do. Before you can use a varray, you
need to call its constructor. You can pass values to the constructor, and those values are
used to create array elements, or you can invoke the constructor with no parameters in
order to create an empty array.
The code in Listing 10.6 shows a varray being declared, and the constructor being called
to create the array with some initial data.
L
ISTING
10.6
Declaring and Creating a Varray
1: DECLARE
2: --Define an array type
3: TYPE dept_array IS VARRAY(100) OF VARCHAR2(30);
4:
5: --Define the array variable and other variables.
6: depts dept_array;
7: inx1 PLS_INTEGER;
8:
9: BEGIN
10: --Initialize the array and create two entries
11: --using the constructor.
12: depts := dept_array (‘Dept One’,’Dept Two’);
13:
14: --Display the contents of the two entries.
15: FOR inx1 IN 1..2 LOOP
16: DBMS_OUTPUT.PUT_LINE(depts(inx1));
17: END LOOP;
18: END;
19: /
282 Day 10
You need the Enterprise Edition of Oracle8i in order to use varrays.
Note
,
S
YNTAX
,
I
NPUT
14 7982 ch10 11/30/99 1:13 PM Page 282
Please purchase PDF Split-Merge on www.verypdf.com to remove this watermark.
Collections 283
10
Dept One
Dept Two
Line 3 declares a type that results in a 100-element array of
VARCHAR2(30)
val-
ues. The
depts
variable is declared in line 6 to be of this type. In line 12 the
array is initialized by calling the constructor. In this example, two values are supplied to
the constructor, so the array is created with those two elements. The size of the array is
still 100 because that’s what is specified in the type declaration. The elements created by
the constructor are numbers 1 and 2, and elements 3 through 100 are empty.
Adding and Removing Data from a Varray
After you’ve initialized a varray, you can add data to and remove it from the varray just
as you do with a nested table. If you want to add more elements to the array than you
created when you initialized it, you can call the
extend
method. However, you can only
extend an array up to the maximum size specified in the array type definition.
Listing 10.7 shows the contents of the
department
table being read into a varray.
L
ISTING
10.7
Reading Data into a Varray
1: DECLARE
2: --Declare a cursor that returns all department records.
3: CURSOR all_depts IS
4: SELECT *
5: FROM department
6: ORDER BY dept_name;
7:
8: --Define a varray type.
9: TYPE dept_array IS VARRAY(100) OF department%ROWTYPE;
10:
11: --Declare a varray variable to
12: --hold the employee records that we read in.
13: depts dept_array;
14: inx1 PLS_INTEGER;
15: inx2 PLS_INTEGER;
16: BEGIN
17: --Initialize the index into the array.
18: inx1 := 0;
19:
20: --Initialize the array.
21: depts := dept_array ();
22:
23: FOR dept IN all_depts LOOP
24: inx1 := inx1 + 1;
25: depts.extend();
O
UTPUT
A
NALYSIS
I
NPUT
continues
14 7982 ch10 11/30/99 1:13 PM Page 283
Please purchase PDF Split-Merge on www.verypdf.com to remove this watermark.
26: depts(inx1).dept_id := dept.dept_id;
27: depts(inx1).dept_name := dept.dept_name;
28: depts(inx1).no_of_emps := dept.no_of_emps;
29: END LOOP;
30:
31: --Display the results.
32: FOR inx2 IN 1..depts.count LOOP
33: DBMS_OUTPUT.PUT_LINE (
34: depts(inx2).dept_id ||
35: ‘ ‘ || depts(inx2).dept_name);
36: END LOOP;
37: END;
38: /
The array type is declared in line 9, with a maximum size of 100 entries. The
actual array variable is declared in line 13. The call to the constructor in line 21
initializes the array. It now exists, but with zero entries. As each entry is added, the array
must be extended in order to hold that entry. Line 25, inside the
FOR
loop, does this. Note
that
extend
cannot be used to grow the array beyond the maximum specified size of 100
entries.
Taking Advantage of Bulk Binding
PL/SQL bulk binding is a new feature with Oracle8i. Bulk binding lets you code
SQL statements that operate on all entries in a collection, without having to loop
through that collection by using PL/SQL code. Several of the examples so far in this les-
son have used a cursor
FOR
loop to load data from a database table into a PL/SQL table
or array. The switch from SQL (for the fetch) to PL/SQL (to add the data to the array) is
called a context switch, and consumes quite a bit of overhead. You can use the bulk bind-
ing feature to avoid much of that overhead.
284 Day 10
L
ISTING
10.7
continued
A
NALYSIS
N
EW
T
ERM
If you are not using Oracle8i, you won’t be able to execute any of the bulk
binding examples shown in this chapter.
Note
Two new keywords support binding.
BULK COLLECT
is used with
SELECT
statements to
place all the data into a collection.
FORALL
is used with
INSERT
,
UPDATE
, and
DELETE
statements to execute those statements once for each element in a collection.
14 7982 ch10 11/30/99 1:13 PM Page 284
Please purchase PDF Split-Merge on www.verypdf.com to remove this watermark.
Collections 285
10
Using
BULK COLLECT
You can use the
BULK COLLECT
keywords to have the results of a
SELECT
statement
placed directly into a collection. You can use
BULK COLLECT
with
SELECT INTO
state-
ments, and also with
FETCH
statements. For example, if
dept_ids
and
dept_names
were
both nested tables, you could issue the following
SELECT
statement:
SELECT dept_id, dept_name
BULK COLLECT INTO dept_ids, dept_names
FROM department;
If you had a cursor named
all_depts
that returned the same data, you could write
BULK
COLLECT
into the
FETCH
statement, like this:
OPEN all_depts;
FETCH all_depts BULK COLLECT INTO dept_ids, dept_names;
CLOSE all_depts;
For some reason, Oracle does not allow you to use
BULK COLLECT
in a collection of
records. Thus, if you are selecting 10 columns, you need to declare 10 collections, one
for each column.
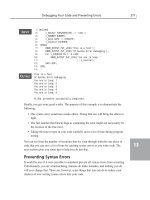
Listing 10.8 shows an example of
BULK COLLECT
being used to load all department
names and IDs into a nested table.
L
ISTING
10.8
An Example Showing the Use of BULK COLLECT
1: DECLARE
2: --Declare a cursor that returns all department records.
3: CURSOR all_depts IS
4: SELECT dept_id, dept_name
5: FROM department
6: ORDER BY dept_name;
7:
8: --Define a nested table type for each column.
9: TYPE dept_id IS TABLE OF department.dept_id%TYPE;
10: TYPE dept_name IS TABLE OF department.dept_name%TYPE;
11:
12: --Declare a nested table variable for each column.
13: dept_ids dept_id;
14: dept_names dept_name;
15: inx1 PLS_INTEGER;
16: BEGIN
17: OPEN all_depts;
18: FETCH all_depts BULK COLLECT INTO dept_ids, dept_names;
19: CLOSE all_depts;
20:
21: --Display the results.
22: FOR inx1 IN 1..dept_ids.count LOOP
I
NPUT
continues
14 7982 ch10 11/30/99 1:13 PM Page 285
Please purchase PDF Split-Merge on www.verypdf.com to remove this watermark.
23: DBMS_OUTPUT.PUT_LINE (
24: dept_ids(inx1) ||
25: ‘ ‘ || dept_names(inx1));
26: END LOOP;
27: END;
28: /
403 BOTTLING
402 DISTILLATION
501 Employee Newsletters
401 FERMENTATION
405 GUTTING
404 SCALE PROCESSING
502 Technical Writing
406 UNLOADING
The
all_depts
cursor declared in lines 3–6 returns two values: the department
ID and name. Lines 9 and 10 declare nested table types for each of these
columns. Corresponding nested table variables are declared in lines 13–14. The
FETCH
statement in line 18 then uses the
BULK COLLECT
keyword to read all the data selected
directly into the arrays. This is much faster than fetching one row at a time using a
PL/SQL loop.
Note that Listing 10.8 contain no call to the nested tables’ constructor methods. The
FETCH
statement takes care of that for you.
The ability to do bulk binds is a great feature. The single annoying thing about it is that
you cannot declare a nested table of
department%rowtype
, and use that as the target.
BULK COLLECT
won’t handle tables of records.
286 Day 10
O
UTPUT
A
NALYSIS
I imagine that some future release of Oracle will remove the restriction
against
BULK COLLECT
loading tables of records. At least I hope that hap-
pens.
Note
Using
FORALL
The
FORALL
keyword allows you to base a Data Manipulation Language (DML) state-
ment (that is,
INSERT
,
UPDATE
,or
DELETE
) on the contents of a collection. When
FORALL
is used, the statement is executed once for each entry in the collection, but only one con-
text switch is made from PL/SQL to SQL. The resulting performance is much faster than
what you get when you code a loop in PL/SQL.
L
ISTING
10.8
continued
14 7982 ch10 11/30/99 1:13 PM Page 286
Please purchase PDF Split-Merge on www.verypdf.com to remove this watermark.
Collections 287
10
Looking back at Listing 10.8, let’s say you wanted to set the employee count to null for
each department. You could do that, after selecting the department information into the
nested tables, by writing the following
FORALL
statement:
FORALL x IN dept_ids.first..dept_id.last
UPDATE department
SET no_of_emps := NULL
WHERE dept_id = dept_ids(x);
In this case, index
x
ranges from the first entry in the
dept_id
table to the last. If you
don’t want the statement to apply to all entries in the table, you can specify a different
range. The use of
dept_ids(x)
indicates that this is where you want nested table values
substituted into the SQL statement when it executes.
Listing 10.9 shows a similar
FORALL
statement being used to change all the department
names to uppercase.
L
ISTING
10.9
An Example Showing the Use of FORALL
1: DECLARE
2: --Declare a cursor that returns all department records.
3: CURSOR all_depts IS
4: SELECT dept_id, dept_name
5: FROM department
6: ORDER BY dept_name;
7:
8: --Define a nested table type for each column.
9: TYPE dept_id IS TABLE OF department.dept_id%TYPE;
10: TYPE dept_name IS TABLE OF department.dept_name%TYPE;
11:
12: --Declare a nested table variable for each column.
13: dept_ids dept_id;
14: dept_names dept_name;
15: inx1 PLS_INTEGER;
16: BEGIN
17: OPEN all_depts;
18: FETCH all_depts BULK COLLECT INTO dept_ids, dept_names;
19: CLOSE all_depts;
20:
21: --Uppercase the names and Display the results.
22: FOR inx1 IN 1..dept_ids.count LOOP
23: dept_names(inx1) := UPPER(dept_names(inx1));
24:
25: DBMS_OUTPUT.PUT_LINE (
26: dept_ids(inx1) ||
27: ‘ ‘ || dept_names(inx1));
28: END LOOP;
I
NPUT
continues
14 7982 ch10 11/30/99 1:13 PM Page 287
Please purchase PDF Split-Merge on www.verypdf.com to remove this watermark.
29:
30: FORALL x IN dept_ids.first..dept_ids.last
31: UPDATE department
32: SET dept_name = dept_names(x)
33: WHERE dept_id = dept_ids(x);
34: END;
35: /
Aside from lines 30–33, this listing is almost exactly like Listing 10.8. One line
(line 23) has been added to the
FOR
loop to make each department name upper-
case. The
FORALL
statement writes the new names back to the database by using an
UPDATE
statement.
FORALL
causes a bulk bind to be used, which is much more efficient
than if you had updated each row individually inside of a PL/SQL loop.
288 Day 10
L
ISTING
10.9
continued
A
NALYSIS
When you use
FORALL
, all the collection elements in the specified range must
exist. If they don’t, you get an error.
Note
If you try to use
FORALL
on a range with missing elements, SQL stops executing the state-
ment and raises an error. At this point, you have to decide whether to commit or roll back
the transaction. If you commit, any changes made prior to the single entry that caused the
error are saved. You don’t, however, have any way to know how many array entries were
processed before the error occurred.
Exception Handling for Collections
Some PL/SQL exceptions are directly related to collections. These are listed in
Table 10.1.
T
ABLE
10.1
Collection-Related Exceptions
Exception Cause
COLLECTION_IS_NULL
You tried to use the collection before initializing it with its construc-
tor function.
NO_DATA_FOUND
You tried to access the value of an entry in a collection, and that entry
doesn’t exist.
SUBSCRIPT_BEYOND_COUNT
You used a subscript that exceeds the number of elements currently in
the collection.
14 7982 ch10 11/30/99 1:13 PM Page 288
Please purchase PDF Split-Merge on www.verypdf.com to remove this watermark.
Collections 289
10
SUBSCRIPT_OUTSIDE_LIMIT
You used a subscript with a varray that was larger than the maximum
supported by the varray’s type declaration.
VALUE_ERROR
You used a subscript that couldn’t be converted to an integer.
When writing code that deals with collections, you can either trap these exceptions or
write code that avoids them. You can avoid
NO_DATA_FOUND
,for example, by testing the
validity of each entry with the
exists
method before you attempt to access the value the
entry. The following snippet of code shows how this is done:
IF dept_names.EXISTS(10) THEN
ELSE
/* Element 10 does not exist */
...
END IF;
You can avoid subscript errors by careful coding. If you’re working with varray, you
should know how many elements you declared that varray to hold in the first place. If
you’re working with a nested table, and you aren’t sure of the size anymore, you can use
the count method to check and see how large the table is.
Summary
Today you’ve learned how to declare and use records. You have also had an opportunity
to learn about all of PL/SQL’s collection types, including index-by tables, nested tables,
and variable-sized arrays. PL/SQL’s bulk bind feature delivers some significant perfor-
mance improvements. To use bulk binds, you need to be working with data stored in col-
lections. You can then execute SQL statements that are automatically applied to each
entry in a collection.
Q&A
QHow do I choose whether to use a variable-sized array in my code, a nested
table, or an index-by table?
A If you’re dealing with database columns, then you should first base your decision
on the column type. For example, if you’re reading a
VARRAY
column from a data-
base table, don’t read it into a PL/SQL nested table. Read it into a PL/SQL varray.
If this issue doesn’t apply to your situation, then base your decision on whether
you will be working with a fixed number of elements. Varrays can only grow to the
limit specified in their type declaration. Tables can grow to any size. If you can’t
easily conceive of a maximum size, then use a table.
Exception Cause
14 7982 ch10 11/30/99 1:13 PM Page 289
Please purchase PDF Split-Merge on www.verypdf.com to remove this watermark.
QAre nested tables the preferred choice for tables? Why would I ever want to
use an index-by table?
A Had nested tables been created first, Oracle might never have developed the index-
by type. However, both are available, and you must choose between them. If you
need an array of a PL/SQL-specific datatype, such as a
BOOLEAN
,
NATURAL
,or
INTEGER
,then an index-by table is your only choice. The other thing to look at is
the indexes you use. Nested tables require that your indexes are consecutive, such
as 1, 2, 3, and so on. Index-by tables allow you to use any arbitrary index value for
an entry, such as 1, 987234, 345, and so on.
QWhy are bulk binds so great?
A Bulk binds reduce the number of PL/SQL to SQL context switches. Each time your
PL/SQL program executes an SQL statement, control switches to the SQL world,
and a context switch occurs. Bulk binds allow you to operate on a large collection
of records with only one context switch occurring. The result is less overhead and
faster execution.
Q What is a PL/SQL record?
A A PL/SQL record is a variable that contains several related elements. The elements
are not treated as an array, and they do not all have to have the same datatype.
Records are commonly declared to match table definitions, or to match the
columns returned by a cursor. They simplify code by allowing you to package
related values, such as the columns in a row, into one unit.
Workshop
You can use this to test your comprehension of this chapter and put what you’ve learned
into practice. You’ll find the answers to the quiz and exercises in Appendix A,
“Answers.”
Quiz
1. Name the three collection types PL/SQL supports.
2. What declaration would you use to declare a variable named
emp_name
with a
datatype and size that exactly match the definition of the
employee.emp_name
col-
umn in the database?
3. What declaration would you use to declare a record named
emp
that matches the
definition of a row in the
employee
table?
290 Day 10
14 7982 ch10 11/30/99 1:13 PM Page 290
Please purchase PDF Split-Merge on www.verypdf.com to remove this watermark.
Collections 291
10
4. What method can you call on to be sure that a collection element really exists?
5. What must you be sure to do before you can add data to a nested table or to a
varray?
Exercise
Write the code necessary to generate a PL/SQL nested table with 10 new department IDs
and names. Use department ID numbers that are not currently being used in the database.
Make up the department names. Next, write a
FORALL
statement that inserts all the
records by using a bulk bind.
14 7982 ch10 11/30/99 1:13 PM Page 291
Please purchase PDF Split-Merge on www.verypdf.com to remove this watermark.
14 7982 ch10 11/30/99 1:13 PM Page 292
Please purchase PDF Split-Merge on www.verypdf.com to remove this watermark.
D
AY
11
W
EEK
2
Writing Database Triggers
by Jonathan Gennick
Today’s lesson discusses database triggers. A trigger is used to write procedural
logic that is invoked in response to a specific event. Creative application of
database triggers will enable you to accomplish many useful things that other-
wise would be impossible. Examples of what you can do with triggers include
replicating data, storing data redundantly to avoid frequent table joins, and
enforcing complex business rules.
Today, you will learn how to:
•Differentiate among the several types of triggers.
•Create triggers that fire in response to specific DML statements that are
issued against a table.
•Use triggers to modify data being inserted into a table.
•Use triggers to maintain a history of changes to a record.
•Use the new database and schema event triggers that were introduced
with Oracle8i.
15 7982 ch11 11/30/99 1:12 PM Page 293
Please purchase PDF Split-Merge on www.verypdf.com to remove this watermark.
What Is a Trigger?
A trigger is a PL/SQL block that is associated with a specific event, stored in a database,
and executed whenever that event occurs. Oracle8i now supports four fundamental types
of triggers:
• Data manipulation language (DML) triggers
•Instead-of triggers
• Data definition language (DDL) triggers
• Database event triggers
DML triggers are the traditional
INSERT
,
UPDATE
, and
DELETE
triggers that Oracle has
supported for years. Instead-of triggers were introduced with Oracle8 as a way to make it
possible to update certain types of views. DDL triggers and Database event triggers are
new with Oracle8i.
DML Triggers
DML triggers are the traditional triggers that can be defined on a table, and are executed,
or fired,in response to the following events:
•A row is inserted into a table.
•A row in a table is updated.
•A row in a table is deleted.
It is not possible to define a trigger to fire when a row is selected.
A DML trigger definition consists of these basic parts:
• The event that fires the trigger
• The database table on which the event must occur
• An optional condition controlling when the trigger is executed
•A PL/SQL block containing the code to be executed when the trigger is fired, or a
CALL
statement to a stored procedure
A trigger is a database object, like a table or an index. When you define a trigger, it
becomes part of the database and is always executed when the event for which it is
defined occurs. It doesn’t matter if the event is triggered by someone typing in an SQL
statement using SQL*Plus, running a client-server program that updates the database, or
running a utility like Oracle’s SQL*Loader in order to bulk-load data. Because of this, a
trigger serves as a choke point, allowing you to perform critical validation or computa-
tions in response to database changes, no matter what the source.
294 Day 11
15 7982 ch11 11/30/99 1:12 PM Page 294
Please purchase PDF Split-Merge on www.verypdf.com to remove this watermark.
Writing Database Triggers 295
11
An Example of a DML Trigger
Suppose for a moment that you wanted to be sure that all department names were stored
using uppercase letters. Perhaps you are doing this to facilitate searching on that field.
Listing 11.1 shows one way to do this with a trigger.
L
ISTING
11.1
Example of a Trigger
1: CREATE OR REPLACE TRIGGER department_insert_update
2: BEFORE INSERT OR UPDATE ON department
3: FOR EACH ROW
4: DECLARE
5: dup_flag INTEGER;
6: BEGIN
7: --Force all department names to uppercase.
8: :NEW.dept_name := UPPER(:NEW.dept_name);
9: END;
10: /
Line 1 tells Oracle to create this trigger with the name
department_insert_update
and to replace any existing trigger of the same
name if necessary. Line 2 says that it will be fired whenever a new row is inserted into
the department table or whenever a department record is changed. In line 8 there is one
line of code that uses the built-in
UPPER
function to force the department name to upper-
case. Notice the reference to
:NEW
. This is the default alias for the new value of the
record. The alias
:OLD
can be used to refer to the old value of a field before an update
takes effect. Line 3 tells Oracle to fire this trigger once for each row modified. If you
were to issue an
UPDATE
statement to change the names of all departments in the table,
this trigger would be fired for each one of those records.
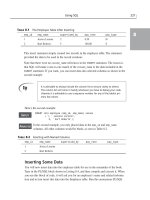
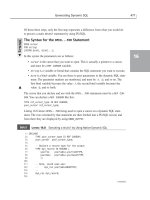
To demonstrate the effect of this trigger, try issuing the statements shown in Listing 11.2.
L
ISTING
11.2
Testing the
department_insert_update
Trigger
1: INSERT INTO department (dept_id, dept_name) VALUES (10,’payroll’);
2: 1 row created.
3: INSERT INTO department (dept_id, dept_name) VALUES (11,’Sewage’);
4: 1 row created.
5: UPDATE department SET dept_name = ‘Payroll’ WHERE dept_id = 10;
6: 1 row updated.
7: SELECT dept_id, dept_name FROM department WHERE dept_id BETWEEN 10 AND 11;
8: DEPT_ID DEPT_NAME
9: --------- --------------------------------
10: 10 PAYROLL
11: 11 SEWAGE
I
NPUT
A
NALYSIS
I
NPUT
/
O
UTPUT
15 7982 ch11 11/30/99 1:12 PM Page 295
Please purchase PDF Split-Merge on www.verypdf.com to remove this watermark.
Note that the trigger has forced all department names to uppercase regardless of
whether the name was the result of a new record inserted or an existing record
that was updated.
Types of DML Triggers
DML triggers can be classified in two different ways: by when they fire in relation to the
triggering SQL statement, or by whether or not they fire for each row affected by the
triggering SQL statement. This results in four basic trigger types.
There are two choices when a trigger fires in relation to an SQL statement: either
before or after. Before triggers are executed before the triggering SQL statement.
After triggers are executed following the triggering SQL statement.
A DML trigger is either a row-level trigger or a statement-level trigger. A row-
level trigger executes once for each row affected by the triggering SQL state-
ment, whereas a statement-level trigger is executed only once. Only row-level triggers
have access to the data values in the affected records. Statement-level triggers do not.
This is because SQL is a set-oriented language--SQL statements can affect many or even
all rows in a table. Statement-level triggers are only fired once, so it would not be possi-
ble to resolve a column reference in such a trigger.
The possible combinations of the choices result in the four DML trigger types listed in
Table 11.1.
T
ABLE
11.1
The Four Basic Trigger Types
When Fired Level Description
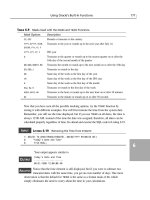
Before Statement Executed once for the triggering SQL statement
before that statement is executed.
Before Row Executed once for each record affected by the trigger-
ing SQL statement before the record in question is
changed, deleted, or inserted.
After Row Executed once for each record affected by the trigger-
ing SQL statement after the record in question has
been changed, deleted, or inserted.
After Statement Executed once for the triggering SQL statement after
that statement has been executed.
Triggers execute in response to an SQL statement and can be defined for the
INSERT
,
UPDATE
, and
DELETE
statements. These are often referred to as insert triggers, update trig-
gers, and delete triggers,respectively. Together with the four types from Table 11.1, this
gives a total of 12 possible triggers that you can define on a table. In addition, any one
trigger may be defined to fire for more than one DML statement.
296 Day 11
N
EW
T
ERM
N
EW
T
ERM
A
NALYSIS
15 7982 ch11 11/30/99 1:12 PM Page 296
Please purchase PDF Split-Merge on www.verypdf.com to remove this watermark.