Tài liệu InDesign CS5 Bible- P4 docx
Bạn đang xem bản rút gọn của tài liệu. Xem và tải ngay bản đầy đủ của tài liệu tại đây (1.07 MB, 50 trang )
Chapter 3: Setting InDesign Preferences
105
l
Window ➪ Styles ➪ Object Styles (Ô+F7 or Ctrl+F7): Select defaults for the [Normal
Graphics Frame] and [Normal Text Frame] object styles, which are what all new frames
created in InDesign use.
l
Window ➪ Text Wrap (Ô+Option+W or Ctrl+Alt+W): The Text Wrap panel lets you
specify how text wraps around all new objects.
l
Object ➪ Corner Options (Ô+Option+R or Ctrl+Alt+R): The Corner Options dialog
box lets you choose a style for the corners of all new frames except those created with the
Type tool.
l
Object ➪ Clipping Path (Option+Shift+Ô+K or Ctrl+Alt+Shift+K): The Clipping Path
dialog box lets you specify the default attributes of clipping paths imported into graphics
frames.
l
Window ➪ Stroke (Ô+F10 or Ctrl+F10), Window ➪ Color ➪ Swatches (F5), Window ➪
Color ➪ Gradient (F6), and Window ➪ Output ➪ Attributes: These panels let you spec-
ify other default properties of objects. For example, if all objects you create are stroked
(framed), specify a weight in the Stroke panel.
l
Double-click the Polygon tool or Polygon Frame to open the Polygon Settings dialog
box (there is no menu command or keyboard shortcut): This lets you specify the
default number of sides and the inset for the first new polygon in a new document. Note
that you can set the two tools differently, letting you have two types of polygons remem-
bered for you.
Modifying Defaults for Views
Another way to customize your copy of InDesign is to specify which layout tools appear by default.
The lower two-thirds of the View menu let you do this. If you’d prefer not to view the edges of
frames, you can hide them by default; or if you always want to start with a document-wide grid,
you can show it by default.
To modify viewing defaults, choose the appropriate menu options. Note that the menu names tog-
gle between Show and Hide each time you select them. (Therefore, if the menu option begins with
Hide, it means that attribute is currently shown; if it starts with Show, it means the attribute is cur-
rently not shown.)
Here are the options:
l
View ➪ Extras ➪ Show/Hide Text Threads (Option+Ô+Y or Ctrl+Alt+Y): This shows
or hides the links between text frames.
l
View ➪ Extras ➪ Show/Hide Frame Edges (Control+Ô+H or Ctrl+H): This shows or
hides the edges of frames.
l
View ➪ Show/Hide Rulers (Ô+R or Ctrl+R): This shows or hides the horizontal and
vertical ruler.
09_607169-ch03.indd 10509_607169-ch03.indd 105 4/22/10 7:47 PM4/22/10 7:47 PM
Please purchase PDF Split-Merge on www.verypdf.com to remove this watermark.
Part I: Welcome to InDesign
106
l
View ➪ Grids & Guides ➪ Show/Hide Guides (Ô+; [semicolon] or Ctrl+; [semicolon]):
This shows or hides margin, column, and layout guides.
l
View ➪ Grids & Guides ➪ Show/Hide Baseline Grid (Option+Ô+' [apostrophe] or
Ctrl+Alt+' [apostrophe]): This shows or hides the baseline grid established in the Grids
pane of the Preferences dialog box. You can access this pane on a Mac by choosing
InDesign ➪ Preferences ➪ Grids or pressing Ô+K; choose Edit ➪ Preferences ➪ Grids or
press Ctrl+K in Windows.
l
View ➪ Grids & Guides ➪ Show/Hide Document Grid (Ô+' [apostrophe] or Ctrl+'
[apostrophe]): This shows or hides the document-wide grid established in the Grids
pane of the Preferences dialog box.
In addition to changing what layout tools appear by default, you can control some of their default
behavior. Choose the appropriate menu options to enable or disable them. Note that if the menu
option is currently enabled, a check mark appears next to its name, in which case choosing it again
disables the option and the check mark disappears. These options are:
l
View ➪ Grids & Guides ➪ Lock Guides (Option+Ô+; [semicolon] or Ctrl+Alt+;
[semicolon]): Disabled by default; when you choose this option to enable it, all ruler
guides are locked in place.
l
View ➪ Grids & Guides ➪ Lock Column Guides: Enabled by default; when you choose
this option to disable it, all column guides are no longer locked in place.
l
View ➪ Grids & Guides ➪ Snap to Guides (Shift+Ô+; [semicolon] or Ctrl+Shift+;
[semicolon]): Enabled by default; when you choose this option to disable it, aligning
objects with guides is more difficult, but positioning objects near guides is easier.
l
View ➪ Grids & Guides ➪ Snap to Document Grid: Disabled by default; when you
choose this option to enable it, objects are easy to align with document grid lines whether
or not they’re showing.
l
View ➪ Grids & Guides ➪ Smart Guides (Ô+U or Ctrl+U): Enabled by default, this
option provides visual feedback to help you size, align, and rotate objects via the mouse,
as Chapter 10 explains.
Cross-Reference
Chapter 7 covers how to use guides and grids in your layout. Chapter 10 covers the smart guides feature. n
Setting Color and Style Defaults
If you find yourself creating the same colors, paragraph styles, character styles, table styles, cell
styles, and/or object styles over and over again, create them with no documents open. They will be
available to all future documents.
09_607169-ch03.indd 10609_607169-ch03.indd 106 4/22/10 7:47 PM4/22/10 7:47 PM
Please purchase PDF Split-Merge on www.verypdf.com to remove this watermark.
Chapter 3: Setting InDesign Preferences
107
To create these elements, use the New command in the flyout menus for the following panels:
Swatches (F5), Character Styles (Shift+Ô+F11 or Ctrl+Shift+F11), Paragraph Styles (Ô+F11 or
Ctrl+F11), Table Styles, Cell Styles, and Object Styles (Ô+F7 or Ctrl+F7). You can also use the
flyout menus’ Load commands to import colors and styles from existing documents instead of
creating them from scratch.
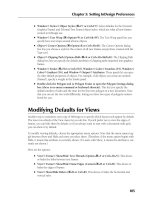
Reverting Preferences and Defaults
If you inherit a copy of InDesign from another user, or if you’ve been changing preferences and
defaults at random and are unhappy with the results, you can revert InDesign to all its default
settings. You particularly want to do this if you’re learning InDesign using tutorial files or in a
class setting.
Tip
To revert all preferences and defaults, deleting the InDesign Defaults preference files when opening InDesign,
press Control+Option+Shift+Ô or Ctrl+Alt+Shift when launching InDesign. n
Note
Keep in mind that you need to re-enable any custom keyboard shortcut set you were using by choosing it from
the Set pop-up menu in the Keyboard Shortcuts dialog box (choose Edit ➪ Keyboard Shortcuts). n
Summary
InDesign provides extensive controls for setting preferences for everything from how objects
appear on-screen and how text spelling and hyphenation are managed to how keyboard shortcuts
work and how color is handled. You can also reset all preference changes to their defaults with just
one command.
09_607169-ch03.indd 10709_607169-ch03.indd 107 4/22/10 7:47 PM4/22/10 7:47 PM
Please purchase PDF Split-Merge on www.verypdf.com to remove this watermark.
09_607169-ch03.indd 10809_607169-ch03.indd 108 4/22/10 7:47 PM4/22/10 7:47 PM
Please purchase PDF Split-Merge on www.verypdf.com to remove this watermark.
Part II
Document
Fundamentals
IN THIS PART
Chapter 4
Creating, Opening, and Saving
Documents
Chapter 5
Working with Pages
Chapter 6
Working with Layers
Chapter 7
Creating Layout Standards
Chapter 8
Defining Colors, Tints, and
Gradients
10_607169-pp02.indd 10910_607169-pp02.indd 109 4/22/10 7:47 PM4/22/10 7:47 PM
Please purchase PDF Split-Merge on www.verypdf.com to remove this watermark.
10_607169-pp02.indd 11010_607169-pp02.indd 110 4/22/10 7:47 PM4/22/10 7:47 PM
Please purchase PDF Split-Merge on www.verypdf.com to remove this watermark.
111
CHAPTER
Creating, Opening,
and Saving Documents
IN THIS CHAPTER
Planning a publication
Creating a new document
Opening native and foreign
documents and templates
Saving documents and
templates
Exporting documents and
document elements
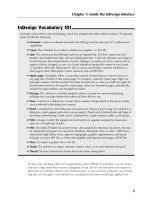
Y
ou’re pumped up. You’ve purchased a copy of InDesign, installed it,
checked out the interface, and now you’re ready to put the program
to work. So, what’s next? Launch the application and start clicking?
Hardly. Creating a publication with InDesign is much like going on a trip.
You don’t reach your destination unless you’ve prepared a plan for getting
there — and you reach your destination more quickly and more easily if
your plan is a sound one.
Remember, too, that most trips don’t go exactly according to plan. InDesign
is both versatile and forgiving. As you create a publication, you should feel
free to change your mind, experiment, and let your creativity roam. As long
as you reach your destination (on time!), taking a few detours is acceptable,
and encountering a few roadblocks (small ones, you hope) is inevitable.
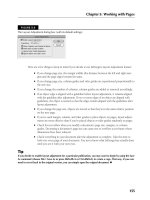
Taking Stock before You Begin
Before you launch InDesign, open a new document, and begin working, you
must answer several fundamental questions about the publication you are
producing:
l
What is the basic nature of the piece? Will it be printed, or will it be
distributed over the Internet or an intranet? Is it going to be pub-
lished as a print, PDF, Flash, or Web piece, or perhaps in several
formats?
l
What are its dimensions?
l
How many pages will it have? If it will be a multipage publication,
will it have facing pages like a book or a catalog, or will it be single-
sided like a flip chart?
11_607169-ch04.indd 11111_607169-ch04.indd 111 4/22/10 7:48 PM4/22/10 7:48 PM
Please purchase PDF Split-Merge on www.verypdf.com to remove this watermark.
Part II: Document Fundamentals
112
l
How many columns will each page have? How wide will the margins be?
l
Does the budget allow for the use of color? If so, how many colors? What kind of paper
will it be printed on? What kind of printer or printing press will be used?
l
How will the publication be distributed? Under what circumstances will it be read? What’s
the life expectancy of the publication?
l
If the publication is bound for the Internet, will you create an HTML file (which can be
viewed by anybody with a Web browser), a Flash presentation (which may require further
work in Adobe Flash Professional and require users to have the free Adobe Flash Player
viewer application or browser plug-in), or a PDF file (which requires viewers to have the
free Adobe Reader application or browser plug-in)?
l
And what about the content of your publication? What programs were used to create the
text files and graphic files your publication will contain? Did you create the content your-
self, or did others? What file formats were used for text and graphic files? What is the
most effective way to present the content given the production requirements and budget?
As you answer these questions, a rough image of your publication begins to take shape in your
mind. When you’re ready to begin turning your ideas into an actual publication, you have a couple
of choices. Many designers whose skills date back to the days of paste-up still prefer to use tradi-
tional tools — a drawing pad and colored markers or pencils in this case — to create rough
sketches before they fire up their page-layout or illustration program. Other designers who were
never exposed to such archaic tools are comfortable doing their brainstorming and sketching on
the fly, using their favorite software. Whatever method suits you is fine. Keep in mind that, at this
early stage, you shouldn’t be spending much time fine-tuning details. You can do that later with
InDesign.
An overly careful person can plan forever, in which case, nothing actually gets done. At some
point, when the image you have of the publication you’re creating is clear enough in your mind to
begin work, it’s time to create a new InDesign document.
Setting Up a New Publication
After you launch InDesign, you have two options: You can choose the Open command (choose
File ➪ Open or press Ô+O or Ctrl+O) to open a previously created document or template (more
on opening documents and templates later in this chapter), or you can choose
File ➪ New ➪ Document or press Ô+N or Ctrl+N to create a new document.
When you create a new document, the New Document dialog box, shown in Figure 4.1, appears.
It is here that you implement many of the decisions you arrived at during the planning stage,
including page size, number of pages, number of columns, and margin width. Although you’re free
to change your mind later, you save yourself time and potential headaches by sticking with the
basic page parameters you establish in the New Document dialog box.
11_607169-ch04.indd 11211_607169-ch04.indd 112 4/22/10 7:48 PM4/22/10 7:48 PM
Please purchase PDF Split-Merge on www.verypdf.com to remove this watermark.
Chapter 4: Creating, Opening, and Saving Documents
113
Tip
To change the measurement units shown in the New Document dialog box, choose InDesign ➪ Preferences ➪
Units & Increments or press Ô+K on the Mac, or choose Edit ➪ Preferences ➪ Units & Increments or press
Ctrl+K in Windows. Next, choose the measurement system you want from the Horizontal and Vertical pop-up
menus in the Ruler Units area. If you change preferences when no documents are open, your changes are
applied to all subsequently created documents. n
FIGURE 4.1
The settings you make in the New Document dialog box establish the basic framework for the pages in your
publication. The example at left shows the settings used to create a letter-sized document (8
1
⁄
2
× 11 inch)
(51p × 66p). The example at right shows the settings used to create an 800-×-600-pixel Web page.
Creating new documents
Here’s how to create a new document:
1.
Choose File ➪ New ➪ Document or press Ô+N or Ctrl+N.
2.
In the Intent pop-up menu, choose Print or Web, based on the type of document
you are creating. Use Web for documents designed to appear on a computer screen,
such as Flash animations and PDF documents you don’t expect readers to print. Note
that the options for the two types of intents aren’t different, though the defaults are; spe-
cifically, the Facing Pages option is deselected by default for Web pages and selected for
print pages, and Web pages use a default measurement of pixels whereas print pages use
a default measurement of picas.
3.
If you know exactly how many pages your publication will have, type the number in
the Number of Pages field. If you don’t know for sure, you can always add or delete
pages later as needed.
11_607169-ch04.indd 11311_607169-ch04.indd 113 4/22/10 7:48 PM4/22/10 7:48 PM
Please purchase PDF Split-Merge on www.verypdf.com to remove this watermark.
Part II: Document Fundamentals
114
4.
If you want the document to start on a page number other than 1, enter it in the
Start Page # field. If you choose an even number and select the Facing Pages option in
Step 5, InDesign has the first page start on the left of a spread rather than on the right.
This new option also sets the page number in the Numbering & Section Options dialog
box, covered in Chapter 5.
5.
Select the Facing Pages option if you’re creating a multipage publication that will
have a spine, such as a book, catalog, or magazine. You do not need to select this
option if you’re creating a one-page document, such as a business card, an ad, or a poster.
Some publications, such as flip charts, presentations, and three-ring bound documents,
have multiple pages but use only one side of the page. For such documents, don’t select
the Facing Pages option, either.
6.
If you want to flow text from page to page in a multipage document, such as a book
or a catalog, select the Master Text Frame option. (See Chapter 18 for more informa-
tion on using master text frames.) When you select this option, InDesign automatically
adds a text frame to the document’s master page and to all document pages based on this
master page. This saves you the work of creating a text box on each page and manually
threading text through each frame.
7.
In the Page Size area, you can choose one of the predefined sizes from the pop-up
menu. Your options are Letter (8.5" × 11"), Legal (8.5" × 14"), Tabloid (11" × 17"), Letter
Half (5.5" × 8.5"), Legal Half (7" × 8.5"), A4 (210mm × 297mm), A3 (297mm × 420mm),
A5 (148mm × 210mm), B5 (176mm × 250mm), US Business Card (2.5 × 3 inches),
Compact Disc (4.7222" × 4.5"), eight variations of Web page sizes (600 × 300, 640 × 480,
760 × 420, 800 × 600, 984 × 588, 1024 × 768, 1240 × 620, and 1280 × 800), or
Custom.
If you choose Custom as the page size, you can type values in the Width and Height
fields. But you don’t have to actually choose Custom: No matter what page size is
selected, if you type values in those fields, the Page Size automatically changes to
Custom. The minimum height and width is 1 pica (0.1667"); the maximum is 216".
Tip
When you specify page size, make sure the values you type in the Height and Width fields are the size of the
final printed piece — and not the size of the paper in your printer. For example, if you’re creating a standard-
sized index card, type 5i in the Width field and 3i in the Height field. n
Tip
If you want to print n-up — meaning several “pages” on one sheet, such as several business cards on an
8
1
⁄
2
-×-11-inch sheet of paper — you can create a letter-sized document (8.5" × 11"), but you have to arrange
the business cards within the page boundary and add your own crop marks for each card. n
8.
To set the page orientation, click the Portrait or Landscape iconic button. Clicking
the Portrait iconic button produces a vertical page; clicking the Landscape iconic button
produces a horizontal page. You can also specify Height and Width values by clicking the
11_607169-ch04.indd 11411_607169-ch04.indd 114 4/22/10 7:48 PM4/22/10 7:48 PM
Please purchase PDF Split-Merge on www.verypdf.com to remove this watermark.
Chapter 4: Creating, Opening, and Saving Documents
115
up and down arrows associated with these fields. Note that if you change the dialog box’s
default orientation setting (usually Portrait), the existing Width and Height values are
swapped.
9.
Type a value in the Columns field to specify how many columns your pages have.
You can also specify the number of columns by clicking the up or down arrow associated
with the Column field.
10.
Specify a gutter distance (the gutter is the space between columns) in the Gutter
field. You can also specify a gutter width value by clicking the up and down arrows
associated with the Gutter field.
11.
Specify margin values in the Margins area. The margin is the white area around the
outside of the page within which page elements — text and graphics — are placed. A
document doesn’t have to have margins (you can type 0 into these fields), and if you
want, you can place text and graphics in the margin area.
If the Facing Pages option is selected, Inside and Outside fields are available in the
Margins area. Designers often specify larger inside margins for multipage publications to
accommodate the fold at the spine. If Facing Pages is not selected, Left and Right fields
replace the Inside and Outside fields. You can also specify margin values by clicking the
up or down arrows associated with the fields.
12.
If you click More Options, the Bleed and Slug area of the New Document dialog
box appears (refer to Figure 4.1), and the More Options button changes to Fewer
Options. The More Options button expands the dialog box to provide options to set
bleed and slug areas. (The button then changes to Fewer Options, which if clicked hides
the Bleed and Slug area.)
A bleed area is a margin on the outside of the page for objects you want to extend past the
edge of the page — you want them to extend at least
1
⁄
8
inch so if the paper shifts during
printing, no white space appears where the image should be (touching the edge of the page).
The slug area is an area reserved for printing crop marks, color plate names, and other
printing information — some output devices cut these off during printing unless a slug
area is defined. For both bleed and slug areas, you can set the top, bottom, left, and right
margins independently.
13.
Click OK to close the New Document dialog box. When you do, your new, blank doc-
ument appears in a new document window. Figure 4.2 shows the window of a newly
created document that uses settings typical for a magazine (8 × 10
7
⁄
16
inches, or
48p × 62p7.5). Note how the zoom level appears both in the Zoom field in the applica-
tion bar and after the name of the document in the document tab.
Tip
You can bypass the New Document dialog box by pressing Option+Ô+N or Ctrl+Alt+N. When you use this
method, the most recent settings in the New Document dialog box are used for the new document, except that
the new document will have just one page and start at page 1, no matter the number of pages or starting page
number set in the previous document. n
11_607169-ch04.indd 11511_607169-ch04.indd 115 4/22/10 7:48 PM4/22/10 7:48 PM
Please purchase PDF Split-Merge on www.verypdf.com to remove this watermark.
Part II: Document Fundamentals
116
FIGURE 4.2
The results of setting up a facing-pages magazine-size document that starts on a left page
New Feature
InDesign CS5 adds several features to the New Document dialog box. The Intent pop-up menu is new, and the
default measurement for Web pages is now pixels instead of points (they achieve the same result). Also new is
the Start Page # field. Chapter 33 covers Web documents in more detail, and Chapter 5 covers using page
numbers in more detail. n
Creating your own document types
InDesign lets you create predefined document types, called document presets, to supplement the
standard ones such as Letter. Note that a preset is much more than a saved page size; it also
includes margins, columns, and the other settings specified in the New Document dialog box.
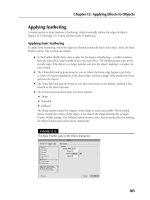
There are two ways to create document presets:
l
You can save these new-document settings by clicking Save Preset in the New Document
dialog box. These saved settings appear in the Document Preset pop-up menu in the
future.
11_607169-ch04.indd 11611_607169-ch04.indd 116 4/22/10 7:48 PM4/22/10 7:48 PM
Please purchase PDF Split-Merge on www.verypdf.com to remove this watermark.
Chapter 4: Creating, Opening, and Saving Documents
117
l
You can choose File ➪ Document Presets ➪ Define to create (by clicking Define) a new
document preset or import one (by clicking Load) from another document. It opens the
dialog box shown in Figure 4.3. When you create a new preset, or edit an existing one,
you get a dialog box that essentially matches the New Document dialog box, shown earlier
in Figure 4.1. Modify the settings as desired and click OK to return to the Document
Presets dialog box.
FIGURE 4.3
The Document Presets dialog box lets you create, import, edit, and delete document
presets.
Opening Documents and Templates
Opening documents with InDesign is pretty much the same as opening documents with any pro-
gram. Simply choose File ➪ Open or press Ô+O or Ctrl+O, locate and click the document you
want to work on, and then click Open. But InDesign offers a few options for opening documents
you don’t find in every program. For example, you can:
l
Open more than one document at a time.
l
Open a copy of a document instead of the original. This keeps you from overwriting
the original file accidentally — very helpful if you’re making several variations of one
document.
l
Open interchange document versions of InDesign files. The InDesign Markup (IDML) for-
mat, for example, lets both InDesign CS4 and CS5 open files exported from InDesign CS5,
and the InDesign Interchange (INX) format lets InDesign CS3, CS4, and CS5 open files
exported from InDesign CS3 and CS4. (Note that InDesign CS5 cannot export INX files.
The IDML format can also be created and opened by other programs, such as custom pub-
lishing databases, so unlike the INX format, it’s not just as a way to downsave files for use
by earlier versions of InDesign.)
11_607169-ch04.indd 11711_607169-ch04.indd 117 4/22/10 7:48 PM4/22/10 7:48 PM
Please purchase PDF Split-Merge on www.verypdf.com to remove this watermark.
Part II: Document Fundamentals
118
l
Open a template under its own name. This makes editing templates easier than it is with
other programs, specifically QuarkXPress.
l
Open documents created with some versions of PageMaker and QuarkXPress: QuarkXPress
and QuarkXPress Passport versions 3.3 through 4.1 and PageMaker versions 6.0 through 7.0.
Tip
InDesign’s File menu displays the names of the ten most recently saved documents in the Open Recent sub-
menu that appears under the Open option in the File menu after you have opened a file. You can change
how many recently saved files are shown by using the Number of Recent Items to Display option in the File
Handling pane of the Preferences dialog box (choose InDesign ➪ Preferences ➪ File Handling or press Ô+K on
the Mac, or choose Edit ➪ Preferences ➪ File Handling or press Ctrl+K in Windows). n
To open a file:
1.
Choose File ➪ Open or press Ô+O or Ctrl+O. The Open a File dialog box shown in
Figure 4.4 appears.
2.
Locate and open the folder that contains the documents you want to open. Click a
file name or press and hold Ô or Ctrl and click multiple file names.
In Windows, the Files of Type pop-up menu offers several options: All Files, All Readable
Files, InDesign files, IDML, InDesign CS3 Interchange (INX), PageMaker 6.0–7.0 files,
QuarkXPress 3.3–4.1x files, Adobe PDF Creation Settings Files, InDesign Book, and All
Formats. Choose any of these options to display a specific file format in the file list.
(Choose All Files in the Files of Type pop-up menu to display files with no extensions.)
Note that InDesign CS5 can open files created by any previous version of InDesign, in
addition to CS5-created files. The InDesign Markup (IDML) format is a variation of the
standard InDesign CS5 format that lets InDesign CS4 read your CS5 files, minus any
CS5-specific formatting. (It can also be used with some other specialized programs.) Also
note that there is no save or export option that lets InDesign CS3 or earlier open files cre-
ated in InDesign CS5.
On a Mac, the Open a File dialog box displays any supported file formats that have file
name extensions, and the dialog box includes a Preview pane that displays a thumbnail
version of the selected file or, more commonly, its icon. (Choose All Documents in the
Enable pop-up menu to display files without the file name extensions.)
Platform Difference
The name of the pop-up menu for selecting file types differs between the Mac and Windows versions of
InDesign, as does the menu option for displaying all files (including those with no file name extensions). n
3.
Click Open Normal (Mac) or Normal (Windows) at the bottom of the Open a File
dialog box if you want to open the original document (rather than a copy of the doc-
ument); click Open Copy (Mac) or Copy (Windows) to open a copy of a document
(see Figure 4.4). When you open a copy of a document, it’s assigned a default name
(Untitled-1, Untitled-2, and so on).
11_607169-ch04.indd 11811_607169-ch04.indd 118 4/22/10 7:48 PM4/22/10 7:48 PM
Please purchase PDF Split-Merge on www.verypdf.com to remove this watermark.
Chapter 4: Creating, Opening, and Saving Documents
119
If you want to use a template to create a new version of a publication, select Normal;
InDesign creates a document based on the template. To open a template under its own
name so that you can edit it, click Open Original (Mac) or Original (Windows).
Templates are explained in the following section. (For documents, selecting Open
Normal/Normal or Open Original/Original does the same thing: It opens the document
for editing.)
FIGURE 4.4
The Open a File dialog box, with the Mac version at top and the Windows version at
bottom. When you open a file, you have the option to open it normally (Open Normal
on the Mac, or Normal in Windows), open the original copy of a template (Open
Original or Original), or open a copy of the file (Open Copy or Copy).
11_607169-ch04.indd 11911_607169-ch04.indd 119 4/22/10 7:48 PM4/22/10 7:48 PM
Please purchase PDF Split-Merge on www.verypdf.com to remove this watermark.
Part II: Document Fundamentals
120
4.
Click OK to close the dialog box. Each document you open appears in a separate docu-
ment window. The page and view magnification shown when a document was last saved
is used when you open the document.
Tip
You can also open an InDesign document or template by double-clicking its file icon. If InDesign is not run-
ning, double-clicking a document or template file — as long as it has the proper file name extension (
.indd
for documents and
.indt
for templates) — launches the application and opens the document/template. If
InDesign is already running, the document appears in a new window. n
Opening documents versus opening templates
Whenever you save a document, you have the option of saving a standard document file or a tem-
plate (more on saving templates later in this chapter). A template is an InDesign file used to create
multiple iterations of the same publication. For example, if you produce a monthly newsletter, you
can save gobs of time and ensure consistency from issue to issue by using a template as the starting
point for each edition of the newsletter. A template is essentially the shell of a publication that
Both Windows and Mac OS X use icons to show you (and tell programs) the format of a file. They also
use file name extensions to identify the file type, but by default these file name extensions are hidden
from view when you open folders.
InDesign uses the file name extension
.indd
to denote InDesign documents. Without this file name
extension, you won’t be able to double-click a file icon to open it, although you can still open the file
from InDesign’s Open a File dialog box (choose File
➪
Open or press Ô+O or Ctrl+O), as long as you
select All Documents from the Enable pop-up menu (on the Mac) or All Files from the Files of Type
pop-up menu (in Windows). Note that the Place dialog box for importing text and graphics — covered
in Chapters 14 and 17 — does not have the Enable pop-up menu on the Mac; InDesign shows all files,
even unsupported ones, in this dialog box.
If file name extensions are hidden in Windows XP, open any folder, choose Tools
➪
Folder Options,
and then select the View tab. (You have to have a disk or folder open to have the View menu.) Select
the Show Hidden Files and Folders option and then click OK.
In Windows Vista, choose Start
➪
Computer, choose Organize
➪
Folder, and then choose Search
Options in the dialog box that appears. Go to the View pane and select the Show Hidden Files and
Folders option, then click OK.
In Windows 7, the steps are the same as for Vista, except you choose Folder and Search Options
(Windows 7’s name for Vista’s Search Options).
If file name extensions are hidden in Mac OS X 10.5 Leopard or Mac OS X 10.6 Snow Leopard, choose
Finder
➪
Preferences, go to the Advanced pane, select the Show All File Extensions option, and close
the dialog box. (You have to be using the Finder, not be in an application, to get this menu.)
Displaying File Name Extensions
11_607169-ch04.indd 12011_607169-ch04.indd 120 4/22/10 7:48 PM4/22/10 7:48 PM
Please purchase PDF Split-Merge on www.verypdf.com to remove this watermark.
Chapter 4: Creating, Opening, and Saving Documents
121
contains the basic framework — page layout, master pages, styles, and so on — but doesn’t con-
tain any actual content.
Cross-Reference
For more information about creating templates, see Chapter 7. n
When you open a template, you have two choices: You can open a copy of the file and use it to
create a new publication or you can open the original file, make changes, and then save an updated
version of the template.
If you want to use a template as the starting point for a new publication, choose File ➪ Open or
press Ô+O or Ctrl+O, locate and select the template, and make sure Open Normal (Mac) or
Normal (Windows) is selected in the Open a File dialog box (refer to Figure 4.4) before you
click Open.
If you want to modify a template, click Open Original (Mac) or Open (Windows) at the bottom of
the dialog box. If Open Normal (Mac) or Normal (Windows) is selected, clicking Open opens a
new document window and assigns the document a default name: Untitled-1, Untitled-2, and so
on. If Open Original (Mac) or Original (Windows) is selected, the original file opens and the origi-
nal name appears in the title bar.
Working with files in the Bridge file system
There’s another way to open documents and templates in InDesign: Choose File ➪ Browse in
Bridge or press Option+Ô+O or Ctrl+Alt+O to open documents or templates, or choose
File ➪ New ➪ Document from Template to open just templates. Choosing either option opens the
Adobe Bridge program, shown in Figure 4.5, where you can browse for a file to open.
FIGURE 4.5
You can access files through the Adobe Bridge program, a common file environment for Creative Suite
applications.
11_607169-ch04.indd 12111_607169-ch04.indd 121 4/22/10 7:48 PM4/22/10 7:48 PM
Please purchase PDF Split-Merge on www.verypdf.com to remove this watermark.
Part II: Document Fundamentals
122
Bridge is designed to be a central repository for Creative Suite programs and support files, mainly
for use in workgroup situations but also as an Adobe-centric alterative to the standard Mac and
Windows file systems. Bridge’s biggest attraction is that it lets you see previews of and file informa-
tion for almost all the files types you’d be working with in your layouts (and Bridge does come
with several canned templates created by Adobe that you might want to consider using).
There’s no difference in the documents or templates available via Bridge than those available via
the regular Open a File dialog box. It’s just a different organizational structure for your files.
If you want to access the template files stored in Bridge’s InDesign folder without using Bridge
itself, navigate to
Library:Application
Support:Adobe:Templates:InDesign
on the
Mac, or to
Program
Files/Common
Files/Adobe/Templates/InDesign
in Windows. Of
course, if you do prefer to use Bridge to store template files, you use InDesign’s regular Save As
dialog box, select InDesign CS5 Template as the file format, and navigate to the Bridge applica-
tion’s
InDesign
folder.
You can access Bridge files directly from the Bridge application, using its folder-based interface to
find files of interest.
Note
Most of Bridge’s features are oriented to Photoshop users, so chances are you can just ignore Bridge. n
New Feature
The new Mini Bridge panel (choose Window ➪ Mini Bridge) is a faster way to find files using Bridge’s file envi-
ronment. Click the Search iconic button to search for specific files, or click the Browse Files iconic button to
navigate for files using a pared-down version of the Adobe Bridge file-navigation controls. n
Converting documents created with other programs
One of InDesign’s hallmarks is its capability to open documents from some versions of
QuarkXPress and PageMaker and convert them to InDesign documents. (If any of these files’ for-
mats aren’t supported in InDesign, you get the Warnings dialog box shown in Figure 4.6.) It can-
not open documents created by Microsoft Publisher, but Markzware does offer a utility to convert
Publisher files to InDesign format.
Also, InDesign cannot import PDF files, but it can bring in PDF files as graphics for placement in
your document. Chapter 14 covers this process in detail. It can also import PDF job-option files,
so you can reuse the same settings already developed for Adobe Acrobat Distiller when you export
to the print PDF format, as Chapter 32 covers.
11_607169-ch04.indd 12211_607169-ch04.indd 122 4/22/10 7:48 PM4/22/10 7:48 PM
Please purchase PDF Split-Merge on www.verypdf.com to remove this watermark.
Chapter 4: Creating, Opening, and Saving Documents
123
Cross-Reference
For links to Markzware and other providers of InDesign tools, visit this book’s companion Web site at
www.InDesignCentral.com
. n
Caution
Because other programs’ formats are so different from InDesign’s, and their capabilities differ as well, the
chances of being able to import a foreign document and have it flawlessly convert to InDesign are small. Use
this feature as the first step in the conversion process, but expect to spend time cleaning up the converted files
by hand. n
FIGURE 4.6
InDesign shows the Warnings dialog box if there are any conversion issues when importing foreign file formats.
QuarkXPress
InDesign can read QuarkXPress and QuarkXPress Passport files from versions 3.3, 4.0, and 4.1.
(Adobe has no plans to support files in the version 5, 6, 7, or 8 formats of QuarkXPress, though
Markzware offers a conversion utility for these formats.)
Because there are so many differences between QuarkXPress and InDesign, it’s impossible to pre-
dict all the conversion issues that may arise. The good news is that a great many things work well,
but some don’t. Here are some common conversion issues you should pay attention to:
l
If your QuarkXPress document relies on XTensions (a type of plug-in) to add capabilities
(such as table creation), it does not convert correctly into InDesign and may not even
import at all. Examples include any documents built with QuarkXPress’s indexing and
book features.
l
The QuarkXPress leading model is different from that of InDesign, so expect leading to
sometimes vary significantly, especially if you use additive leading as the automatic lead-
ing method in QuarkXPress.
l
InDesign doesn’t retain kerning-table adjustments in QuarkXPress files. (It does retain any
kerning applied manually.)
11_607169-ch04.indd 12311_607169-ch04.indd 123 4/22/10 7:48 PM4/22/10 7:48 PM
Please purchase PDF Split-Merge on www.verypdf.com to remove this watermark.
Part II: Document Fundamentals
124
l
The customizable dashes in QuarkXPress are converted to solid and dashed lines. (Note
that stripes do convert properly.)
l
Special gradient blends, such as the diamond pattern, are converted to linear blends or
circular blends.
l
Text on a curved path is converted to regular text in a rectangular frame, even though
InDesign supports text on paths.
l
H&J sets don’t have an equivalent in InDesign, so they do not convert, although any H&J
settings are carried over into the converted paragraph styles.
l
Libraries don’t convert.
l
Printer styles don’t convert.
PageMaker
InDesign can read PageMaker 6.0, 6.5, and 7.0 files. Because PageMaker and InDesign offer many
of the same features, there are fewer translation issues between them. Some to take note of include:
l
Fill patterns aren’t supported.
l
Libraries won’t convert.
l
Printer styles won’t convert.
Recovering a document after a crash or power failure
InDesign includes an automatic recovery feature that protects your documents in the event of a
power failure or a system crash. As you work on a document, any changes you make after saving
it are stored in a separate, temporary file. Under normal circumstances, each time you choose
File ➪ Save or press Ô+S or Ctrl+S, the information in the temporary file is applied to the docu-
ment. The data in the temporary file is important only if you aren’t able to save a document before
crashing. A word of warning: Although InDesign’s automatic recovery feature is a nice safety net,
you should still be careful to save your work often. Here’s how it works:
1.
Relaunch InDesign or, if necessary, restart your computer and then launch
InDesign.
2.
If automatic-recovery data is available, InDesign automatically opens the recovered
document and displays the word Recovered in the document’s title bar. This lets you
know that the document contains changes that were not included in the last saved version.
3.
If you want to save the recovered data, choose File ➪ Save or press Ô+S or Ctrl+S.
Recovered is removed as part of the file name, and InDesign asks whether you want to
overwrite the old file. Overwriting the old file is easier than choosing File ➪ Save As or
pressing Shift+Ô+S or Ctrl+Shift+S and then typing a name, unless you do want to save
a copy of the file in case you want to go back to the old version later.
If you want to use the last saved version of the document (and disregard the recovered
data), close the file (choose File ➪ Close or press Ô+W or Ctrl+W) without saving and
then open the file (choose File ➪ Open or press Ô+O or Ctrl+O).
11_607169-ch04.indd 12411_607169-ch04.indd 124 4/22/10 7:48 PM4/22/10 7:48 PM
Please purchase PDF Split-Merge on www.verypdf.com to remove this watermark.