Tài liệu InDesign CS5 Bible- P12 doc
Bạn đang xem bản rút gọn của tài liệu. Xem và tải ngay bản đầy đủ của tài liệu tại đây (1.06 MB, 50 trang )
Chapter 20: Specifying Character Attributes
505
Leaving Space between Characters and
Lines
Typographers often pay as much attention to the space between characters, words, and lines of text
as they do to the appearance of the characters themselves. Their concern about space is well justi-
fied. The legibility of a block of text depends as much on the space around it, called white space, as
it does on the readability of the font.
InDesign offers two ways to adjust the space between characters — kerning and tracking — as well
one way to adjust spacing between lines: leading.
Cross-Reference
InDesign also provides a way to adjust the space between paragraphs; see Chapter 21. It also explains how to
control the spacing between words, which is part of paragraph formatting.
n
Kerning
Kerning is the adjustment of space between a pair of characters. Most fonts include built-in kern-
ing tables that control the space between pesky character pairs, such as LA, Yo, and WA, that other-
wise could appear to have a space between them even when there isn’t one. Particularly at small
font sizes, it’s safe to use a font’s built-in kerning information to control the space between letter
pairs; but for large font sizes, for example the front-page nameplate of a newsletter or a magazine
headline, you may want to manually adjust the space between certain character pairs to achieve
consistent spacing.
The Kerning controls in the Character panel and Control panel provide three options for kerning
letter pairs: metrics kerning, optical kerning, and manual kerning:
l
Metrics kerning uses a font’s built-in kerning pairs to control the space between character
pairs in the highlighted text.
l
Optical kerning has InDesign look at each letter pair in highlighted text and add or
remove space between the letters based on the shapes of the characters.
l
Manual kerning is adding or removing space between a specific letter pair in user-
specified amounts.
The kerning method you use depends on the circumstances. For example, some fonts include a
large set of kerning pairs. Such fonts, especially at text font sizes (9 to 12 points) and lower, may
look fine using the default metrics kerning option, which uses built-in kerning pairs. On the other
hand, if the font applied to highlighted text has few or no built-in kerning pairs or if several differ-
ent fonts are mixed together, the text may benefit from the optical kerning method. At display font
sizes (36 points and larger), you may want to manually kern individual letter pairs to suit your
taste.
30_607169-ch20.indd 50530_607169-ch20.indd 505 4/22/10 7:59 PM4/22/10 7:59 PM
Please purchase PDF Split-Merge on www.verypdf.com to remove this watermark.
Part V: Text Fundamentals
506
When the flashing text cursor is between a pair of characters, the Kerning field displays the pair’s
kerning value. If metrics or optical kerning is applied, the kerning value is shown in parentheses.
To apply metrics or optical kerning to highlighted text, choose the appropriate option from the
Kerning popup menu. To apply manual kerning, click between a pair of letters and then type a
value in the Kerning field or choose one of the predefined values. Negative values tighten; positive
values loosen.
Note
InDesign applies kerning (and tracking) to highlighted text in
1
⁄
1,000
-em increments called units. An em is as wide
as the height of the current font size (that is, an em for 12-point text is 12 points wide), which means that kern-
ing and tracking increments are relative to the applied font size.
n
You can also use a keyboard shortcut to apply manual kerning. Press Option+← or Alt+← to
decrease the kerning value in increments of 20 units. Press Option+→ or Alt+→ to increase the
kerning value in increments of 20 units. If you add the Ô or Ctrl keys to these keyboard shortcuts,
the increment is increased to 100 units. If you use the up and down cursor keys in the Kerning
field in the Character panel or Control panel, you change the kerning in increments of 10; while
pressing and holding Shift, the increments increase to 25.
Caution
A warning about kerning and tracking: InDesign happily lets you tighten or loosen text to the point of illegibil-
ity. If this is the effect you’re after, go for it. However, as a general rule, when letter shapes start to collide,
you’ve tightened too far.
n
Tracking
Tracking is similar to kerning but applies to a range of highlighted text. Tracking is the process of
adding or removing space among all letters in a range of text. You might use tracking to tighten
character spacing for a font that you think is too spacey, or loosen spacing for a font that’s too
tight. You could also track a paragraph tighter or looser to eliminate a short last line or a widow
(the last line of a paragraph that falls at the top of a page or column).
To apply tracking to highlighted text, type a value in the Character panel’s Tracking field or choose
one of the predefined values. Negative values tighten; positive values loosen (in 0.001-em incre-
ments). Use the same keyboard techniques as for kerning.
Leading
InDesign’s leading (rhymes with sledding, not with heeding) feature lets you control the vertical space
between lines of type. In the days of metal type, typesetters would insert thin strips of metal — spe-
cifically, lead — between rows of letters to aid legibility. In the world of digital typography, leading
refers to the vertical space between lines of type as measured from baseline to baseline.
30_607169-ch20.indd 50630_607169-ch20.indd 506 4/22/10 7:59 PM4/22/10 7:59 PM
Please purchase PDF Split-Merge on www.verypdf.com to remove this watermark.
Chapter 20: Specifying Character Attributes
507
In the publishing world, leading is traditionally an attribute of paragraphs, but InDesign takes a
nonstandard, character-oriented approach. This means that you can apply different leading values
within a single paragraph. InDesign looks separately at each line of text in a paragraph and uses
the largest applied leading value within a line to determine the leading for that line.
That capability might have some utility in some cases, but for most publishers, the results are
unevenly spaced lines that look unacceptably amateurish. Fortunately, you can make InDesign
work the way the rest of the world does and apply consistent leading to entire paragraphs (using
the largest leading value applied if several have been applied in a paragraph): Select the Apply
Leading to Entire Paragraphs option in the Type pane of the Preferences dialog box (choose
InDesign ➪ Preferences ➪ Type or press Ô+K on the Mac, or choose Edit ➪ Preferences ➪ Type or
press Ctrl+K in Windows).
By default, InDesign applies Auto Leading to text. When Auto Leading is applied, leading is equal
to 120 percent of the font size. For example, if Auto Leading is applied to 10-point text, the lead-
ing value is 12 points; for 12-point text, Auto Leading is 14.4 points; and so on. As long as you
don’t change fonts or font sizes in a paragraph, Auto Leading works pretty well. If you do change
fonts or sizes, Auto Leading can result in inconsistent spacing between lines. For this reason, it’s
safer to specify an actual leading value.
Generally, it’s a good idea to use a leading value slightly larger than the font size, which is why
Auto Leading works in many cases. When the leading value equals the font size, text is said to be
set solid. That’s about as tight as you ever want to set leading unless you’re trying to achieve a spe-
cial typographic effect or working with very large text sizes in ad copy headlines. As is the case
with kerning and tracking, when tight leading causes letters to collide — ascenders and descenders
are the first to overlap — you’ve gone too far.
In many ways, InDesign makes once-mystical typographic processes easy to use by designers, honoring
the rules and intricacies of typography historically known only to typographers. When it comes to auto
leading, however, InDesign has gone off in a mysterious direction.
For example, why is something that InDesign treats as a character format setting accessed through the
Paragraph panel? (Easy answer: Leading should be a paragraph attribute in the first place, and whoever
put the Leading control in the Character panel missed the Auto Leading control!) A harder mystery:
Why is the Auto Leading control offered as part of the justification controls, for which it has no relation-
ship? (Maybe that’s how it got missed when Leading was put in the Character panel!)
Another mystery is why you cannot specify Auto Leading amounts in anything other than percentages.
This causes many QuarkXPress documents imported into InDesign to flow incorrectly because
QuarkXPress lets you set the Auto Leading to a specific value, such as +2 (which adds 2 points to the
text size rather than use a percentage such as 120 percent that results in awkward leading amounts
such as 14.4 points). Being able to specify a specific additive value such as +2 makes sense for many
kinds of layouts, so the inability to specify such values is an unfortunate, continued omission in
InDesign.
Auto Leading Mysteries
30_607169-ch20.indd 50730_607169-ch20.indd 507 4/22/10 7:59 PM4/22/10 7:59 PM
Please purchase PDF Split-Merge on www.verypdf.com to remove this watermark.
Part V: Text Fundamentals
508
You can change InDesign’s preset Auto Leading value of 120 percent. To do so, choose
Type ➪ Paragraph or press Option+Ô+T or Ctrl+Alt+T to display the Paragraph panel. Choose
Justification in the flyout menu, type a new value in the Auto Leading field, and then click OK.
To modify the leading value applied to selected text, choose one of the predefined options from the
Leading popup menu in the Character panel or Control panel, or type a leading value in the field.
You can type values from 0 to 5,000 points in 0.001-point increments. You can also use the up
and down cursor keys to change leading in 1-point increments.
Summary
As a user of InDesign, modifying the appearance of type is one of the more common tasks you’ll
perform. InDesign lets you modify the appearance of highlighted characters or selected paragraphs.
When text is highlighted, you can use the controls in the Character panel or Control panel to
change any of several character attributes: font family, font size, font style, leading, kerning, track-
ing, vertical and horizontal scale, baseline shift, and skew. You can also set the hyphenation and
spell-checking language, apply all caps or small caps, superscripts or subscripts, underline, strike-
through, ligatures, and OpenType variations.
You also set line spacing (leading) as a character attribute, something normally applied to entire
paragraphs in other programs. Setting it as a character attribute can lead to uneven line spacing,
something that, fortunately, InDesign lets you override to get consistent leading throughout a
paragraph.
30_607169-ch20.indd 50830_607169-ch20.indd 508 4/22/10 7:59 PM4/22/10 7:59 PM
Please purchase PDF Split-Merge on www.verypdf.com to remove this watermark.
509
CHAPTER
Specifying Paragraph
Attributes
IN THIS CHAPTER
Understanding paragraph
fundamentals
Working with paragraph and
nested styles
Changing margins,
indentation, spacing, and
column spanning
Applying initial caps, inline
graphics, and automatic
bullets and numbering
Working with hyphenation and
justification
Modifying other paragraph
formats
A
s is an individual character, a paragraph in InDesign is treated like a
basic typographic unit. When you create a new text frame and begin
typing, you create a paragraph each time you press Return or Enter.
A paragraph can be as short as one character or word on a single line or
many words strung out over many lines. When you press Return or Enter,
the paragraph formats of the preceding paragraph are automatically used for
the subsequent paragraph (unless you create styles that automatically change
paragraph formats).
In general, paragraph formats control how the lines of text in the paragraph
are constructed. Changing paragraph formats doesn’t change the appearance
of the individual characters within the paragraph. To do that, you must
highlight the characters and modify character-level formats.
Cross-Reference
This chapter focuses on applying paragraph-level typographic formats; Chapter
20 focuses on applying character-level formats.
n
Working with Paragraph Formats
To select a paragraph, simply click within it using the Type tool. Any change
you make to a paragraph-level format applies to all the lines in the para-
graph. (In contrast to how you modify character-level formats, you don’t
have to highlight all the text in a paragraph to modify a paragraph-level for-
mat.) If you need to change the paragraph formats of several consecutive
paragraphs, you can highlight all the text in all the paragraphs, or you can
31_607169-ch21.indd 50931_607169-ch21.indd 509 4/22/10 8:00 PM4/22/10 8:00 PM
Please purchase PDF Split-Merge on www.verypdf.com to remove this watermark.
Part V: Text Fundamentals
510
click anywhere in the first paragraph, drag anywhere within the last paragraph, and then release
the mouse button.
Just as you can’t apply two different colors to a single character, so you can’t apply conflicting
paragraph formats within a single paragraph. For example, you can’t specify that one line in a para-
graph be left-aligned and the rest right-aligned. All lines in a paragraph must share the same align-
ment, indents, tab settings, and all other paragraph-level formats.
As is the case with character formats, you apply paragraph formats in two ways:
l
Use the controls in the Paragraph panel or Control panel’s Paragraph (¶) pane, shown in
Figures 21.1, or their keyboard shortcuts.
l
Create and apply paragraph styles.
A paragraph style is essentially a text-formatting macro that lets you apply multiple paragraph and
character formats to selected paragraphs in a single operation. If you’re working on a multipage
publication such as a book, newspaper, magazine, or catalog that repeatedly uses the same basic
text formats, you definitely want to use paragraph styles to handle the bulk of your formatting
chores; but even if you use styles, you will probably also use the Paragraph panel to do some man-
ual paragraph formatting.
Cross-Reference
Tab settings are also a paragraph-level format. See Chapter 25 for a detailed explanation of InDesign’s tabs
feature.
n
Setting paragraph attributes
There are three ways to open the Paragraph panel: Choose Type ➪ Paragraph, choose
Window ➪ Type & Tables ➪ Paragraph, or press Option+Ô+T or Ctrl+Alt+T.
The Paragraph panel can have two appearances: If you choose Hide Options from the popup
menu, the Space Before, Space After, Drop Cap Number of Lines, Drop Cap One or More
Characters, Hyphenate, Align to Baseline Grid, and Do Not Align to Baseline Grid controls are not
shown. You can use the double-arrow iconic button to the left of the panel name to toggle among
showing the panel title, the basic options, and all options.
You can also use the Control panel’s paragraph formatting options, shown in Figure 21.1. (Be sure
to click the ¶ iconic button to get the paragraph options.) These controls mirror those in the
Paragraph panel, and using them instead of the Paragraph panel can reduce screen clutter. If the
Control panel is not visible (it almost always is), display it by choosing Window ➪ Control or
pressing Option+Ô+6 or Ctrl+Alt+6.
In both the Paragraph panel and the Control panel, several of the options have keyboard shortcuts.
31_607169-ch21.indd 51031_607169-ch21.indd 510 4/22/10 8:00 PM4/22/10 8:00 PM
Please purchase PDF Split-Merge on www.verypdf.com to remove this watermark.
Chapter 21: Specifying Paragraph Attributes
511
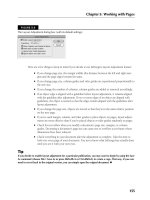
FIGURE 21.1
Top: The Paragraph panel and its flyout menu. Bottom: The Control panel’s Paragraph (¶) pane and flyout
menu.
Align buttons
Justify buttons
Align to/from
Spine buttons
Right Indent
Space After
Last Line Right Indent
Drop Cap One or More Characters
Left Indent
First Line
Left Indent
Space
Before
Drop Cap
Number
of Lines
Align Baseline Grid to Buttons
Character
Formatting Controls
(Character pane)
Align buttons
Left Indent
Right Indent
Space Before
Space After
Bulleted List
Paragraph Styles flyout menu Paragraph Styles
Do Not Align to Baseline Grid
Number of Columns
Span Columns
Paragraph Formatting Controls (Paragraph pane)
Justify
buttons
Align to/from Spine buttons
First Line
Left Indent
Last Line
Left Indent
Drop Cap
Number
of Lines
Drop Cap One or More Characters
Numbered List
Clear Overrides
Align to Baseline Grid
Gutter
Horizontal Cursor Position
Quick Apply
31_607169-ch21.indd 51131_607169-ch21.indd 511 4/22/10 8:00 PM4/22/10 8:00 PM
Please purchase PDF Split-Merge on www.verypdf.com to remove this watermark.
Part V: Text Fundamentals
512
Tip
If the Type tool is selected and no objects are active, any changes you make in the Control panel’s Paragraph
(¶) pane become the default settings for the document and are automatically used when you create new text
frames.
n
Working with paragraph styles
To work with paragraph styles, use the Paragraph Styles panel, which you open by choosing
Type ➪ Paragraph Styles or pressing Ô+F11 or Ctrl+ F11. (You can also choose Window ➪
Styles ➪ Paragraph Styles.) A paragraph style can set any or all of the attributes in the Paragraph
panel and its flyout menu.
A paragraph style can also set character-level formatting such as font, language, case, and so on (see
Chapter 20). That means you can use one style (the paragraph style) to set all formatting attributes
for text in a paragraph. And you would use character styles just for applying character formatting to
text selections within paragraphs, such as for highlighting new terms or indicating hyperlinks.
Note
Your layout’s Paragraph Styles panel includes any character styles imported from Word or RTF files. Chapter
17 explains how to control style import when importing text files.
n
Cross-Reference
For details about creating, modifying, applying, and managing styles, see Chapter 7. For details on Grep styles,
see Chapter 26.
n
Paragraph styles work like other styles, with these exceptions:
l
If your selected paragraphs have more than one paragraph style applied within the group,
the Paragraph Styles panel displays the text (Mixed) at the lower left.
l
When you delete a paragraph style that is applied to text in your document and select [No
Paragraph Style] as the replacement style, you have the option to select the Preserve
Formatting option to convert the unapplied style’s formatting to local formatting, or to
deselect it to make the text lose that formatting as well as its style.
Three options in the Control panel’s Paragraph (¶) pane are unrelated to paragraph formatting:
The Number of Columns and Gutter fields affect text frames and have the same effects as the same-
named controls in the Text Frame Options dialog box, as described in Chapter 18.
The Horizontal Cursor Position status indicator shows the horizontal position, relative to the frame’s left
inset, of the text cursor. This indicator can be helpful when you’re trying to measure where to draw
vertical rules, set tab stops, or otherwise understand where specific text sits within a line so that you can
align or place something at the same horizontal location.
The Paragraph Pane’s Guest Functions
31_607169-ch21.indd 51231_607169-ch21.indd 512 4/22/10 8:00 PM4/22/10 8:00 PM
Please purchase PDF Split-Merge on www.verypdf.com to remove this watermark.
Chapter 21: Specifying Paragraph Attributes
513
l
The Convert "current style name" Bullets and Numbering to Text option in the Paragraph
Styles panel’s flyout menu removes any automatic bullets or numbering defined through
InDesign’s bulleted and numbered lists feature from selected paragraphs (see Chapter 22).
The paragraphs that this option is applied to still have bullets and numbers, but they are
no longer updated if the style is changed or if paragraphs are added or deleted. (Adding
paragraphs would normally add bullets or adjust numbering.)
l
InDesign has a neat capability that lets you apply multiple styles to selected text. First,
define the various styles, and be sure that each style has a different style selected in the
Next Style pop-up menu in the Paragraph Style Options or New Paragraph Style dialog
boxes. For example, if you have Headline, Byline, and Body Copy styles, make sure that
Headline has Byline selected in Next Style and that Byline has Body Copy selected in Next
Style. Then highlight all the text that uses this sequence of styles. Now Control+click or
right-click Headline and select Apply “Headline” + Next Style from the contextual menu.
InDesign applies Headline to the first paragraph, Byline to the second paragraph, and
Body Copy to the rest.
New Feature
The default font in the [Basic Paragraph] paragraph style has changed in InDesign CS5: It is now Minion Pro
Regular, which InDesign installs for you. Previously, [Basic Paragraph] used Times on the Mac and Times New
Roman in Windows as its font.
n
Working with nested styles
Often, you’ll want to apply character formatting in a consistent manner within paragraphs. For
example, you may want to change the font for the first character in a bulleted list so that the cor-
rect symbol appears for the bullet. Or you might want to italicize the numerals in a numbered list.
Or you might want the first four words of body text that appear after a headline to be boldface and
in small caps. Or you might want the first sentence in instructional paragraphs to be italic.
InDesign lets you automate such formatting through the nested styles feature.
As with all paragraph formatting, you can use this feature via the Paragraph panel for specific para-
graphs or via the Paragraph Styles panel for all paragraphs using a specific style.
Note
InDesign has a second form of nested style, called nested line styles, which works just the same as other nested
styles (explained next) except that it lets you apply a character style to a certain number of lines in a para-
graph. This is a popular design approach, such as having the first line in small caps. You specify the desired
character style and how many lines you want it applied to, and InDesign does the rest.
n
Figure 21.2 shows an example of nested styles in use, along with the Paragraph Style Options dia-
log box’s Drop Caps and Nested Styles pane in which you create them. Here, you can see that the
first sentence of the introductory paragraph’s text is set to appear in red.
31_607169-ch21.indd 51331_607169-ch21.indd 513 4/22/10 8:00 PM4/22/10 8:00 PM
Please purchase PDF Split-Merge on www.verypdf.com to remove this watermark.
Part V: Text Fundamentals
514
FIGURE 21.2
You can use a nested style to set the first line (for example) to use a specific character style. Essentially, you
create a set of rules as to how much text gets a specific character style applied using the scope options,
shown in the pop-up menu, for a nested style to determine what text receives the specified formatting,
such as two sentences or all words until an em space. A nested line style does the same for lines of text.
Note
The Nested Styles feature is included in the same dialog box as the Drop Caps feature. That’s because a drop
cap would be the first nested style in a paragraph and can never be anything but the first style. By combining
the two into one dialog box, InDesign lets you treat a drop cap as part of a series of styles to be applied to a
paragraph. If you want only a drop cap, you simply don’t create a nested style.
n
Here’s how the nested styles work:
1.
Define any character styles that you’ll apply to text through a nested style. Even if
all you’re doing is making text italic, you need to define a character style to do so. The
nested styles feature cannot apply any attributes other than those available in a character
style.
2.
Open the Paragraph Styles panel (choose Type ➪ Paragraph Styles or press Ô+F11
or Ctrl+F11), choose Style Options from the flyout menu to open the Paragraph
Style Options dialog box, and go to the Drop Caps and Nested Styles pane.
31_607169-ch21.indd 51431_607169-ch21.indd 514 4/22/10 8:00 PM4/22/10 8:00 PM
Please purchase PDF Split-Merge on www.verypdf.com to remove this watermark.
Chapter 21: Specifying Paragraph Attributes
515
3.
Click New Nested Style. An entry appears in the Nested Styles section of the dialog box.
This is what will be applied to text.
4.
Click the style name in the Nested Styles section of the pane to choose from an
existing character style. When you click the style name, a list of other styles appears,
including [None], which uses the paragraph style’s default formatting.
Tip
You also have the [Repeat] option, which if selected lets you repeat a sequence of previous styles. (You choose
the number in the third column.)
n
5.
Click in the second column to determine the scope endpoint. Your choices are
Through or Up To. For example, if you choose Through for a nested style that is set for
four words, all four words get the nested style. If you choose Up To, the first three words
get the style and the fourth doesn’t.
6.
In the third column, specify how many items you want InDesign to count in deter-
mining the scope’s endpoint. For example, if you want the first seven characters to have
the style applied, type the number 7. If you want to have the style applied up to the first
tab, type 1.
7.
Click the item in the fourth column to specify the scope of text to which you’re
applying the nested styles. Figure 21.2 shows the options. They break into three
groups: a number of items (characters, words, and so on), a specific character (tab, em
space, and so on), and a specific marker character (anchored object marker, auto page
number, and section marker). Whatever you choose needs to be consistent in all your
text because InDesign follows these rules slavishly.
8.
Create multiple nested styles in one paragraph with different rules for each.
Obviously, you may not need to do this, but the option exists. InDesign applies the styles
in the order in which they appear in the dialog box, and each starts where the other ends.
Use the up and down arrow iconic buttons at the bottom of the section to change the
order of nested styles.
9.
Create any desired line styles in the Nested Line Styles section of the pane. It works
just like the Nested Styles section except that there are just two popup menus: one for the
character style you want to apply and one for the number of lines you want it applied to.
If you create more than one nested line style, they are applied in the order shown in the
pane. Use the up and down arrow iconic buttons at the bottom of the section to change
the order of nested line styles.
10.
Select the Preview option to preview the formatting if you selected sample text
before opening the dialog box.
11.
Click OK when you’re done.
Tip
If you don’t have a character style ready to use for your drop cap, nested style, or nested line style, InDesign
lets you create it by choosing New Character Style in each of the Character Style popup menus.
n
31_607169-ch21.indd 51531_607169-ch21.indd 515 4/22/10 8:00 PM4/22/10 8:00 PM
Please purchase PDF Split-Merge on www.verypdf.com to remove this watermark.
Part V: Text Fundamentals
516
Note
InDesign provides a special character that forces a nested style to stop being applied. Called End Nested Style
Here, you insert this character by choosing Type ➪ Insert Special Character ➪ Other ➪ End Nested Style Here.
Using this character ends a nested style before whatever criterion you set for the scope of text occurs in Step 5
previously. (You can also make use of End Nested Style Here as a criterion.)
n
Controlling Alignment and Indents
The nine alignment icons at the top of the Paragraph panel and the four fields are always shown;
the four additional fields, two icons, and the Hyphenate option are also shown when you choose
Show Options from the flyout menu. InDesign refers to the top set of options as Basic Paragraph
Formats; the additional seven options are Advanced Paragraph Formats.
The top set lets you control a paragraph’s alignment and indents (left, right, first line, and last
line). The additional options control paragraph spacing and drop caps, as well as lock or unlock
text baselines to the baseline grid.
Setting paragraph alignment
The nine alignment icons at the top of the Paragraph panel control how line beginnings and end-
ings in selected paragraphs are placed relative to the left and right margins. (All but one are also
available in the Control panel’s Paragraph [¶] pane.) Here’s a description of each alignment option
(the icons do a pretty good job of showing what they do):
l
Align Left (Shift+Ô+L or Ctrl+Shift+L): Places the left edge of every line at the left mar-
gin (the margin can be the frame edge, frame inset, left indent, or column edge) and fits as
many words (or syllables, if hyphenation is turned on) on the line as possible. When a
word (or syllable) won’t fit at the end of a line, it’s placed (flush left) on the next line. In
left-aligned paragraphs, the right margin is said to be ragged because the leftover space at
the right end of each line differs from line to line and produces a jagged edge.
Some designers prefer to use this alignment for columns of text because they like the irregu-
lar, somewhat organic shapes that result; others prefer to align both left and right edges by
increasing spacing as needed between characters (called justification), which produces a more
rigid, vertical look. Similarly, left-aligned text is sometimes hyphenated, sometimes not.
(You can find more about hyphenation and justification later in this chapter.)
l
Align Center (Shift+Ô+C or Ctrl+Shift+C): To create centered text, the leftover space
of each line is divided in half. One-half of the leftover space is placed on the left end of the
line; the other half is placed on the right end. The result is that both the left and right
edges of the paragraphs are ragged, and the text is balanced along a vertical axis.
31_607169-ch21.indd 51631_607169-ch21.indd 516 4/22/10 8:00 PM4/22/10 8:00 PM
Please purchase PDF Split-Merge on www.verypdf.com to remove this watermark.
Chapter 21: Specifying Paragraph Attributes
517
l
Align Right (Shift+Ô+R or Ctrl+Shift+R): This is a mirror opposite of Align Left. The
right edge is straight; the left edge is ragged. Columns of text are seldom set flush right
because it’s not as easy to read as flush-left text. Right-aligned text is sometimes used for
such things as captions placed to the left of a picture, blurbs on magazine covers, and
advertising copy.
l
Left Justify (Shift+Ô+J or Ctrl+Shift+J): In justified text, the left and right ends of each
line are flush with the margins. The flush-left/flush-right results are produced either by
sprinkling the spaces of each line among characters and/or words or by reducing space
between characters and/or words to accommodate additional characters (more about justi-
fication later in this chapter). Justified text is nearly always hyphenated (if you don’t
hyphenate justified text, spacing between letters and words is very inconsistent). Aligning
the last line flush left is the traditional way of ending a paragraph, which is why Left
Justify is the justified-text style most often used on paragraphs.
l
Center Justify: This is the same as Left Justify except that the last line is center-aligned.
l
Right Justify: This is the same as Left Justify except that the last line is right-aligned. Note
that this iconic button is not available in the Control panel.
l
Full Justify (Shift+Ô+F or Ctrl+Shift+F): This is the same as Left Justify except that the
last line is also forcibly justified. This option can produce very widely spaced last lines.
The fewer the characters on the last line, the greater the spacing.
The previous three options are rarely used, and for good reason. People expect justified
text to have the last line aligned left and the space at the end of the line to be a marker
that the paragraph has ended. By changing the position of that last line, you can confuse
your reader. So use Center Justify, Right Justify, and Full Justify options sparingly in spe-
cial situations in which the reader won’t be confused — typically in brief copy like ads
and pull-quotes.
l
Align Towards Spine: This is similar to Left Justify or Right Justify except that InDesign
automatically chooses a left or right alignment based on where the spine is in a facing-
pages document. Essentially, this automatically creates right-aligned text on left-hand
pages and left-aligned text on right-hand pages.
l
Align Away from Spine: This is the same as Towards Spine except that the alignment is
reversed: text aligns to the left on left-hand pages and to the right on right-hand pages.
To apply a paragraph alignment to selected paragraphs, click one of the icons. (The hand pointer
appears when the pointer is over a panel button.) You can also use the keyboard shortcuts in the
preceding list.
Note
Left-aligned and right-aligned paragraphs typically fit fewer characters per line than justified paragraphs. Most
publications standardize on one of these two alignments for body copy; one factor is often how much copy
needs to be squeezed in.
n
31_607169-ch21.indd 51731_607169-ch21.indd 517 4/22/10 8:00 PM4/22/10 8:00 PM
Please purchase PDF Split-Merge on www.verypdf.com to remove this watermark.
Part V: Text Fundamentals
518
Setting indents
You can move the edges of paragraphs away from the left and/or right margins and indent the first
line using the indent controls in the Paragraph panel or Control panel.
Left and right indents are often used for lengthy passages of quoted material within a column of
text. Using indents is also a handy way of drawing attention to pull-quotes and moving text away
from a nearby graphic.
The options are:
l
Left Indent: Type a value in this field to move the left edge of selected paragraphs away
from the left margin. You can also use the up and down arrow keys. Each click increases
the value by 1 point; pressing and holding Shift while clicking increases the increment to
1 pica.
l
Right Indent: Type a value in this field to move the right edge of selected paragraphs
away from the right margin. You can also use the up and down arrow keys.
l
First-Line Left Indent: Type a value in this field to move the left edge of the first line of
selected paragraphs away from the left margin. You can also press the up and down arrow
keys. The value in the First-Line Indent field is added to any Left Indent value. For exam-
ple, if you’ve specified a Left Indent value of 1 pica and you then specify a 1-pica First-
Line Indent value, the first line of selected paragraphs is indented 2 picas from the left
margin. If you’ve specified a Left Indent value, you can specify a negative First-Line Left
Indent value to create a hanging indent (also called an outdent). However, you cannot spec-
ify a First-Line Left Indent value that would cause the first line to extend past the left edge
of the text frame (that is, the First-Line Left Indent value can’t exceed that of the Left
Indent value).
l
Last-Line Right Indent: Type a value in this field to move the right edge of the last line of
selected paragraphs away from the right margin. You can also press the up and down
arrow keys. This function otherwise works just like the First-Line Left Indent function, so
the Last-Line Right Indent value cannot exceed that of the Right Indent value.
Using a tab or spaces to indent the first line of a paragraph, which is what was done in the age of
typewriters, is usually not a good idea. You’re better off specifying a First-Line Indent. Similarly,
you can indent an entire paragraph by inserting a tab or multiple word spaces at the beginning of
every line in the paragraph, but both are typographic no-nos. Use the indent controls instead.
Hanging indents often have awkward measurements because they depend on the width of the bul-
let or other lead-in character. That can involve lots of experimentation to get the hang right. A sim-
pler way is to insert the Indent Here character (choose Type ➪ Insert Special Character ➪ Other ➪
Indent to Here or press Ô+\ or Ctrl+\). InDesign figures out the dimensions for you. Note that in
this case, the Paragraph or Control panel does not show any indent values.
31_607169-ch21.indd 51831_607169-ch21.indd 518 4/22/10 8:00 PM4/22/10 8:00 PM
Please purchase PDF Split-Merge on www.verypdf.com to remove this watermark.
Chapter 21: Specifying Paragraph Attributes
519
Caution
There is a risk with using Indent Here: You can have inconsistent hanging indents if the lead-in characters or
space differs in your paragraphs, or if tracking or kerning of text before the indent-to-here characters varies
from paragraph to paragraph.
n
Setting column spans
InDesign CS5 lets you override the number of columns set in a text frame (see Chapter 19) at a
paragraph level. That means you can have a headline and its body text in the same text frame, with
the text flowing into, say, two columns within the frame but the headline going across the full
frame width, as the top of Figure 21.3 shows. This type of layout is extremely common in newslet-
ters, newspapers, and magazines.
The Span Columns control is not all-or-nothing. Instead, it lets you specify how many columns the
paragraph spans:
l
All columns
l
Two columns
l
Three columns
l
Four columns
The easy part of creating first-line indents and hanging indents is using the software. The hard part can
be deciding how much space to use. For example, how do you decide how deep to make a first-line
indent? Amateur publishers or designers, who are likely to be thinking in inches rather than points or
picas, are likely to use too much space. They’re tempted to use 0.25", 0.125", or another nice dividend
of an inch for spacing rather than a more appropriate value such as 6 points. When deciding on spac-
ing, consider the following:
l
First-line indents that indicate new paragraphs should generally be one or two em spaces
wide. The width of an em space is equal to the point size in use — so 10-point text should
have a 10- or 20-point first-line indents. Opt for less space in narrower columns to avoid
awkward space and more space in wider columns so that the spacing is evident.
l
As you remember from grade-school outlines, indents help organize information, with deeper
indents indicating more detail about a topic. Professional publications, though, have many
organizational options — such as headlines, subheads, and run-in heads — so they rarely
have a need for more than two levels of indents. You might use indents on lengthy quotes,
bulleted lists, numbered lists, kickers, and bylines. If you do, stick to the same amount of
indent for each so that the readers’ eyes don’t wander.
Although these values give you a good starting point, you might need to modify them based on the
typeface, font size, column width, design, and overall goals of the publication.
Spacing Guidelines for Indents
31_607169-ch21.indd 51931_607169-ch21.indd 519 4/22/10 8:00 PM4/22/10 8:00 PM
Please purchase PDF Split-Merge on www.verypdf.com to remove this watermark.
Part V: Text Fundamentals
520
For example, if you have a four-column text frame and set Span Columns to Span 2 for the head-
line, the headline stretches across the first two columns of the frame, with the text in those col-
umns appearing below the headline, but the text in the other two columns is not affected, as the
middle of Figure 21.3 shows.
The Span Columns control also lets you split text within its column. For example, if you choose a
split of 2, the text is split into two columns within its text column. The bottom of Figure 21.3
shows an example.
FIGURE 21.3
The new Span Columns control lets you set text to break across columns in a text frame, such as text for
headlines and pull-quotes. At the top, setting a headline to span the entire text frame. In the middle, setting
a headline to span two columns in a four-column text frame. At bottom, setting a headline to split into two
columns in a two-column text frame.
31_607169-ch21.indd 52031_607169-ch21.indd 520 4/22/10 8:00 PM4/22/10 8:00 PM
Please purchase PDF Split-Merge on www.verypdf.com to remove this watermark.
Chapter 21: Specifying Paragraph Attributes
521
New Feature
The Span Columns controls are new to InDesign CS5. Before, you had to place the multicolumn-spanning
headlines in separate text frames.
n
Controlling Paragraph Spacing
InDesign lets you adjust spacing for paragraphs in two ways — between lines of text and between
paragraphs — and it provides three mechanisms for doing so.
Using leading
Leading (rhymes with sledding, not heeding), or the space between lines in a paragraph, is treated by
InDesign as a character format through the Character panel or Control panel, even though it’s tra-
ditionally an attribute of the paragraph. However, you can override InDesign’s character-oriented
approach so that it works like all other layout programs.
To ensure that leading changes affect entire paragraphs, select the Apply Leading to Entire
Paragraphs option in the Type pane of the Preferences dialog box (choose InDesign ➪ Preferences ➪
Type or press Ô+K on the Mac, or choose Edit ➪ Preferences ➪ Type or press Ctrl+K in Windows).
Cross-Reference
For more details on how to apply leading using the Character panel or Control panel, see Chapter 20.
n
Note
When creating paragraph styles, you set leading in the Basic Character Formats pane of the New Paragraph
Styles dialog box.
n
Adding space between paragraphs
When you choose Show Options from the Paragraph panel’s flyout menu, four additional fields
appear, as shown earlier in Figure 21.1. They’re also always in the Control panel. Two of these
fields let you insert space before and/or after paragraphs.
When you need to format a lengthy chunk of text with multiple paragraphs, there are two ways to
indicate a new paragraph. You can:
l
Indent the paragraph’s first line (by specifying a First-Line Left Indent value).
l
Insert some extra space between the new paragraph and the preceding one.
31_607169-ch21.indd 52131_607169-ch21.indd 521 4/22/10 8:00 PM4/22/10 8:00 PM
Please purchase PDF Split-Merge on www.verypdf.com to remove this watermark.
Part V: Text Fundamentals
522
Note
There’s no rule that says you can’t use both spacing methods, but generally you’ll use one or the other. What
you don’t want to do is insert extra returns between a paragraph, which is what was done in the days of
typewriters.
n
To insert space before selected paragraphs, type a value in the Space Before field in the Paragraph
panel or Control panel. You can also use the up and down nudge buttons next to the fields, and
you can use the ↑ and ↓ keys. (Just be sure you’ve selected the Space Before field first.) Each click
of the nudge button or press of the ↑ or ↓ key increases the Space Before value by 1 point. If you
press and hold Shift while using the nudge buttons or ↑ and ↓ keys, InDesign makes the spacing
the nearest multiple of 10 points and then continues to increment your Space Before value 10
points at a time as long as you hold Shift.
The Space After field works the same as the Space Before field but inserts space below selected
paragraphs. Generally, you use Space Before or Space After to separate paragraphs. Combining
both can be confusing.
Locking text to the baseline grid
Every document includes a grid of horizontal lines, called the baseline grid, which can be shown or
hidden (choose View ➪ Grids & Guides ➪ Show/Hide Baseline Grid or press Option+Ô+' or
Ctrl+Alt+') and used to help position objects and text baselines. A document’s baseline grid is
established in the Grids pane of the Preferences dialog box (choose InDesign ➪ Preferences ➪ Grids
or press Ô+K on the Mac, or choose Edit ➪ Preferences ➪ Grids or press Ctrl+K in Windows).
Generally, a document’s baseline grid interval is equal to the leading value applied to the body text.
You can ensure that lines of text align across columns and pages by locking their baselines to the
baseline grid. To do so, click the Align to Baseline Grid iconic button in the Paragraph panel (the
rightmost button on the bottom). To prevent such locking to the baseline, click the Do Not Align
to Baseline Grid iconic button. These same buttons also exist on the right side of the Control pan-
el’s Paragraph (¶) pane.
You can also set individual baseline grids for specific text frames. You do so in the Baseline Options
pane of the Text Frame Options dialog box (choose Object ➪ Text Frame Options or press Ô+B or
Ctrl+B). This is particularly handy for multicolumn text frames. InDesign aligns a paragraph to its
text frame’s baseline grid if it has one and to the document’s baseline grid if not — assuming, of
course, that the Align to Baseline Grid option is selected.
Cross-Reference
Chapter 10 covers how to set up baseline grids in more detail.
n
Although you can use InDesign’s Lock to Baseline Grid feature to align text baselines across col-
umns and pages (or within text frames), you can produce the same results by combining uniform
body text leading with other paragraph formats (Space Before and Space After). Some designers
like the certainty and simplicity of the Lock to Baseline Grid feature; others prefer to control text
alignment across columns themselves. Whichever works best for you is fine.
31_607169-ch21.indd 52231_607169-ch21.indd 522 4/22/10 8:00 PM4/22/10 8:00 PM
Please purchase PDF Split-Merge on www.verypdf.com to remove this watermark.
Chapter 21: Specifying Paragraph Attributes
523
Note
Keep in mind that when paragraphs are aligned to the baseline grid, the applied leading values are ignored.
n
InDesign provides a way to change how the Lock to Baseline Grid feature works. Normally, every
line in your text is aligned to the baseline grid when the feature is selected, but in some cases you
want only the first line of a paragraph to align to the baseline grid. For example, it’s common to
align just the first line in a multiline subhead to the baseline grid, letting the extra lines fall natu-
rally based on the paragraph’s leading. InDesign gives you a control to get this behavior: The Only
Align First Line to Grid option in the Paragraph panel’s and Control panel’s flyout menus. You can
use this option for any paragraph that you want to be the reset point if your text gets off the base-
line grid, without forcing every line to align to the grid. (Otherwise, every line in the subhead
would be aligned to the baseline grid, essentially overriding your leading.)
Another option, Balance Ragged Lines, in the Paragraph panel’s and Control panel’s flyout menus
ensures that the rag is balanced, which means that the lines of text alternate between short and
long when possible, rather than fall in a seemingly random pattern. The purpose of this option is
to make headlines and other large copy, such as in ads, more visually pleasing. You wouldn’t use
this option for body text; the use of small text size and the need for efficient spacing in body text
make this feature irrelevant. Unfortunately, this setting also forces hyphenation to achieve the bal-
anced rag, which may be contrary to your intent.
Using Initial Caps
A common layout technique meant to embellish key paragraphs is the use of initial caps. An initial
cap is an oversized first letter often dropped into the paragraph (and thus called a drop cap), but
InDesign also supports several variations of this technique.
Applying basic drop caps
A drop cap is created by notching a paragraph’s first letter or letters into the upper-left corner of the
paragraph. Drop caps are often used to embellish the first paragraph of a story, to draw attention
to paragraphs, and to interrupt the grayness in columns of text.
In the Paragraph panel or Control panel, InDesign lets you specify the number of letters you want
to include in a drop cap and the number of lines you want to notch them.
To add one or more drop caps to selected paragraphs, type a number in the Drop Cap Number
field in the Paragraph panel or Control panel. That’s how many characters will be made into drop
caps. To specify the number of lines a drop cap extends into a paragraph, type a value in the Drop
Cap Depth field.
If the first character in a paragraph is a quotation mark (“ or ‘), it can look odd as a one-character
drop cap. If you don’t like this look, you have a couple of options: You can either delete the open-
ing quotation mark, an acceptable but potentially confusing practice, or you can use the first two
31_607169-ch21.indd 52331_607169-ch21.indd 523 4/22/10 8:00 PM4/22/10 8:00 PM
Please purchase PDF Split-Merge on www.verypdf.com to remove this watermark.
Part V: Text Fundamentals
524
characters in the paragraph as drop caps instead. Some publications simply prefer not to start para-
graphs with quotes, preventing the problem from the editorial side.
After you create a drop cap, you can modify it by highlighting it and then changing any of its char-
acter formats — font, size, color, and so on — using a character style, the Character panel or
Control panel, and other panels (such as Stroke and Swatches). Figure 21.4 shows some examples
of drop caps.
FIGURE 21.4
The first (leftmost) drop cap has a one-character drop cap three lines deep. In the second example, the font
size of a one-letter, four-line drop cap has been enlarged to raise it above the first line of text. In the third
example, a Left Indent value combined with a negative First-Line Left Indent value produced the one-
character, three-line drop cap’s hanging indent. The fourth (rightmost) example is of a two-line, four-
character drop cap.
Using special initial cap techniques
The three-line, single-letter drop cap is used so often that it’s almost a cliché. Serviceable, yes, but
very commonplace. But you can create all sorts of initial caps — large first letters such as drop caps
and raised caps — in InDesign, as Figure 21.5 shows.
Creating raised caps
Raised caps are an alternative to drop caps, created by enlarging and raising the first few characters
of the paragraph above the first line in the paragraph. Creating raised caps is simple — highlight
the characters you want to raise with the Type tool and enlarge them using the Font Size field
in the Character panel (choose Type ➪ Character or press Ô+T or Ctrl+T) or in the Character pane
of the Control panel (press the A iconic button).
If you raise a word or phrase, you might need to track the raised words to tighten them. You also
might need to kern between the raised text and the remainder of the line. Other options for raised
caps include changing the font, color, and scale of the characters. If you plan to repeat the raised-
cap formatting, save it as a character style.
You can also create partially raised caps by creating a drop cap and then enlarging the drop cap
using the Character panel, the Character pane of the Control panel, or a character style.
31_607169-ch21.indd 52431_607169-ch21.indd 524 4/22/10 8:00 PM4/22/10 8:00 PM
Please purchase PDF Split-Merge on www.verypdf.com to remove this watermark.