Tài liệu ASP.NET MVC Tutorial 10 CS docx
Bạn đang xem bản rút gọn của tài liệu. Xem và tải ngay bản đầy đủ của tài liệu tại đây (255.65 KB, 12 trang )
MVC :: Creating Model Classes with LINQ to
SQL
The goal of this tutorial is to explain one method of creating model classes for an ASP.NET
MVC application. In this tutorial, you learn how to build model classes and perform database
access by taking advantage of Microsoft LINQ to SQL
In this tutorial, we build a basic Movie database application. We start by creating the Movie
database application in the fastest and easiest way possible. We perform all of our data
access directly from our controller actions.
Next, you learn how to use the Repository pattern. Using the Repository pattern requires a
little more work. However, the advantage of adopting this pattern is that it enables you to
build applications that are adaptable to change and can be easily tested.
What is a Model Class?
An MVC model contains all of the application logic that is not contained in an MVC view or
MVC controller. In particular, an MVC model contains all of your application business and
data access logic.
You can use a variety of different technologies to implement your data access logic. For
example, you can build your data access classes using the Microsoft Entity Framework,
NHibernate, Subsonic, or ADO.NET classes.
In this tutorial, I use LINQ to SQL to query and update the database. LINQ to SQL provides
you with a very easy method of interacting with a Microsoft SQL Server database. However,
it is important to understand that the ASP.NET MVC framework is not tied to LINQ to SQL in
any way. ASP.NET MVC is compatible with any data access technology.
Create a Movie Database
In this tutorial -- in order to illustrate how you can build model classes -- we build a simple
Movie database application. The first step is to create a new database. Right-click the
App_Data folder in the Solution Explorer window and select the menu option Add, New
Item. Select the SQL Server Database template, give it the name MoviesDB.mdf, and
click the Add button (see Figure 1).
Figure 1 – Adding a new SQL Server Database
After you create the new database, you can open the database by double-clicking the
MoviesDB.mdf file in the App_Data folder. Double-clicking the MoviesDB.mdf file opens the
Server Explorer window (see Figure 2).
The Server Explorer window is called the Database Explorer
window when using Visual Web Developer.
Figure 2 – Using the Server Explorer window
We need to add one table to our database that represents our movies. Right-click the Tables
folder and select the menu option Add New Table. Selecting this menu option opens the
Table Designer (see Figure 3).
Figure 3 – The Table Designer
We need to add the following columns to our database table:
Column Name Data Type Allow Nulls
Id Int False
Title NVarchar(200) False
Director NVarchar(50) false
You need to do two special things to the Id column. First, you need to mark the Id column
as a primary key column by selecting the column in the Table Designer and clicking the icon
of a key. LINQ to SQL requires you to specify your primary key columns when performing
inserts or updates against the database.
Next, you need to mark the Id column as an Identity column by assigning the value Yes to
the Is Identity property (see Figure 3). An Identity column is a column that is assigned a
new number automatically whenever you add a new row of data to a table.
After you make these changes, save the table with the name tblMovie. You can save the
table by clicking the Save button.
Create LINQ to SQL Classes
Our MVC model will contain LINQ to SQL classes that represent the tblMovie database table.
The easiest way to create these LINQ to SQL classes is to right-click the Models folder,
select Add, New Item, select the LINQ to SQL Classes template, give the classes the name
Movie.dbml, and click the Add button (see Figure 4).
Figure 4 – Creating LINQ to SQL classes
Immediately after you create the Movie LINQ to SQL Classes, the Object Relational Designer
appears. You can drag database tables from the Server Explorer window onto the Object
Relational Designer to create LINQ to SQL Classes that represent particular database tables.
We need to add the tblMovie database table onto the Object Relational Designer (see Figure
4).
Figure 4 – Using the Object Relational Designer
By default, the Object Relational Designer creates a class with the very same name as the
database table that you drag onto the Designer. However, we don’t want to call our class
tblMovie. Therefore, click the name of the class in the Designer and change the name of the
class to Movie.
Finally, remember to click the Save button (the picture of the floppy) to save the LINQ to
SQL Classes. Otherwise, the LINQ to SQL Classes won’t be generated by the Object
Relational Designer.
Using LINQ to SQL in a Controller Action
Now that we have our LINQ to SQL classes, we can use these classes to retrieve data from
the database. In this section, you learn how to use LINQ to SQL classes directly within a
controller action. We’ll display the list of movies from the tblMovies database table in an
MVC view.
First, we need to modify the HomeController class. This class can be found in the Controllers
folder of your application. Modify the class so it looks like the class in Listing 1.
Listing1 – Controllers\HomeController.cs
using System.Linq;
using System.Web.Mvc;
using MvcApplication1.Models;
namespace MvcApplication1.Controllers
{
[HandleError]
public class HomeController : Controller
{
public ActionResult Index()
{
var dataContext = new MovieDataContext();
var movies = from m in dataContext.Movies
select m;
return View(movies);
}
}
}
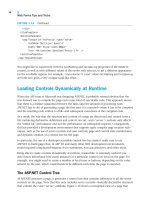
The Index() action in Listing 1 uses a LINQ to SQL DataContext class (the
MovieDataContext) to represent the MoviesDB database. The MoveDataContext class was
generated by the Visual Studio Object Relational Designer.
A LINQ query is performed against the DataContext to retrieve all of the movies from the
tblMovies database table. The list of movies is assigned to a local variable named movies.
Finally, the list of movies is passed to the view through view data.