Tài liệu Nghệ thuật xếp hình Nhật Bản:butterfly pdf
Bạn đang xem bản rút gọn của tài liệu. Xem và tải ngay bản đầy đủ của tài liệu tại đây (44.8 KB, 7 trang )
$ Butterfly
Copyright 1998-99 Stephen Hecht. All Rights Reserved
A dollar bill makes a model 55mm long with a 65mm wingspan. For your first attempt, begin with a 3x7
rectangle larger than a dollar bill.
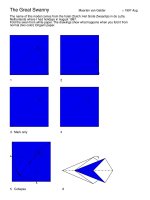
1. Begin black side up.
Valley-crease, the horizontal
not too sharply. Turn over.
2. Crease halfway,
making a mark.
3. Soft mountain-fold
on 45-degree line.
4. Pinch where mark from
step 2 hits edge. Unfold.
5. Use mark from previous
step to make this valley-
fold. Unfold.
6. Use the 2 existing
creases to add 3 more.
8. Mountain in half.
9. Crease and unfold.
10. Crease and unfold, bisecting.
Crease from previous step will
align with vertical crease.
11. Reverse-fold, in-and-out.
12. Reverse-fold.
7. Pinch halfway marks
where indicated.
$ Butterfly (continued)
Copyright 1998-99 Stephen Hecht. All Rights Reserved
13. Pleat top layer on
existing creases.
14. Reverse-fold, following
the hidden edge. Unfold to
step 13.
15. Pleat top layer, softly
on the dotted line.
16. Follow hidden vertical edge.
Softly on dotted line.
17. Bisect angle. Softly on
dotted line. Unfold to step 13.
18. Creases exist as shown.
A
19. Collapse on the creases.
First close up the mountain-
fold triangle, pinching the tiny
new valley-fold. Then flatten
to form mountain-fold “A”.
20. Note that “A” does not
reach corner. Repeat 13-
19 on rear flap.
13-19
B
21. Pleat. Mountain-fold is the
existing half-line. For the valley,
bring the 1/4-mark to lie under
“B”. The dotted line is a hidden
mountain-fold caused by shifting
paper.
fudge
here
$ Butterfly (continued)
Copyright 1998-99 Stephen Hecht. All Rights Reserved
22. Note shifted creases in
fudged area. It needn’t be
precise, it will be hidden later.
Repeat 21 behind.
23. Close-up of right edge.
Fold and unfold to hidden edge
(hold model up to the light).
24. Fold and unfold (bisection),
aligning previous crease with
hidden edge.
25. Reverse-fold, in-and-out.
26. Reverse-fold. These
steps are similar to 9-12.
Turn over.
27. Fold and pinch, where
limited by most recent
reverse-fold.
28. Undo the reverse-fold
from step 26. Then spread
the area towards the right.
29. Push from behind and create
a new mountain-crease linking
the base of the reverse-folds to
the pinch mark of step 27.
30. Begin to flatten by pinching
where shown. Swing the
standing edge to the right.
$ Butterfly (continued)
Copyright 1998-99 Stephen Hecht. All Rights Reserved
31. To flatten, first align bottom
edges. Then flatten “C”, then
flatten “D”. Careful of tearing
due to imprecision.
align
C
D
32. Swivel. The upper crease
partially exists. Use it to start
the swivel and locate the end
of the vertical crease.
33. Wrap top layer around to
the inside. Reverse-fold
corner, noting the bisected
angle.
34. Reverse-fold hidden
corner, bisecting. Then
unfold it.
35. Crease and unfold.
Lower crease bisects. Upper
crease aligns vertical edges.
36. Reverse the two creases
just made and add the tiny
mountain-fold, pushing edge
towards the left (model not flat).
C
37. Still pushing towards the left,
also push in at the tiny valley-fold,
swinging the point down to align
with edge “C”.
38. Model is flat again. Swivel
on existing creases and tuck
between layers.
39. Curve the tip towards you
a bit. Helps keep together.
Repeat steps 23-39 on the
other wing.
23-39
$ Butterfly (continued)
Copyright 1998-99 Stephen Hecht. All Rights Reserved
40. Entire model again.
Spread upper layers a bit.
E
41. “E” is the mark made in step
7. First make the long mountain-
folds. Then make the left valley
(an exact bisection). Then make
the right valley (not an exact
bisection), closing up the model.
40-41
42. Thus. Repeat 40-41 on
other side. Then open model
out.
43. Valley-fold, limited by the
folds of step 41. If you have
been accurate, it will hit the
bottom corner. Unfold.
44. Valley to previous crease
and unfold. Repeat 43-44 on the
left. Close up the model again.
43-44
45. Closed-sink central ridge
halfway.
46. Tuck into sink, creasing
sharply. Repeat behind.
Then open model again.
47. Reform valley-folds from
44, then valley folds from 43.
Close up model, adding new
mountain folds.
48. Mountain to shape wing.
Reverse-fold at overlaps to help
secure. Repeat behind. Bottom
half is now done.