Tài liệu Lab 1.2.6 Troubleshooting RIP v2 using Debug docx
Bạn đang xem bản rút gọn của tài liệu. Xem và tải ngay bản đầy đủ của tài liệu tại đây (145.59 KB, 6 trang )
1 - 6 CCNA 3: Switching Basics and Intermediate Routing v 3.0 - Lab 1.2.6 Copyright 2003, Cisco Systems, Inc.
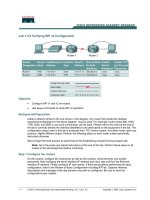
Lab 1.2.6 Troubleshooting RIP v2 using Debug
Objective
• Configure RIP v2 on both routers
• Use debug commands to verify proper RIP operation and analyze data transmitted between
routers.
Background/Preparation
Cable a network similar to the one shown in the diagram. Any router that meets the interface
requirements displayed on the above diagram may be used. For example, router series 800, 1600,
1700, 2500, and 2600 or any such combination can be used. Please refer to the chart at the end of
the lab to correctly identify the interface identifiers to be used based on the equipment in the lab. The
configuration output used in this lab is produced from 1721 series routers. Any other router used may
produce slightly different output. Perform the following steps on each router unless specifically
instructed otherwise.
Start a HyperTerminal session as performed in the Establishing a HyperTerminal session lab.
Note: Go to the erase and reload instructions at the end of this lab. Perform those steps on all
routers in this lab assignment before continuing.
Step 1 Configure the routers
On the routers, configure the hostnames as well as the console, virtual terminal, and enable
passwords. Next configure the serial interface IP address and clock rate and the Fast Ethernet
interface IP address. Finally configure IP host names. If there are problems performing the basic
configuration, refer to the Review of Basic Configuration including RIP lab. Optional interface
descriptions and message of the day banners may also be configured. Be sure to save the
configurations just created.
2 - 6 CCNA 3: Switching Basics and Intermediate Routing v 3.0 - Lab 1.2.6 Copyright 2003, Cisco Systems, Inc.
Step 2 Configure the routing protocol on the Gadsden router
Go to the proper command mode and configure RIP routing on the Gadsden router according to the
chart.
Step 3 Save the Gadsden router configuration
Any time that changes are correctly made to the running configuration, they should be saved to the
startup configuration. Otherwise if the router is reloaded or power cycled, the changes that are not in
the startup configuration will be lost.
Step 4 Configure the routing protocol on the Birmingham router
Go to the proper command mode and configure RIP routing on the Birmingham router according to
the chart.
Step 5 Save the Birmingham router configuration
Step 6 Configure the hosts with the proper IP address, subnet mask, and default gateway
Step 7 Verify that the internetwork is functioning by pinging the FastEthernet interface of
the other router
a. From the host attached to the GAD, ping the other host attached to the BHM router. Was the
ping successful?
________
b. From the host attached to the BHM, ping the other host attached to the GAD router. Was the
ping successful?
________
c. If the answer is no for either question, troubleshoot the router configurations to find the error.
Then do the pings again until the answer to both questions is yes.
Step 8 Show the debug IP options
a. At the privileged EXEC mode type debug ip ?.
b. Which routing protocols can use debug commands?
__________________________________________________________________________
Step 9 Show the debug IP RIP options
a. At the privileged EXEC mode type debug ip rip ?.
b. How many options are available for debug ip rip ??
_____________________________
Step 10 Show the RIP routing updates
a. From the enable privileged EXEC mode, examine the routing table entries using command
debug ip rip command on each router.
b. What are the three operations that take place listed in the rip debug statements?
________________________ ________________________ ________________________
c. Turn off debugging by typing either no debug ip rip or undebug all.
Step 11 Enable RIP Version 2 Routing
Enable version 2 of the RIP routing protocol on the Gadsden router only.
3 - 6 CCNA 3: Switching Basics and Intermediate Routing v 3.0 - Lab 1.2.6 Copyright 2003, Cisco Systems, Inc.
Step 12 Start the debug function again on the GAD router
a. Does a problem occur now that we have RIP v2 on the GAD router?
____________________
b. What is the problem?
_______________________________________________________
Step 13 Clear the routing table
a. Instead of waiting for the routes to time out, type clear ip route *. Then type show ip
route.
b. What has happened to the routing table?
________________________________________
c. Will it be updated to include RIP routes if the debug output says the update is ignored?
_______
d. Turn off debugging by typing either no debug ip rip or undebug all.
Step 14 Start the debug RIP function
a. Start the debug RIP function on the BHM router again by typing debug ip rip.
b. Does a problem occur now that RIP v2 is on the GAD router?
____________________
c. What is the problem?
_______________________________________________________
Step 15 Clear the routing table
a. Instead of waiting for the routes to time out, type clear ip route *. Then type show ip
route.
b. What has happened to the routing table?
________________________________________
c. Does a problem occur now that RIP v2 is on the GAD router?
__________________________
d. Turn off debugging by typing either no debug ip rip or undebug all.
Step 16 Enable RIP version 2 routing
Enable version 2 of the RIP routing protocol on the Birmingham router.
Step 17 Use the debug function to see packet traffic on a router
a. Use the debug function to see packet traffic on the Gadsden router by typing debug ip
packet at the privileged EXEC mode.
b. When an RIP update is sent how many source addresses are used?
____________________
c. Why are there multiple source addresses used?
___________________________________
d. What is the source address used?
_____________________________________________
e. Why is this address used?
___________________________________________________
Step 18 Start the debug RIP database function again on the BHM router
a. Start the RIP database debugging by typing debug ip rip database, then clear the routing
table by typing clear ip route *.
b. Are the old routes in the table deleted?
__________________________________________
c. Are new routes added back into the table?
_______________________________________
d. What does the last entry in the debug output say?
_________________________________
e. Turn off debugging by typing either no debug ip rip or undebug all.
4 - 6 CCNA 3: Switching Basics and Intermediate Routing v 3.0 - Lab 1.2.6 Copyright 2003, Cisco Systems, Inc.
Step 19 Use the debug events function to see routing updates
a. Use the debug function to see routing updates by typing debug ip rip events in privileged
EXEC mode on the BHM router.
b. What interfaces are the routing updates sent on?
__________________________________
c. How many routes are in the routing updates being sent?
_____________________________
Once the previous steps are completed, log off by typing exit, and turn the router off. Then remove
and store the cables and adapter.
5 - 6 CCNA 3: Switching Basics and Intermediate Routing v 3.0 - Lab 1.2.6 Copyright 2003, Cisco Systems, Inc.
Erasing and reloading the router
Enter into the privileged EXEC mode by typing enable.
If prompted for a password, enter class. If that does not work, ask the instructor for assistance.
Router>enable
At the privileged EXEC mode, enter the command erase startup-config.
Router#erase startup-config
The responding line prompt will be:
Erasing the nvram filesystem will remove all files! Continue?
[confirm]
Press Enter to confirm.
The response should be:
Erase of nvram: complete
Now at the privileged EXEC mode, enter the command reload.
Router(config)#reload
The responding line prompt will be:
System configuration has been modified. Save? [yes/no]:
Type n and then press Enter.
The responding line prompt will be:
Proceed with reload? [confirm]
Press Enter to confirm.
In the first line of the response will be:
Reload requested by console.
After the router has reloaded the line prompt will be:
Would you like to enter the initial configuration dialog? [yes/no]:
Type n and then press Enter.
The responding line prompt will be:
Press RETURN to get started!
Press Enter.
Now the router is ready for the assigned lab to be performed.