Tài liệu Access Control List Basics and Extended Ping ppt
Bạn đang xem bản rút gọn của tài liệu. Xem và tải ngay bản đầy đủ của tài liệu tại đây (31.75 KB, 4 trang )
1 - 4 Semester 5: Advanced Routing v2.0 - Lab 1.4.3 Copyright 2001, Cisco Systems, Inc.
1.4.3 Introductory Lab 3: Access Control List Basics and Extended Ping
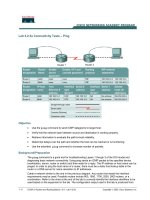
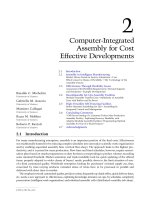
SanJose1
SanJose2
S0/0 192.168.1.1 /24 S0/1 192.168.2.1 /24
S0/0 192.168.1.2 /24 S0/1 192.168.2.2 /24
Fa0/0 10.0.0.1 /24
Fa0/0 10.0.0.2/ 24
Workstation
192.168.3.2 /24
Fa0/0 192.168.3.1/24
Vista
Objective
This lab activity reviews the basics of standard and extended access lists, which are used
extensively in the CCNP curriculum.
Scenario
The LAN users connected to the Vista router are concerned about access to their
network from hosts on network 10.0.0.0. You must use a standard access list to block all
access to Vista’s LAN from network 10.0.0.0/24.
You must also use an extended ACL to block network 192.168.3.0 host access to Web
servers on the 10.0.0.0/24 network.
Step 1
Build and configure the network according to the diagram. Use RIPv1, and enable
updates on all active interfaces with the appropriate network commands. The
commands necessary to configure SanJose1 are shown here as an example:
SanJose1(config)#router rip
SanJose1(config-router)#network 192.168.1.0
SanJose1(config-router)#network 10.0.0.0
Use the ping command to verify your work and test connectivity between all interfaces.
Step 2
Check the routing table on Vista using the show ip route command. Vista should
have all four networks in its table. Troubleshoot, if necessary.
2 - 4 Semester 5: Advanced Routing v2.0 - Lab 1.4.3 Copyright 2001, Cisco Systems, Inc.
Access Control List Basics
Access Control Lists (ACLs) are simple but powerful tools. When the access list is
configured, each statement in the list is processed by the router in the order in which it
was created. If an individual packet meets a statement’s criteria, the permit or deny is
applied to that packet, and no further list entries are checked. The next packet to be
checked starts again at the top of the list.
It is not possible to reorder an access list, skip statements, edit statements, or delete
statements from a numbered access list. With numbered access lists, any attempt to
delete a single statement results in the entire list’s deletion. Named ACLs (NACLs) do
allow for the deletion of individual statements.
The following concepts apply to both standard and extended access lists:
Two-step process. First, the access list is created with one or more access-list
commands while in global configuration mode. Second, the access list is applied to or
referenced by other commands, such as the access-group command, to apply an ACL
to an interface. An example would be the following:
Vista#config t
Vista(config)#access-list 50 deny 10.0.0.0 0.0.0.255
Vista(config)#access-list 50 permit any
Vista(config)#interface fastethernet 0/0
Vista(config-if)#ip access-group 50 out
Vista(config-if)#^Z
Syntax and Keywords
The basic syntax for creating an access list entry is as follows:
router(config)#access-list acl-number {permit | deny}...
The permit command allows packets matching the specified criteria to be accepted for
whatever application the access list is being used for. The deny command discards
packets matching the criteria on that line.
Two important keywords that can be used with IP addresses and the access list
command are any and host. The keyword any matches all hosts on all networks
(equivalent to 0.0.0.0 255.255.255.255). The keyword host can be used with an IP
address to indicate a single host address. The syntax is host ip-address, such as host
192.168.1.10. This is treated exactly the same as 192.168.1.10 0.0.0.0.
Implicit deny statement. Every access list contains a final “deny” statement that
matches all packets. This is called the implicit deny. Because the implicit deny statement
is not visible in show command output, it is often overlooked, with dire consequences. As
an example, consider the following single-line access list:
Router(config)#access-list 75 deny host 192.168.1.10
Access-list 75 clearly denies all traffic sourced from the host, 192.168.1.10. What might
not be obvious is that all other traffic will be discarded as well, because the implicit deny
any is the final statement in any access list.
At least one permit statement is required. There is no requirement that an ACL
contain a deny statement. If nothing else, the implicit deny any statement takes care of
that. But if there are no permit statements, the effect will be the same as if there were
only a single deny any statement.
3 - 4 Semester 5: Advanced Routing v2.0 - Lab 1.4.3 Copyright 2001, Cisco Systems, Inc.
Wildcard mask. In identifying IP addresses, ACLs use a wildcard mask instead of a
subnet mask. Initially, they might look like the same thing, but closer observation reveals
that they are very different. Remember that a binary 0 in a wildcard bitmask instructs the
router to match the corresponding bit in the IP address.
In/out. When you are deciding whether an ACL should be applied to inbound or
outbound traffic, always view things from the router’s perspective. In other words,
determine whether traffic is coming into the router (inbound) or leaving the router
(outbound).
Applying ACLs. Extended ACLs should be applied as close to the source as possible,
thereby conserving network resources. Standard ACLs (by necessity) must be applied as
close to the destination as possible, because the standard ACL can match only at the
source address of a packet.
Step 3
On the Vista router, create the following standard ACL and apply it to the LAN interface:
Vista#config t
Vista(config)#access-list 50 deny 10.0.0.0 0.0.0.255
Vista(config)#access-list 50 permit any
Vista(config)#interface fastethernet 0/0
Vista(config-if)#ip access-group 50 out
Vista(config-if)#^Z
Try pinging 192.168.3.2 from SanJose1.
The ping should be successful. This result might be surprising, because you just blocked
all traffic from the 10.0.0.0/8 network. The ping is successful because, even though it
came from SanJose1, it is not sourced from the 10.0.0.0/8 network. A ping or traceroute
from a router uses the closest interface to the destination as the source address. Thus,
the ping is coming from the 192.168.1.0/24 (SanJose1’s Serial 0/0).
In order to test the ACL from SanJose1, you must use the extended ping command to
specify a specific source interface.
Step 4
On SanJose1, issue the following commands. Remember that the extended ping works
only in privileged mode.
SanJose1#ping 192.168.3.2
Sending 5, 100-byte ICMP Echos to 192.168.3.2, timeout is 2
seconds:
!!!!!
Success rate is 100 percent (5/5), round-trip min/avg/max =
4/4/4 ms
SanJose1#
SanJose1#ping
Protocol [ip]:
Target IP address: 192.168.3.2
Repeat count [5]:
Datagram size [100]:
Timeout in seconds [2]:
Extended commands [n]: y
Source address or interface: 10.0.0.1
Type of service [0]:
Set DF bit in IP header? [no]:
4 - 4 Semester 5: Advanced Routing v2.0 - Lab 1.4.3 Copyright 2001, Cisco Systems, Inc.
Validate reply data? [no]:
Data pattern [0xABCD]:
Loose, Strict, Record, Timestamp, Verbose[none]:
Sweep range of sizes [n]:
Type escape sequence to abort.
Sending 5, 100-byte ICMP Echos to 192.168.3.2, timeout is 2
seconds:
.....
Success rate is 0 percent (0/5)
Step 5
Standard ACLs are numbered 1-99 (IOS 12 also allows standard lists to be numbered
1300–1699). Extended ACLs are numbered 100-199 (IOS 12 allows 2000-2699).
Extended ACLs can be used to enforce highly specific criteria for filtering packets. In this
step, you will configure an extended ACL to block access to a Web server. Before you
proceed, issue the no access-list 50 and no ip access-group 50 commands
on the Vista router to remove the ACL configured previously.
First, you must configure both SanJose1 and SanJose 2 to act as Web servers, by using
the ip http server command, as shown here:
SanJose1(config)#ip http server
SanJose2(config)#ip http server
From the workstation at 192.168.3.2, use a Web browser to view both routers’ Web
servers at 10.0.0.1 and 10.0.0.2. The Web login requires that you enter the router’s
enable secret password as the password.
After you verify Web connectivity between the workstation and the routers, proceed to
Step 6.
Step 6
On the Vista router, enter the following commands:
Vista(config)#access-list 101 deny tcp 192.168.3.0
0.0.0.255 10.0.0.0 0.0.0.255 eq www
Vista(config)#access-list 101 deny tcp 192.168.3.0
0.0.0.255 any eq ftp
Vista(config)#access-list 101 permit ip any any
Vista(config)#interface fastethernet 0/0
Vista(config-if)#ip access-group 101 in
From the workstation at 192.168.3.2, again attempt to view the Web servers at 10.0.0.1
and 10.0.0.2. Both attempts should fail.
Next, browse SanJose1 at 192.168.1.2. Why is this not blocked?