Tài liệu Windows Form Microsoft .NET Framework phần 3 docx
Bạn đang xem bản rút gọn của tài liệu. Xem và tải ngay bản đầy đủ của tài liệu tại đây (147.02 KB, 7 trang )
Dưới đây là phần mã cho lớp AutoCompleteComboBox:
using System;
using System.Windows.Forms;
public class AutoCompleteComboBox : ComboBox {
// Biến cờ dùng khi một phím đặc biệt được nhấn
// (trong trường hợp này, thao tác thay thế text sẽ bị bỏ qua).
private bool controlKey = false;
// Xác định xem phím đặc biệt có được nhấn hay không.
protected override void OnKeyPress(
System.Windows.Forms.KeyPressEventArgs e) {
base.OnKeyPress(e);
if (e.KeyChar == (int)Keys.Escape) {
// Xóa text.
this.SelectedIndex = -1;
this.Text = "";
controlKey = true;
}
else if (Char.IsControl(e.KeyChar)) {
controlKey = true;
}
else {
controlKey = false;
}
}
// Thực hiện thay thế text.
protected override void OnTextChanged(System.EventArgs e) {
base.OnTextChanged(e);
if (this.Text != "" && !controlKey) {
// Tìm kiếm item trùng khớp.
string matchText = this.Text;
int match = this.FindString(matchText);
// Nếu tìm thấy thì chèn nó vào.
if (match != -1) {
this.SelectedIndex = match;
// Chọn (bôi đen) phần text vừa thêm vào để
// nó có thể được thay thế nếu người dùng kiếp tục gõ.
this.SelectionStart = matchText.Length;
this.SelectionLength =
this.Text.Length - this.SelectionStart;
}
}
}
}
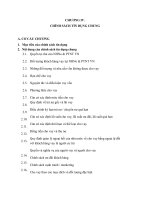
Để thử nghiệm AutoCompleteComboBox, bạn có thể tạo một client đơn giản: thêm
ComboBox vào form và thêm một số từ (word) vào ComboBox. Trong ví dụ này, các từ
được lấy từ một file text và ComboBox được thêm vào form bằng mã lệnh. Bạn cũng có
thể biên dịch lớp AutoCompleteComboBox thành một Class Library Assembly độc lập
rồi thêm nó vào hộp công cụ, thế là bạn có thể thêm nó vào form lúc thiết kế.
using System;
using System.Windows.Forms;
using System.Drawing;
using System.IO;
public class AutoCompleteComboBoxTest : System.Windows.Forms.Form {
// (Bỏ qua phần mã designer.)
private void AutoCompleteComboBox_Load(object sender,
System.EventArgs e) {
// Thêm ComboBox vào form.
AutoCompleteComboBox combo = new AutoCompleteComboBox();
combo.Location = new Point(10,10);
this.Controls.Add(combo);
// Thêm một số từ (từ một file text) vào ComboBox.
FileStream fs = new FileStream("words.txt", FileMode.Open);
using (StreamReader r = new StreamReader(fs)) {
while (r.Peek() > -1) {
string word = r.ReadLine();
combo.Items.Add(word);
}
}
}
}
Hình 6.5 ComboBox có tính năng auto-complete
1.1
Sắp xếp ListView theo cột bất kỳ
V
V
Bạn cần sắp xếp một ListView, nhưng phương thức nội tại ListView.Sort chỉ
sắp xếp căn cứ trên cột đầu tiên.
#
#
Tạo một hiện thực cho giao diện System.Collections.IComparer để có thể sắp
xếp các đối tượng ListViewItem (kiểu IComparer có thể sắp xếp dựa trên bất
kỳ tiêu chuẩn nào bạn muốn). Thiết lập thuộc tính
ListView.ListViewItemSorter với một đối tượng của kiểu IComparer trước khi
gọi phương thức ListView.Sort.
ListView cung cấp phương thức Sort để sắp các item theo thứ tự alphabet dựa trên phần
text trong cột đầu tiên. Nếu muốn s
ắp xếp dựa trên các giá trị cột khác hoặc sắp thứ tự
các item theo bất kỳ cách nào khác, bạn cần tạo một hiện thực tùy biến của giao diện
IComparer.
Giao diện IComparer định nghĩa một phương thức có tên là Compare, phương thức này
nhận vào hai đối tượng và xác định đối tượng nào sẽ được sắp trước. Lớp tùy biến
ListViewItemComparer dưới đây hiện thực giao diện IComparer và cấp thêm hai thuộc
tính: Column và Numeric. Trong đ
ó, Column cho biết cột nào sẽ được sử dụng để sắp
The image part with relationship ID rId5 was not fo und in the file.
xếp; và Numeric là một cờ Boolean, được thiết lập là true nếu muốn thực hiện việc so
sánh theo thứ tự số thay vì so sánh theo thứ tự alphabet.
using System;
using System.Collections;
using System.Windows.Forms;
public class ListViewItemComparer : IComparer {
private int column;
private bool numeric = false;
public int Column {
get {return column;}
set {column = value;}
}
public bool Numeric {
get {return numeric;}
set {numeric = value;}
}
public ListViewItemComparer(int columnIndex) {
Column = columnIndex;
}
public int Compare(object x, object y) {
ListViewItem listX = (ListViewItem)x;
ListViewItem listY = (ListViewItem)y;
if (Numeric) {
// Chuyển text thành số trước khi so sánh.
// Nếu chuyển đổi thất bại, sử dụng giá trị 0.
decimal listXVal, listYVal;
try {
listXVal = Decimal.Parse(listX.SubItems[Column].Text);
}
catch {
listXVal = 0;
}
try {
listYVal = Decimal.Parse(listY.SubItems[Column].Text);
}
catch {
listYVal = 0;
}
return Decimal.Compare(listXVal, listYVal);
}
else {
// Giữ nguyên text ở định dạng chuỗi
// và thực hiện so sánh theo thứ tự alphabetic.
string listXText = listX.SubItems[Column].Text;
string listYText = listY.SubItems[Column].Text;
return String.Compare(listXText, listYText);
}
}
}
Bây giờ, để sắp xếp ListView, bạn cần tạo một đối tượng ListViewItemComparer, cấu
hình cho nó một cách hợp lý, và rồi thiết lập nó vào thuộc tính
ListView.ListViewItemSorter trước khi gọi phương thức ListView.Sort.
Form dưới đây trình bày một thử nghiệm đơn giản cho ListViewItemComparer. Mỗi khi
người dùng nhắp vào header của một cột trong ListView thì ListViewItemComparer sẽ
được tạo ra và được sử dụng để sắp xếp danh sách dựa trên cột đó.
using System;
using System.Windows.Forms;
public class ListViewItemSort : System.Windows.Forms.Form {
// (Bỏ qua phần mã designer.)