Tài liệu MASTERING SQL SERVER 2000- P5 doc
Bạn đang xem bản rút gọn của tài liệu. Xem và tải ngay bản đầy đủ của tài liệu tại đây (2.03 MB, 50 trang )
CHAPTER 5 • TRANSACT-SQL OVERVIEW AND BASICS
170
TABLE 5.8: SQL SERVER DATEPART CONSTANTS
Constant Meaning
yy or yyyy Year
qq or q Quarter
mm or m Month
wk or ww Week
dy or y Day of year (1 to 366)
dd or d Day
hh Hour
mi or n Minute
ss or s Second
ms Millisecond
For example, the DATEADD function takes as arguments a datepart, a quantity,
and a date. It returns the result of adding the given quantity of the given datepart to
the given date. Thus, to add three days to the current date, you could use the follow-
ing expression:
PRINT DATEADD(d, 3, GETDATE())
WARN I NG
The datepart constants are not strings and thus should not be enclosed
in single quotes.
Here’s the full list of available date and time functions:
• DATEADD adds time to a date.
• DATEDIFF reports the number of dateparts between two dates.
• DATENAME extracts textual names (for example, February or Tuesday) from
a date.
• DATEPART returns the specified datepart from a specified date.
• DAY returns the day from a date.
• GETDATE returns the current date and time.
• MONTH returns the month from a date.
• YEAR returns the year from a date.
2627ch05.qxt 8/22/00 10:35 AM Page 170
Please purchase PDF Split-Merge on www.verypdf.com to remove this watermark.
171
Mathematical Functions
SQL Server supplies almost two dozen mathematical functions for manipulating inte-
ger and floating-point values. These functions include all the common functions that
you’d naturally expect to find in any programming language. Table 5.9 lists the avail-
able mathematical functions.
TABLE 5.9: MATHEMATICAL FUNCTIONS IN T-SQL
Function Meaning
ABS Absolute value
ACOS Arccosine
ASIN Arcsine
ATAN Arctangent
ATN2 Arctangent of the angle defined by two angles
CEILING Smallest integer greater than the expression
COS Cosine
COT Cotangent
DEGREES Converts radians to degrees
EXP Exponential
FLOOR Largest integer smaller than the expression
LOG Base 2 logarithm
LOG10 Base 10 logarithm
PI The constant pi
POWER Exponentiation operator
RADIANS Converts degrees to radians
RAND Random number generator
ROUND Rounds floating-point numbers by precision
SIGN Sign of the expression
SIN Sine
SQRT Square root
SQUARE Square
TAN Tangent
FUNCTIONS
Transact-SQL
PART
II
2627ch05.qxt 8/22/00 10:35 AM Page 171
Please purchase PDF Split-Merge on www.verypdf.com to remove this watermark.
CHAPTER 5 • TRANSACT-SQL OVERVIEW AND BASICS
172
TIP
SQL Server uses radians to measure angles for trigonometric functions.
System and Metadata Functions
System and metadata functions return internal information about SQL Server and the
data it’s storing. Most of these functions are pretty obscure, and you can find a full list
in the T-SQL help in Books Online. However, you might find a few of the following
functions useful in your databases:
• The CONVERT function converts one type of data to another (for example, inte-
ger to character).
• The CURRENT_USER function returns the name of the current user (the one
running the SQL batch).
• The ISDATE function will tell you whether its input represents a valid date.
• The ISNULL function replaces any null value with a specified replacement
value.
• The ISNUMERIC function will tell you whether its input is a number.
Figure 5.8 demonstrates the use of these functions in SQL Query Analyzer.
2627ch05.qxt 8/22/00 10:35 AM Page 172
Please purchase PDF Split-Merge on www.verypdf.com to remove this watermark.
173
FIGURE 5.8
Some useful system
functions
User-Defined Functions
SQL Server 2000 also allows you to define your own functions for use anywhere you
can use the system-defined functions. To do this, you use the CREATE FUNCTION
statement:
CREATE FUNCTION [owner_name].function_name
(
[{@parameter_name data_type [=default_value]} [,…n]]
)
RETURNS data_type
[AS]
{BEGIN function_body END}
FUNCTIONS
Transact-SQL
PART
II
2627ch05.qxt 8/22/00 10:35 AM Page 173
Please purchase PDF Split-Merge on www.verypdf.com to remove this watermark.
CHAPTER 5 • TRANSACT-SQL OVERVIEW AND BASICS
174
NOTE
This definition has been simplified somewhat. In particular, we’ve omitted the
clauses you’d use to return a table from a user-defined function. See Books Online for
more details.
For example, you could define a function named TwoTimes in the following way:
CREATE FUNCTION TwoTimes
( @input int=0 )
RETURNS int
AS
BEGIN
RETURN 2 * @input
END
After it’s been created, you could call this function as part of a SELECT statement:
SELECT OrderID, dbo.TwoTimes(Quantity) AS Extra
FROM [Order Details]
Figure 5.9 shows the result set from this query. Note that you need to specify the
owner of the function (by default, the creating user—in this case, dbo, the owner of
the database) when you call the function, even if you don’t specify the owner when
you create the function.
NOTE
You’ll learn more about the SELECT statement in Chapter 6.
2627ch05.qxt 8/22/00 10:35 AM Page 174
Please purchase PDF Split-Merge on www.verypdf.com to remove this watermark.
175
FIGURE 5.9
Calling a user-defined
function
Executing T-SQL
So far, the few examples we’ve shown for executing SQL have all used SQL Query
Analyzer. In this section, we’ll look at Query Analyzer in a bit more detail. Then we’ll
consider two alternatives for executing SQL: SQL Enterprise Manager and the com-
mand line OSQL utility.
Using Query Analyzer
In addition to simply executing queries, Query Analyzer offers some additional func-
tionality to make it both easier to use and more powerful. In this section, you’ll learn
how to create, save, and retrieve queries; how to view results in several formats; and
EXECUTING T-SQL
Transact-SQL
PART
II
2627ch05.qxt 8/22/00 10:35 AM Page 175
Please purchase PDF Split-Merge on www.verypdf.com to remove this watermark.
CHAPTER 5 • TRANSACT-SQL OVERVIEW AND BASICS
176
how to view the execution plan of a query, which is a list of the actions that SQL
Server will undertake to deliver the results of the query.
Creating a Query
You’ve already learned how to create a query to test arbitrary SQL statements, but let’s
review the steps here:
1. Launch Query Analyzer from the Start menu by choosing Programs ➢ Microsoft
SQL Server ➢ Query Analyzer.
2. Choose the SQL Server that you want to connect to from the combo box. This
box will show servers with which you’ve recently connected. To see other
servers on your network, click the Browse button. You can also use the special
name “(local)” to connect to a server on the computer that you’re using.
3. Either click the Windows NT Authentication option button or click the SQL
Server Authentication option button, and supply your SQL Server username and
password. If you don’t know how to log on, try Windows NT Authentication
first, before you call your database administrator. We recommend this option
for all new installations of SQL Server.
4. Click OK to log on to the server.
5. A new query window appears. You can select a database to use from the combo
box on the main Query Analyzer toolbar. You can also type in as many SQL
statements as you’d like to execute.
6. Click the Execute Query button or press F5 to see the results.
You can also use the New Query button on the toolbar to open additional query
windows. Query Analyzer will let you open an almost unlimited number of windows,
so you don’t have to lose one set of results to try something else.
Saving a Query
Query Analyzer lets you save SQL batches for later. This is useful for complex queries
that you might want to run again in the future. It’s also useful if you need to keep
track of versions of a SQL batch during development; you can save the SQL batch and
use a source code control tool such as Visual Sourcesafe to store it. For example, you
might have a query that gives you aggregate sales results by joining half a dozen
tables from your sales database. Once you’ve perfected the query, you’ll want to save
it so you don’t have to type in the complex SQL code again the next time that you
want to see current results.
2627ch05.qxt 8/22/00 10:35 AM Page 176
Please purchase PDF Split-Merge on www.verypdf.com to remove this watermark.
177
To save a query, choose File ➢ Save from the Query Analyzer menu or click the
Save button. You’ll need to supply a filename, of course. By default, Query Analyzer
uses .SQL as an extension for queries.
Opening a Saved Query
To open a previously saved query, choose File ➢ Open from the Query Analyzer menu
or click the Open button. Browse to the query you want to open and click OK. The
query will be displayed in the current query window, and you’ll be able to execute it
immediately.
Viewing Results
Query Analyzer lets you view results in two formats. The first format, results in text, is
the format that we’ve used for all of the examples so far in this chapter. This format is
most useful for queries that return only a bit of information.
The other format is to view the results in a grid. This is useful if the query returns a
set of records. Figure 5.10 shows a set of results in a Query Analyzer grid.
FIGURE 5.10
Viewing results in
a grid
To switch from one format to the other, choose the Execute Mode drop-down tool-
bar button, or select Query ➢ Results in Text or Query ➢ Results in Grid from the
Query Analyzer menus.
EXECUTING T-SQL
Transact-SQL
PART
II
2627ch05.qxt 8/22/00 10:35 AM Page 177
Please purchase PDF Split-Merge on www.verypdf.com to remove this watermark.
CHAPTER 5 • TRANSACT-SQL OVERVIEW AND BASICS
178
TIP
As you can see in Figure 5.10, white space is generally not significant in the T-SQL
language. You can insert new lines, spaces, and tabs to make your SQL statements more
readable.
You can also select Query ➢ Results to File to save the results instead of seeing
them immediately on-screen.
Viewing the Execution Plan
Query Analyzer can also show you the execution plan for any query. The execution
plan is the set of steps that SQL Server will use to execute the query. This information
is useful because each step will show its estimated relative cost (in time). You can use
this tool to locate bottlenecks in your applications and to help you make changes to
slow queries to make them faster. To see the execution plan for a query, select Query
➢ Display Estimated Execution Plan or use the Ctrl+L shortcut.
Figure 5.11 shows the execution plan for a query. Each step is represented by an
icon. If you make the mouse hover over an icon, you’ll see detailed information for
that step.
FIGURE 5.11
Viewing a query’s
execution plan
2627ch05.qxt 8/22/00 10:35 AM Page 178
Please purchase PDF Split-Merge on www.verypdf.com to remove this watermark.
179
NOTE
There’s more information on using execution plans to optimize queries in
Chapter 26.
Viewing a Server Trace
Query Analyzer can show you exactly which operations were performed on the server
when executing a query. This is similar to the tracing provided by SQL Server Profiler,
which we mentioned in Chapter 3. To see a server trace for a query, select Query ➢
Show Server Trace. Figure 5.12 shows a sample server trace.
FIGURE 5.12
Viewing the server
trace for a query
TIP
One use for a trace is identifying statements in a batch that take a long time to com-
plete. The Duration column shows the number of milliseconds taken by each statement.
Using SQL Server Enterprise Manager
SQL Query Analyzer is not the only tool that will let you execute SQL statements.
You can also use the tools within SQL Server Enterprise Manager to evaluate queries.
To do so, you need to save the queries as either views or stored procedures within a
database, so this method is less useful for ad hoc exploration of the language. On the
other hand, the visual designer for views makes it easy to create quite complex queries.
EXECUTING T-SQL
Transact-SQL
PART
II
2627ch05.qxt 8/22/00 10:35 AM Page 179
Please purchase PDF Split-Merge on www.verypdf.com to remove this watermark.
CHAPTER 5 • TRANSACT-SQL OVERVIEW AND BASICS
180
To launch SQL Server Enterprise Manager, choose Programs ➢ Microsoft SQL
Server ➢ Enterprise Manager from the Start menu. This will open an instance of
Microsoft Management Console, with a treeview of SQL Servers and their contents
already loaded. You can expand the treeview to navigate to any part of any database
on any server that you have permissions to use.
NOTE
For more information about SQL Server Enterprise Manager, see Chapter 9.
Creating a View
A view is a SQL Server SELECT statement that’s been saved in a database. A view can
be used to retrieve data from one or more tables, and to summarize, sort, or filter this
data. You’ll learn more about views in Chapter 13. Until then, here’s how you can cre-
ate a very simple view within SQL Server Enterprise Manager:
1. Select the Views node in the treeview for the database that you want to query.
2. Click the New button on the toolbar.
3. Right-click in the top pane of the view and choose Add Table. Select the table
that contains the data of interest and click Add, then click Close.
4. Check the columns in the table that contain the data you want to view.
5. Click the Run button to see the results of the view.
Figure 5.13 shows a simple view in SQL Server Enterprise Manager.
2627ch05.qxt 8/22/00 10:35 AM Page 180
Please purchase PDF Split-Merge on www.verypdf.com to remove this watermark.
181
FIGURE 5.13
A SQL Server view
The view designer consists of four panes:
• The diagram pane shows the tables and columns that the view is using to
retrieve data.
• The grid pane shows column aliases, sorts, and criteria.
• The SQL pane shows the SQL statement that the view is creating.
• The results pane shows the results of the view.
Changes in any of these panes are reflected in the other panes. For example, if you
check a new field in the diagram pane, that field will show in the grid pane and in the
SQL statement in the SQL pane.
EXECUTING T-SQL
Transact-SQL
PART
II
2627ch05.qxt 8/22/00 10:35 AM Page 181
Please purchase PDF Split-Merge on www.verypdf.com to remove this watermark.
CHAPTER 5 • TRANSACT-SQL OVERVIEW AND BASICS
182
TIP
If you experiment with the view designer, you’ll find that you can also select data
from multiple tables at the same time. You’ll find the view designer to be especially useful
as you work through the SELECT statement syntax in Chapter 6.
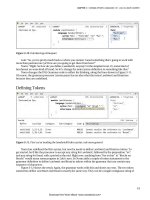
Creating a Stored Procedure
You can also create a stored procedure to execute arbitrary SQL statements using SQL
Server Enterprise Manager. Unlike a view, a stored procedure can contain multiple
SQL statements, so in that way it’s similar to the queries you’ve seen in SQL Query
Analyzer. You’ll learn more about stored procedures in Chapter 14.
To create and execute a simple stored procedure:
1. Select the Stored Procedures node in the treeview for the database that you want
to query.
2. Click the New button on the toolbar.
3. Replace the “[PROCEDURE NAME]” placeholder in the Stored Procedure Proper-
ties dialog box with the name you’d like to use for this stored procedure.
4. Type the SQL statements that make up the stored procedure. Click the Check
Syntax button if you’d like to verify that your SQL code is correct. Figure 5.14
shows this step of defining the stored procedure.
FIGURE 5.14
Defining a stored
procedure
2627ch05.qxt 8/22/00 10:35 AM Page 182
Please purchase PDF Split-Merge on www.verypdf.com to remove this watermark.
183
5. Click OK to save the stored procedure.
6. Launch SQL Query Analyzer.
7. Type the name of the stored procedure into the SQL Query Analyzer query win-
dow and execute it.
Figure 5.15 shows the results of executing the stored procedure that you just
defined.
FIGURE 5.15
Results of a stored
procedure
WARN I N G
There’s no way to view results of a stored procedure within SQL Server
Enterprise Manager.
Using OSQL
You may sometimes want to see the results of a SQL statement without any of the
overhead of a graphical tool. In those cases, you can use OSQL to execute your SQL
statement. OSQL is a command line tool that takes input as text and delivers its
results right to the command prompt.
Figure 5.16 shows the use of OSQL to retrieve the results of a query in the North-
wind database. Here, the -d argument tells OSQL the name of the database, the -Q
argument contains the SQL statement to execute, and the -E argument specifies that
OSQL should use Windows NT integrated security.
EXECUTING T-SQL
Transact-SQL
PART
II
2627ch05.qxt 8/22/00 10:35 AM Page 183
Please purchase PDF Split-Merge on www.verypdf.com to remove this watermark.
CHAPTER 5 • TRANSACT-SQL OVERVIEW AND BASICS
184
FIGURE 5.16
Using OSQL
OSQL is a rather powerful utility, if you can remember all of its command line
options. As you can see in this example, if an option requires more information, it’s
supplied immediately after the argument. Table 5.10 lists all of the arguments that
you can use with OSQL.
TABLE 5.10: OSQL ARGUMENTS
Argument Meaning
-a packet_size Specifies packet size to use when talking to the server. If
you’re sending a very long batch, you may wish to increase
this from the default size of 512.
-b Aborts the batch and returns a DOS ERRORLEVEL when an
error occurs.
-c command_terminator Specifies an end of batch marker. By default, this is GO.
-d database Uses the specified database.
-D datasourcename Uses the specified ODBC Data Source Name (DSN) to con-
nect to a database. The DSN must point to a SQL Server
database.
-e Echoes input to output.
-E Uses Windows NT Integrated security.
-h rows Sets number of rows to print before repeating column
headers.
2627ch05.qxt 8/22/00 10:35 AM Page 184
Please purchase PDF Split-Merge on www.verypdf.com to remove this watermark.
185
TABLE 5.10: OSQL ARGUMENTS (CONTINUED)
Argument Meaning
-H workstation Sets the workstation name to use when communicating
with the server.
-I input_file Designates a file containing SQL statements to execute.
-I Sets QUOTED_IDENTIFIER ON.
-l timeout Sets number of seconds to wait for a login to complete.
-L Lists known servers.
-m error_level Sets minimum severity error to display.
-n Don’t number input lines.
-o output_file Designates a file to create or overwrite with results.
-O Disables new features so OSQL acts like the defunct ISQL
utility.
-p Prints performance statistics when the query is completed.
-P password Sets SQL Server password.
-R Uses local client settings when displaying numbers, dates,
and currency.
-q “query” Executes the supplied query, but does not exit OSQL.
-Q “query” Executes the supplied query and immediately exits OSQL.
-r0 Sends error messages to the screen even when piping
results to a file.
-s separator Sets a separator character to use between columns. By
default, this is a blank space.
-S server Sets the server with which to connect. If this is not sup-
plied, OSQL uses the local server.
-t timeout Sets the number of seconds to wait for results before abort-
ing a batch.
-u Displays results in Unicode.
-U login_id Designates the SQL Server login ID.
-w width Sets the number of columns to print before wrapping
output.
-? Displays a syntax summary.
WARN I N G
OSQL arguments are case-sensitive.
EXECUTING T-SQL
Transact-SQL
PART
II
2627ch05.qxt 8/22/00 10:35 AM Page 185
Please purchase PDF Split-Merge on www.verypdf.com to remove this watermark.
CHAPTER 5 • TRANSACT-SQL OVERVIEW AND BASICS
186
Summary
This chapter has introduced you to the basics of the Transact-SQL programming lan-
guage, which is the native language of SQL Server. You learned about SQL standards
and compatibility, and how to configure SQL Server for various levels of compatibil-
ity. You’ve also seen T-SQL datatypes and functions, as well as some of the tools that
will let you execute T-SQL batches.
Now it’s time to move on to the most important statement in the SQL language,
the SELECT statement. The SELECT statement is used to retrieve data from database
tables, and is both complex and flexible. You’ll learn about this powerful statement in
the next chapter.
2627ch05.qxt 8/22/00 10:35 AM Page 186
Please purchase PDF Split-Merge on www.verypdf.com to remove this watermark.
CHAPTER
6
SELECT Queries
FEATURING:
Using Basic SELECT Queries 188
Using JOINs 195
Turning Result Sets into Reports 201
Full-Text Searching 217
Linked Server Queries 231
Summary 232
2627ch06.qxt 9/6/00 11:15 AM Page 187
Please purchase PDF Split-Merge on www.verypdf.com to remove this watermark.
Y
ou now have the knowledge you need to create databases and fill them
with data, but that knowledge is useless without the ability to pull that data
back out in a meaningful fashion, a fashion that is well-organized and easy
to read. To do this, you must understand the SELECT statement and its vari-
ous options.
In this chapter, we will discuss the various ways that you can get your data from
one or more tables by using joins. We’ll also look at how to limit the data that is
returned by using the WHERE clause. Once you have the data you want, we’ll show
you how to organize it by using such clauses as GROUP BY, HAVING, COMPUTE,
COMPUTE BY, TOP N, ROLLUP, and CUBE.
After SELECT queries are mastered, we’ll move into Full-Text Search, a marvelous
tool for searching through massive amounts of text with accuracy. Finally we’ll dis-
cover how to make all of this happen when the data spans more than one server by
using linked server queries. So hold on, it’s going to be quite a ride.
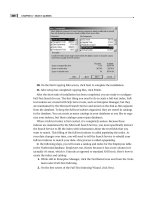
Using Basic SELECT Queries
As was already mentioned, SELECT queries are the primary method for reading the
data that is stored in your tables. These queries can be very complex (as you will soon
see) or very simple. The simplest of SELECT queries is one that pulls all of the data out
of a table and displays it in no particular order. In fact, let’s take a gander at just such
a query—the following example will display all of the records in the authors table of
the pubs database:
1. Open Query Analyzer in the SQL Server 2000 group in Programs on the Start
menu.
2. Connect using Windows NT Authentication.
3. Type the following code:
USE pubs
SELECT * from authors
4. Click the green arrow or press CTRL+E to execute. You should see the results
shown in Figure 6.1.
2627ch06.qxt 9/6/00 11:15 AM Page 188
Please purchase PDF Split-Merge on www.verypdf.com to remove this watermark.
189
FIGURE 6.1
SELECT * from authors
is a basic SELECT
query.
NOTE
Throughout this chapter, we will be querying the pubs and Northwind data-
bases. These databases were created by Microsoft expressly for you to experiment with
and test out your SQL skill set.
This query returned every single record and every single column from the authors
table. That would be fine if you really needed to see all of this information, but that is
seldom the case. In fact, it is recommended that you do not use such queries regularly
because they cause SQL Server to perform a table scan. A table scan occurs when SQL
Server must read every record of your table to return a result set, which creates a bit of
a strain on your server. It is much better to limit the information returned by the
SELECT query. The first bit of information to limit is the number of columns that are
returned in your result set by listing them in the SELECT query. This next set of steps
will show you how to limit the number of columns that are returned by a SELECT
query by adding a list of columns to the query:
1. Click the New Query button on the toolbar just above your query—it looks like
a piece of paper with a folded corner at the far left.
USING BASIC SELECT QUERIES
Transact-SQL
PART
II
2627ch06.qxt 9/6/00 11:15 AM Page 189
Please purchase PDF Split-Merge on www.verypdf.com to remove this watermark.