Tài liệu ASP.NET 1.1 Insider Solutions- P2 ppt
Bạn đang xem bản rút gọn của tài liệu. Xem và tải ngay bản đầy đủ của tài liệu tại đây (1.06 MB, 50 trang )
</div>
</ItemTemplate>
<EditItemTemplate>
<asp:Textbox id=”txtPrecis” runat=”server”
TextMode=”MultiLine” Rows=”4”
Width=”300” Style=”width:300px”
Text=’<%# Container.DataItem(“Precis”) %>’ />
</EditItemTemplate>
</asp:TemplateColumn>
You might like to experiment with the
CellPadding
and
CellSpacing
properties of the
DataGrid
control, as well as with different values of the
border
style selector, to get a different appearance
for the scrollable regions. For example,
“style=border:3 inset”
when
CellPadding
and
CellSpacing
are both zero gives a very compact grid-like effect.
Loading Controls Dynamically at Runtime
When the ASP team at Microsoft was designing ASP.NET, it probably seemed obvious that the
way forward was to compile the pages into some kind of executable code. This approach means
that there is a distinct separation between the tasks (and the amount of processing work
ASP.NET has to do) of generating a page the first time it is executed—when it has to be compiled
and the resulting code written to disk—and subsequent executions of the compiled code.
As a result, the way that the structure and content of a page are discovered and created from a
file containing declarative definitions and code in
<script runat=”server”>
sections only affects
the “initial hit” performance and not the performance on subsequent requests. Consequently,
this has provided a development environment that supports quite complex page creation tech-
niques, such as the use of server controls and user controls, page and control state maintenance,
and dynamic creation of a control tree for the page.
In particular, the use of a developer-accessible control tree has made it really easy to use
ASP.NET to build pages that, in ASP 3.0 and many other Web development environments,
would required complicated
Response.Write
statements,
#include
directives, and other tricks.
Being able to create controls dynamically at runtime, meanwhile, is extremely useful if you
don’t know beforehand how many instances of a particular control you need on the page. For
example, you might need to create a number of text boxes or buttons, depending on the value
entered by the user, which could therefore be different each time the page is executed.
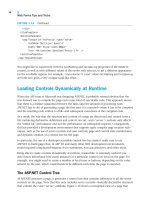
The ASP.NET Control Tree
As ASP.NET processes a page, it generates a control tree that contains references to all the server
controls on the page. Note that this only includes server controls—basically declarative elements
that contain the
runat=”server”
attribute. Figure 1.10 shows a conceptual view of a page that
1
Web Forms Tips and Tricks
38
LISTING 1.14 Continued
03 0672326744 CH01 5/4/04 12:22 PM Page 38
Please purchase PDF Split-Merge on www.verypdf.com to remove this watermark.
39
Loading Controls Dynamically at Runtime
contains several server controls, including a server-side
<form>
element that contains many of
the controls on the page. Notice also that the
Hyperlink
and
HtmlAnchor
(
<a>
element) controls in
this example have child
Image
and
HtmlImage
controls. These represent the typical output that
provides clickable images:
<a href=””>
<img src=”click.gif” border=”0” />
</a>
Page
HtmlGenericControl
Label
Image
TextBox
HtmlInputFile
CheckBox
Hyperlink
Button
Image
HtmlAnchor
HtmlImage
HtmlForm
Label
FIGURE 1.10 A conceptual view of an
ASP.NET page that contains
nested controls.
In more technical terms, the page consists of a hierarchy of control instances. Figure 1.11 shows
this in tree form. Each object in the tree is a server control that is descended directly or indi-
rectly from
System.Web.UI.Control
and thus exposes a
Controls
property that references a
ControlCollection
instance. Each
ControlCollection
instance is, as you might guess, a collection
of references to all the child controls for that control.
You can manipulate the control tree by adding controls to and removing them from these
ControlCollection
instances. When the page is rendered, the control tree is used to build the
HTML (or other output) that is sent to the client. Table 1.1 shows the properties and methods of
the
ControlCollection
object that are useful when manipulating the control tree.
03 0672326744 CH01 5/4/04 12:22 PM Page 39
Please purchase PDF Split-Merge on www.verypdf.com to remove this watermark.
TABLE 1.1
The Members of the
ControlCollection
Object for Working with, Adding, and Removing Controls
Property or Method Description
Count
Returns the number of controls in the
ControlCollection
instance.
Item
Acts as the indexer for the zero-based
ControlCollection
instance, returning a
reference to a control within the collection.
Add(control)
Adds the
Control
instance referenced by the
control
parameter to the end of the
ControlCollection
instance of this control.
AddAt(index, control)
Inserts the
Control
instance referenced by the
control
parameter into the
ControlCollection
instance of this control at the specified
Integer index
.
Clear()
Removes all the controls from the
ControlCollection
instance of this control.
Contains(control)
Returns a
Boolean
value indicating whether the
Control
instance referenced in the
control
parameter is a member of this control’s
ControlCollection
instance.
IndexOf(control)
Returns the
Integer
index of the
Control
instance referenced in the
control
parameter within this control’s
ControlCollection
instance.
Remove(control)
Removes the
Control
instance referenced in the
control
parameter from this
control’s
ControlCollection
instance.
RemoveAt(index)
Removes the
Control
instance at the specified
Integer index
from this control’s
ControlCollection
instance.
Adding Controls to the Control Tree
In most cases, you can just use the
Add
method to add controls to the control tree in the correct
order to produce the output you want. This is generally easier than trying to figure out where to
insert a control within a collection, although the other methods are useful if you need to do any
complex management of the child controls for a particular control.
Probably the easiest way to insert a control into a page at a specific point is to use an ASP.NET
PlaceHolder
control. This generates no output in the page, but it does expose a
ControlCollection
instance to which you can add other controls. When you use this approach, the newly added
1
Web Forms Tips and Tricks
40
Page
Label
Label
HtmlGeneric
Control
Image CheckBox
TextBox HtmlInputFile Button
HtmlAnchor
HtmlImage
Hyperlink
Image
HtmlForm
FIGURE 1.11
The ASP.NET control tree
for the page shown in
Figure 1.10.
03 0672326744 CH01 5/4/04 12:22 PM Page 40
Please purchase PDF Split-Merge on www.verypdf.com to remove this watermark.
41
Loading Controls Dynamically at Runtime
controls will always appear in the same position in the page, even if you later add or remove
controls from elsewhere in the control tree or the parent control’s
ControlCollection
instance.
The following code demonstrates the use of the
PlaceHolder
control. In the
Page_Load
event, you
just create a new
Hyperlink
control and set the
NavigateUrl
property. Then you create a new
Image
control and specify its
ImageUrl
property. Next, you add the
Image
control to the
ControlCollection
instance of the
Hyperlink
control and add the
Hyperlink
control to the
ControlCollection
instance of the
PlaceHolder
control:
<asp:PlaceHolder id=”ph1” runat=”server” />
...
Sub Page_Load()
Dim oLink As New Hyperlink()
oLink.NavigateUrl = “”
Dim oImage As New Image()
oImage.ImageUrl = “~/images/True.gif”
oLink.Controls.Add(oImage)
ph1.Controls.Add(oLink)
End Sub
When the page is rendered, the following
output is generated (ASP.NET automatically
adds the
border=”0”
attribute):
<a href=””>
<img src=”../images/True.gif” border=”0” />
</a>
Creating a
DataGrid
Control Dynamically at Runtime
Compared to the previous, somewhat trivial example, the following example generates a more
complex page which contains a
DataGrid
control that supports inline editing. The result is
shown in Figure 1.12.
The Actual Output Format
The output is not actually indented as shown
here, but instead is generated as a single line
with no spaces or carriage returns. In this
example it is formatted with carriage returns
and indented so that you can see the result
more clearly.
FIGURE 1.12
A dynamically generated
DataGrid
control.
03 0672326744 CH01 5/4/04 12:22 PM Page 41
Please purchase PDF Split-Merge on www.verypdf.com to remove this watermark.
The page contains all the server-side code to handle the events in the
DataGrid
control, using the
same techniques in the first example in this chapter. (We won’t be looking at that code here.)
With this example, we are interested in the way that the
DataGrid
control itself is generated. The
HTML section of the sample page contains a server-side
<form>
element, but no other content:
<form id=”frmMain” runat=”server”>
<!-- DataGrid and Label will be dynamically inserted here -->
</form>
Instead, the
DataGrid
control and the
Label
control used to display any data access errors
are added to the page dynamically during the
Page_Load
event. Also, the various events in
the
DataGrid
control are wired to the appropri-
ate event handlers already located in the
<script>
section of the page.
The previous example uses a
PlaceHolder
control as the container to which the new
controls are added. However, a server-side
<form>
element works just as well, and in this
example you can add the controls directly to
the
ControlCollection
instance of the
HtmlForm
control that implements the server-side
<form>
control.
Setting Size and Color Properties Dynamically
You can generate values for some of the properties of Web Forms server controls. Properties that
set the color of parts of the output, such as
ForeColor
and
BackColor
, accept references to a
Color
structure. Properties that accept sizes, such as
Width
and
BorderWidth
, accept references to a
Unit
structure. When declaring a server control in the HTML section of the page, you can use the
color names or size values directly, as in this example:
<HeaderStyle ForeColor=”#ffffff” BackColor=”#b50055” />
<ItemStyle BorderWidth=”1px” />
However, to set these properties dynamically, you have to provide an instance of the correct
structure classes. Here’s an example:
oGrid.HeaderStyle.ForeColor = Color.FromName(“#ffffff”)
oGrid.HeaderStyle.BackColor = Color.FromName(“#b50055”)
oGrid.ItemStyle.BorderWidth = Unit.Pixel(1)
The
Unit
structure is part of the
System.Web.UI.WebControls
namespace, so it is available by
default in all ASP.NET Web pages. However, the
Color
structure is defined in the
System.Drawing
1
Web Forms Tips and Tricks
42
Choosing the Event when Adding Controls
Instead of generating the controls during
other ASP.NET page events, such as
Init
or
Render,
we had most success getting the
process to work reliably, especially when
wiring up event handlers, by using the
Page_Load
event. The controls must be
generated on every postback (not just when
the page is first loaded) and in exactly the
same order and with the same ID values.
Unlike control values, dynamically generated
controls are not maintained in the viewstate
of the page. However, values are maintained
and will be reloaded after the controls have
been created and added to the control tree.
03 0672326744 CH01 5/4/04 12:22 PM Page 42
Please purchase PDF Split-Merge on www.verypdf.com to remove this watermark.
43
Loading Controls Dynamically at Runtime
namespace, which is not imported into ASP.NET pages by default. Therefore, you have to
include the appropriate
Import
directive in any pages that reference a
Color
structure:
<%@Import Namespace=”System.Drawing” %>
Creating the
DataGrid
Control
Creating the
DataGrid
control itself is not difficult; it just requires quite a lot of repetitive code.
You create an instance of a
DataGrid
control, set all the properties, and then you add it to the
Controls
collection of the
<form>
element in the page. You do the same with the
Label
control
that will display any data access errors.
Listing 1.15 shows the declaration of two page-level variables that are used to hold references to
the new controls (so that they can be accessed in routines other than the
Page_Load
event
handler), followed by the start of the
Page_Load
event handler. Here, you create the
DataGrid
control and add all the properties that set the appearance and behavior of the control. You can
reduce the amount of code required by taking advantage of the Visual Basic .NET
With
construct.
Notice how you set the properties of objects that are actually children of the
DataGrid
control,
such as the
HeaderStyle
,
ItemStyle
, and
AlternatingItemStyle
objects. You can use a nested
With
construct or just reference them by using a period to access the child objects.
LISTING 1.15 Dynamically Generating a
DataGrid
Control
Dim oGrid As DataGrid
Dim oLabel As Label
Sub Page_Load()
‘ create a DataGrid control
oGrid = New DataGrid()
‘ set control properties
With oGrid
.id = “dgr1”
.BorderStyle = BorderStyle.None
.BorderWidth = Unit.Pixel(0)
.BackColor = Color.FromName(“#deba84”)
.CellPadding = 3
.CellSpacing = 0
.DataKeyField = “CustomerID”
.Width = Unit.Percentage(100)
.AutoGenerateColumns = False
With .HeaderStyle
.Font.Bold = True
.ForeColor = Color.FromName(“#ffffff”)
.BackColor = Color.FromName(“#b50055”)
End With
03 0672326744 CH01 5/4/04 12:22 PM Page 43
Please purchase PDF Split-Merge on www.verypdf.com to remove this watermark.
.ItemStyle.BackColor = Color.FromName(“#fff7e7”)
.AlternatingItemStyle.BackColor = Color.FromName(“#ffffc0”)
End With
‘ create a column for the DataGrid control
‘ and set properties
Dim oCol1 As New EditCommandColumn()
With oCol1
.EditText = “Edit”
.CancelText = “Cancel”
.UpdateText = “Update”
End With
‘ add column to DataGrid
oGrid.Columns.Add(oCol1)
‘ repeat for remaining columns
Dim oCol2 = New BoundColumn()
With oCol2
.DataField = “CustomerID”
.HeaderText = “ID”
.ReadOnly = True
End With
oGrid.Columns.Add(oCol2)
...
‘ same for CompanyName, City, Country and Phone columns
...
Toward the end of Listing 1.15, you can see the columns being added. You create an instance of
the appropriate type of column, set the properties, and then add the column to the
Columns
collection. Like the
Controls
property, the
Columns
property of a
DataGrid
control is a collection
of references to the columns that make up the
DataGrid
control. Listing 1.15 does not contain
the declarations of the Company Name, City, Country, and Phone columns because they are
identical to the Customer ID column (except, of course, that they refer to different columns in
the source data).
Wiring Up the
DataGrid
Control Events
With the
DataGrid
control complete, you can attach its events to the appropriate event handler
routines already present in the page, as shown in Listing 1.16. In Visual Basic .NET you use the
AddHandler
statement, and in C# you just append the event delegates by using the
+=
operator.
You can wire up the
EditCommand
,
UpdateCommand
, and
CancelCommand
events, targeting them at the
1
Web Forms Tips and Tricks
44
LISTING 1.15 Continued
03 0672326744 CH01 5/4/04 12:22 PM Page 44
Please purchase PDF Split-Merge on www.verypdf.com to remove this watermark.
45
Loading Controls Dynamically at Runtime
event handlers named
DoItemEdit
,
DoItemUpdate
, and
DoItemCancel
. This achieves the same result
as declaring them directly in the page, as in the
DataGrid
control example earlier in this chapter:
OnEditCommand=”DoItemEdit”
OnUpdateCommand=”DoItemUpdate”
OnCancelCommand=”DoItemCancel”
LISTING 1.16 Wiring Up the Event Handlers, Creating the
Label
Control, and Populating the
DataGrid
Control
...
‘ add event handlers to the grid
AddHandler oGrid.EditCommand, _
New DataGridCommandEventHandler(AddressOf DoItemEdit)
AddHandler oGrid.UpdateCommand, _
New DataGridCommandEventHandler(AddressOf DoItemUpdate)
AddHandler oGrid.CancelCommand, _
New DataGridCommandEventHandler(AddressOf DoItemCancel)
‘ create new Label control and set properties
oLabel = New Label()
With oLabel
.id = “lblErr”
.EnableViewState = False
End With
‘ add new controls to page as children of <form>
frmMain.Controls.Add(oGrid)
frmMain.Controls.Add(oLabel)
‘ only need to databind if it is not a postback
‘ viewstate used to populate dynamically added controls
If Not Page.IsPostback Then
oGrid.DataSource = GetCustomers()
oGrid.DataBind()
End If
End Sub
After attaching the event handlers, you generate a new
Label
control and set its properties. Then
you add the
DataGrid
and the
Label
controls to the
ControlCollection
instance of the server-side
<form>
control declared in the page (as shown in Listing 1.16).
Populating the
DataGrid
Control
The final task in this example, shown at the end of Listing 1.16, is to populate the
DataGrid
control. As long as the control tree you generate is the same every time the page is loaded, the
03 0672326744 CH01 5/4/04 12:22 PM Page 45
Please purchase PDF Split-Merge on www.verypdf.com to remove this watermark.
values of all the controls will be maintained through the viewstate of the page—even for
dynamically added controls. So you only have to perform the data binding to the data source if
this is not a postback, just as you would if you had declared the
DataGrid
control directly within
the HTML section of the page.
The viewstate of the page also stores the values of many of the other properties of the controls
on the page. So if you allow users to modify properties, such as whether specific columns are
visible or the color of the text, you’ll want these values to be preserved across page loads and
not be reset every time you regenerate the control. In this case, you can set the values only the
first time the page loads, at the same time as populating the
DataGrid
control. For example, this
code sets the style of the header row only when the page first loads, but it is maintained across
postbacks within the viewstate of the page:
If Not Page.IsPostback Then
oGrid.DataSource = GetCustomers()
oGrid.DataBind()
oGrid.HeaderStyle.Font.Bold = True
oGrid.HeaderStyle.ForeColor = Color.FromName(“#ffffff”)
oGrid.HeaderStyle.BackColor = Color.FromName(“#b50055”)
End If
Loading User Controls Dynamically at Runtime
The final topic we’ll briefly look at to finish this chapter is dynamically loading user controls at
runtime. In theory, the principles are the same as for the
DataGrid
control; however, there are a
couple things to be aware of with user controls. A user control is not strongly typed—in other
words, it is usually generated as an instance of the generic
UserControl
class, whereas other
server controls are specific classes from the .NET Framework class library.
You can use the
LoadControl
method of the
Page
object to load a user control. The following
code takes the path and name of the
.ascx
disk file and returns a reference to the control as a
UserControl
instance that you can add to the
ControlCollection
instance of any other control:
Dim oNewCtrl As UserControl = LoadControl(“path-to-ascx-file”)
oExistingControl.Controls.Add(oNewCtrl)
This is fine if the user control is simply some static user interface content. However, if you want
to access properties or other members of the user control, you have a problem because the
UserControl
class that represents the user control doesn’t expose them. In that case, you have to
add to the page a reference to the user control, and you have to specify the classname of the
user control in the
.ascx
file.
When you insert a user control in the page declaratively, you use a
Register
directive to specify
the tag prefix and tag name you’ll be using, and you use the path and name of the
.ascx
file
that implements the user control. Here’s an example:
<%@Register TagPrefix=”ahh” TagName=”Spinbox”
Src=”..\ascx\user-spinbox.ascx” %>
1
Web Forms Tips and Tricks
46
03 0672326744 CH01 5/4/04 12:22 PM Page 46
Please purchase PDF Split-Merge on www.verypdf.com to remove this watermark.
47
Loading Controls Dynamically at Runtime
When you want to insert a user control dynamically and be able to access it as a strongly typed
object, you use the
Reference
directive instead. The following example just takes the path and
name of the user control:
<%@Reference Control=”..\ascx\user-spinbox.ascx” %>
However, this assumes that the user control itself declares a classname. In the user control, you
have to add the
ClassName
attribute to the
Control
directive, as in this example:
<%@Control Language=”VB” ClassName=”UserSpinBox” %>
Now you can use the
CType
statement in Visual Basic (or a direct cast in C#) to convert the
UserControl
reference into a reference to the specific class. For example, you can load an
instance of the
SpinBox
user control you’ll be meeting later in this book and expose it as a
UserSpinBox
instance with the following code:
Dim oCtrl As UserControl = LoadControl(“..\ascx\user-spinbox.ascx”)
Dim oSpinBox As UserSpinBox = CType(oCtrl, UserSpinBox)
Alternatively, if you just want to set a property (such as the
Increment
property), you can use
something like this:
Dim oCtrl As UserControl = LoadControl(“..\ascx\user-spinbox.ascx”)
CType(oCtrl, UserSpinBox).Increment = 3
oPlaceHolder.Controls.Add(oCtrl)
An Example of Loading a User Control
To briefly demonstrate the dynamic loading of a user control, the final example in this chapter
loads instances of the custom
SpinBox
user control, as shown in Figure 1.13.
The page contains both a
Register
and a
Reference
directive for the
SpinBox
user control:
<%@Register TagPrefix=”ahh” TagName=”Spinbox”
Src=”..\spinbox\ascx\user-spinbox.ascx” %>
<%@Reference Control=”..\spinbox\ascx\user-spinbox.ascx” %>
The first
SpinBox
instance you see in the page
is inserted declaratively, which is possible
because of the presence of the
Register
direc-
tive. However, as you can see from Listing
1.17, the remainder of the page is made up
basically of three
PlaceHolder
controls where
you can dynamically add the other instances
of the
SpinBox
control.
Running the
SpinBox
Example
As you’ll see in Chapter 8, “Building Adaptive
Controls,” which discusses the
SpinBox
control, you have to copy a file that we
provide with the samples into the
aspnet_client
folder of your Web site for
this example to work. You should copy the
file
spinbox.js
from the samples into a new
subfolder named
custom
within the
aspnet_client
folder of your Web site.
03 0672326744 CH01 5/4/04 12:22 PM Page 47
Please purchase PDF Split-Merge on www.verypdf.com to remove this watermark.
LISTING 1.17 The
<form>
Section of the Page and Declaration of One
SpinBox
Control
<form runat=”server”>
Declared in HTML section of page: <ahh:Spinbox runat=”server” />
<hr />
Created dynamically: <asp:PlaceHolder id=”ph1” runat=”server” />
<hr />
Inserting three new control instances:<p />
<asp:PlaceHolder id=”ph2” runat=”server” />
<hr />
Inserting three instances of the same control reference:<br />
<asp:PlaceHolder id=”ph3” runat=”server” />
</form>
Listing 1.18 shows the
Page_Load
event handler. You generate a
SpinBox
control as a
UserControl
instance, and then you set the
Increment
property by converting the reference into a
UserSpinBox
instance, before adding it to the
ControlCollection
instance of the first
PlaceHolder
control.
Next, you add three separate new instances of the
SpinBox
control to the
ControlCollection
instance of the second
PlaceHolder
control. (You may have wondered if it is possible to use
multiple instances of the same control.) You place each one on a new line by separating them
with a
<br />
element. Notice how you generate this by using an
HtmlGenericControl
instance, as
mentioned earlier in this chapter.
LISTING 1.18 The
Page_Load
Event Handler That Loads the
SpinBox
Control Instances
Sub Page_Load()
Dim oCtrl1 As UserControl = LoadControl(“..\spinbox\ascx\user-spinbox.ascx”)
1
Web Forms Tips and Tricks
48
FIGURE 1.13 A sample page that demon-
strates loading user controls
dynamically.
03 0672326744 CH01 5/4/04 12:22 PM Page 48
Please purchase PDF Split-Merge on www.verypdf.com to remove this watermark.
49
Summary
CType(oCtrl1, UserSpinBox).Increment = 3
ph1.Controls.Add(oCtrl1)
Dim oCtrl2 As UserControl
For iCount As Integer = 1 To 3
oCtrl2 = LoadControl(“..\spinbox\ascx\user-spinbox.ascx”)
ph2.Controls.Add(oCtrl2)
ph2.Controls.Add(New HtmlGenericControl(“br”))
Next
Dim oCtrl3 As UserControl = LoadControl(“..\spinbox\ascx\user-spinbox.ascx”)
For iCount As Integer = 1 To 3
ph3.Controls.Add(oCtrl3)
ph3.Controls.Add(New HtmlGenericControl(“br”))
Next
End Sub
Finally, the code demonstrates a common mistake that some people make when inserting
controls into a page dynamically. Instead of creating a new instance of the control each time (as
in the previous
For...Next
loop with the
LoadControl
method), it simply loads the user control
and then inserts it into the
PlaceHolder
control’s
ControlCollection
instance three times.
If you look back at Figure 1.13, you’ll see that even though the control gets added three times,
the sequence of actions that render the page remove all but the last instance. This is because the
three references in the
ControlCollection
collection are all to the same instance of the user
control. So remember to create new instances of your user controls if you want to insert multi-
ple instances into the page.
Summary
This chapter covers quite a few different but interlinked topics. It starts with a look at how you
can get more from the very clever ASP.NET validation controls. In particular, it looks at how you
can use them with non-text controls and how you can validate other types of controls that do
not directly support validation. This section of the chapter concludes with an example that uses
the validation controls within a
DataGrid
control. Along the way, we looked at using images in a
DataGrid
control column to indicate
Boolean
values, populating and selecting values in simple
nested list controls, and storing the source
DataSet
instance in the user’s ASP.NET session to
improve performance and efficiency.
Next, this chapter looks at some different issues with the
DataGrid
control, specifically aimed at
exerting more control over presentation of the contents. It talks about how you can control the
width of columns, edit more than one value in a cell, and provide scrolling in a cell to avoid
having the
DataGrid
control expand vertically when long text strings are displayed.
LISTING 1.18 Continued
03 0672326744 CH01 5/4/04 12:22 PM Page 49
Please purchase PDF Split-Merge on www.verypdf.com to remove this watermark.
This chapter also looks at the techniques for inserting controls into a page dynamically. As well
as covering some of the basic theory of the ASP.NET control tree, this chapter provides an
example that dynamically creates a
DataGrid
control, complete with inline editing. This involves
considering when to populate the grid, as well as wiring up the events in the
DataGrid
control to
the appropriate event handlers.
Finally, this chapter finishes with a look at the issues involved in loading user controls dynami-
cally and being able to access their properties and methods as strongly typed objects.
1
Web Forms Tips and Tricks
50
03 0672326744 CH01 5/4/04 12:22 PM Page 50
Please purchase PDF Split-Merge on www.verypdf.com to remove this watermark.
2
Cross-Page
Posting
I
sn’t it amazing how some people are never
satisfied? In ASP 3.0, it was becoming the de
rigueur approach to build pages that post
back to themselves and include code that
detects which button was clicked, extract
the values of the HTML controls on the
page, and then repopulate them. This
required loads of fiddly work, inserting
value
and
selected
attributes into each
control and building the decision constructs
that decide which code to execute in
response to the user’s action.
Then along came ASP.NET, with its
fiendishly clever postback architecture that
does all the difficult stuff automatically.
Hardly any code is required, there’s no need
to poke around in the
Request.Form
and
Request.QueryString
collections, and even
proper event handling is provided.
So what do people keep asking how to do
now? They want to post values back to a
different page! A lot of programmers at
Microsoft would be turning in their graves if
they weren’t still alive to see it. However,
because there actually are some legitimate
situations in which this is useful, this
chapter looks at the possibilities and tech-
niques for implementing ASP.NET server-
side forms that post back to different pages.
You might want to do this if you need to
IN THIS CHAPTER
Techniques for Passing Values Between
Pages 52
Client-Side Versus Server-Side
Redirection 60
Exposing Values to Another Page via
References 62
Best Practice: Exposing Control Values
or Control References As Properties 65
Best Practice: Reducing Data
Transfer Volumes by Using the
Server.Transfer
Method 68
The
Server.Execute
Method 68
Summary 72
04 0672326744 CH02 5/4/04 12:26 PM Page 51
Please purchase PDF Split-Merge on www.verypdf.com to remove this watermark.
take advantage of pages in another application or site but still want to use server controls in
your page. Or you might want to reuse pages so that each one can receive values from several
sources. Whatever the reason, this chapter demonstrates how you can achieve it.
Techniques for Passing Values Between Pages
ASP.NET engenders a postback architecture, where pages containing a server-side form (a
<form>
element that contains the
runat=”server”
attribute) are always posted back to themselves. In
fact, this is effectively enforced by ASP.NET, which doesn’t allow server-side code to set the
action
attribute of a server-side form (in other words, the
Action
property of the
HtmlForm
control
instance that implements a server-side form) to any value other than the current URL.
However, there are basically four ways that you can force a
<form>
element to pass values to a
different page:
n
Use a non-server control for the
<form>
element—in other words, omit the
runat=”server”
attribute—This means that the page will behave just as in ASP 3.0, and
you can collect the values in the controls on the form from the
Request
collections in the
traditional way. This also allows you to have multiple forms on the page, but it prevents
you from using many of the ASP.NET server controls on the form. It also prevents the
ASP.NET postback architecture from working, so you cannot access the controls on the
original page—you can access only their posted values.
n
Use client-side script to change the
action
attribute of the
<form>
element after
the page has loaded into the browser—However, this method requires the target
page to have the MAC encoding check on the viewstate disabled to prevent an error.
n
Use the
Response.Redirect
method to load the target page after the values have
been posted back to the original page—The submitted values must then be extracted
from the
Request
collections, and you also have to use an intermediate page to handle the
case where the
method
of the form is set to
POST
(the default for a server-side form) rather
than
GET
.
n
Use the
Server.Transfer
or
Server.Execute
method to cause the second page to run
within the context of the original page—In this case, you can expose values and
controls as properties of the original page and access them in the target page. The user
does not see the URL of the target page in his or her browser.
This chapter does not look at the first of these techniques because it does not differ from tradi-
tional pre-ASP.NET methods. However, it does look at two sample pages that explore the
concepts of the other three techniques.
Accessing Request Values in Another Page
The sample page
redirectpage.aspx
, shown in Figure 2.1, allows you to experiment with the
second and third of the techniques listed in the preceding section. The page contains several
server-side controls, hosted within a server-side
<form>
element. The first three (the text box, list,
2
Cross-Page Posting
52
04 0672326744 CH02 5/4/04 12:26 PM Page 52
Please purchase PDF Split-Merge on www.verypdf.com to remove this watermark.
53
Techniques for Passing Values Between Pages
and drop-down list) are only there to provide values that will be passed to the target page. The
option buttons allow you to select which method will be used:
POST
or
GET
.
Below these controls are four buttons that submit the form to the server. The first two use
client-side code to change the
action
attribute of the
<form>
element before the page is submit-
ted so that it is actually submitted to a different target page. The second two buttons are wired
up to server-side event handlers that call the
Response.Redirect
method to load the target page.
Changing the
action
Attribute of a Form
The first two buttons in the sample page shown in Figure 2.1 are ordinary HTML
<input>
elements that call a client-side script function named
changeAction
and pass to it the name of
the target page that will be loaded:
<input type=”submit” name=”btnChangeAction”
value=”Submit (normal)”
onclick=”changeAction(‘catchrequest.aspx’)” />
<input type=”submit” name=”btnActionNoMAC”
value=”Submit (no MAC check)”
onclick=”changeAction(‘catchnomac.aspx’)” />
The
changeAction
function simply changes the
action
attribute of the server-side
<form>
element
that contains all the controls on the page to the specified URL:
function changeAction(sURL) {
var theForm = document.getElementById(‘frmMain’);
theForm.action = sURL;
}
In the case of the first button, the target page is
catchrequest.aspx
. This page contains an
ASP.NET
Label
control and a server-side
<form>
element with an ASP.NET
Button
control:
FIGURE 2.1 A sample page that demon-
strates changing the
action
attribute and redirection.
04 0672326744 CH02 5/4/04 12:27 PM Page 53
Please purchase PDF Split-Merge on www.verypdf.com to remove this watermark.
<b>Values in the Request collections</b>:<br />
<asp:Label id=”lblRequest” runat=”server” />
<form runat=”server”>
<asp:Button Text=”Back” runat=”server” OnClick=”GoBack” />
</form>
The server-side code in this page, shown in Listing 2.1, implements a
Page_Load
event handler
that simply iterates through the
Request.QueryString
and
Request.Form
collections, collecting any
values stored there and displaying them in the
Label
control. The
GoBack
event handler, which
executes when the button on the page captioned Back is clicked, redirects the browser back to
the original page.
LISTING 2.1 The
Page_Load
and
GoBack
Event Handler Routines
Sub Page_Load()
If Not Page.IsPostback Then
‘ display the values in the Request collections
lblRequest.Text &= “* QueryString collection:<br />”
For Each oValue As String In Request.QueryString
lblRequest.Text &= “ “ & oValue & “ = “ _
& Request.QueryString(oValue) & “<br />”
Next
lblRequest.Text &= “* Form collection:<br />”
For Each oValue As String In Request.Form
lblRequest.Text &= “ “ & oValue & “ = “ _
& Request.Form(oValue) & “<br />”
Next
End If
End Sub
‘ return to previous page and end current response
Sub GoBack(sender As Object, args As EventArgs)
Response.Redirect(“redirectpage.aspx”, True)
End Sub
When you try this example by clicking the Submit (Normal) button in the original page, you see
an ASP.NET error page, indicating that the viewstate for the page is corrupted (see Figure 2.2).
This is because ASP.NET encodes the viewstate it stores in the page along with the control tree
and other details of the original page. When a postback occurs, ASP.NET validates this encoded
data against the current page to act as a guard against malicious spoofing or other attacks.
Because the page that is now executing is different from the original page, the validation check
fails.
2
Cross-Page Posting
54
04 0672326744 CH02 5/4/04 12:27 PM Page 54
Please purchase PDF Split-Merge on www.verypdf.com to remove this watermark.
55
Techniques for Passing Values Between Pages
Turning Off Viewstate Validation
You can get around the failed validation check problem by turning off viewstate validation in
the target page. This means, of course, that the target page is no longer protected against spoof-
ing, so if you use this technique, you must be sure to fully validate any submitted values to
prevent malicious activity.
To turn off viewstate validation, you simply add the attribute
EnableViewStateMac=”False”
to the
Page
directive. In this example, clicking the Submit (No MAC Check) button on the original page
changes the
action
attribute of the form to point to the page
catchnomac.aspx
. This page is identi-
cal to the
catchrequest.aspx
page, except that it also contains the
EnableViewStateMac=”False”
attribute. The result of clicking this button is shown in Figure 2.3, where you can see that now
the values in the
Request.Form
collection are available and displayed.
Changing the
Method
Property of a Server-Side Form Control
In the example described in the preceding section, the values in the
<form>
element are posted
to the server because the default for the
method
attribute of a server-side form is
POST
. However,
you can change it to
GET
by adding the
method=”get”
attribute to the declaration of the
<form>
control:
<form method=”get” runat=”server”>
You can also change the
Method
property by using server-side code in your ASP.NET page or with
client-side script code. The sample page allows you to change the
method
attribute of the form by
using client-side script, which means that you can choose the method you want to use before
submitting the form. Figure 2.4 shows the two option buttons for this, which are located on the
page above the four submit buttons.
FIGURE 2.2
The error message
displayed when the view-
state validation check fails.
04 0672326744 CH02 5/4/04 12:27 PM Page 55
Please purchase PDF Split-Merge on www.verypdf.com to remove this watermark.
Listing 2.2 shows the declaration of the
RadioButtonList
control that creates these option
buttons. It has
AutoPostback
set to
True
, and any change to the selected index executes the
server-side event handler named
ChangeMethod
(also shown in Listing 2.2). This just sets the
Method
attribute to the selected value.
LISTING 2.2 A
RadioButtonList
Control and an Event Handler to Change the Method of a Form
<asp:RadioButtonList id=”optMethod” runat=”server”
RepeatDirection=”Horizontal” RepeatLayout=”Flow”
OnSelectedIndexChanged=”ChangeMethod” AutoPostback=”True”>
<asp:ListItem Text=”POST (default)” Value=”post” Selected=”True” />
<asp:ListItem Text=”GET” Value=”get” />
</asp:RadioButtonList>
...
Sub ChangeMethod(sender As Object, args As EventArgs)
frmMain.Method = optMethod.SelectedValue
End Sub
If you select the GET option button and then click the Submit (No MAC Check) button again,
the values then appear in the
Request.QueryString
collection instead of in the
Request.Form
collection. They are also visible in the browser’s address bar, appended to the URL as the query
string.
2
Cross-Page Posting
56
FIGURE 2.3
Turning off viewstate validation to
allow the target page to execute.
FIGURE 2.4 Changing the
Method
property
of a server-side form.
04 0672326744 CH02 5/4/04 12:27 PM Page 56
Please purchase PDF Split-Merge on www.verypdf.com to remove this watermark.
57
Techniques for Passing Values Between Pages
Redirecting Postbacks to the Target Page
The two submit actions described in the preceding section work by fooling the browser and
ASP.NET into working just like they do in ASP 3.0 and earlier. The browser automatically posts
the values of the elements on the form or sends them as a query string, depending on the value
of the
method
attribute of the
<form>
element.
The technique that this section examines uses
a different approach. You allow ASP.NET to
perform a postback in the usual way, but then
you perform redirection to the target page by
using the
Response.Redirect
method in the
server-side code.
The server-side event handler named
DoRedirect
, which you attach to the Redirect
button on the original page, looks like this:
Sub DoRedirect(sender As Object, _
args As EventArgs)
Response.Redirect(“catchrequest.aspx”, _
True)
End Sub
It simply redirects the browser to the same
catchrequest.aspx
page (described in Listing
2.1) that displays the values in the
Request.QueryString
and
Request.Form
collec-
tions. However, if you click the Redirect button, you’ll see that there are no values sent from the
page following a call to the
Response.Redirect
method (see Figure 2.5).
Halting Execution by Using the
Response.Redirect
Method
The
Redirect
method has two overloads.
The first takes a single parameter—the URL
of the page to redirect to. The second over-
load accepts an additional
Boolean
parame-
ter, which indicates whether processing of the
current page should be halted. Usually, when
you perform a redirection, you set this second
parameter to
True
. However, in some cases
you might like to continue executing the origi-
nal page code—even though the output from
the page will not be sent to the client. For
example, you might want to redirect the user
to a different page when an error occurs but
allow the original page code to clean up any
resources it’s using, such as closing database
connections. You can always halt execution
later by calling the
Response.End
method.
FIGURE 2.5
The
Response.Redirect
method does
not pass values to the target page.
Passing Form Values to a Target Page by Using
Response.Redirect
Listing 2.3 shows the server-side event handler that is attached to the Redirect with Values
button, the last of the four buttons on the original sample page. Similar to the Redirect button,
it performs a redirection to the
catchrequest.aspx
page, which displays the values in the
Request.QueryString
and
Request.Form
collections. However, before it does this, it creates a query
string containing the values of the text box, list, drop-down list, and option buttons on the
page (you don’t pass the values of the four buttons).
04 0672326744 CH02 5/4/04 12:27 PM Page 57
Please purchase PDF Split-Merge on www.verypdf.com to remove this watermark.