Tài liệu 2D Artwork and 3D Modeling for Game Artists- P8 doc
Bạn đang xem bản rút gọn của tài liệu. Xem và tải ngay bản đầy đủ của tài liệu tại đây (3.04 MB, 50 trang )
14. Apply an inner bevel to the cross to complete the effect (see Figure 8.194).
Style: Bevel and Emboss
Style: Inner Bevel
Technique: Smooth
Depth: 510%
Direction: Down
Size: 16 pixels
Soften: 0
The rivets and screws will look much better once you’ve scaled them down to size.
In the image shown in Figure 8.195, I added a bunch of them, then applied the
dripping-rust effect that we did earlier.
324
8.
Inorganic Texture Tutorials with Photoshop
Figure 8.194
Add a dark cross on
a new layer, and
apply an inner bevel
to turn the rivet into
a Phillips-head screw.
Figure 8.195
Scaling down the riv-
ets and screws will
make them look very
real. Add dripping-rust
effects to crown it all
off.
TEAMFLY
Team-Fly
®
Please purchase PDF Split-Merge on www.verypdf.com to remove this watermark.
. . . And the Rest
There’s only a handful of stuff left that I want to show you, so I didn’t bother to try
to sort everything into separate main categories.
Wood
I know, wood is technically an organic texture. But this chapter focuses on textures
that make up all types of building materials for a scene, so I decided to squeak it in
here. As with other textures, you can create wood one of two ways: by taking a pic-
ture of the real thing, or by making it from scratch via filters. I’ve tried to re-create
wood from scratch, but the best I’ve come up with is something that looks like
those snap-together, faux-finish plastic
pieces kids get for G.I. Joe karate boards
(see the Crate tutorial in Chapter 9).
I’ll show you a couple filtering techniques
for creating wood, but only for fun (using
pictures of wood is by far the best way to
go):
1. Start a new 512×512-pixel RGB image. (Dimensions aren’t critical here, since
most of the time you’re only interested in slivers of wood for boards.)
2. Press D to reset your swatches.
3. Choose Filter, Render, Clouds.
4. Start a new layer and fill it with the foreground color (black).
5. Choose Filter, Sketch, Graphic Pen. Use a Vertical setting; this will be the
wood grain (see Figure 8.196)
325
. . . And the Rest
NOTE
If you did any of my Photoshop
tutorials, the sampler.psd file
had a piece of fake wood I made.
Figure 8.196
Apply the Graphic
Pen filter for wood
grain.
Please purchase PDF Split-Merge on www.verypdf.com to remove this watermark.
Filter: Sketch, Graphic Pen
Stroke Length: 15
Light/Dark Balance: 50
Stroke Direction: Vertical
6. Select the Magic Wand tool and make sure you uncheck Contiguous in the
tool’s Options panel.
7. Click a portion of the grain layer that’s black to select all the black parts of
the layer.
8. Right-click on the selection, and choose Layer Via Cut.
9. Delete the middle layer that has the white stuff that got cut out.
10. The grain is now isolated on a transparent layer above the background layer.
Apply a slight outer bevel to the grain layer to raise its surface (see Figure
8.197).
Style: Bevel and Emboss
Style: Outer Bevel
Technique: Smooth
Depth: 100%
Direction: Up
Size: 3 pixels
Soften: 0
326
8.
Inorganic Texture Tutorials with Photoshop
Figure 8.197
Apply an outer bevel
to the grain layer.
Please purchase PDF Split-Merge on www.verypdf.com to remove this watermark.
You can now flatten this image and take long rectangular selections as boards. Kind
of sucks, doesn’t it? Your best bet is to play around with colors, or even try the
Liquify command (Ctrl+Shift+X) on the grain layer to produce knots and the like.
Like I said, though, the absolute best way to make anything out of wood is from an
image. Let’s go ahead and make a wooden sign based on wood from a picture:
1. Start a new 512×512-pixel RGB image.
2. Fill the background layer with black.
3. Open the woodpic.jpg file in the Chapter 8 Data section on the CD-ROM
(see Figure 8.198).
4. Using the Polygonal Lasso tool, select
a board from the image, copy it, and
paste it into a new layer. Repeat for a
second board (pasting it into a new
layer as well), as shown in Figure
8.199. Scale each board so it fits in the
image.
327
. . . And the Rest
Figure 8.198 The
woodpic.jpg image
from which you’ll
extract some wood.
TIP
You don’t have to do a perfect
job with the selection. In fact, it’s
better to keep your selection
boundary within the border of
the wood so you don’t have to
clean up the edges.
Please purchase PDF Split-Merge on www.verypdf.com to remove this watermark.
5. Rotate the two boards horizontally and align them so they are parallel to
each other with just a slight gap in between. (This is going to be a rustic old
sign, so don’t be too finicky.)
6. Merge the two board layers when finished (see Figure 8.200).
7. Let’s tear up and then apply a 3D effect to the left and right edges of the
boards to give it some depth. Using the Lasso tool, make a jagged selection
along the left edge and choose Layer Via Cut. As shown in Figure 8.201, my
selection is only slightly inside of the edge of the wood.
328
8.
Inorganic Texture Tutorials with Photoshop
Figure 8.199 Copy
and paste two boards
from the picture into
your new image. (I’m
using the two vertical
boards on top.)
Figure 8.200
Rotate and align the
boards with a slight
gap.
Please purchase PDF Split-Merge on www.verypdf.com to remove this watermark.
8. Move the new cut layer from the top of the layer stack to the middle.
9. Apply a drop shadow to the top layer (the one with the boards).
10. In the jagged cut layer, use the Lasso tool to make another jagged cut to its
outside border to match the inner jagged cut. Now the board’s overall edge
looks three-dimensional and chopped up (see Figure 8.202).
329
. . . And the Rest
Figure 8.202
Apply a drop shadow
to the top boards,
and cut up the edge
to complete the 3D
effect.
Figure 8.201 Make
a jagged cut at the
end of the boards onto
a new layer. Position
the layer between the
other two.
Small jagged selection
Move selection layer
below the top boards
Please purchase PDF Split-Merge on www.verypdf.com to remove this watermark.
Style: Drop Shadow
Blend Mode: Multiply
Opacity: 75%
Angle: 0 degrees
Distance: 0
Spread: 45
Size: 8
11. Repeat the jagged look for the right
side of the board.
12. Link all layers except for the background layer, and choose Layer, Merge
Linked.
13. Let’s bind the two boards with a rusty iron, er, binder. First, create a new
layer.
14. On the new layer, use the Rectangular Marquee tool to create a selection
near the left end that’s slightly thicker than the two boards combined.
15. Fill the selection with the Rusted Metal texture.
16. Apply a drop shadow to the binder with the same settings as before (see
Figure 8.203).
17. On a new layer above the binder, add two rusty rivets using the Rivet proce-
dure outlined earlier in this chapter.
330
8.
Inorganic Texture Tutorials with Photoshop
Figure 8.203 Make
a rectangular selection
on a new layer and fill
it with Rusted Metal.
This will be the metal
that binds the two
boards together.
TIP
Later on, you can use the Burn
tool to further darken areas that
stand out, particularly the sharp
edges at the ends of the boards.
Binder slightly thicker
than both boards
Please purchase PDF Split-Merge on www.verypdf.com to remove this watermark.
18. Link and merge the rivet layer with the binder layer, then copy it to the right
side of the boards (see Figure 8.204).
19. Add and scale some dark text to the wood with a font of your choice. I
masked and spattered my text selection before filling it, as demonstrated ear-
lier in this chapter, to give it a weathered look.
20. Apply a contoured outer bevel to recess the text into the wood.
21. Rasterize the type and cut out a selection where the gap between the boards
exists (see Figure 8.205).
331
. . . And the Rest
Figure 8.204
Add rivets to the
binder, and copy the
binder to the right
side.
Figure 8.205
Add text to the wood
and apply a con-
toured outer bevel.
Split the text where
the gap exists
between the boards.
Please purchase PDF Split-Merge on www.verypdf.com to remove this watermark.
Now just add some finishing touches to your work. In the image shown in Figure
8.206, I put the sign on the stone wall we made a while ago, then added some drip-
ping-rust effects from the iron binders. Also, add a drop shadow for the entire sign
on a wall to give it depth, and use the Burn tool to burn out those annoying high-
lights everywhere.
Glass
Doing the actual texturing for glass is very simple if you think of glass in terms of
alpha transparency, dealing strictly with a grayscale range. Pure black represents
100% transparency, whereas pure white is 100% opaque. For instance, Figure 8.207
shows a texture with a linear grayscale gradient applied, and how it would look
when rendered in the game’s engine. Notice that behind the window you can see
objects, but things get more opaque towards the bottom.
332
8.
Inorganic Texture Tutorials with Photoshop
Figure 8.206
The completed wood
sign on the stone
wall.
Figure 8.207 A
grayscale gradient
texture applied to a
window. Notice that
the window becomes
more transparent
towards the darker
end.
Please purchase PDF Split-Merge on www.verypdf.com to remove this watermark.
A typical window, for example, would be completely transparent (all black), featur-
ing very light gray streaks to represent the reflection of light. Let me show you a
quick one:
1. Start a new 512×512-pixel RGB image.
2. Fill the background with pure black (hex# 000000).
3. Create a new layer.
4. Use the Rectangular Marquee tool to make a small rectangular selection.
5. Fill the selection with pure white (hex# FFFFFF).
6. To skew the area for that “glass” look, choose Edit, Transform, Skew, and
skew the white area up about 45 degrees or so (see Figure 8.208).
7. Here’s where the transparency comes into effect. Adjust the opacity of the
layer to 10%. This opacity will correlate almost directly to the game engine’s
translation of transparency.
333
. . . And the Rest
Figure 8.208
Make a rectangular
selection and fill it
with white. Skew it for
that “glass” look.
Please purchase PDF Split-Merge on www.verypdf.com to remove this watermark.
8. Make a few other skewed rectangles and fill them with white; make sure
they’re all on the same layer. Overlap one or two for an added effect (see
Figure 8.209).
Decals
Decals are simply small images, usually coupled with an alpha channel, that are
placed on top of existing textured objects in a game. If you’ve ever blown some-
thing away that was near a wall, for instance, and seen blood or slime splatter all
over the place, those images were decals overlaid dynamically by the game’s engine.
A decal can also be a simple metal sign or something that needs to be placed any-
where.
The only thing special about these game assets is that they sometimes have trans-
parent sections to them, requiring a single color to represent transparency. The
channel that represents transparency is a parameter you need to find out—consult
the engine’s specifications. For instance, if you’re creating a decal for Half-Life
(using the Worldcraft/Hammer editors), the transparent color will be pure white
(hex# FFFFFF), whereas a decal in Unreal (using UnrealEd) will be medium gray
(hex# 808080). See Table 8.1 for what to think about when generating images that
have some sort of transparency, particularly for Half-Life, Unreal, and the Torque
engine. Note that levels in Torque may be created using the Worldcraft or
Hammer level editor.
334
8.
Inorganic Texture Tutorials with Photoshop
Figure 8.209
Adjust the opacity of
the white layer to
10%, making it see-
through. Notice the
effect it has on the
room’s window.
TEAMFLY
Team-Fly
®
Please purchase PDF Split-Merge on www.verypdf.com to remove this watermark.
The only other thing you should keep in mind when creating this stuff is what will
be the base material to which they are applied. You’ll be doing bullet holes here,
but not every hole will look good on every surface. Hence, it might be necessary to
make an arsenal of bullet-hole decals that can be put on a wide range of objects.
Bullet Holes
People (like me) make a big stink about this type of decal, when most of the time
it’s just a silly, feathered or splotchy black hole. One quick squirt with your
Airbrush tool will usually do the job, and the resultant texture is an overall 8×8
pixels. But, seeing as you’re an artist, you’ll want to look at it in more detail.
Bullet Holes on Metal, Inward
This is one of the two most common types of bullet holes: The lead has made a
penetrating entry mark that has curved the metal inward. Here’s how to create this
effect:
1. Start a new 512 × 512-pixel RGB image.
2. Fill the background layer with pure white (hex# FFFFFF). This will be the
alpha (transparency) channel (for the Half-Life engine).
335
. . . And the Rest
Ta b le 8.1
Game/engine Texture Type Transparency Color
Half-Life Decals White (hex# FFFFFF)
Half-Life Brush objects (catwalks, etc.) Blue (hex# 0000FF)
Half-Life Sprites Black (grayscale, where
hex# 000000 is 100% transparent)
Unreal Decals Gray (hex# 808080)
Unreal Brush objects Black (grayscale variable)
Unreal Sprites Black
Torque Decals none (uses Photoshop’s
transparency in .png format)
Please purchase PDF Split-Merge on www.verypdf.com to remove this watermark.
3. Start a new layer.
4. Enable Photoshop’s Snap and Grid features.
5. Select the Elliptical Marquee tool, and in its Options panel, type
20
in the
Feather field.
6. Create a circular selection in the middle of the image, about 350 pixels wide,
and fill it with the Basic Metal texture (see Figure 8.210).
7. Start another new layer. This is important, because you’ll be applying an
inner bevel to this to make the hole curve inward.
8. With the previous selection still active, choose Select, Transform Selection,
and scale the selection down about 100 pixels. It will help to hold down Shift
and Alt at the same time to make the selection scale down uniformly.
9. Press Enter to commit the change, and with the 20-pixel Feather option still
set, fill the selection with black (see Figure 8.211).
336
8.
Inorganic Texture Tutorials with Photoshop
NOTE
If you’re doing this texture for Unreal (or a similar
engine), fill the background layer with pure gray (hex#
808080). Make sure you check the engine’s specifica-
tions for alpha-channel colors for decals.
Figure 8.210 Fill a
feathered selection
with the Basic Metal
texture on a new
layer.
Please purchase PDF Split-Merge on www.verypdf.com to remove this watermark.
10. You should now have three layers; the top is the bullet hole, the middle is the
curved metal, and the bottom is the pure black background. To the top bul-
let-hole layer, apply an inner bevel. I set the Highlight Mode color to dark
yellow at a 90-degree light angle to give it some finesse (see Figure 8.212).
Style: Bevel and Emboss
Style: Inner Bevel
Technique: Chisel Soft
Depth: 500%
Direction: Down
Size: 20 pixels
337
. . . And the Rest
Figure 8.211
Reduce the selection
and feather-fill it with
near black on a new
layer.
Figure 8.212
Apply an inner bevel
to the bullet hole to
give it depth.
Please purchase PDF Split-Merge on www.verypdf.com to remove this watermark.
Soften: 5
Shading Angle: 90 degrees
Highlight Mode Color: dark yellow, hex# 8E8D34
If you want to see the results of this hole, just
fill the background layer with any metal mater-
ial to see the effects. To keep things more real,
modify the curved-metal layer (the middle
layer) to suit different types of metals. When
you’re ready to apply this texture as a decal,
you need to flatten the image and make it very
small. Check out Figure 8.213; these are multi-
ple holes on a sign applied in combination
with the Peeling Paint procedure.
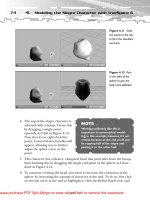
Bullet Holes on Metal, Outward
This is the second most common type of bullet hole. In this case, the shot was fired
from behind the metal, rupturing the metal outward. The actual physics involved
are like this: The bullet was traveling around the speed of sound. After piercing the
metal, the bullet’s speed would cause the metal to whip open, creating intense heat
and fatigue in a very short period of time. This might cause the metal to curl, dis-
tort, and discolor . . . so here we go:
1. Start a new 512×512-pixel RGB image.
338
8.
Inorganic Texture Tutorials with Photoshop
Figure 8.213
Bullet holes applied
to a sign in combina-
tion with the Peeling
Paint procedure.
TIP
Group a cluster of different-
sized bullet holes onto a decal
for shotgun effects. Dust the
areas between the holes using
a black airbrush to simulate
the blast powder.
Please purchase PDF Split-Merge on www.verypdf.com to remove this watermark.
2. Fill the background layer with pure
gray (hex# 808080).
3. Start a new layer.
4. Press D to reset the swatches.
5. Choose Filter, Render, Clouds.
6. Choose Filter, Render, Difference Clouds (see Figure 8.214).
7. Choose Filter, Blur, Gaussian Blur, with a radius of 4.0 pixels.
8. Choose Filter, Sketch, Chrome.
9. Adjust the levels by sliding the Highlights marker to the left. This will give
the texture the appearance of fatigued (or liquid) metal (see Figure 8.215).
339
. . . And the Rest
NOTE
I’m pretending this is a decal for
Unreal. If this were for Half-Life,I’d
use pure white (hex# FFFFFF).
Figure 8.214
Apply the Clouds,
then the Difference
Clouds filter to a new
layer.
Figure 8.215
Apply the Gaussian
Blur and Chrome fil-
ters. Adjust the levels
to make the texture
look like fatigued
steel.
Please purchase PDF Split-Merge on www.verypdf.com to remove this watermark.
Filter: Blur, Gaussian Blur
Radius: 4.0 pixels
Filter: Sketch, Chrome
Detail: 10
Smoothness: 0
10. With the fatigued-metal layer active, choose Edit, Transform, Scale, and scale
the image down evenly about 50% (see Figure 8.216).
11. Start a new layer.
12. Set your foreground color to black.
13. Using the Airbrush tool (with its brush type set to Soft Round 100 pixels),
spray a hole in the middle of the metal. (The paint should be on a separate
layer.)
340
8.
Inorganic Texture Tutorials with Photoshop
Figure 8.216
Scale the metal layer
down 50%.
Please purchase PDF Split-Merge on www.verypdf.com to remove this watermark.
14. Apply an inner bevel to this layer with a medium-gray Highlight Mode color
(see Figure 8.217).
Style: Bevel and Emboss
Style: Inner Bevel
Technique: Chisel Soft
Depth: 500%
Direction: Down
Size: 10 pixels
Soften: 0
Shading Angle: 90 degrees
Highlight Mode Color: medium-gray, hex# 757373
15. Select the metal layer (it should be the one in between the background and
the bullet hole).
341
. . . And the Rest
Figure 8.217
Spray an off-black
circle on a new layer,
and apply an inner
bevel to it.
Please purchase PDF Split-Merge on www.verypdf.com to remove this watermark.
16. Use the Lasso tool to create a jagged selection around the bullet hole. This
will be the pattern of the outwardly bent metal (see Figure 8.218).
17. Choose Select, Inverse. You’ll be deleting the outside portion of the metal
from this selection.
18. Now let’s chop up the edges of the selection. First, press Q to enter Quick
Mask mode.
19. With the mask active, choose Filter, Brush Strokes, Spatter.
20. Press Q to exit Quick Mask mode.
21. Press Delete to remove the outside metal (see Figure 8.219).
342
8.
Inorganic Texture Tutorials with Photoshop
Figure 8.218
Use the Lasso tool to
select a jagged bor-
der around the bullet
hole.
Figure 8.219
Spatter the selection
in Quick Mask mode,
then delete the outer
portion of the metal.
Please purchase PDF Split-Merge on www.verypdf.com to remove this watermark.
Filter: Brush Strokes, Spatter
Spray Radius: 10
Smoothness: 5
22. Apply a small drop shadow to the metal layer to give it some height off the
surface.
23. Use the Dodge tool to add highlights around the rim near the hole, and use
the Burn tool to darken the edges where the metal appears torn (see Figure
8.220). This will make the metal appear to be curving up and down.
Style: Drop Shadow
Blend Mode: Multiply
Opacity: 75
Angle: 90
Distance: 7
Spread: 0
Size: 5
And there you have it! You can merge the hole and metal layers, then scale every-
thing to size. Try filling the blue background layer with a metal texture to see the
end effect.
343
. . . And the Rest
Figure 8.220
Apply a drop shadow
to the metal, then
dodge and burn the
inside and outside to
give it a curved feel.
Please purchase PDF Split-Merge on www.verypdf.com to remove this watermark.