Tài liệu 2D Artwork and 3D Modeling for Game Artists- P11 ppt
Bạn đang xem bản rút gọn của tài liệu. Xem và tải ngay bản đầy đủ của tài liệu tại đây (3.42 MB, 50 trang )
This page intentionally left blank
TEAMFLY
Team-Fly
®
Please purchase PDF Split-Merge on www.verypdf.com to remove this watermark.
CHAPTER 12
Skinning
the Slogre
with Deep
Paint 3D
and
Photoshop
Please purchase PDF Split-Merge on www.verypdf.com to remove this watermark.
476
12.
Skinning the Slogre
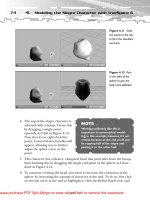
Figure 12.1
This stage in the
compound asset–
creation process.
C
ontinuing with the compound asset–design path, this chapter picks up where
you left off in Chapter 6, “U-V Mapping the Slogre with DeepUV” (see Figure
12.1). Here, you’ll use your newly developed U-V texture map to texture the slogre
in both Deep Paint 3D and Photoshop.
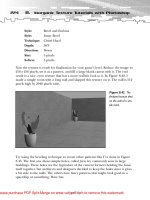
In this chapter, you’ll use Lars’ sketch of the slogre in combination with the 3D
mesh you created in Chapter 4, “Modeling the Slogre Character with trueSpace 6,”
to develop an eerie, otherworld-style skin texture for the character. Figure 12.2
shows the completed texture applied to the slogre.
In this chapter, you will
■
Dissect the slogre sketch and consider texturing possibilities.
■
Receive an overview of what texturing techniques you’ll be employing.
■
Link 3D Studio Max, DeepUV, Deep Paint 3D, and Photoshop to create a
fluid texturing operation.
■
Use Deep Paint 3D to assist your 3D texturing in conjunction with
Photoshop.
■
Texture the slogre using advanced texturing techniques.
Please purchase PDF Split-Merge on www.verypdf.com to remove this watermark.
Identifying
the Slogre’s Body
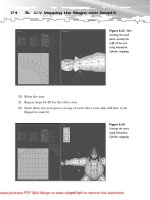
Before you start tossing paint onto your texture canvas, let me point out highlight
areas of the slogre’s body, just as I did with his RF-9, so that you have a somewhat
logical plan. Figure 12.3 maps out the areas I’m about to discuss.
1. Face/tusks. The sketch in Figure 12.3 shows the slogre as having large,
pursed lips that cover jagged teeth; I was thinking that the lips themselves
should be more reptilian, instead of big Mick Jagger–style ones. Other
sketches Lars drew also included a pair of uncomfortable-looking tusks or
fangs—nearly a half meter long—protruding from the sides of his mouth.
These will be easy; just apply an off-white, powdery texture like that of ele-
phant tusks. Two other areas in the front of the face of interest to me are the
nose, which I envision to be two small vertical slits (like a sea lion’s), and a
wrinkly forehead that seemingly has way too much fat present beneath it.
Notice, too, that the underside of the neck area appears much different from
the rest of the body—very reptilian, almost like the underbelly of a snake.
You can use some dodging and burning for the forehead to enhance the
fatty bulges, and apply shadowed bevels for the neck.
477
Identifying the Slogre’s Body
Figure 12.2
The texture you’ll be
making in this chap-
ter, applied to the
slogre.
Please purchase PDF Split-Merge on www.verypdf.com to remove this watermark.
2. Eyes. The location of the eyes in this sketch are a bit higher than I imagined;
I’d like to see them down on the side of the face, like the eyes on a fish or a
bird, making this character appear much more alien. The eyes themselves
should be a glossy, menacingly deep red, and slightly recessed into the head.
The ridge that’s underneath the eye in the sketch should be on top for shad-
ing from the intense heat generated by the twin-sun solar system from which
the slogre originates.
3. Mane. The hairs on the back of the slogre could have been done nicely on a
separate, perpendicular plane with a transparency channel, but I think I’m
going to opt for no hair at all. I’d rather see this creature look more reptil-
ian. The hump in this area might be a little more weathered since the suns
in his world beat down on it constantly, so you’ll make use of the Dodge tool
here.
4. Backpack. During my initial discussions with Lars about the look of this char-
acter, I envisioned him (the slogre, not Lars) carrying a pack of ammo wher-
ever he went. Now, however, I’m wondering how the hell he’s going to reach
around and nimbly remove a small pellet clip with half-meter-long claws! For
this reason, I neglected to model a backpack onto this character; besides, the
pack can always be modeled separately and attached by the game engine if
needed. (All you have to do is add an appropriate mounting dummy; see
478
12.
Skinning the Slogre
Figure 12.3 The
areas that are most
critical to the slogre.
Please purchase PDF Split-Merge on www.verypdf.com to remove this watermark.
Chapter 14, “Making The Slogre Game-Ready with 3D Studio Max and
Character Studio,” for more information.)
5. Body. I’m going to cover the entire body with a scaly green/red/orange base
texture, very much like the full-color image Lars provided (see the color-
plate section in the middle of the book). This is easily done with the Stained
Glass filter. I’ll also bevel the individual cells of this texture to raise it upward
and give it a nice rough feel. Some areas around the tail, gut, and middle are
folded with a fat/muscle composition; careful dodging and burning should
do the trick.
6. Arms and legs. The arms and legs will be textured in the same way as the
body, only you’ll deepen the shadows that define the edges of the muscles to
make them bulge more. The geometry of the slogre’s mesh will take care of
the rest.
7. Cuffs. These are the only inorganic objects on the slogre. You’ll apply a base
metal texture to them, and scratch them up a bit as needed. The metal
should be a nice, worn, tarnished
steel. (At first I pictured shiny
brass, but would he really have
that?)
8. Claws/nails. These will have a tex-
ture similar to that of the tusks.
You’ll define the toenails by draw-
ing them with a lasso selection and
filling them with the off-white tex-
ture, then possibly applying inner
bevels to raise them a bit.
Thoughts on Texturing
As I mentioned in Chapter 2, “Getting Ready to Model: Concept Art,” I get lots of
my ideas from animals that live on Earth; you probably remember that much of the
slogre’s appearance derives from the extinct sloth. I also get lots of ideas for textur-
ing from watching movies and reading books (more so from movies). Some movies
I considered while creating the sloth include
■
The Alien series. The aliens’ oblong heads gave me insight for the slogre’s
head.
479
Thoughts on Texturing
NOTE
Feel free to try texturing this
model (or your own) however you
want. In fact, I’d really like to see
your own texturing attempts at this
model put mine to shame! If you
like, you can e-mail your attempts
to me at
Please purchase PDF Split-Merge on www.verypdf.com to remove this watermark.
■
The Predator series. These movies helped me envision the slogre’s skin tex-
ture, size and strength, and claws.
■
Relic. The massive fangs the beast in this movie used to grip its victims before
yanking out their hypothalamuses was what I envisioned for the slogre’s tusks.
Also, the size and structure of the beast’s body is very similar to the slogre’s.
■
Dreamscape. At the end of this movie, the antagonist transformed himself
into a hideous, huge snake monster; the underside of the slogre’s neck is pat-
terned after the underside of this monster’s neck.
■
The Jurassic Park series. The dinosaurs’ skin in these movies is of particular
interest to me; mottled green/red/brown, and rough like that of a rhinoc-
eros, it looks much like the skin of a reptile—even though dinosaurs were
warm blooded. The claws and fangs of the larger Rexes interest me too—off-
white, dulled and pitted from use, and stained near the skin and gum lines.
■
Return of the Jedi. Remember the part where Luke is dumped into the pit at
Jabba’s lair? The pit contained a Rancor—a five-meter tall beast with similar
qualities to your slogre model, particularly in the face.
Texturing the Slogre
I like to make great use of many of Photoshop’s filters and styles to lay the ground
work for my textures. The organic stuff, however, needs a bit more traditional art-
work applied—mostly through dodging and burning the base texture to enhance
the muscular and fatty features of the animal. Other than that, most of what I’ve
covered in previous texturing chapters should suffice.
Let’s kick this into gear just like you did in Chapter 11, “Skinning the RF-9 Plasma
Gun with Deep Paint 3D and Photoshop,” by linking the model to your painting
programs and applying a test U-V map. The linking steps presented here are nearly
identical to the ones in the previous chapter.
Step 1: Linking the U-V Map to
Deep Paint 3D and Photoshop
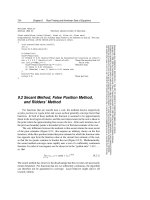
The U-V map and texturing portions of this project are closely related and, in your
case, rely on four separate programs all inter-linked with one another, as shown in
Figure 12.4. With enough system memory, you can efficiently work with all these
programs open, and bounce back and forth between them as you model, U-V, and
texture.
480
12.
Skinning the Slogre
Please purchase PDF Split-Merge on www.verypdf.com to remove this watermark.
In Chapter 5, “U-V Mapping the RF-9 Plasma Gun with DeepUV,” you installed the
demo version of DeepUV (if you didn’t already have that program) as well as the
necessary Max plug-ins. For the remainder of this chapter, you’ll also use Deep
Paint 3D, also from Right Hemisphere, the demo of which is located in the
Programs section on the CD-ROM. Install that now (if you don’t already have it), as
well as the necessary plug-ins for both Max and Photoshop. If you need help with
the installation of the Deep Paint 3D demo, visit
/>Once everything’s installed, the first thing you need to do is bounce your U-V map
from Max (or DeepUV) over to Deep Paint 3D. (Mind you, this is only one way to
do this kind of work; you could just as easily work between 3D Studio Max and
Photoshop. I simply want to expose you to a great work structure that many other
game artists employ.) Start by opening up your U-V-mapped slogre in 3D Studio
Max. This should be the file you saved in Chapter 6 (if you don’t have it, open the
file slogre_mapped.max, located in the Chapter 12 Data section on the CD-ROM).
Then do the following:
1. With the U-V mapped version of the slogre loaded in 3D Studio, click on the
Utilities tab at the top-right of the screen.
2. Click on the Right Hemisphere button to expand the list. This should
include two sections, one for DeepUV and one for Deep Paint 3D.
481
Texturing the Slogre
Figure 12.4
The dynamic link
and work structure
between the U-V and
texturing programs
you’ll be using.
Please purchase PDF Split-Merge on www.verypdf.com to remove this watermark.
3. Make sure your slogre
model is selected and
click the Paint Selection
button in the Right
Hemisphere utility panel
(see Figure 12.5). This
will fire up Deep Paint 3D
and begin the U-
V–importing procedure.
482
12.
Skinning the Slogre
NOTE
Even though DeepUV is a linked part of the
scheme in Figure 12.4, you’ll be skipping it for
now.You can always bring your model into
DeepUV and click File, Export, Paint with
Deep Paint 3D; that way, you can make U-V
adjustments, if necessary, while you work.
NOTE
You may have to manually start Deep Paint 3D (and/or
DeepUV if you want that open as well) if you get a Couldn’t
Connect error when trying to paint the selection. If you still
can’t link Max with Deep Paint, consult Right Hemisphere’s
technical support at />Figure 12.5 Click
on the Paint Selection
button in the Right
Hemisphere section
of the Utilities panel.
The Paint
Selection button
Please purchase PDF Split-Merge on www.verypdf.com to remove this watermark.
4. A Material Import screen pops up (see Figure 12.6); in it, Deep Paint 3D asks
you what material size you want your texture to be and what channel to
assign it to. The panel is broken into two sections: The top is the mesh object
with U-V–mapping coordinates, and the bottom is the untextured material
that Max automatically assigned when you did your U-Ving. Click the mater-
ial name itself (mine is New Material), then click the Edit/Resize button.
5. Change the X and Y dimensions of the texture map to 1024 each. This will
make a huge texture map so you can do detailed work (you’ll shrink it down
later on).
6. Uncheck the Start in Projection Mode option. Projection mode enables you
to paint directly on a model, regardless of distortions or other arrangements
of the U-V map, as though the U-V are 1:1 with the mesh vertices. (This is
very useful for painting along seams!)
7. Click OK, and give the map a name (I called mine slogreSkin). Click OK
again.
8. Click on the Channels button.
9. The material must be placed in a shader channel so the program knows how
to display it. The first item on the list is the letter “C” for “Color.” Click it.
10. A small menu pops up; choose Nothing. This adds a New Blank Map entry in
the list.
483
Texturing the Slogre
Figure 12.6
The Material Import
screen pops up, ask-
ing you about the
properties of your
new texture map.
Please purchase PDF Split-Merge on www.verypdf.com to remove this watermark.
11. Click OK once, and then again in the Material Import screen, and your slo-
gre model will load in a 3D painting screen (see Figure 12.7).
12. your slogre model is loaded into Deep Paint 3D; you can now manipulate
and paint it with the tools in the toolbox as shown in Figure 12.7. The tools
are very similar to the ones in both DeepUV and Photoshop, and are very
easy to use. The great thing about Deep Paint 3D is you can actually paint
directly on a model, going across U-V seams and everything! However, you
need to do your detailed artwork within Photoshop. To do so, click the
Export Materials to Photoshop button at
the top of the screen (see Figure
12.8). This sends the current U-V map
and material over to Photoshop 6 or
higher (that is, if you’ve properly
installed the plug-ins that came with
the Deep Paint 3D demo).
484
12.
Skinning the Slogre
Figure 12.7
The Deep Paint 3D
painting interface.You
can dynamically
manipulate and paint
the slogre here.
NOTE
Notice that there is a Send
Materials to 3D Application but-
ton at top as well; click this to
update your texturing back to
3D Studio Max while you work.
TEAMFLY
Team-Fly
®
Please purchase PDF Split-Merge on www.verypdf.com to remove this watermark.
With Photoshop linked and fired up, you’ll get a new 1024×1024 canvas with two
layers. (Open up the Layers palette and you’ll see.) The top layer represents the U-
V mesh that you made in DeepUV; this is just a guide for you to paint with, and can
(and will) be deleted when you’re finished. Because this map is so big, you’ll have
to zoom into it to see the fine details. I changed the color from that default blue to
black so it’s easier to see (see Figure 12.9).
485
Texturing the Slogre
NOTE
Photoshop 7 users: I’ve found that if you haven’t had Photoshop 6
installed on your system, the Deep Paint 3D plug-in might not work.
To r esolve this problem, you need to set a registry key in
the Registry Editor (Start, Run, Regedit).The plug-in key directory is
listed under \HKEY_CURRENT_USER\Software\Right
Hemisphere\Deep Paint 3D\Directories\. In this area, you should
make sure the keys are set to point to the proper plug-in folder
where Photoshop 7 is installed. I’ve also saved a deeppaint.reg file
on the CD-ROM that you can double-click to install, but my soft-
ware installation folders listed in this key may be different from
yours. It might be best to manually browse the Registry Editor and
adjust the keys yourself, or contact Right Hemisphere’s technical
support for help (see />Export to
Photoshop
Figure 12.8
Export the U-V map
and material to
Photoshop.
Please purchase PDF Split-Merge on www.verypdf.com to remove this watermark.
The bottom layer of the image is the actual
painting layer you’ll be working on. Make sure
you don’t change the name of or delete this layer!
You’ll need to send this texture back over to
Deep Paint 3D, and it uses this base layer (called
Base Layer: Color) when sending and fetching
the texture. If this layer is renamed or deleted,
you’ll have to start all over in Deep Paint 3D.
Fixing U-Vs: Add a Checkerboard Map
Even though you did a careful job of unwrapping and organizing the U-Vs in
DeepUV, there’s still a chance that the isolated U-V portions of the texture map
may be inverted (like looking in a mirror—not a big deal for the slogre character);
or that texture coordinates crossed (resulting in smearing), overlapped (causing a
duplication of texture), or not properly relaxed (causing bloating or shrinking of
the texture). I can almost guarantee that at least one of the aforementioned scenar-
ios exists in your setup, but it’s not a huge ordeal; it just means you have to go back
to DeepUV and fix them.
One outstanding way of detecting problems before you begin the skinning process
is to set up a checkerboard map. By simply filling your texture map with a small
checkerboard pattern, and then applying the texture to the model, you will have a
486
12.
Skinning the Slogre
Figure 12.9
The new texture can-
vas courtesy of Deep
Paint 3D.
TIP
If you need help with
Photoshop, or are otherwise
new to the program, see the
Photoshop tutorials located
on this book’s CD-ROM.
Please purchase PDF Split-Merge on www.verypdf.com to remove this watermark.
much easier time checking for errors. I like to fill the individual areas of my tex-
ture map with differently colored patterns to make each of the U-V sections clear. I
also like to add some text to the area, which not only helps me to identify that area
but will display an inverted map area as well—if one exists, the text comes out
backwards.
To see what I mean, first fill the individual U-V sections of the Base Layer: Color
layer on the texture map. I’ve saved eight checkerboard patterns for you—just load
the checkerboard.pat file (located on the CD-ROM) in Photoshop. Then use the
Lasso tool to create selections around the U-V areas, and fill the selections with the
different-colored patterns using either Edit, Fill, or the Paintbucket tool (Figure
12.10 shows my map). Finally, use the Type tool to position text on the separate
U-V areas, or put any non-symmetrical symbol on them, so that if any particular
area happens to be inverted you’ll be able to tell instantly.
Next, you need to transfer the material back to Deep Paint 3D. Do this either by
clicking Filter, Right Hemisphere, Material to Deep Paint 3D, or by going back to
Deep Paint 3D and clicking on the Fetch the Material from Photoshop icon at top.
You might get a warning in Deep Paint saying that the operation is undoable; just
click OK.
Now, check for any signs of smearing, overlapping, and/or unevenness. The most
noticeable one is the very front of the face, where the density of the checkerboard
map is less than its surroundings. This indicates that you should go back to
487
Texturing the Slogre
Figure 12.10
Fill the separate U-V
areas with different-
colored patterns.
Please purchase PDF Split-Merge on www.verypdf.com to remove this watermark.
DeepUV and select the points in that area and relax them, or scale them up a bit
so the greed for the material map is even in that section (greed is just the way
DeepUV gives relaxing preference to certain texture points over others). Because I
relaxed nearly all portions of the U-V map in DeepUV, I don’t see any other prob-
lems with smearing (see Figure 12.11).
Step 2: Texturing the Head
Once you’ve fixed your U-V map and
your material is re-imported back to
Deep Paint 3D and Photoshop, you can
close DeepUV. You’ll be doing the tex-
turing in Photoshop, and occasionally
sending it back to Deep Paint to see
how it looks, so those are the only two
programs you really need to have active.
488
12.
Skinning the Slogre
Figure 12.11
Send the checker-
board material back
to Deep Paint 3D,
and check for signs
of smearing, overlap-
ping, or unevenness.
Face area not
even with rest
of head
CAUTION
If you close Deep Paint 3D while it is
linked to Photoshop, it will remove
the texture map from Photoshop,
thereby destroying your work! If you
need to shut down Deep Paint 3D
and continue texturing, first save the
texture map in Photoshop, then
close down Deep Paint 3D.
Please purchase PDF Split-Merge on www.verypdf.com to remove this watermark.
Create a Base Texture
Before you proceed with creating a base texture in Photoshop, adjust the resolu-
tion of the image by choosing Image, Image Size, and changing the Resolution
parameter from 72 to 1024. Make sure the dimensions of the image are 1024×1024
as well, because the resolution is linked to those settings. I’d like to create a basic,
scaly skin texture first; one that resembles sort of a dinosaur skin by doing the fol-
lowing:
1. Fill the Base Layer: Color layer (from now on, I’ll refer to this as the back-
ground layer) with the Clouds filter, using a mix of dark yellow-green (try
hex# 415C07) and dark brown (say, hex# 4F3105).
2. Apply the Noise filter, about 5%
monochromatic.
3. Choose Filter, Texture, Stained
Glass. Crank the settings for this
filter all the way down so you get
a nice scaly texture for your slo-
gre (this filter at this resolution
will take a while to work—mine
took over two minutes).
4. Choose Image, Adjust, Variations,
and change the color scheme to a
darker, redder mix. Figure 12.12 shows the result of this operation, after I
had switched back to Deep Paint 3D and clicked on the Fetch Material from
Photoshop button to apply the new texture to the model.
489
Texturing the Slogre
NOTE
If you don’t have anything set up to
this point and want to start fresh here,
open the slogre.dp3 file, located in
the Chapter 12 Data section on the
CD-ROM, in Deep Paint.
CAUTION
Don’t delete the bottom base
layer! Deep Paint 3D uses this
layer when sending and fetch-
ing the texture map back and
forth with Photoshop.
TIP
If you’re having trouble using the fil-
ters or other tools and operations
native to Photoshop, read Chapter 8,
“Inorganic Texture Tutorials with
Photoshop.” Also, there’s a
Photoshop tutorial on the CD-ROM
that accompanies this book.
Please purchase PDF Split-Merge on www.verypdf.com to remove this watermark.
Filter: Texture, Stained Glass
Cell Size: 2
Border Thickness: 1
Light Intensity: 0
5. Create a displacement map so you can selectively bump the surface of the
individual sections of the slogre’s body. To do so, press Ctrl+A to select the
entire background layer—which should contain the cell pattern you just
made—and then press Ctrl+C to copy it. Use the Channels palette to create
a new channel, and paste the copy of the entire background layer into the
new channel with Ctrl+V. Adjust the levels to make the pattern a bit brighter
and crisper.
6. According to the U-V layout, nearly all the body parts are oriented normally
(up and down), but the body portion at the top right is upside down. You’ll
have to render that one separately. To begin, switch to the background layer,
and use the Lasso tool to select the upside-down body portion.
7. Choose Select, Inverse; your selection should now encompass the entire
background layer minus the body.
8. With the selection active, choose Filter, Render, Lighting Effects, using the
new Alpha 1 channel you created as a displacement map (see Figure 12.13).
490
12.
Skinning the Slogre
Figure 12.12
Using the Stained
Glass filter on a mot-
tled green/red/brown
mix makes for great
scales.
Please purchase PDF Split-Merge on www.verypdf.com to remove this watermark.
I used a Directional light type, pointing at a slight angle from top-right to
bottom-left. Play around with this filter to get the results you want; you’re try-
ing to achieve a pitted, scaly look.
9. With the selection still active, choose Select, Inverse to reselect only the
upside-down body portion. Apply the Lighting Effects filter a second time,
but invert the direction of the light source. This will make the bump map
render properly (see Figure 12.14).
491
Texturing the Slogre
Figure 12.13
Render the back-
ground layer using its
copy as a displace-
ment map.
Figure 12.14
Render the body por-
tion of the U-V map,
this time with the light
source inverted.
Render this selection
upside-down
Please purchase PDF Split-Merge on www.verypdf.com to remove this watermark.
Make a few adjustments to this base texture, such as clicking Image, Adjust,
Hue/Saturation, and desaturating it so the colors don’t burn a hole in your eyes. A
slight levels adjustment would be good too, just to sharpen it up and tone it down.
(You’ll almost always make last-minute adjustments like these to get your textures
looking good!)
Make the Eyes
The slogre character’s eyes really make this creature look evil. To bestow shiny, red
snake eyes upon your own beast, do the following:
1. Create a new layer.
2. Using the Elliptical Marquee tool, create
an elliptical shape.
3. Fill the shape you just created with the
Clouds filter, using two reddish colors of
your choice (see Figure 12.15).
4. Create a new layer on top of the red-eye layer.
5. Make another elliptical selection, but this time in the shape of a snake’s
pupil.
6. Fill the new selection with black, and apply an inner-bevel style to the layer
(see Figure 12.16).
492
12.
Skinning the Slogre
Figure 12.15 Start
making the eyes by fill-
ing an elliptical selec-
tion with a Clouds mix
of red.
NOTE
The eye you’re making now
should be huge.When you’re
finished, you’ll scale it down
and position it as needed.
Please purchase PDF Split-Merge on www.verypdf.com to remove this watermark.
7. Press Ctrl+E to merge the pupil layer with the eye’s layer.
8. Ctrl+click the newly merged layer to reload the eye selection, and start a new
layer.
9. With the eye-shaped selection on a new layer, apply a white-to-black radial
gradient (see Figure 12.17) to simulate the curvature of the 3D eyeball.
10. In the Layers palette, change the gradient layer’s blending mode from
Normal to Color Dodge (dodging will turn the gradient into more of a light-
ing source that fades from the darker to the lighter areas). Notice in Figure
12.18 how the gradient makes a cool lighting effect on the eyeball layer
below it; the eyeball looks shiny and 3D.
493
Texturing the Slogre
Figure 12.16
Create a snake-eye
pupil on another layer
and apply an inner
bevel to it.
Figure 12.17 Fill the
eye shape with a white-
to-black radial gradient
on another layer.
Please purchase PDF Split-Merge on www.verypdf.com to remove this watermark.