Tài liệu 2D Artwork and 3D Modeling for Game Artists- P13 docx
Bạn đang xem bản rút gọn của tài liệu. Xem và tải ngay bản đầy đủ của tài liệu tại đây (3.35 MB, 50 trang )
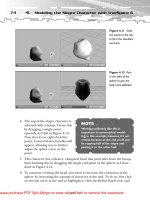
8. Another way to adjust the weighting of the vertices is by using the Paint
Weights option in the Skin modifier’s envelope rollout. For instance, press F3
to enter wireframe mode, and look at the tail area; I’d like to have the pelvis
bone take control of this area, since the tail doesn’t do much else aside from
following the pelvis in motion. With the Paint Weights button active, click
the ellipse button to bring up the Painter Options screen. Here you can
adjust the brush size and strength, along with about a billion other parame-
ters. Change both the Max Strength and Max Size to 0.2; doing so will make
the painting brush a small crosshair with not so much strength. Then, with
the pelvis bone selected, just click and drag over the tail area to paint the
weighting onto the vertices (Figure 14.40).
The Paint Weights option is handy if you’re positioning bones and notice weird or
improper bulges between bones. By painting on these affected areas, you’ll dynami-
cally see the bulges shift around accordingly. Continue adjusting weights all over
your model until you’re satisfied, then save your scene as a .MAX file.
574
14.
Making the Slogre Game-Ready
Figure 14.40
Use the Paint
Weights option in the
Envelope rollout to
manually paint the
vertices of the tail to
be included with the
Pelvis bone.
TEAMFLY
Team-Fly
®
Please purchase PDF Split-Merge on www.verypdf.com to remove this watermark.
Adding and Manipulating
Dummy Nodes
You’ll need to create several dummy objects to represent those critical game hooks
I mentioned in the previous chapter. Dummies are simply inert boxes you create,
label, and link to specific parts of the character’s body so that the game engine
knows where to place items like weapons, backpacks, and so on. Some common
ones for Torque are
■
A mounting location called
Mount0
. This is the primary weapon-mounting
location on all characters; for the slogre, it will be on the hand of your
choice. Required on all character models.
■
Secondary mounting locations, called
Mount#
, where
#
is a successive number
1, 2, and so on. These locations represent other mounting areas, so that the
slogre can attach items like backpacks, other weapons, and vehicles.
Mount1
and
Mount2
are required dummies to be located just outside of the slogre’s
back.
■
A dummy called
Eye
. This is located and oriented directly in front of the
character’s face.
Eye
represents the camera through which the player sees the
game world when playing the game, using the character model as his or her
own player mesh. For bots (non-player characters), this might not be
required. Consult your game engine’s requirements.
■
A dummy called
Cam
. This is the camera mounting location, which can repre-
sent several things. For instance, when a player switches to a flying mode, in
which he is no longer manipulating a character mesh (such as in post
mortem, which is when you fly around the game world undetected until you
re-spawn), the camera uses
Cam
to see the world. Some programmers use
Cam
to circle around a player who has been killed, as is the case in Unreal. For the
Torque Engine, this dummy is attached to another dummy called
Unlink
.
■
Detail objects, called
Detail#
, where
#
defines the level of detail. Required for
all models, you must have at least one detail dummy to represent the base
polygon count of the character’s mesh. Level of detail (LOD) is critical for
character meshes, because having a game full of 3,000+ characters walking
around at all distances would be a complete waste of polygons. (See the LOD
section ahead for details on creating, er, details.)
■
Vehicle dummies, such as
Ski0
and
Ski1
—which are located near the charac-
ter’s calves—enabling the character to mount or sit in a vehicle.
575
Adding and Manipulating Dummy Nodes
Please purchase PDF Split-Merge on www.verypdf.com to remove this watermark.
■
The character can also have
Light#
dummies to allow for a lighting source
for special situations like self-illumination and so on.
Some games and their engines might require additional mount and sprite loca-
tions, such as an
ExplodePoint
location for the programmers to hook a death explo-
sion sequence onto. It’s up to you to let the programmers know what will be
attaching where, and what it will be called.
For now, your slogre really only needs the
Detail2
,
Mount0
,
Mount1
,
Mount2
,
Eye
,
Cam
,
Ski0
, and
Ski1
dummy objects, plus another one called
Unlink
(for death camera
purposes). Here’s what to do:
1. In the Create tab of the Command Panel, click on the Helpers button (it
looks like a tape measure).
2. In the Object Type section, click the Dummy button.
3. In an orthogonal view, click and
drag to create a small dummy
box (see Figure 14.41), and posi-
tion it in one of the slogre’s
hands, just in front of the palm
and between the thumb and first
finger. This is where the slogre
will hold the weapon.
4. Type
Mount0
in the field in the
Name and Color section.
576
14.
Making the Slogre Game-Ready
NOTE
The size of the dummy is irrelevant;
the Torque engine simply looks for a
dummy object with the name Mount0
for a weapon mounting location, and
references the dummy’s axes for
weapons location and alignment.
Figure 14.41 Create a
dummy object named
Mount0
and position it in
the slogre’s hand.This will
represent the mounting
location for weapons.
The Helpers button
The Dummy button
Please purchase PDF Split-Merge on www.verypdf.com to remove this watermark.
5. You need to align the axes of the
Mount0
dummy just like you did earlier with
the slogre’s axes. In this case, however, the y axis must point in the direction
you want the weapon to point. To begin, click on the Hierarchy tab in the
Command Panel, then click the Affect Pivot Only button.
6. Use the Select and Rotate tool to rotate the axis so that the y axis points
toward the slogre’s fingers (see Figure 14.42). Use the Angle Snap tool,
located at the bottom of the screen, to constrain this rotation in degree
increments. With the y axis pointing forward, the weapon’s grip will mount
to it and face in the same direction.
7. Create and position two more dummies,
Eye
and
Cam
; these should be placed
right between the slogre’s eyes and a few inches ahead of them, respectively.
8. Align the pivot point so the y axes for both are pointing forward, with the z
axes pointing up.
9. Create and position two dummies,
Mount1
and
Mount2
. Both of these should
be located at the slogre’s back, between the shoulders.
10. Create and position another two dummies,
Ski0
and
Ski1
. The first should be
located behind the left calf bone, and the second in the same location
behind the right calf. Position the y axes so that they face forward.
11. Create a final dummy called
Unlink
. Just position it on the floor between the
slogre’s feet.
577
Adding and Manipulating Dummy Nodes
Figure 14.42 Align
the pivot point (axes)
of the dummy object
so the y axis points
in the direction that
the weapon should
point.
Please purchase PDF Split-Merge on www.verypdf.com to remove this watermark.
Linking the Nodes
Now that you’ve created all of the basic nodes required to make the slogre work in
Torque, you need to link them to the proper locations in the Schematic View. Open
the Schematic View and link each node as follows:
■
The
detail2
dummy must be linked to the Bip01 node (at the very top of the
hierarchy).
■
The
Mount0
dummy must be linked to the Bip01 Right Hand.
■
The
Mount1
and
Mount2
dummies must be linked to Bip01 Spine2.
■
The
Eye
dummy must be linked to the Bip01 Head.
■
The
Unlink
dummy must be linked to the Bip01 node. Then, the
Cam
dummy
must be linked to the
Unlink
dummy.
■
The
Ski0
and
Ski1
dummies must be linked to the Bip01 Left Calf and Right
Calf, respectively.
Finally, the Bounds (bounding box) must be linked to the Bip01 node (at the top
of the hierarchy). Figure 14.43 shows the exploded schematic view you should
have.
578
14.
Making the Slogre Game-Ready
Figure 14.43 The
properly attached
nodes to the biped.
Please purchase PDF Split-Merge on www.verypdf.com to remove this watermark.
Create a Root Pose
When you export the slogre to the Torque engine, he’ll need a default pose (unless
you want him standing with his arms spread wide!). Create a root pose simply by
manipulating and moving his arms and legs so he’s in a position of your liking. In
Figure 14.44, I modified the biped in the slogre’s mesh so he looks ready to hold
and fire the RF-9 plasma gun.
Exporting and Viewing
the Slogre in Torque
Exporting with the DTS Exporter utility in the Utilities panel is a bit different this
time than it was earlier in this chapter. Go to the exporter and select Whole Shape.
Make the name player.dts, and save the file to the
\RealmWars\rw\data\shapes\player\ area instead. Be sure to have your player.cfg file
in the same directory, along with the 3D Studio Max .MAX file and the
SlogreSkin.png skin file. The difference in exporting this time is that you need to
create the .DTS object in the existing \player\ folder. Navigate over to that folder
579
Exporting and Viewing the Slogre in Torque
Figure 14.44
Create a root pose
by moving the bones
of the slogre.
Please purchase PDF Split-Merge on www.verypdf.com to remove this watermark.
and you’ll see over 30 different .DSQ files, which are Torque’s animation sequence
files. These were also generated using the DTS Exporter utility. These files will ani-
mate the slogre’s bones structure during game play.
The exporter might take a bit longer than it did the last time, as there is a lot to
process. Remember to look at the dump.dmp file if anything goes wrong, or if an
animation sequence does not work properly. Sometimes when a certain animation
sequence won’t work, you need to adjust the .CFG file and include or exclude node
or bone labels.
Once the model is loaded using the realmwars.exe -show utility, click on the
Thread Control button. This will load a Thread Control panel that you can use to
view the different animation sequences being applied to the bones in the slogre
(see Figure 14.45). Make sure that the animations work or you’ll have problems
using the slogre during the game!
580
14.
Making the Slogre Game-Ready
Figure 14.45
Use the Thread
Control button in the
Torque -Show utility
to view the animation
sequences driving the
slogre.
Please purchase PDF Split-Merge on www.verypdf.com to remove this watermark.
Levels of Detail (LODs)
Here’s the last thing you can do to optimize the mesh in the game, just as I said in
the previous chapter. The levels of detail for the slogre represent the varying mesh
densities the character will have in relation to the distances of the other players. It’s
important to have these levels of detail, as it would bog down the game engine to
unnecessarily process a 3,000-polygon model that a player can’t see from afar. In
Chapter 13 I showed you how to make two LODs; here I’ll show you how to make
two as well.
1. In the Schematic View you should have the
detail2
and
Slogre2
objects; they
currently should not be linked to anything. Just link the
detail2
dummy
object to the Bip01 object (the root of the biped itself). This will represent
the lowest level of detail—the higher the number, the higher the detail. Of
course, these are just reference markers for the game engine to use.
2. With the
detail2
object still selected, you need to create another dummy
object representing the highest level of detail. The easiest way to do this is by
clicking Edit, Clone on the top menu bar. In the Clone Options dialog box,
make sure Copy is checked. For the name, type in
detail64
and click OK.
The number is arbitrary, but it’s good to keep the trailing number large, so
you know that the larger the number, the higher will be the mesh density.
Now look back to the Schematic View, and notice that the new detail marker
has been added and attached to the Bip01 object, as it is a clone.
3. With the detail markers in place, you need to create a single level of detail
mesh using the MultiRes modifier, just as you did for the RF-9 in Chapter 13.
First select the
Slogre2
object in the Schematic View, then create a clone of
the mesh. Just click Edit, Clone, and name the new copy
Slogre64
. This will
represent the highest level of detail.
4. Finally, reselect the
Slogre2
object. Then, in the Modifier panel, apply a
MutliRes modifier to this mesh. In the MultiRes rollout, click Generate.
Change the Vert Percent parameter to 50.0; this will reduce the polygon
count to 50% of the original mesh, or in this case about 1500 faces—not
bad, considering there’s not much loss in detail. This represents the lowest
level of detail that will be seen by other players from afar. You should now
have two slogre meshes in your scene (
Slogre2
and
Slogre64
) that are refer-
enced, by the Torque engine, by the detail dummy markers
detail2
and
detail64
, respectively. Be sure that you can view these two detail meshes in
the RealmWars.exe -show feature, using the Details button.
581
Levels of Detail (LODs)
Please purchase PDF Split-Merge on www.verypdf.com to remove this watermark.
Last Note on
Other Game Engines
You’re probably wondering about using the RF-9 and Slogre models in other
games. Most of the information about creating meshes, skinning them, and setting
them up for use in the Torque engine apply to other games like Half-Life, Quake, and
Unreal. All that’s really necessary is to obtain the 3D Studio Max plug-ins for those
games in order to export your models and change the naming of an object or two,
add a dummy, and so on. I decided to avoid getting into any detail on those
engines, as getting permissions to use plug-ins, screen shots, and so on from com-
panies like that is very difficult, not to mention time-consuming. GarageGames
were kind enough to allow me to use Torque, an excellent 3D game engine, and
coupled with the fact that it’s so affordable ($100), what could be better!
Remember, for that small price you’re not just getting a game, but an entire game
engine whose code you can modify to create your own game, including your own
personalized graphics. Anyway, for other game engines, just get on the Web and
download their SDK (software development kit) for which you want to develop; I’m
sure the kits (not the engines) will be free of charge.
See Appendix E, “Related Websites and Links,” for information on popular game
engine sites. The SDKs are usually free for download, and contain the plug-ins and
instructions necessary to get you rockin’ and rollin’.
Summary
The last stage in preparing a character mesh for a video game is usually the most
time consuming—installing a skeletal system to animate the mesh itself. Applying a
texture to your mesh, installing biped systems, adjusting skin envelopes, setting up
dummy objects for game hooks, and adding levels of detail are just the basics of
readying your character for a game engine. Most games work in such a similar
manner, and it’s only a matter a making a few adjustments to get your model to
work in them. This chapter covered these foundations in detail.
582
14.
Making the Slogre Game-Ready
Please purchase PDF Split-Merge on www.verypdf.com to remove this watermark.
PART FIVE
Bringing it
All Together
Please purchase PDF Split-Merge on www.verypdf.com to remove this watermark.
15 Bringing Your Work into
the Torque Game Engine
TEAMFLY
Team-Fly
®
Please purchase PDF Split-Merge on www.verypdf.com to remove this watermark.
CHAPTER 15
Bringing
Your Work
into the
Torque
Game
Engine
Please purchase PDF Split-Merge on www.verypdf.com to remove this watermark.
I
decided to focus on developing models for the Torque engine because it is one of
the most affordable 3D game engines around. Indeed, GarageGames.com offers
this engine for a mere $100; using it, you can reprogram and develop your own
publishable game. So unless you can shell out the $50,000–$300,000 required for
high-end game engines like Quake and Unreal, I think Torque will do.
In this chapter you will
■
Use the Torque game engine demo to see your character, weapon, and tex-
tures in live gaming action.
■
Learn how to create and manipulate the terrain.
■
Texture the landscape with your own images.
■
Add and manipulate your own game objects.
■
Have fun playing with your own game art creations!
Playing Realm Wars Using
the Slogre and RF-9
The Torque demo, as I mentioned in Chapters 13, “Making the RF-9 Plasma Gun
Game-Ready with 3D Studio Max,” and 14, “Making the Slogre Game-Ready with
3D Studio Max and Character Studio,” is aliased Realm Wars, the demo of which is
also on the CD-ROM that came with this book. In the previous chapters, I outlined
how to install this demo and use the Show feature to view your completed weapon
and character models. Now it’s time to see it all live!
Testing the Slogre
If you properly produced your slogre bipedal arrangement and were able to view it
using the Show command, you should have the model (aptly named player.dts)
located in the \RealmWars\rw\data\shapes\player\ directory, along with all the ani-
mation sequences. The default sequences, as I said in Chapter 14, will be at the
very least sufficient to animate the bones structure embedded within the slogre
model. Go ahead and fire up the demo, playing a single-player game; as soon as
586
15.
Bringing Work into the Torque Game Engine
Please purchase PDF Split-Merge on www.verypdf.com to remove this watermark.
you’re in the game, start running around. If everything appears to be working,
you’re in business! Just press Tab to switch to third-person mode and see the big
guy in action (see Figure 15.1).
Locating the RF-9 Plasma Gun
The plasma-gun model (aptly named weapon.dts) you created should also be in
place in the \RealmWars\rw\data\shapes\crossbow\ directory; you’re simply substitut-
ing the existing weapons and character models with your own. (You’ll need to pur-
chase the game engine and modify the code to make these models more unique to
the game, such as telling the engine to call up and use a primary player character
called slogre.dts, adding different sprite effects, and so on.) The ammo, clip, and
sounds for the RF-9 can be substituted for the existing crossbow items; grab them
from the Chapter 15 Data section on the CD-ROM and place them in the \crossbow\
and \sounds\ folders. Then, in the game, start hunting around and you’ll soon find
the RF-9, along with some ammo; walk over it, and you’ll be ready to blast things
away to your heart’s content (see Figure 15.2). The default sprite action that is gen-
erated when you fire the weapon is almost perfect for the RF-9!
587
Playing Realm Wars Using the Slogre and RF-9
Figure 15.1 The
fruits of your labor,
awaiting your com-
mand in Realm
Wars.
Please purchase PDF Split-Merge on www.verypdf.com to remove this watermark.
Editing the World
When you’re in Realm Wars, the game engine allows you to edit the terrain, sky, and
water, and to place or remove objects. Just press F11 to enter the World Editor to
see what I mean; by default, you’ll be in World Editor Inspector mode (see Figure
15.3). Just open the Window menu up top, and choose from several modes.
Terrain Editor
If you choose Window, Terrain Editor, your tools will change and allow you to edit
your game’s ground; open the Action menu and select from a list of actions that
you can perform. When you move your cursor over any area of the ground, you’ll
see a multitude of lit rectangles, the size of which is dictated in the Brush menu.
For instance, to change the height of the ground, select Action, Adjust Height, and
click and drag the ground up and down (see Figure 15.4). With what seems like
the hand of God, you can literally move mountains! This engine is well known for
its outdoor environment and infinite landscape; try wandering around for a while
to see what I mean.
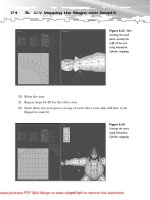
While in the Terrain Editor, you can also add your own diligently created textures by
choosing Window, Terrain Texture Painter. A list appears on the right, displaying all
588
15.
Bringing Work into the Torque Game Engine
Figure 15.2
Search the area for
the RF-9 plasma gun
and pick it up!
Please purchase PDF Split-Merge on www.verypdf.com to remove this watermark.
589
Editing the World
Figure 15.3 Press
F11 to enter the
World Editor.
Figure 15.4
In seconds you can
carve your landscape
and create moun-
tains at will in the
Terrain Editor.
Please purchase PDF Split-Merge on www.verypdf.com to remove this watermark.
the textures you’ve saved as .png files and stored in the \RealmWars\rw\data\
terrains\ folder. Add a useable texture to the cell by clicking the Add button in an
empty cell, and then browse for the texture you want. To paint the texture, choose
Action, Paint Material, and then click and drag over the terrain. In Figure 15.5, I
used the lava texture developed in Chapter 8 (and saved as lava.png, a 256×256
pixel texture), to cover the sandy beach near the water. If your texture is properly
tileable, you should have some awesome results.
Adding Other Objects
You can continue to add textured models to the world using the World Editor
Creator, also located in the Window menu. While in that mode, you can expand
the Shapes directory tree at the lower left and browse for any .dts shape files you’ve
placed in the \RealmWars\rw\data\shapes\ folder. These shapes can be created in
exactly the same way as the RF-9; you just don’t have to include a mounting loca-
tion on them (obviously). Try adding one of the trees in the Trees subfolder by sin-
gle-clicking the tree2 item to place it in your scene (see Figure 15.6). The tree
object may initially be right on top of you; just back away a bit, and you’ll see the
object’s axes, which you can move, rotate, or scale.
Some of the actions require keyboard commands. For instance, holding down the
Alt key while clicking on an x, y, or z axis of the tree will rotate the tree along that
axis. To look around while editing in this manner, just right-click and drag. The
forward, backward, and strafe keys allow you to move around as well (W, S, A, and
D, by default, respectively).
Texturing Buildings
By default, buildings and other static 3D
shapes in the Realm Wars game are not
texture-modifiable within the Torque
game engine. These objects were cre-
ated and textured in a level-editing pro-
gram like Valve’s Hammer editor (go to
to download
the Hammer editor), or they were cre-
ated in the Milkshape 3D modeler and
textured in the same way as the RF-9.
GarageGames has a Torque plug-in for
these editors that allows you to export
590
15.
Bringing Work into the Torque Game Engine
NOTE
Level editing is a subject for another
book entirely! In any case, there are a
number of free level editors on the
Web that are compatible with creat-
ing buildings and levels for Torque
(and other game engines), as well as a
plethora of tutorials for them on the
GarageGames.com Website.
Please purchase PDF Split-Merge on www.verypdf.com to remove this watermark.
591
Editing the World
Figure 15.5
Applying new tex-
tures to the ground
in the Terrain Texture
Painter.
Figure 15.6
Adding and manipu-
lating a tree object in
the World Editor
Creator.
Please purchase PDF Split-Merge on www.verypdf.com to remove this watermark.
building models as DIF files (located in the \RealmWars\rw\data\interiors\ folder),
which are map files converted into solid objects.
Saving Your Modifications
When you’re finished re-creating your world, save your changes by choosing File,
Save Mission As, and entering a new name for the mission. (Mission is another
word for level.) Then, press F11 to exit the World Editor mode and see your
results. The next time you start the game, select your mission from the mission list,
and rock and roll!
The Last Word
Here it is, the last paragraph of my book. I truly hope you’ve enjoyed this stuff, and
are ready to tear up the gaming universe! I poured in as much as I could think of
(and as much as my publisher would allow me), and hope you got something out
of it. I’ve only scratched the surface with the basics here, but I think that after read-
ing this book you’ll see the unlimited possibilities and excellent occupational fun
of game-art creation. Please feel free to e-mail me with your work; I’m developing a
Web site to catalogue my artwork, and will include yours as well. You can reach me
at I truly would like to see your modifications of the mod-
els and textures in this book, as well as any original models of your own! Take care,
and happy gaming!
592
15.
Bringing Work into the Torque Game Engine
Figure 15.7 Our
hero (image courtesy
Lars Ricaldi).
Please purchase PDF Split-Merge on www.verypdf.com to remove this watermark.
POSTSCRIPT
Finding
Work as
a Game
Artist
Please purchase PDF Split-Merge on www.verypdf.com to remove this watermark.