Tài liệu PHP and script.aculo.us Web 2.0 Application Interfaces- P6 doc
Bạn đang xem bản rút gọn của tài liệu. Xem và tải ngay bản đầy đủ của tài liệu tại đây (1.16 MB, 30 trang )
Chapter 8
Horizontal slider
When the axis orientation of a slider is defined as horizontal, the slider becomes and
acts as a horizontal slider.
So let's get our hands dirty with code and start defining the constructors for
horizontal and vertical slider with options. Trust me this will be fun.
Code usage for the slider
As a developer, I am sure you must have got a little bored reading only explanation.
But hey hang on, we are getting into code!
Let's start with our HTML code and then the basic constructor definition of
the slider.
The HTML code snippet is shown as follows:
<div id="track"><div id="handle1"></div>div>
Here, we have defined our track and handle as <div> elements.
The handle element should b��������������������
e placed inside the track element.
Good. So let's define the constructor for the slider here:
new Control.Slider('handle1', 'track1');
That's it! No, wait. We are missing something. Although the code is perfect, when we
fire it up in the browser we can't see anything. That's because we need to style it.
The complete code with CSS is shown as follows:
<script type="text/javascript">
window.onload = function() {
new Control.Slider('handle1', 'track1'
);
}
</script>
<style type="text/css">
h4{ font: 13px verdana }
#track1 {
background-color:#BCE6D6;
height: 1em;
width: 150px;
}
[ 139 ]
This material is copyright and is licensed for the sole use by Richard Ostheimer on 18th June 2009
Please purchase PDF Split-Merge
2205 hilda
on www.verypdf.com
ave., , missoula, , 59801to remove this watermark.
Slider for Dynamic Applications using script.aculo.us
#handle1 {
background-color:#30679B;
height: 1em;
width: 6px;
}
</style>
<body>
Basic Slider Example
<div id="track1">
<div id="handle1"></div>
</div>
And the resulting output is shown in the following screenshot:
That's the most basic slider we created. And I am sure you are not content with that.
We need to explore more.
Code usage for the vertical slider
Moving on, we will now create a vertical slider and add some options to enhance our
slider feature.
Most of the code remains from the above example. We will focus on the required
changes to be made in the above code.
As mentioned in the explanation above, we need to define the axis orientation as
vertical in our options to make a slider vertical.
axis: 'vertical'
[ 140 ]
This material is copyright and is licensed for the sole use by Richard Ostheimer on 18th June 2009
Please purchase PDF Split-Merge
2205 hilda
on www.verypdf.com
ave., , missoula, , 59801to remove this watermark.
Chapter 8
So, the new constructor looks like the snippet shown as follows:
window.onload = function() {
new Control.Slider('handle1', 'track1',
{
axis:'vertical'
}
);
}
And yes, since we are trying to make our slider vertical we need to change the CSS
properties of height. The new CSS code will look like the following snippet:
#track1 {
background-color:#BCE6D6;
height: 10em;
width: 15px;
}
#handle1 {
background-color:#30679B;
height: 1em;
width: 15px;
}
So, the final script for the vertical slider is shown as follows:
<script type="text/javascript">
window.onload = function() {
new Control.Slider('handle1', 'track1',
{
axis:'vertical'
}
);
}
</script>
<style type="text/css">
h4{ font: 13px verdana }
#track1 {
background-color:#BCE6D6;
height: 10em;
width: 15px;
}
#handle1 {
[ 141 ]
This material is copyright and is licensed for the sole use by Richard Ostheimer on 18th June 2009
Please purchase PDF Split-Merge
2205 hilda
on www.verypdf.com
ave., , missoula, , 59801to remove this watermark.
Slider for Dynamic Applications using script.aculo.us
background-color:#30679B;
height: 1em;
width: 15px;
}
</style>
</head>
<body>
Basic Vertical Slider Example
<div id="track1">
<div id="handle1"></div>
</div>
And, the beautiful vertical slider is here! Check out the following screenshot:
Code usage for the horizontal slider
We have seen how to create a vertical slider. We want you to have a wild guess of
how to make a horizontal slider. Let me give you two hints:
•
We don't have to struggle to make a slider horizontal. It's the default
axis option.
•
We can make a horizontal slider by passing the "horizontal" option to axis.
[ 142 ]
This material is copyright and is licensed for the sole use by Richard Ostheimer on 18th June 2009
Please purchase PDF Split-Merge
2205 hilda
on www.verypdf.com
ave., , missoula, , 59801to remove this watermark.
Chapter 8
Which one would you prefer?
I am not going to give you code for this one though. But yes, I will guide you for
doing the same. The code will be given in the next chapter.
We have already created one horizontal slider in the Code usage for the horizontal slider
section. That was one approach. Now try changing the axis option to horizontal in
the above code for the vertical slider.
You may also need to change some CSS properties for height and width, and I am
sure you would love doing them. It's so much fun! After you make changes to the
height and width parameters of the CSS properties, the screenshot of slider should
look like the following:
Code usage for sliders with options
We are now done with the most important part of the slider: the implementation of
the slider in our applications.
But wait, we need the slider to suit our applications, right? So let's customize our
slider with options.
[ 143 ]
This material is copyright and is licensed for the sole use by Richard Ostheimer on 18th June 2009
Please purchase PDF Split-Merge
2205 hilda
on www.verypdf.com
ave., , missoula, , 59801to remove this watermark.
Slider for Dynamic Applications using script.aculo.us
We have mentioned earlier that track is the range of values. So let's first define the
range for our slider.
window.onload = function() {
new Control.Slider('handle1', 'track1',
{
axis:'vertical',
range:$R(1,100)
}
The range option uses the Prototypes' objectRange instance. Hence, we declare
it using
$R (minimum, Maximum).
Everything looks neat until here. Let's add some more options to our constructor,
onSlide().
Using the onSlide() callback every time, we drag the slider and the callback is
invoked. The default parameter passed to onSlide() is the current slider value.
window.onload = function() {
new Control.Slider('handle1', 'track1',
{
axis:'vertical',
range:$R(1,100),
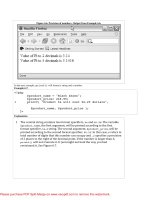
onSlide: function(v) { $('value1').innerHTML = "New Slide
Value="+v;}
}
We have added a div called value1 in our HTML code. On dragging the slider, we
will update the value1 with the current slider value.
OK, so let's see what happened to our slider uptill now. Check out the
following screenshot:
[ 144 ]
This material is copyright and is licensed for the sole use by Richard Ostheimer on 18th June 2009
Please purchase PDF Split-Merge
2205 hilda
on www.verypdf.com
ave., , missoula, , 59801to remove this watermark.
Chapter 8
Impressed? And, we are not done yet. Let's add more options to the slider now.
You may ask me, what if the slider in the application needs to be at a particular value
by default? And I will say use the sliderValue option. Let's make our slider value
10 by default. Here is the snippet for the same:
window.onload = function() {
new Control.Slider('handle1', 'track1',
{
axis:'vertical',
range:$R(1,100),
sliderValue: 10,
onSlide: function(v) { $('value1').innerHTML =
"New Slide Value="+v;}
}
}
And, you should see the slider value at 10 when you run the code.
Now your dear friend will ask, what if we don't want to give the range, but we need
to pass the fixed set of values? And you proudly say, use the values option.
[ 145 ]
This material is copyright and is licensed for the sole use by Richard Ostheimer on 18th June 2009
Please purchase PDF Split-Merge
2205 hilda
on www.verypdf.com
ave., , missoula, , 59801to remove this watermark.
Slider for Dynamic Applications using script.aculo.us
Check out the usage of the values options in the constructor.
window.onload = function() {
new Control.Slider('handle1', 'track1',
{
range:$R(1,25),
values:[1, 5,10,15,20,25],
onSlide:function(v){ $('value1').innerHTML = "New Slide
Value="+v;}
}
);
}
We have added a set of values in the array form and passed it to our constructor.
Let's see what it looks like.
Tips and tricks with the slider
After covering all the aspects of the slider feature, here is a list of simple tips and
tricks which we can make use of in our applications with ease.
[ 146 ]
This material is copyright and is licensed for the sole use by Richard Ostheimer on 18th June 2009
Please purchase PDF Split-Merge
2205 hilda
on www.verypdf.com
ave., , missoula, , 59801to remove this watermark.
Chapter 8
Reading the current value of the slider
script.aculo.us "genie" provides us with two callbacks for the slider to read the
current value of the slider. They are:
•
onSlide
•
onChange
Both these callbacks are used as a part of options in the slider.
onSlide contains the current sliding value while the drag is on. The callback syntax
is shown as follows:
onSlide: function(value) {
// do something with the value while sliding. Write or Edit the
//value of current slider value while sliding
}
onChange callback will contain the value of the slider while the "sliding" or the drag
event ends. After the drag is completed and if the value of the slider has changed
then the onChange function will be called. For example, if the slider's current value
is set to 10 and after sliding we change it to 15, then the onChange callback will be
fired. The callback syntax is shown as follows:
onChange: function(value){
// do anything with the "changed" and current value
}
Multiple handles in the slider
Now, a thought comes to our mind at this point: Is it possible for us to have two
handles in one track?
And, the mighty script.aculo.us library says yes!
Check out the following code snippet and screenshot for a quick glance of having
two handles in one track:
HTML code
<div id="track1">
<div id="handle1"></div>
<div id="handle2"></div>
</div>
[ 147 ]
This material is copyright and is licensed for the sole use by Richard Ostheimer on 18th June 2009
Please purchase PDF Split-Merge
2205 hilda
on www.verypdf.com
ave., , missoula, , 59801to remove this watermark.
Slider for Dynamic Applications using script.aculo.us
JavaScript code for the same:
window.onload = function() {
new Control.Slider(['handle1','handle2'] , 'track1'
);
}
Now, check out the resulting screenshot having two handles and one track:
The same can also be applied for the vertical slider too.
Disabling the slider
We can disable our slider element using the option: disabled. We need to pass true
to set the element in the disabled state. By default the value is set to false.
Our constructor definition would look like the code snippet shown as follows:
window.onload = function() {
new Control.Slider('handle1', 'track1',
{
range:$R(1,25),
values:[1, 5,10,15,20,25],
disabled:true,
[ 148 ]
This material is copyright and is licensed for the sole use by Richard Ostheimer on 18th June 2009
Please purchase PDF Split-Merge
2205 hilda
on www.verypdf.com
ave., , missoula, , 59801to remove this watermark.
Chapter 8
onSlide:function(v){ $('value1').innerHTML = "New Slide
Value="+v;}
}
);
}
The disabled option will initially make the element's state disabled, and we can
change this state using setDisabled.
Enabling the slider
As we can disable our slider element using the disabled option, we can also enable
the element using the same option by passing the value as false.
Our constructor definition would look like the code snippet shown as follows:
window.onload = function() {
new Control.Slider('handle1', 'track1',
{
range:$R(1,25),
values:[1, 5,10,15,20,25],
disabled:false,
onSlide:function(v){ $('value1').innerHTML = "New Slide
Value="+v;}
}
);
}
By default the value of the disabled option is false. The elements are enabled, and
we can change the state using setEnabled.
Hands-on example: Using vertical and
horizontal slider
Now that we have worked with vertical and horizontal slider, wouldn't it be a great
idea to see both types of the slider on the same page? Yes indeed.
Let's get started.
At a very basic level, we can change the Axis option of slider and we can get either
the horizontal or vertical slider.
[ 149 ]
This material is copyright and is licensed for the sole use by Richard Ostheimer on 18th June 2009
Please purchase PDF Split-Merge
2205 hilda
on www.verypdf.com
ave., , missoula, , 59801to remove this watermark.
Slider for Dynamic Applications using script.aculo.us
So now we will have two slider types on one page, and the only difference is in the
axis orientation.
We need to create two tracks and the respective handles for the slider <div>s. The
HTML part of the code is given as follows:
Mashup of Horizontal + Vertical Sliders
<div id="track1" class="track">
<div id="handle1" class="handle"></div>
</div>
<div id="track2">
<div id="handle2"></div>
</div>
This code is pretty simple. We have created a <div> as track1 and its respective
inner <div> to hold the value as handle1. Similarly, we have created one more slider
<div> as track2 and its handle as handle2.
After a bit of trendy dressing up of, and applying make-up to, the CSS, the basic
slider looks like the following screenshot:
[ 150 ]
This material is copyright and is licensed for the sole use by Richard Ostheimer on 18th June 2009
Please purchase PDF Split-Merge
2205 hilda
on www.verypdf.com
ave., , missoula, , 59801to remove this watermark.
Chapter 8
The CSS code is given here:
h4{ font: 13px verdana }
#track1 {
background-color:#BCE6D6;
height: 1em;
width: 200px;
}
#handle1 {
background-color:#30679B;
height: 0.5em;
width: 10px;
}
#track2 {
background-color:#BCE6D6;
height: 10em;
width: 15px;
}
#handle2 {
background-color:#30679B;
height: 1em;
width: 15px;
}
#sliding {
font: 13px verdana;
}
#changed {
font: 13px verdana;
}
OK, so now we have our slider in our page. Wait, we are missing something.
Are you wondering where is the scripting and functionality?
Before that, let's add two divs, which will help us view the current values using the
onChange and onSlide callbacks.
Now let's first add script.aculo.us power to track1, our first slider.
new Control.Slider('handle1', 'track1',
{
range: $R(1,50),
values: [1,5,15,25,35,45,50],
sliderValue: 1,
onChange: function(value){
[ 151 ]
This material is copyright and is licensed for the sole use by Richard Ostheimer on 18th June 2009
Please purchase PDF Split-Merge
2205 hilda
on www.verypdf.com
ave., , missoula, , 59801to remove this watermark.
Slider for Dynamic Applications using script.aculo.us
$('changed').innerHTML = 'Changed Value : '+value;
},
onSlide: function(value) {
$('sliding').innerHTML = 'Sliding Value: '+value;
}
} );
Let's take a closer look at the above code and see what is happening.
We have defined range, values, and sliderValue options for the slider. We have
also added two callbacks onChange and onSlide. As I mentioned earlier, these
callbacks get the current value of the slider as a parameter.
Hence, we are reading values from both the callbacks and updating the divs' sliding
and changed when the event occurs.
Also, since we did not exclusively mention the axis definition, the default
is horizontal.
So, the application now looks like the following screenshot:
Remember, the values will only be updated if we move the horizontal slider. And,
nothing happens if we slide through the vertical slider. We have not yet defined the
functionality for the vertical slider. Let's do it now.
[ 152 ]
This material is copyright and is licensed for the sole use by Richard Ostheimer on 18th June 2009
Please purchase PDF Split-Merge
2205 hilda
on www.verypdf.com
ave., , missoula, , 59801to remove this watermark.
Chapter 8
The code for the vertical slider will also remain mostly similar with only difference of
axis orientation.
new Control.Slider('handle2', 'track2',
{
range: $R(1,50),
axis:'vertical',
sliderValue: 1,
onChange: function(value){
$('changed').innerHTML =
'Changed Value : '+value;
},
onSlide: function(value) {
$('sliding').innerHTML =
'Sliding Value: '+value;
}
} );
You can notice the fact that the callback definition remains the same for the vertical
slider as well.
So now when we move the vertical slider, the value gets updated in the sliding and
changed <div>s. They get updated with the current value.
The complete module with both horizontal and vertical slider is shown as follows:
[ 153 ]
This material is copyright and is licensed for the sole use by Richard Ostheimer on 18th June 2009
Please purchase PDF Split-Merge
2205 hilda
on www.verypdf.com
ave., , missoula, , 59801to remove this watermark.
Slider for Dynamic Applications using script.aculo.us
Summary
In this chapter we have learned and explored the following topics:
•
Introduction to the slider using script.aculo.us
•
Explanation of the slider
•
Different types of the slider
•
Options provided with the slider
•
Code usage for the slider and options
•
Tips and tricks with slider
•
Hands-on example for the horizontal and vertical slider
So far we have learned all the features of script.aculo.us in detail. We have
also worked on some hands-on examples to make us more comfortable using
the features of script.aculo.us in our own applications.
But we think it would be nice to have a cheat sheet of all the features in one page.
This would act as a reference for us at any point in time. We will cover all this and
more in the next chapter!
[ 154 ]
This material is copyright and is licensed for the sole use by Richard Ostheimer on 18th June 2009
Please purchase PDF Split-Merge
2205 hilda
on www.verypdf.com
ave., , missoula, , 59801to remove this watermark.
script.aculo.us in One Go
We have explored all the features of script.aculo.us so far. We started with a simple
one-line effect to go deep into the Prototype library, which includes everything
from PHP techniques to effects, from drag-drop to in-place editing, and finally
from autocompletion to slider.
Each of these features has its own significant importance and, when used effectively,
can help you in making the next BIG thing on the Web.
The script.aculo.us features are very useful, but do we have any quick reference for
all of them?
We are going to create one now. At any point if we want to see the feature and its
quick implementation, remind yourself of all the quick hands-on examples we will
learn in this chapter.
Here's a quick list of the key topics that we will explore in this chapter:
•
A hands-on example: Multiple script.aculo.us features mash up
•
A quick glance at all of the features of script.aculo.us
Hands-on example: Multiple
script.aculo.us features mash up
So far we have worked with features individually. But if we look closely, we will find
that some of the features are quite interdependent.
Let's see and work with some of these features. We will aim to get some of the key
features of script.aculo.us onto one page.
This material is copyright and is licensed for the sole use by Richard Ostheimer on 18th June 2009
Please purchase PDF Split-Merge
2205 hilda
on www.verypdf.com
ave., , missoula, , 59801to remove this watermark.
script.aculo.us in One Go
Adding in-place editing in page
So your friend liked the in-place editing feature? OK! We will start with it.
The basic HTML code for in-place editing is shown as follows:
<div id="editme">Click to Edit Me</div>
This way we have created a simple <div> element, which we will make editable.
Let's make it trendy using CSS.
#editme{
width: 200px;
font: 13px verdana;
}
We have now specified the width and font for the <div> element. You are welcome
to add even more CSS style elements to make it even better.
Let's move on to the most interesting part. Yes, you guessed it right, playing with
script.aculo.us. Add the required script.aculo.us files here:
</script>
</script>
src="src/lib/prototype.js">
src="src/src/scriptaculous.js">
src="src/src/effects.js"></script>
src="src/src/controls.js"></script>
Now, let's make our in-place element editable.
new Ajax.InPlaceEditor($('editme'), '/server-side-script.php');
That was super cool. Again, we did it just in one line. Wow! Check out how it looks
on this page:
[ 156 ]
This material is copyright and is licensed for the sole use by Richard Ostheimer on 18th June 2009
Please purchase PDF Split-Merge
2205 hilda
on www.verypdf.com
ave., , missoula, , 59801to remove this watermark.
Chapter 9
Adding effects to the page
Since we are trying to make use of the script.aculo.us features in a combination, let's
add beauty to our in-place editing:
new Ajax.InPlaceEditor($('editme'), '/server-side-script.php',
{highlightcolor:'#BCE6D6'});
We have added the highlight option to our in-place editor. We are overriding the
default color with our new color. Now check out how the new in-place editor looks:
How about adding the drag and drop feature?
We are content with what we just did, but I think we can do much better. Yes, we can
add more features to the page. Let's also add the drag and drop feature.
Start with the following basic HTML code:
Drag & Drop With Effects
<div id="myDrag">
iPhone
</div>
And, let's add some style with CSS as follows:
#myDrag {
font: 13px verdana;
background-color:#E2F1B1;
width:300px;
}
[ 157 ]
This material is copyright and is licensed for the sole use by Richard Ostheimer on 18th June 2009
Please purchase PDF Split-Merge
2205 hilda
on www.verypdf.com
ave., , missoula, , 59801to remove this watermark.
script.aculo.us in One Go
We are adding width, font, and background-color style elements to our
drag and drop element. Check out the following screenshot:
What about the functionality of drag and drop element? Let's spice it up.
new Draggable('myDrag',{revert:true});
So our element is all set to get dragged and dropped. Check out the
following screenshot:
[ 158 ]
This material is copyright and is licensed for the sole use by Richard Ostheimer on 18th June 2009
Please purchase PDF Split-Merge
2205 hilda
on www.verypdf.com
ave., , missoula, , 59801to remove this watermark.