Tài liệu PHP and script.aculo.us Web 2.0 Application Interfaces- P7 doc
Bạn đang xem bản rút gọn của tài liệu. Xem và tải ngay bản đầy đủ của tài liệu tại đây (882.37 KB, 30 trang )
Todonow: A Tadalist Clone
I have a lot of things on my mind before leaving my house such as visiting the
bank, buying vegetables, or office work. But whatever is on my mind is there on
my tadalist.com application too.
Tadalist is a simple web application for making lists and managing items. It comes
in handy all the time. So after learning script.aculo.us, why don't we try to create our
own Tadalist clone? Hang on. Before we proceed and create an application, let's give
it a Web 2.0-ish name—say todonow. Get, set, and code!
Some of the key points we will be covering in this chapter are:
•
The BIG picture of the application
•
Features and functionalities
•
Creating a database for the project
•
Implementing all the features of the application
The BIG picture
Let's quickly get a complete picture of what the application is and what it should do.
In simple words, we are trying to create a to-do list manager. As a user, we should
be able to sign up, log in, and log out as mentioned in Chapter 3 in the User login
management system module.
•
The user should be able to create lists and add items to a list
•
The user can mark items as completed, when done
•
The user will see completed items as well as incomplete tasks
All these operations will be performed when the user is logged in. And, finally, the
user can log out.
This material is copyright and is licensed for the sole use by Richard Ostheimer on 18th June 2009
Please purchase PDF Split-Merge hildawww.verypdf.com to remove this watermark.
2205 on ave., , missoula, , 59801
Todonow: A Tadalist Clone
Features and functionality
Now that we are clear about what our application will do, let's quickly get an
overview of the features and functionality that our application will have.
•
User signup
•
User login
•
View all my lists
•
Show a summary of items for lists (in complete status)
•
Create new lists
•
Add new items
•
Mark items as completed
•
Mark complete items as incomplete
•
Delete lists
•
Logout
These features and functionalities are the fundamental requirements for any
to-do list manager. You may think there are too many features and functionalities
to code. Nope! We have already implemented some of them in our User login
management system.
Creating a database playground
Having a clear picture of todonow gives us clarity about the kind of data we will be
dealing with. In our application, users will create lists, add items, update the status
of the items, and so on.
We explored and used the phpMyAdmin application to work with the MySQL
database in Chapter 3. We will be using phpMyAdmin again for creating our
database tables.
We will need three tables for user information, lists, and items, to store the
corresponding data in our application. So, let's quickly create the tables for users,
lists, and items.
We have already created the schema for the user table in our login management
system in Chapter 3.
[ 170 ]
This material is copyright and is licensed for the sole use by Richard Ostheimer on 18th June 2009
Please purchase PDF Split-Merge hildawww.verypdf.com to remove this watermark.
2205 on ave., , missoula, , 59801
Chapter 10
The fields for the database table lists are as follows:
•
listID: This is the primary key to identify the lists individually. It is defined
as auto_increment, which means our system will automatically increase
the value of this field every time we add entries. In Oracle SQL, we call these
fields a sequence.
•
ListName: This is the name of the list provided by the user.
•
ownerID: This tracks the user of the list.
•
Date: This is the time when the list was created.
The database schema for storing lists is as follows:
CREATE TABLE `lists` (
`listID` int(11) NOT NULL auto_increment,
`ListName` varchar(50) NOT NULL,
`ownerID` int(11) NOT NULL,
`Date` timestamp NOT NULL default CURRENT_TIMESTAMP on update
CURRENT_TIMESTAMP,
PRIMARY KEY (`listID`)
) ENGINE=InnoDB DEFAULT CHARSET=latin1 AUTO_INCREMENT=1 ;
Similarly, fields for the database table items are as follows:
•
ItemID: It is the primary key to identify the items individually. This is
defined as auto_increment, which means that the system will automatically
increase the value of this field every time we add entries. In Oracle SQL, we
call these fields a sequence.
•
ListID: This helps in identifying the parent of items.
•
ItemName: This is the name of the item provided by the user.
•
Status: This shows whether the item is complete or incomplete.
•
ownerID: This tracks the user of the list.
•
Date: This is the time when the list was created.
The database schema for storing the items is as follows:.
CREATE TABLE `items` (
`ItemID` int(11) NOT NULL auto_increment,
`ListID` int(11) NOT NULL,
`ownerID` int(11) NOT NULL,
`itemName` varchar(40) NOT NULL,
`status` enum('Incomplete','Completed') NOT NULL,
`Date` timestamp NOT NULL default CURRENT_TIMESTAMP,
PRIMARY KEY (`ItemID`)
) ENGINE=InnoDB DEFAULT CHARSET=latin1 AUTO_INCREMENT=1 ;
[ 171 ]
This material is copyright and is licensed for the sole use by Richard Ostheimer on 18th June 2009
Please purchase PDF Split-Merge hildawww.verypdf.com to remove this watermark.
2205 on ave., , missoula, , 59801
Todonow: A Tadalist Clone
We shall loop through the code snippets for each feature to understand
it better. The complete code is available to download for free at the URL
given in the Preface of the book.
Let's log in…
I am sure you must have figured out that I am referring to the login management
system that we created in Chapter 3.
Check out the following screenshot from Chapter 3 for a quick reference:
Once we log in to the application, we don't see much happening. What we created in
Chapter 3 was just a simple secured page that looked like the following screenshot:
[ 172 ]
This material is copyright and is licensed for the sole use by Richard Ostheimer on 18th June 2009
Please purchase PDF Split-Merge hildawww.verypdf.com to remove this watermark.
2205 on ave., , missoula, , 59801
Chapter 10
We have created a raw skeleton for the todonow application. So let the party begin!
The login management system is just a simple and basic module for your
understanding. In real web applications, you may need to enhance or
modify it according to your security and performance needs.
User interface comes first
Coding is a costly affair, and that's why we will start designing the user interface
first. We can always change the interface layout, color combinations, and look and
feel of the application. This really is a useful feature, since our code functionality
will remain the same. Only the user interface changes, and trust me it doesn't hurt!
My friend John thinks that the three-column layout is better than a two-column
layout. Different people have different tastes for interface design. And, that's the
reason I am suggesting a simple user interface for our todonow application. Feel
free to modify it on the basis of your comfort.
It's time now for us to create a user interface for our application once the user has
successfully logged in. We will try and keep the user interface as simple and beautiful
as possible. Below is the simple modification done to our existing index.php file
from the login management system. We have added the session variables to our page
to read user ID {$_SESSION(uid)} and username {$_SESSION(uid)}.This will help
us in further reading the values based on user authorization.
The following code is used to create a simple user interface for our application:
<img src="images/logo.png">
<span class="header-text">
<?php echo 'Welcome, '.$_SESSION['username']; ?>
</span> |
<span class="MyLists">My Lists</span>
<span class="header-links"> |
<a class="sideMenu_links" href="AddLists.php">
Create New List </a> |
<a class="sideMenu_links" href="logout.php">Logout</a>
</span>
[ 173 ]
This material is copyright and is licensed for the sole use by Richard Ostheimer on 18th June 2009
Please purchase PDF Split-Merge hildawww.verypdf.com to remove this watermark.
2205 on ave., , missoula, , 59801
Todonow: A Tadalist Clone
What we have done here is pretty neat and simple. We needed text, My Lists, and
two hyperlinks each for Create New Lists and Logout. Check out the result in the
following screenshot:
View all my lists
Now that the user is logged in, we need to check if the user has created any lists.
If the user has previously created lists, we shall show all those lists on the user
home page.
Logic and code
The process to view the lists for a logged-in user is as follows:
•
We will read the userID from the session variable.
•
We will run the query to select the lists, if any, created by the user. We are
using DBClass defined in our login management system and the related
functions by creating an object of the database class.
•
We are running the SQL query to read the lists and the lists details such as
ListID, ListName, and Date created by the user.
require_once 'DBClass.php';
$db = new DBClass();
$GetListDetails = "SELECT ListID,ListName,MonthName(Date) as
Month,Day(Date) as Day from Lists where
ownerID=".$_SESSION['uid'];
$ListResult = $db->Query($GetListDetails);
[ 174 ]
This material is copyright and is licensed for the sole use by Richard Ostheimer on 18th June 2009
Please purchase PDF Split-Merge hildawww.verypdf.com to remove this watermark.
2205 on ave., , missoula, , 59801
Chapter 10
•
We check whether the user has created any lists before. Using the
Mysql_num_rows function of MySQL, we get the number of rows returned by
our query. If the count is more than zero, we will read the rows individually;
else, we will show no lists.
$num_rows = mysql_num_rows($ListResult);
if($num_rows>0)
•
We will loop through the result array. We are calling the fetchArray
function defined in our DBClass to get the array of results and using a
while loop to read each row.
while($row = $db->fetchArray($ListResult))
•
We display each row on the screen. Using the value ListID, we will create a
link to a viewList.php file with ListID, so that the user can click on the list
to view the details. And yes, make it attractive using the power of CSS.
echo '<li>
<a href="ViewList.php?ListID='.$row[ListID].'">'.$row[ListName].'
</a>
</li>
';
Check out the resulting output in the following screenshot:
[ 175 ]
This material is copyright and is licensed for the sole use by Richard Ostheimer on 18th June 2009
Please purchase PDF Split-Merge hildawww.verypdf.com to remove this watermark.
2205 on ave., , missoula, , 59801
Todonow: A Tadalist Clone
View all my lists along with a summary of
incomplete items
A better way of representing the data is by showing a summary. We have displayed
the lists created by the user on the home page. It would be of great help to show the
user the status of incomplete items from the lists.
Logic and code
Extending the code used for reading the lists, we will create a subquery inside the
while loop to read the count of the number of items with the status Incomplete.
while($row = $db->fetchArray($ListResult))
{
$sql2 = "SELECT COUNT(ItemID) from Items where
ListID=".$row[ListID]." AND status='Incomplete'";
$result2 = $db->perform_query($sql2);
$row2 = $db->fetch_one_row($result2);
}
Now, let's also display the timestamp when the list was created. We have read the
value in the SQL query used while reading the lists created by the user.
$GetListDetails = "SELECT ListID,ListName,MonthName(Date) as
Month,Day(Date) as Day from Lists where ownerID=".$_SESSION['uid'];
Let's display the summary of the incomplete items and the date timestamp to the
user along with the lists.
echo '<li>
<a href="ViewList.php?ListID='.$row[ListID].'">
'.$row[ListName].'</a>
<span class="ItemsInfo"> --'.$row2[0].' remaining items </span>
<span class="DateDetails">on'.$row[Day].'
'.$row[Month].'</span>
</li>
';
Check out the result shown in the following screenshot:
[ 176 ]
This material is copyright and is licensed for the sole use by Richard Ostheimer on 18th June 2009
Please purchase PDF Split-Merge hildawww.verypdf.com to remove this watermark.
2205 on ave., , missoula, , 59801
Chapter 10
Creating new lists
I prefer classifying my items into separate lists. It helps me to be what I am actually
not—organized! I classify my items as Home, Office, Personal, and so on. This brings
us to the core feature of our application: creating new lists to get organized.
Logic and code
The first thing we need to do is show the user a form to create the list. We will be
creating a new file addLists.php. As we decided earlier, we shall keep the form
very neat and pretty simple. Check out the following screenshot to see what our
form will look like:
[ 177 ]
This material is copyright and is licensed for the sole use by Richard Ostheimer on 18th June 2009
Please purchase PDF Split-Merge hildawww.verypdf.com to remove this watermark.
2205 on ave., , missoula, , 59801
Todonow: A Tadalist Clone
The code to create the user interface in the screenshot is given here. We have to
create an input text box and a submit button. The user will Enter a Title for the List
and hit the Add This List button.
<div class="AddListForm">
<div class="MyNewList">Add New List</div>
<form action="AddLists.php" method="POST">
Enter a Title for the List
<input type="text" name="ListTitle" size="35">
<input type="submit" name="AddLists" value="Add This List">
</form>
</div>
When the user submits the information, we will check whether or not the user has
posted the data (reading POST variables).
We will read userID using the session variable. Using $_POST, we will be reading
the value of the list name entered by the user.
For those of you who are Object Oriented Programming Languages and Systems
(OOPS) lovers, we have created a class called lists. This will have all the
constructors and functions related to working with lists, some of which are
ad_new_list(), read_list(), and so on. Otherwise, a simpler way is to run
the query from the code itself.
$db = new DBClass();
$newlist = new lists();
$title = $_POST['ListTitle'];
$ownerid = $_SESSION["uid"];
$query = $newlist->add_new_list($title,$ownerid);
//$AddListQuery = "INSERT INTO Lists (listID,ListName,ownerID,Date)
VALUES (NULL,'$title','$ownerid',CURRENT_TIMESTAMP)";
We shall execute the query calling our DBClass function query.
$AddListResult = $db->Query($query);
We have added the list to our database, and we will now use a Mysql_insert_id()
function to read ListID, which is an auto_increment. This function will always
return the ID of the last INSERT action performed, and then we will execute the
query and check if the query returned a value or not.
$sql = 'SELECT ListID, ListName from lists
where ListID = '.mysql_insert_id();
$result = $db->Query($sql);
if (!$result) {
echo 'Could not run query: ' . mysql_error();
exit;
}
[ 178 ]
This material is copyright and is licensed for the sole use by Richard Ostheimer on 18th June 2009
Please purchase PDF Split-Merge hildawww.verypdf.com to remove this watermark.
2205 on ave., , missoula, , 59801
Chapter 10
From the result set, we will read the list details.
$row = $db->fetch_one_row($result);
Now comes a very tricky part. Once we have read the ListID of the newly added
list, we shall redirect the user to the list page showing the details. For that, we will
write a simple Redirect function that will take time and page URL as parameters.
•
The time parameter is used to define after how much and at what interval
the user should be redirected
•
The page URL will be used to specify to which page the application
gets redirected
The code for the Redirect function is as follows:
function Redirect($time, $topage) {
echo "url={$topage}\" /> ";
}
Adding items to our lists
OK, now that we have created our lists we need to populate them with items or
tasks. Wait, this is where our script.aculo.us magic comes into the picture. We are
going to add the items in our AJAX way. We will do this in two steps:
1. Add items to the database.
2. Read the newly added items and place them back on the page.
Adding items to the database
We will add our items using a simple form in the viewList.php file. When a user
enters the item name and hits submit, the JavaScript function AddItem() gets
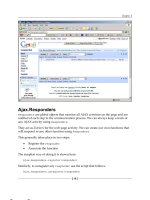
invoked. It uses Ajax.Request of Prototype to submit the data to GetItem.php.
Values of the item are read, that is the item name entered by the user, using our good
old $F() function and then passed as parameters using $_POST.
The code for the AddItem() function is as follows:
function AddItem() {
var input = 'myinput='+$F('myinput');
var list = 'ListID='+$F('ListID');
var user = 'userID='+$F('userID');
var pars = input+'&'+user+'&'+list;
[ 179 ]
This material is copyright and is licensed for the sole use by Richard Ostheimer on 18th June 2009
Please purchase PDF Split-Merge hildawww.verypdf.com to remove this watermark.
2205 on ave., , missoula, , 59801
Todonow: A Tadalist Clone
new Ajax.Request(
'addItem.php',
{
asynchronous:true,
parameters:pars,
onComplete: ShowData
}
);
$('myform').reset();
$('myinput').activate();
return false;
}
These values will be passed to our GetItem.php file, which will be working in the
background asynchronously.
We will read the value of the itemName, ListID, and userID, and insert these
values into the database table items.
But before we do that, we have to create an XML file through GetItem.php since we
are using the AJAX way of returning the results. So let's define the headers for the
XML file.
header("Content-Type: text/xml");
print'<?xml version="1.0" encoding="UTF-8" standalone="yes"?>';
Now, let's read the values of the variables and create a query to insert the values in
the database. Using our DBClass, we will create an object for the class and invoke
the query function to execute the query.
$the_name = $_POST['myinput'];
$List_name = $_POST['ListID'];
$user_name = $_POST['userID'];
$sql = "INSERT INTO items (ItemID,ListID,ownerID,itemName,status,Date)
VALUES (NULL,'$List_name','$user_name','$the_name','Incomplete',
CURRENT_TIMESTAMP)";
require_once 'DBClass.php';
$db= new DBClass();
$result = $db->Query($sql);
We have added the item to our database table. Since we need to put the item
back on the screen, we will read the ID of the recently inserted item using
mysql_insert_id() and execute the query to read the details of the item.
$rowID = mysql_insert_id();
$sql = "SELECT itemName from items where ItemID=".$rowID;
$result = $db->Query($sql);
$row = $db->fetch_one_row($result);
$itemValue = $row[0];
[ 180 ]
This material is copyright and is licensed for the sole use by Richard Ostheimer on 18th June 2009
Please purchase PDF Split-Merge hildawww.verypdf.com to remove this watermark.
2205 on ave., , missoula, , 59801
Chapter 10
As I said, we are going to return an XML file. Therefore, we need to place our data in
the XML format.
echo
echo
echo
echo
'<response>';
'<ItemID>'.$rowID.'</ItemID>';
'<ItemValue>'.$itemValue.'</ItemValue>';
'</response>';
Finally, we are done with our XML file. The system is ready to return the data back
to the JavaScript function.
Reading the newly added item and placing it
back on the page
If you remember, we mentioned the showData() function when the AJAX call was
completed. We will read the XML values returned by the Ajax.Request call and put
them back on the screen in the incomplete <div>.
We are reading the values using getElementsByTagName of ItemID and ItemValue,
which we mentioned while creating the XML file.
function ShowData(originalRequest) {
var xmlDoc = originalRequest.responseXML.documentElement;
var value1 = xmlDoc.getElementsByTagName("ItemID")[0].childNodes[0].
nodeValue;
var value = xmlDoc.getElementsByTagName("ItemValue")[0].childNodes[0].
nodeValue;
Now, let's use this information and create a <div> element and a checkbox with the
values we have read from the XML file.
divID = 'DIV'+value1;
var div = document.createElement('div');
div.className ='ItemRow';
div.id = divID;
var val = '"'+value+'"';
var i = document.createElement('input');
i.type='checkbox';
i.id=value1;
i.value=value;
i["onclick"] = new Function("MarkDone(this.id)");
var t = document.createTextNode(value);
div.appendChild(i);
div.appendChild(t);
$('ItemTree').appendChild(div);
[ 181 ]
This material is copyright and is licensed for the sole use by Richard Ostheimer on 18th June 2009
Please purchase PDF Split-Merge hildawww.verypdf.com to remove this watermark.
2205 on ave., , missoula, , 59801
Todonow: A Tadalist Clone
If you look closely, we have added a function for the onclick event called
MarkDone(this.id). We shall get to this function in the next topic. Let's just be
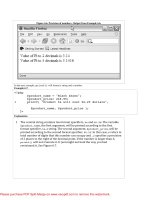
happy to see how the application is shaping up. Check out the following screenshot:
Adding effects to our items
Now that we have added our items in the AJAX way, you must have already started
thinking of how to make them more appealing using the effects of the script.aculo.us
library. In this section we will add effects to our functionality.
We are now well-versed with the power and beauty of the script.aculo.us library for
using effects in our application. Before we do that, let's include the required files.
<script type="text/javascript" src="src/prototype.js"></script>
<script type="text/javascript" src="src/scriptaculous.js"></script>
<script type="text/javascript" src="src/effects.js"></script>
[ 182 ]
This material is copyright and is licensed for the sole use by Richard Ostheimer on 18th June 2009
Please purchase PDF Split-Merge hildawww.verypdf.com to remove this watermark.
2205 on ave., , missoula, , 59801
Chapter 10
Alright, now we are ready to explore the special effects in our application.
Just add this one line of code at the end of the above function:
new Effect.Highlight($(div));
And, you will not believe me. So, go ahead and see the visual treat for yourself!
Check out the following screenshot:
Mark items as completed
OK, this is the story so far. We have created lists, added items to our lists, and
highlighted them using effects. Perfect! Now, the user has completed a particular
task, so what's the point of showing the same task to the user along with the
incomplete items? So the user marks the item as complete. The user will have to just
click on the checkbox of the item and the item should get added into the incomplete
item <div>.
In the previous topic we talked about the MarkDone(this.id)function, and we will
cover that function in this section.
For that, we have some background work to process.
•
Add the item to the completed <div>
•
Delete the item from the incomplete <div>
•
Change the status of the item to completed
[ 183 ]
This material is copyright and is licensed for the sole use by Richard Ostheimer on 18th June 2009
Please purchase PDF Split-Merge hildawww.verypdf.com to remove this watermark.
2205 on ave., , missoula, , 59801
Todonow: A Tadalist Clone
Before we get into the code, have a look at the following screenshot to see what the
application will look like:
Let's get started. What follows is the snippet for the function MarkDone(this.id).
We are just calling the function by passing the ID and the value of the item.
function MarkDone(valueID){
var itemValue = $(valueID).value;
AddtoCompleted(valueID, itemValue);
}
Add the item to the completed <div>
We are calling the AddtoCompleted function. The purpose of this function is to
create a <div> element and append an input checkbox element with the onclick
event as MarkUndone(this.id). The functions DeletefromItemTree() and
ChangeStatus() will be covered in the next topic.
The AddtoCompleted function takes valueID and itemValue as parameters. We are
creating a <div> and the checkbox on the fly.
Function AddtoCompleted(valueID, itemValue) {
var str = "DIV"+valueID;
var divDelete = $(str);
[ 184 ]
This material is copyright and is licensed for the sole use by Richard Ostheimer on 18th June 2009
Please purchase PDF Split-Merge hildawww.verypdf.com to remove this watermark.
2205 on ave., , missoula, , 59801
Chapter 10
DeletefromItemTree(divDelete);
ChangeStatus(valueID);
var div1 = document.createElement('div');
div1.className ='ItemComplete';
div1.id = str;
var i = document.createElement('input');
i.setAttribute("type","checkbox");
i.id=valueID;
i.defaultChecked="true";
i.value=itemValue;
i.className="ItemList";
i["onclick"] = new Function("MarkUnDone(this.id)");
var t = document.createTextNode(itemValue);
div1.appendChild(i);
div1.appendChild(t);
$('Completed').appendChild(div1);
new Effect.Highlight($(div1));
}
Delete the item from the incomplete <div>
In the above function AddToCompleted(), we have called the
DeleteFromItemTree(divDelete) function. It takes <div> to delete from the
completed <div> called ItemTree.
function DeletefromItemTree(divDelete)
{
$('ItemTree').removeChild(divDelete);
}
Using the code that we just saw, we are removing the child from the
completed ItemTree <div>.
Change the status of the item to completed
We have also called the function changeStatus(valueID) function, which is
used to update the status of the item in the database. Again, we will be making
Ajax.Request and updating the status.
function ChangeStatus(valueID) {
var list = 'ListID='+$F('ListID');
var user = 'userID='+$F('userID');
var itemID = 'itemID='+valueID;
var pars = itemID+'&'+user+'&'+list;
new Ajax.Request(
[ 185 ]
This material is copyright and is licensed for the sole use by Richard Ostheimer on 18th June 2009
Please purchase PDF Split-Merge hildawww.verypdf.com to remove this watermark.
2205 on ave., , missoula, , 59801
Todonow: A Tadalist Clone
'ChangeStatus.php',
{
asynchronous:true,
parameters:pars,
onComplete: ShowStatus
}
);
}
We are calling the changeStatus.php; script. We will update the status by
executing the query, reading back the value, and returning the message.
require_once 'DBClass.php';
$ListID = $_POST['ListID'];
$user_name = $_POST['userID'];
$itemID = $_POST['itemID'];
$sql = "UPDATE items SET `status` = 'Completed'
WHERE itemID =".$itemID;
$db = new DBclass();
$result = $db->Query($sql);
if (!$result) {
echo 'Could not run query: ' . mysql_error();
exit;
}
else {
$sql = "SELECT COUNT(itemID) from Items WHERE `status` = 'Incomplete'
and ListID =".$ListID;
$result = $db->Query($sql);
$row = $db->fetch_one_row($result);
$num = $row[0];
echo 'You Have'.$num.' Of Incomplete Tasks';
}
?>
OK, now we are done completely with marking the item as completed.
Convert completed items to incomplete
status
Oh my god! I marked the place new LCD monitor order item as completed. But a small
problem, I just placed an order and I didn't pay for it. So, it's still an incomplete task.
What do I do now? Simple, I will uncheck to make the item incomplete again. So we
[ 186 ]
This material is copyright and is licensed for the sole use by Richard Ostheimer on 18th June 2009
Please purchase PDF Split-Merge hildawww.verypdf.com to remove this watermark.
2205 on ave., , missoula, , 59801
Chapter 10
need to change the status of the item from completed to incomplete.
Before we actually go into making our items incomplete, we will add a function on
the onclick event as MarkUnDone(this.id).
The code for the MarkUnDone function is as follows:
function MarkUnDone(valueID){
var itemValue = document.getElementById(valueID).value;
AddtoItemTree(valueID, itemValue);
}
The same process applies to converting the completed items back to incomplete status.
•
Add the item to the incomplete <div>
•
Delete the item from the complete <div>
•
Change the status of the item to incomplete
Add the item to the incomplete <div>
Now you must have guessed it right. We are going to perform the reverse process of
the same procedure that we did in the previous topic.
First, we are going to add a <div> element and an input checkbox to append with
the MarkDone(this.id)function on the onclick event.
We are also calling the functions DeleteFromCompleted() and ResetStatus(). The
code for the function AddtoItemTree() is as follows:
function AddtoItemTree(valueID, itemValue) {
var str = "DIV"+valueID;
var divDelete = $(str);
DeletefromCompleted(divDelete);
ResetStatus(valueID);
var div = document.createElement('div');
div.className ='ItemRow';
div.id = str;
var i = document.createElement('input');
i.type='checkbox';
i.id=valueID;
i.value=itemValue;
i["onclick"] = new Function("MarkDone(this.id)");
var t = document.createTextNode(itemValue);
var br = document.createElement('br');
div.appendChild(i);
[ 187 ]
This material is copyright and is licensed for the sole use by Richard Ostheimer on 18th June 2009
Please purchase PDF Split-Merge hildawww.verypdf.com to remove this watermark.
2205 on ave., , missoula, , 59801
Todonow: A Tadalist Clone
div.appendChild(t);
div.appendChild(br);
$('ItemTree').appendChild(div);
new Effect.Highlight($(div));
}
Delete the item from the complete <div>
Now, let's repeat the same logic that we used while deleting the item from the
completed <div>. We will be removing the item from the completed <div> using
this function:
function DeletefromCompleted(divDelete)
{
$('Completed').removeChild(divDelete);
}
Change the status of the item to incomplete
There is one last thing to do before we place the item back to the incomplete <div>.
We need to reset the status of the item just as we did in changing the status from
incomplete to complete.
We are making Ajax.Request to update the status of the item back from complete to
incomplete. The ResetStatus.php file, which will be used to update the status of the
item, is called.
The code for the function ResetStatus() is as follows:
function ResetStatus(valueID) {
var list = 'ListID='+$F('ListID');
var user = 'userID='+$F('userID');
var itemID = 'itemID='+valueID;
var pars = itemID+'&'+user+'&'+list;
new Ajax.Request(
'ResetStatus.php',
{
asynchronous:true,
parameters:pars,
onComplete: ShowStatus
}
);
}
[ 188 ]
This material is copyright and is licensed for the sole use by Richard Ostheimer on 18th June 2009
Please purchase PDF Split-Merge hildawww.verypdf.com to remove this watermark.
2205 on ave., , missoula, , 59801
Chapter 10
In the resetStatus.php script we are updating the status of the item back to
incomplete again, and then sending the status update back to the user screen.
The value of the parameters are read and the query to update the status of the items
is executed.
$ListID = $_POST['ListID'];
$user_name = $_POST['userID'];
$itemID = $_POST['itemID'];
$db = new DBClass();
$sql = "UPDATE items SET `status` = 'Incomplete' WHERE itemID
=".$itemID;
$result = $db->Query($sql);
If the result is true, we will count the total number of items that have an incomplete
status. The number will be prompted back to the user.
$sql = "SELECT COUNT(itemID) from Items WHERE `status` = 'Incomplete'
and ListID =".$ListID;
$result = $db->Query($sql);
$row = $db->fetch_one_row($result);
$num = $row[0];
echo 'You Have'.$num.' Of Incomplete Tasks';
}
?>
After a lot of coding and scripting, I am sure that you are now eager to see the output
of the application. Here it is. Check out the following screenshot:
[ 189 ]
This material is copyright and is licensed for the sole use by Richard Ostheimer on 18th June 2009
Please purchase PDF Split-Merge hildawww.verypdf.com to remove this watermark.
2205 on ave., , missoula, , 59801
Todonow: A Tadalist Clone
Deleting lists
The other day I was planning for a reunion and it got cancelled. Now that there is no
reunion, I want to delete the entire list. We can delete any list on the fly. Be game and
let's take this feature as your homework. I shall give the code for this feature in the
next chapter. Here is the hint.
Read the session userID, read the $_POST value of the list, delete it from
the database, and update the user about the status. Try it out.
Let's wrap up and log out
Finally, the user has finished today's tasks and (s)he can join the party downtown.
The user can log out. Here, the script is the same as the one we used in our login
management system module.
Check out the following screenshot:
[ 190 ]
This material is copyright and is licensed for the sole use by Richard Ostheimer on 18th June 2009
Please purchase PDF Split-Merge hildawww.verypdf.com to remove this watermark.
2205 on ave., , missoula, , 59801
Chapter 10
Don't worry about your lists. Now that we have killed the session, no one will be
able to see your data. Go ahead and party hard!
Our Todonow is ready to go live
So after a long journey, we reached our first destination. Our todonow application is
now ready to go live. Here is a glimpse of our application:
Summary
In the previous chapters we learned about the striking features of script.aculo.us. In
this chapter we implemented some of those features and created a ready-to-go-live
project (and a to-do list manager), that is, the Todonow application.
In this chapter we used features of Prototype and script.aculo.us such as Ajax.
Request and effects. It's amazing to see that we started our journey with simple
features and now we are ready with our own applications.
The sole idea was to show how web developers and user interface designers use
the wonderful yet powerful script.aculo.us library to make appealing and useful
web applications.
In the next chapter we will create yet another killer web application. Yes, now it's
time for you and me to go ahead and plan our lists and tasks for the day.
[ 191 ]
This material is copyright and is licensed for the sole use by Richard Ostheimer on 18th June 2009
Please purchase PDF Split-Merge hildawww.verypdf.com to remove this watermark.
2205 on ave., , missoula, , 59801
This material is copyright and is licensed for the sole use by Richard Ostheimer on 18th June 2009
Please purchase PDF Split-Merge hildawww.verypdf.com to remove this watermark.
2205 on ave., , missoula, , 59801
Creating Delicious and Digg
Bookmarks Manager
Now that we have planned our to-do list for today (using our todonow manager
created in the previous chapter), let's quickly get started with the day's work.
Some of the key topics we will be covering are how to:
•
Create a database for our application
•
Define features and functionality
•
Create the user interface for our frontend user
•
Implement the features
•
View the complete application at a glance
In this chapter we will be creating a mash up of Delicious and Digg applications.
Let's admit that we love Delicious and Digg applications. So, why not try and build
some of the features in our web application based on these lovely applications?
The whole point of doing this project is to understand how we, as developers, can
explore new possibilities and build features in a more agile way.
Application at a glance
Let's quickly get the complete picture of what the application is all about. Let's call
this application bookmarker.
We are trying to create a mash up of Delicious and Digg applications. As a
user, we will be able to submit our URLs and search using real-time search
(aka autocompletion). We learned this in Chapter 7.
This material is copyright and is licensed for the sole use by Richard Ostheimer on 18th June 2009
Please purchase PDF Split-Merge hildawww.verypdf.com to remove this watermark.
2205 on ave., , missoula, , 59801