Chapter7Advanced ModelingTools-I
Bạn đang xem bản rút gọn của tài liệu. Xem và tải ngay bản đầy đủ của tài liệu tại đây (753.37 KB, 42 trang )
Chapter
7
Advanced Modeling
Tools-I
After completing this chapter you will be able to:
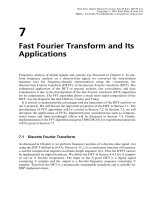
• Create sweep feature using the Sweep > Solid and Sweep > Thin options.
• Create features using sweep cut.
• Create Parallel, Rotational, and General blend.
• Use Blend Vertex in blend features.
• Create Shell feature.
Learning Objectives
7-2 Pro/ENGINEER for Designers
© CADCIM T© CADCIM T
© CADCIM T© CADCIM T
© CADCIM T
echnologies, USAechnologies, USA
echnologies, USAechnologies, USA
echnologies, USA
. F. F
. F. F
. F
or online training, contact online training, contact
or online training, contact online training, contact
or online training, contact
OTHER PROTRUSION OPTIONS
The Extrude and Revolve options available in the SOLID OPTS menu were discussed in
Chapter 3, and the Sweep and Blend options are discussed in this chapter. As mentioned
earlier, Protrusion and Cut are the two basic options available in Pro/ENGINEER that are used
to create a feature.
NoteNote
NoteNote
Note
All the options that are available for creating a cut are similar to those that are available for
creating a protrusion. Remember, that a cut is performed on an existing feature and therefore,
the Cut option is available only when at least a base feature exists on the graphics screen.
In the next section you will learn about both protrusion and cut sweeps.
SWEEP
The Sweep option extrudes a section along a defined trajectory. The order of operation is to
first create a trajectory and then a section. Trajectory is a path along which a section is swept.
The trajectory for a sweep feature can be either sketched or selected. The Sweep option of
protrusion is similar to the Extrude option, the only difference being that in the case of the
Extrude option the feature is extruded in the direction normal to the sketching plane, but in
the case of the Sweep option the section is swept along the sketched or selected trajectory. The
trajectory can be open or closed. Normal sketching tools are used for sketching the trajectory.
The cross section of the swept feature remains constant throughout the sweep.
Note
Some important points to remember while drawing a trajectory and a
section for a sweep feature are discussed later in this chapter.
Sweep > Solid
The Sweep option can be used for adding material as well as for removing
material, that is, for protrusion as well as for cut features. In the Sweep >
Solid option that is discussed here, material defined by the section is
added in the specified path. Figure 7-1 shows the SOLID OPTS submenu
that is displayed when you choose FEAT > Solid > Protrusion. You can
also choose the Sweep option from the menu bar. Choose Insert menu
from the menu bar; various options are displayed in this menu. Choose
Protrusion > Sweep. The SWEEP TRAJ menu appears. Similarly, when
you choose the Done option in the SOLID OPTS menu, the SWEEP
TRAJ menu is displayed as shown in Figure 7-2. The options in this
menu are discussed next.
Sketch Traj
The Sketch Traj option is used when you want to sketch the trajectory
for the sweep feature. This is the most commonly used option for defining
the trajectory. The trajectory can be open or closed. There are some
limitations for using closed or open trajectory with closed or open section.
Figure 7-1 SOLID
OPTS menu
Figure 7-2 SWEEP
TRAJ menu
Advanced Modeling Tools-I 7-3
© CADCIM T© CADCIM T
© CADCIM T© CADCIM T
© CADCIM T
echnologies, USAechnologies, USA
echnologies, USAechnologies, USA
echnologies, USA
. F. F
. F. F
. F
or engineering seror engineering ser
or engineering seror engineering ser
or engineering ser
vices, contact , contact
vices, contact , contact
vices, contact
These limitations are discussed in the next section. When you choose the Sketch Traj option,
you are prompted to select a sketching plane. The sketching plane you select will be parallel to
the screen when you sketch the trajectory. Figure 7-3 shows how the section is swept along the
sketched trajectory, and Figure 7-4 shows the shaded image of the swept feature.
The following points specify the combinations of trajectories and
sections that are possible/not possible to create.
1. Open section and open trajectory are not possible.
2. Closed section and open trajectory are possible.
3. If the sketched trajectory is a closed loop then the
ATTRIBUTES menu is displayed as shown in Figure 7-5.
There are two options that are available: Add Inn Fcs (Add
inner faces) and No Inn Fcs (No inner faces).
For Add Inn Fcs, only open sections are possible, as shown in Figure 7-6. The shaded
image of the corresponding swept feature is shown in Figure 7-7. The two figures below
explain the Add Inn Fcs option.
Figure 7-4 Shaded imageFigure 7-3 Sweep along the sketched trajectory
Figure 7-5 ATTRIBUTES
menu
Figure 7-6 Add Inn Fcs option Figure 7-7 Shaded image
7-4 Pro/ENGINEER for Designers
© CADCIM T© CADCIM T
© CADCIM T© CADCIM T
© CADCIM T
echnologies, USAechnologies, USA
echnologies, USAechnologies, USA
echnologies, USA
. F. F
. F. F
. F
or online training, contact online training, contact
or online training, contact online training, contact
or online training, contact
For No Inn Fcs, only closed sections are possible, as shown in Figure 7-8. The shaded
image of the corresponding swept feature is shown in Figure 7-9.
Select Traj
The Select Traj option allows you to select a trajectory on the graphics screen. The trajectory
to be selected can be an existing edge or a datum curve. Creation of datum curves will be
discussed later in the chapter. When you choose this option from the SWEEP TRAJ menu, the
CHAIN menu is displayed. The CHAIN menu is also discussed later in this chapter.
Figure 7-10 and Figure 7-11 show two examples of selecting the edges of the base feature and
then using these as a trajectory to sweep and their corresponding swept features.
Sketching a trajectory aligned to an existing geometry
When one end of the sketched trajectory is aligned to the adjacent geometry of the existing
feature, Pro/ENGINEER provides two options. The first option is to merge the ends of the
trajectory with the adjacent geometry and the second option is to leave the ends of the trajectory
free. These options are available in the ATTRIBUTES menu that is displayed after you
Figure 7-9 Swept feature
Figure 7-8 No Inn Fcs option
Figure 7-11 Sweep along the selected trajectory
Figure 7-10 Sweep along the selected trajectory
Advanced Modeling Tools-I 7-5
© CADCIM T© CADCIM T
© CADCIM T© CADCIM T
© CADCIM T
echnologies, USAechnologies, USA
echnologies, USAechnologies, USA
echnologies, USA
. F. F
. F. F
. F
or engineering seror engineering ser
or engineering seror engineering ser
or engineering ser
vices, contact , contact
vices, contact , contact
vices, contact
complete the sketch of the trajectory and choose the Continue
with the current section button. The ATTRIBUTES menu is
shown in Figure 7-12.
The ATTRIBUTES menu is displayed only when the trajectory
is aligned to an edge or surface of the feature that already exists
on the graphics screen. This means that the ATTRIBUTES menu
does not appear if the sweep feature you are drawing is the base
feature of a model or, in other words, if there is no adjacent
geometry to which the trajectory can be merged. The options
available in the ATTRIBUTES menu are discussed next.
Merge Ends
The Merge Ends option merges the end of a sweep feature to the surface to which the
end of the trajectory is aligned. For this option the trajectory should be aligned to the adjacent
geometry.
Free Ends
The Free Ends option leaves the sweep feature partially attached to the adjacent feature even
if the end of the trajectory is aligned to the adjacent geometry.
Figure 7-13 show the Merge Ends and Free Ends options. In the figure shown below, the
trajectory is aligned with the adjacent geometry in both the cases. Figure 7-14 shows the
corresponding shaded image.
Creating Sweep feature by selecting a trajectory
When you choose the Select Traj option from the SWEEP TRAJ menu, the CHAIN menu is
displayed as shown in Figure 7-15. You can use the CHAIN menu only when if you have
created a feature that will be used to select the trajectory. The options in this menu are used to
select a trajectory. These options are discussed next.
Figure 7-12 ATTRIBUTES
menu
Figure 7-13 Merge Ends and Free Ends options Figure 7-14 Shaded image
7-6 Pro/ENGINEER for Designers
© CADCIM T© CADCIM T
© CADCIM T© CADCIM T
© CADCIM T
echnologies, USAechnologies, USA
echnologies, USAechnologies, USA
echnologies, USA
. F. F
. F. F
. F
or online training, contact online training, contact
or online training, contact online training, contact
or online training, contact
One By One
The One By One option of the CHAIN menu is selected by
default. Using this option you can select an edge or curve
individually, one by one. When you select an edge using the left
mouse button, the color of the selected edge changes to blue.
Before selecting the edge, make sure that the Select option in
the CHAIN menu is highlighted. The edge once selected and
confirmed by choosing Done Sel from the GET SELECT menu
or by using the middle mouse button can also be unselected by
selecting the Unselect option from the CHAIN menu.
Tangent Chain
Using this option, you can select an edge or edges tangent to
the selected edge. When you select an edge, all the edges
tangent to the selected edge are highlighted. If the selected edge
is not tangent to any other edge then the function of this option
is the same as that of the One By One option, the difference
being that you can select only one edge in the case of the
Tangent Chain option.
Curve Chain
You can select a chain of curves by using the Curve Chain option.
Bndry Chain
The Bndry Chain option is used only for surface features. You
can define a chain by selecting a quilt and using its one-sided
edges. If the quilt has more than one loop, select a specific
loop to define the chain. When you select the edge of the quilt,
it is highlighted in blue and the CHOOSE menu is displayed
with the options as shown in Figure 7-16.
Figure 7-15 CHAIN menu
Figure 7-16 CHOOSE menu
Tip: The following points should be remembered while creating a sweep feature:
1. Similar to other sketched features the trajectory of the sweep feature is also sketched
after selecting a sketching plane.
2. The section for the sweep trajectory is sketched using the normal sketcher tools
when the sketch trajectory option is selected.
3. At bends in a trajectory, the radius of the bend should be proportionate to the
cross section to be swept to avoid overlapping. If the section size is large and the
radius of the curve or bend is small, overlapping takes place and the sweep
feature will not be created. Therefore, make sure that the ratio of the size of the
section to the size of the trajectory is appropriate.
Advanced Modeling Tools-I 7-7
© CADCIM T© CADCIM T
© CADCIM T© CADCIM T
© CADCIM T
echnologies, USAechnologies, USA
echnologies, USAechnologies, USA
echnologies, USA
. F. F
. F. F
. F
or engineering seror engineering ser
or engineering seror engineering ser
or engineering ser
vices, contact , contact
vices, contact , contact
vices, contact
Surf Chain
Using the Surf Chain option, you can define a chain by selecting a
surface and using its edges. If the surface has more than one loop,
then you are prompted to specify a loop to define the chain. When a
surface is selected, the CHAIN OPT menu is displayed as shown in
Figure 7-17. Choose either Select All or From-To from the CHAIN
OPT menu.
Intent Chain
The Intent Chain option is used to select multiple edges. When a section is extruded, the
edges formed by the extrusion consists of intent chains. The intent chains can either be the
edges of the section or the edges of the extruded surface. The edges selected should form a
closed loop.
Sweep > Thin
The Sweep > Thin option creates a thin sweep feature with a specified thickness. This option
is similar to the Extrude > Thin option that was discussed in Chapter 3. In the case of thin
features, a certain thickness has to be specified. The thickness is specified on one sides of the
section or symmetrically to both the sides of the section. The resultant sweep is similar to the
solid sweep created with a section comprising of two closed loops at some offset distance.
Figure 7-18 shows the sections that can be used to create the model shown in Figure 7-19.
Sweep Cut
To create a Sweep Cut feature, the procedure to be followed is the same as that in Sweep
Protrusion. The only difference is that in case of cut features, the material is removed from
existing feature. The Cut option can be invoked from PA RT > Feature > Create > Solid >
Cut > Sweep. Cut can be a solid swept cut or thin swept cut. Figure 7-20 shows trajectories for
the Sweep Cut feature. Figure 7-21 shows the shaded model of an open trajectory sweep cut
and a closed trajectory sweep cut.
Figure 7-18 Two possible options to create the
same model
Figure 7-19 Model created using the same sections
Figure 7-17 CHAIN
OPT menu
7-8 Pro/ENGINEER for Designers
© CADCIM T© CADCIM T
© CADCIM T© CADCIM T
© CADCIM T
echnologies, USAechnologies, USA
echnologies, USAechnologies, USA
echnologies, USA
. F. F
. F. F
. F
or online training, contact online training, contact
or online training, contact online training, contact
or online training, contact
BLEND
Blend features are composed of two or more sections that are joined
through transitional faces at their edges so as to form a continuous
feature. The Blend is one of the types of Protrusion options and Cut
options that are available in Pro/ENGINEER. The Blend option is used
where the feature to be created has varying cross sections. It can be
invoked from PA RT > Feature > Create > Solid > Protrusion or Cut
> Blend > Solid or Thin. You can also invoke the Blend option from
the menu bar. Choose Insert > Protrusion or Cut > Blend.
When you choose the Blend option, the BLEND OPTS submenu is
displayed as shown in Figure 7-22. The options in this menu are
discussed next.
Parallel
Parallel blends have sections that are drawn parallel to each other and
a distance is defined between the parallel sections.
After choosing Parallel > Regular Sec > Done from the BLEND OPTS submenu, the
ATTRIBUTES menu is displayed as shown in Figure 7-23. The options in this menu are
discussed next.
Straight
The Straight option is used to connect the vertices of all sections
in a blend feature with straight lines.
Smooth
The Smooth option is used to connect the vertices of all sections
in a blend feature with curves.
Figure 7-21 Shaded model with sweep cuts
Figure 7-20 Trajectories for Sweep Cut
Figure 7-22 BLEND
OPTS submenu
Figure 7-23 ATTRIBUTES
menu
Advanced Modeling Tools-I 7-9
© CADCIM T© CADCIM T
© CADCIM T© CADCIM T
© CADCIM T
echnologies, USAechnologies, USA
echnologies, USAechnologies, USA
echnologies, USA
. F. F
. F. F
. F
or engineering seror engineering ser
or engineering seror engineering ser
or engineering ser
vices, contact , contact
vices, contact , contact
vices, contact
Figure 7-24 shows three sections that are used to create the blend feature. Figure 7-25 and
Figure 7-26 show the parallel blend features with straight edges and smooth edges
respectively created using the sections shown in Figure 7-24.
Note
While drawing a section, the start point of the section should be similar in order to avoid twisted
blend features.
Figure 7-26 Parallel blend with smooth edges
Figure 7-25 Parallel blend with straight edges
Figure 7-24 Parallel sections
7-10 Pro/ENGINEER for Designers
© CADCIM T© CADCIM T
© CADCIM T© CADCIM T
© CADCIM T
echnologies, USAechnologies, USA
echnologies, USAechnologies, USA
echnologies, USA
. F. F
. F. F
. F
or online training, contact online training, contact
or online training, contact online training, contact
or online training, contact
Rotational
Rotational blends have sections that are rotated about the y-axis up to a maximum of
120-degree and the distance between each section is measured
from the coordinate system. Between each section, an angle called
the rotational blend angle has to be defined. In this type of blend,
each section has its own user-defined coordinate system. If the
rotational blend angle entered between the two sections is equal
to 0-degree then Rotational blend option functions in the same
way as the Parallel blend option.
Note that all the nonparallel blends can be open or closed.
Therefore, after choosing Rotational > Regular Sec > Done from
the BLEND OPTS submenu, the ATTRIBUTES menu is
displayed as shown in Figure 7-27. The options in this menu are
discussed next.
Figure 7-27 ATTRIBUTES
menu
Tip: The following points should be remembered while creating a Parallel blend
feature:
1. After completing first section, use the Toggle Section option to proceed to drawing
the second section. You can also hold down the right mouse button and choose the
Toggle Section option from the shortcut menu that appears. If you choose the
Continue with the current section button before drawing the second section,
the system prompts to use the Toggle Section option to continue with the second
section.
2. Active section appears in cyan color and the other sections appears in gray.
3. All the sections in a blend feature must always have the same number of entities.
However, you can blend a point with any section irrespective of the number of
entities.
4. System prompts for depth between subsequent sections after completion of all the
sections in the blend.
5. By default, the start point of any entity that is drawn to define a section is
considered as the Start Point of the section. To change the Start Point of a
section, select the point to be defined as the Start Point and hold down the right
mouse button to display the shortcut menu. Choose the Start Point option from
this shortcut menu to change the start point.
6. After defining the sections in a blend feature and before choosing the Continue
the current section button, the sections can be modified by using the Toggle
Section option.
Advanced Modeling Tools-I 7-11
© CADCIM T© CADCIM T
© CADCIM T© CADCIM T
© CADCIM T
echnologies, USAechnologies, USA
echnologies, USAechnologies, USA
echnologies, USA
. F. F
. F. F
. F
or engineering seror engineering ser
or engineering seror engineering ser
or engineering ser
vices, contact , contact
vices, contact , contact
vices, contact
Open
The Open option is used when the blend feature to be created has to be kept open.
Closed
The Closed option is used to create a closed blend feature. In this type of blend feature,
Pro/ENGINEER closes the feature by automatically blending the last section with the first section.
Figure 7-28 shows the sections used to create a rotational smooth blend feature. The three
default datum planes can also be seen. From Figure 7-28, it is evident that two sections are
used to create the blend feature and that these sections are at an angle of 45-degree. It is also
evident from the figure that the second section is dimensioned from the coordinate system
that was defined in the first section. Figure 7-29 shows the shaded model of the same blend
feature.
General
Using the General option, sections are translated and rotated about the x, y, and z axes. The
sections are aligned using the user-defined coordinate system. The coordinate system has to
be manually placed in every section sketch that constitutes the blend feature.
USING BLEND VERTEX
As mentioned earlier, each section of the blend feature must have an equal number of entities.
However, you can use the Blend Vertex option is if the number of entities in all the sections
are not the same. For example, to create a blending between a rectangle and a triangle, add
blend vertex on a point other than the start point of the triangle. The two vertices of the
triangle will be blended with the two vertices of rectangle and the blend vertex in the triangle
Figure 7-29 Shaded model of rotational
open blend feature
Figure 7-28 The two sections with dimensions and
the default datum planes used to create the blend
feature shown in the adjacent figure
Tip: It is recommended that the closed blend should have at least three sections.
7-12 Pro/ENGINEER for Designers
© CADCIM T© CADCIM T
© CADCIM T© CADCIM T
© CADCIM T
echnologies, USAechnologies, USA
echnologies, USAechnologies, USA
echnologies, USA
. F. F
. F. F
. F
or online training, contact online training, contact
or online training, contact online training, contact
or online training, contact
will be blended with the remain two vertices in the rectangle.
Note
The Blend Vertex can be used only in either the first or last section of a blend feature.
SHELL OPTION
The Shell option scoops out the material from the model and at the
same time removes the selected faces, leaving behind a thin model
with some specified wall thickness. The Shell option can be invoked
from the menu bar by choosing Insert > Shell. The Shell option
can also be invoked from the Menu Manager by choosing FEAT >
Create > Solid > Shell. The Shell option is used on existing models
and hence this option is available only when a model exists on the
graphics screen.
When you choose the Shell option, the FEATURE REFS menu shown
in Figure 7-30 is displayed. The options in this menu are discussed next.
Add
The Add option is chosen to select the faces to be removed from the model. The selected face
will be removed from the model, leaving the specified thickness from the boundary of the
selected surface as shown in Figure 7-31 and Figure 7-32.
Remove
The Remove option is available only when you have selected the faces using the Add option
and chosen Done Sel from the GET SELECT submenu. This option is chosen to restore the
faces that were selected to be excluded from the model with the Add option.
Remove All
The Remove All option is used to remove all the faces that were selected using the Add
option. The Remove and Remove All options are generally used when the selection of faces
Figure 7-30 FEATURE
REFS menu
Figure 7-32 Shell created on the selected surface
Figure 7-31 Highlighted surface to shell
Advanced Modeling Tools-I 7-13
© CADCIM T© CADCIM T
© CADCIM T© CADCIM T
© CADCIM T
echnologies, USAechnologies, USA
echnologies, USAechnologies, USA
echnologies, USA
. F. F
. F. F
. F
or engineering seror engineering ser
or engineering seror engineering ser
or engineering ser
vices, contact , contact
vices, contact , contact
vices, contact
has to be changed and these options are available only when the faces are already selected
using the Add option.
Done Refs
The Done Refs option is used to confirm the selection after the selection of all the faces is
completed.
Quit Refs
The Quit Refs option is used to abort the selection procedure.
Note
When the system prompts you to enter the shell thickness value, the Message Input Window
appears. The thickness value entered can be positive or negative. If the value entered is positive,
the material is removed, leaving the shell thickness inside the boundary of the face selected. But
when the value entered is negative, the shell thickness is added outside the boundary of the face
selected.
DATUM CURVES
Datum curves are useful in creation of advanced solid and surface features such as the sweep
trajectories to create a sweep feature. A datum curve is considered as a feature and is displayed
Tip: You can also create a variable thickness shell. To create a shell with variable
thickness, follow the step given below:
1. Choose the Shell option from the Insert menu in the menu bar. The
FEATURE REFS menu is displayed and you are prompted to select a face to
remove.
2. Using the left mouse button select the face to remove, the selected face will turn
red. Choose Done Sel from the GET SELECT submenu and choose Done Refs
from the FEATURE REFS menu. The Message Input Window is displayed
and you are prompted to enter the thickness, enter a value that will define the
wall thickness and press ENTER.
3. Now, choose the Spec Thick option from the SHELL dialog box and choose the
Define button. The SPEC THICK menu is displayed. In this menu the Set
Thickness option is selected by default and you are prompted to select a surface
to specify different thickness.
4. Using the left mouse button select the surface to specify different thickness and
enter the value of the different thickness in the Message Input Window and
press ENTER.
5. Repeat the step 4 to specify the different thickness value to the other surfaces.
After specifying the different thickness to all the surfaces choose Done from the
SPEC THICK menu and choose OK from the SHELL dialog box.
7-14 Pro/ENGINEER for Designers
© CADCIM T© CADCIM T
© CADCIM T© CADCIM T
© CADCIM T
echnologies, USAechnologies, USA
echnologies, USAechnologies, USA
echnologies, USA
. F. F
. F. F
. F
or online training, contact online training, contact
or online training, contact online training, contact
or online training, contact
in the Model Tree. The option to create a datum curve can be invoked
from the menu bar by choosing Insert > Datum > Curve. You can also
use the Insert a datum curve. button from the Right Toolchest to
invoke the options for creating a datum curve.
When you choose the Insert a datum curve. button from the Right
Toolchest, the CRV OPTIONS submenu is displayed as shown in
Figure 7-33. Some of the options available in this submenu are discussed
next.
Sketch
The Sketch option is used to sketch a datum curve using the sketcher
tools. The sketch can be open or closed.
Intr. Surfs
The Intr. Surfs (Intersection of Surfaces) option creates a datum curve
at the intersection of a face of the model and a datum plane,
intersection of a face of the model and a quilt surface, intersection of a
quilt surface and a datum plane. Note that you cannot create a datum
curve at the intersection of two datum planes, two quilts, or two model
faces using this option.
Thru Points
The Thru Points option creates a datum curve by selecting the existing datum points. The
resulting datum curve may be a spline curve or can have a user-defined radii.
From File
The From File option is used to import a datum curve from IGES, VDA, *.ibl file formats.
Projected
The Projected option projects a selected or sketched entity on one or more planar or
non-planar surfaces or datum planes. The projected datum curve forms a true projection of
the selected or sketched entity on the specified surfaces. The length of the original entity may
distort while projecting.
Formed
This option is used to create a datum curve by wrapping a sketched entity around a solid or a
quilt.
Figure 7-33 CRV
OPTIONS submenu
Advanced Modeling Tools-I 7-15
© CADCIM T© CADCIM T
© CADCIM T© CADCIM T
© CADCIM T
echnologies, USAechnologies, USA
echnologies, USAechnologies, USA
echnologies, USA
. F. F
. F. F
. F
or engineering seror engineering ser
or engineering seror engineering ser
or engineering ser
vices, contact , contact
vices, contact , contact
vices, contact
TUTORIALS
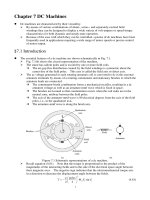
In this tutorial you will create the model shown in Figure 7-34. This figure also shows the
sectioned front view, top view, and the right side view of the solid model with dimensions.
(Expected time: 40 min)
The following steps outline the procedure for creating this model:
a. First, examine the model and determine the number of features in it. The model is
composed of six features, see Figure 7-34.
b. The base feature is a sweep feature, see Figure 7-37. Select the sketching plane for the base
feature, draw the sketch using the sketcher tools, and apply constraints and dimensions.
c. The second feature is a shell of given thickness. Both the end surfaces of the sweep feature
will be removed during shelling, see Figure 7-38.
d. The third and the fourth features are extruded features and will be created on the two
Figure 7-34 Top, front, right-side, and isometric views of the model. The hidden lines are suppressed for
clarity
Tutorial 1
7-16 Pro/ENGINEER for Designers
© CADCIM T© CADCIM T
© CADCIM T© CADCIM T
© CADCIM T
echnologies, USAechnologies, USA
echnologies, USAechnologies, USA
echnologies, USA
. F. F
. F. F
. F
or online training, contact online training, contact
or online training, contact online training, contact
or online training, contact
ends of the swept feature respectively. These features have different sketching planes and
hence will be created as separate features. Select the sketching plane, draw the sketch
using the sketcher tools, apply constraints and dimensions, and then extrude the sketch to
the given distance, see Figure 7-40.
e. The fifth feature is a counterbore hole that will be created on the third feature, see
Figure 7-42. This hole will be created using the HOLE dialog box.
f. The sixth feature is a counterbore hole that will be created on the fourth feature, see
Figure 7-42. This hole will be created using the HOLE dialog box. Then, the two
counterbore holes will be patterned on the third and the fourth feature, see Figure 7-43.
After understanding the procedure for creating the model, you are now ready to create it.
When Pro/ENGINEER session is started, the first task is to set the working directory. Since
this is the first tutorial of this chapter, you need to create a folder named c07 if it does not
exist. Choose the New Directory button in the Select Working Directory dialog box and
create a directory named c07 at C:\ProE.
Creating New Object File
1. Open a new part file and name it as c07tut1.
The three default datum planes are displayed on the graphics screen. The Model Tree
also appears on the graphics screen. Exit the Model Tree by choosing the Model Tree on/
off button from the Model Display toolbar.
Invoking the Sweep Option
There are two methods to invoke the Sweep option. The first method is to use the menu bar
present on the top of the screen and the second method is to use the Menu Manager present
on the right side of the graphics screen.
1. Choose Insert > Protrusion > Sweep from the menu bar or choose PART > Feature >
Create > Solid > Protrusion > Sweep > Solid > Done from the Menu Manager. The
SWEEP TRAJ menu is displayed.
2. Choose the Sketch Traj option from the SWEEP TRAJ menu. You are prompted to select
or create a sketching plane.
Selecting the Sketching Plane
The trajectory of the sweep feature will be sketched on the FRONT datum plane.
1. Select FRONT datum plane as the sketching plane. A red arrow points in the direction of
feature creation and you are prompted to specify the direction of feature creation.
2. Choose Okay from the DIRECTION submenu. The SKET VIEW submenu is displayed.
3. Choose Top from this submenu and select the TOP datum plane.
Advanced Modeling Tools-I 7-17
© CADCIM T© CADCIM T
© CADCIM T© CADCIM T
© CADCIM T
echnologies, USAechnologies, USA
echnologies, USAechnologies, USA
echnologies, USA
. F. F
. F. F
. F
or engineering seror engineering ser
or engineering seror engineering ser
or engineering ser
vices, contact , contact
vices, contact , contact
vices, contact
After you select the planes for orientation, the system takes you to the sketcher environment.
Specifying References
The References dialog box is displayed on the top right corner of the screen and the status
displayed in the Reference status area of the References dialog box is Fully Placed. This
means that the references required are already defined and you can now start drawing the
sketch. Exit the References dialog box by choosing the Close button from the dialog box.
Drawing the Trajectory
From the model it is evident that the trajectory for the sweep feature is a quarter circle.
1. Choose the Create an arc by picking its center and endpoints. button from the
Sketcher Tools toolbar. This button is available on the flyout that is displayed
when you choose the black arrow that is on the right side of the Create an arc by
3 points or tangent to an entity at its endpoint. button.
2. Draw an arc such that the center of the arc lies at the intersection of the two perpendicular
planes namely TOP and RIGHT as shown in Figure 7-35. As you specify the center of the
arc, the cursor snaps to the point of intersection of the two planes. Now, draw the arc and
exit this tool.
The endpoints of the arc are automatically aligned to the TOP and RIGHT datum planes.
You will notice that an arrow is attached at the start point of the trajectory. This arrow
points in the direction of sweep.
Modifying the Dimensions of the Trajectory
When you were drawing the arc, the Intent Manager was on. Therefore, the arc was
dimensioned automatically and a weak radial dimension is assigned to it. You need to modify
the dimension as per your requirement.
1. Using the left mouse button double-click on the dimension and modify the radial dimension
to 26 as shown in Figure 7-36. You will notice the sketch refits on the screen.
Figure 7-35 The sketch of required trajectory
Figure 7-36 Dimension for the arc
7-18 Pro/ENGINEER for Designers
© CADCIM T© CADCIM T
© CADCIM T© CADCIM T
© CADCIM T
echnologies, USAechnologies, USA
echnologies, USAechnologies, USA
echnologies, USA
. F. F
. F. F
. F
or online training, contact online training, contact
or online training, contact online training, contact
or online training, contact
2. Choose the Continue with the current section. button.
Drawing the Section for Sweep
After choosing the Continue with the current section button, the direction of viewing is
modified such that the start point of the trajectory becomes normal to the screen. A blue cross
of infinite length appears on the screen. This cross consists of two perpendicular lines of
infinite length. The intersection point of these lines is the start point of the trajectory. The
center of the circle should lie at the intersection of these lines. The References dialog box is
also displayed. The status displayed in the Reference status area of the References dialog
box is Fully Placed. Close the References dialog box. You are also prompted to draw the
cross-section for the sweep.
1. Choose the Create circle by picking the center and a point on the circle. button
and create a circle such that the center of circle lies at the intersection of the two
infinite perpendicular lines.
When you draw the circle, the cursor snaps to the intersection point of the cross. The
circle will be dimensioned automatically because the Intent Manager is on.
Modifying the Dimensions of the Section
1. Choose the Select one item at a time - shift to gather more than one item. button
and using the left mouse button double-click on the dimension and modify the
diameter dimension to 21.
The sketch accepts the value and refits on the screen.
2. Choose the Continue with the current section. button.
Previewing the Swept Feature
The sweep feature is completed and now it can be previewed.
1. Choose the Preview button from the PROTRUSION dialog box that is present on the
top right corner of the window.
2. Choose the Saved view list button from the View toolbar. From the drop-down list choose
the Default option. The model orients on the graphics screen as shown in Figure 7-37.
You can use the CTRL+middle mouse button to change the orientation of the model.
3. Now, choose the OK button from the PROTRUSION dialog box to exit it.
Tip: When you enter the sketcher environment to define a section for sweep trajectory,
it is often difficult to understand the orientation of the view. For this purpose, a blue
colored cross is available that determines the orientation of the section with respect to
the trajectory.
Advanced Modeling Tools-I 7-19
© CADCIM T© CADCIM T
© CADCIM T© CADCIM T
© CADCIM T
echnologies, USAechnologies, USA
echnologies, USAechnologies, USA
echnologies, USA
. F. F
. F. F
. F
or engineering seror engineering ser
or engineering seror engineering ser
or engineering ser
vices, contact , contact
vices, contact , contact
vices, contact
Creating the Shell Feature
The sweep feature is completed and now you can create the next feature. The next feature is
shell. The swept feature is shelled and the shell thickness lies outside the section. That is, the
shell thickness is -4.
1. Choose Insert > Shell from the menu bar. The FEATURE REFS menu is displayed and
you are prompted to select one or more surfaces to remove.
2. Select the two end surfaces of the swept feature using the left mouse button. The edges of
the two surfaces selected are highlighted red in color.
3. Choose Done Sel from the GET SELECT submenu to accept the selection made on the
feature. Now, choose Done Refs from the FEATURE REFS menu.
4. The Message Input Window appears and you are prompted to enter the thickness value.
Enter -4 in this window and press ENTER.
The shell feature is created and you can now preview it.
Note
Instead of using the Shell option, two concentric circles can be drawn while drawing the section
for the sweep feature in order to obtain the desired hollow feature. Also, the Sweep > Thin
option can be used to obtain the same hollow feature. However, in this tutorial you will use the
Shell option.
Previewing the Shell Feature
1. Choose the Preview button from the SHELL dialog box.
The default trimetric view of the shell feature is shown in Figure 7-38. You can use the
CTRL+middle mouse button to change the orientation of the model.
2. Now, choose the OK button from the SHELL dialog box to exit it.
Figure 7-38 Shell feature without datum planes
Figure 7-37 Sweep feature without datum
planes
7-20 Pro/ENGINEER for Designers
© CADCIM T© CADCIM T
© CADCIM T© CADCIM T
© CADCIM T
echnologies, USAechnologies, USA
echnologies, USAechnologies, USA
echnologies, USA
. F. F
. F. F
. F
or online training, contact online training, contact
or online training, contact online training, contact
or online training, contact
Creating the Extrude Features
The next feature is an extrude feature having a depth of extrusion of 5 that is created at both
the ends of the swept feature. While drawing the circle of the sketch for the extrude feature,
remember to use the edge of the shell in order to create a hole in the extruded feature also.
1. Choose Insert > Protrusion > Extrude. The ATTRIBUTES menu is displayed.
2. Choose One Side > Done. Select the top surface of the swept feature as the sketching plane
and choose Okay.
3. Choose the Right option from the SKET VIEW submenu and select the RIGHT datum plane.
4. The References dialog box is displayed with the status Not Placed. Select the FRONT and
RIGHT datum planes. Now, note that the status displayed under the Reference Status area
in the References dialog box is Fully Placed.
5. Draw the sketch of the extrude feature and apply constraints and dimensions as shown in
Figure 7-39.
6. Create the extruded feature having a depth of extrusion of 5. Similarly, create the next
extruded feature at the other end of the swept feature. Select the sketching plane, draw
the sketch similar to the first extruded section, apply the same dimensions and constraints,
and extrude the sketch to the given distance.
The extruded features created at both the ends of the swept feature are shown in Figure 7-40.
Creating the Hole Feature
After creating extruded features at both the ends of the swept feature, counterbore holes will
be created. One hole is created on each extruded surface and then they are patterned on
individual planes separately to create the remaining three instances.
Figure 7-39 Sketch with dimensions and
constraints
Figure 7-40 The two extruded features on the
ends of the sweep feature
Advanced Modeling Tools-I 7-21
© CADCIM T© CADCIM T
© CADCIM T© CADCIM T
© CADCIM T
echnologies, USAechnologies, USA
echnologies, USAechnologies, USA
echnologies, USA
. F. F
. F. F
. F
or engineering seror engineering ser
or engineering seror engineering ser
or engineering ser
vices, contact , contact
vices, contact , contact
vices, contact
1. Choose Insert > Hole from the menu bar. The HOLE dialog box is displayed.
2. Choose the Sketched radio button from the Hole Type area in the HOLE dialog box. The
system takes you to the sketcher environment; sketch the section for the counterbore hole
as shown in Figure 7-41. Sketch a center line, apply constraints, and diametrically dimension
the entities.
3. After completing the sketch, choose the Continue with the current section. button. The
system exits the sketcher environment and the Hole dialog box is redisplayed. Now, you
are prompted to select the references for the hole placement.
4. Choose the top planar surface of the third extruded feature for the placement of hole. You
are prompted to select the linear references.
5. Select the top edge and the side edge of the third feature for specifying the linear references.
The hole is at a distance of 5 from both the edges.
6. Enter the value of 5 in both the Distance edit boxes.
7. Choose the Build feature and repeat the same feature type creation.
button from the HOLE dialog box. The hole is created on the selected
surface and the HOLE dialog box is displayed again.
8. Create another hole on the fourth feature using the same procedure as discussed above.
The default trimetric view of the model that is completed until now is shown in Figure 7-42.
Patterning the Hole
After one hole is placed on each of the two planes, they are patterned.
1. Choose PART > Feature > Pattern. Create pattern of the sketched hole using Identical
type of pattern.
Figure 7-41 Sketch with dimensions and
constraints for the counterbore hole
Figure 7-42 One hole each on the two extruded
features
7-22 Pro/ENGINEER for Designers
© CADCIM T© CADCIM T
© CADCIM T© CADCIM T
© CADCIM T
echnologies, USAechnologies, USA
echnologies, USAechnologies, USA
echnologies, USA
. F. F
. F. F
. F
or online training, contact online training, contact
or online training, contact online training, contact
or online training, contact
Similarly, create pattern of the hole on the other extruded feature also. The default
trimetric view of the complete model is shown in Figure 7-43.
Saving the Model
1. Choose the Save the active object button from the File toolbar and save the model. The
order of feature creation can be seen from the Model Tree shown in Figure 7-44. As
discussed in earlier chapters, the model tree is used to get an idea of the order of feature
creation. In the Model Tree, the id numbers displayed in front of the features may be
different when you create the features.
In this tutorial you will create the model shown in Figure 7-45. This figure also shows the front
view, top view, and the right-side view of the solid model with dimensions.
(Expected time: 30 min)
The following steps outline the procedure for creating this model:
a. First, examine the model and determine the number of features in it. The model is
composed of three features, see Figure 7-45.
b. The base feature is a sweep, see Figure 7-48. Select the sketching plane for the base feature,
draw the trajectory, apply dimensions and constraints, draw the section of the sweep
feature, and then apply dimensions and constraints to the section.
c. The second feature is an extrude feature. Create a datum plane that will be used as the
sketching plane for this feature, see Figure 7-49. Draw the sketch for this feature, apply
dimensions and constraints, and then extrude the sketch upto the outer curved surface of
the base feature, see Figure 7-50.
Tutorial 2
Figure 7-43 The default trimetric view of the
model
Figure 7-44 Model Tree for Tutorial 1
Advanced Modeling Tools-I 7-23
© CADCIM T© CADCIM T
© CADCIM T© CADCIM T
© CADCIM T
echnologies, USAechnologies, USA
echnologies, USAechnologies, USA
echnologies, USA
. F. F
. F. F
. F
or engineering seror engineering ser
or engineering seror engineering ser
or engineering ser
vices, contact , contact
vices, contact , contact
vices, contact
d. The third feature is a hole, see Figure 7-51. The hole will be created on the base feature
using the HOLE dialog box.
After understanding the procedure for creating the model, you are now ready to create it.
The working directory is already selected in Tutorial 1 and therefore you do not need to
select it again. However, if you want to change the working directory, choose File > Set
Working Directory and then select c07 in the Select Working Directory dialog box.
Creating New Object File
1. Open a new part file and name it as c07tut2.
The three default datum planes are displayed on the graphics screen.
Invoking the Sweep Option
As mentioned earlier, there are two ways to invoke the Sweep option. One way is to use the
menu bar present on the top of the screen and the other way is to use the Menu Manager that
is present on the right of the graphics screen.
1. Choose Insert > Protrusion > Sweep from the menu bar. The SWEEP TRAJ menu is
displayed.
Figure 7-45 Top, front, right side, and isometric views of the model
7-24 Pro/ENGINEER for Designers
© CADCIM T© CADCIM T
© CADCIM T© CADCIM T
© CADCIM T
echnologies, USAechnologies, USA
echnologies, USAechnologies, USA
echnologies, USA
. F. F
. F. F
. F
or online training, contact online training, contact
or online training, contact online training, contact
or online training, contact
2. Choose the Sketch Traj option from the SWEEP TRAJ menu. You are prompted to select
or create a sketching plane.
Selecting the Sketching Plane
1. Select FRONT datum plane as the sketching plane. A red arrow points in the direction of
feature creation and you are prompted to specify the direction of feature creation.
2. Choose Okay from the DIRECTION submenu. The SKET VIEW submenu is displayed.
3. Choose Top from this menu and select the TOP datum plane present on the graphics
screen.
Specifying References
After you select the planes for orientation, the system takes you to the sketcher environment.
The References dialog box is displayed at the top right corner of the screen and the status
displayed in the Reference status area of the References dialog box is Fully Placed. Exit the
References dialog box by choosing the Close button from the dialog box.
Drawing the Trajectory
The sketch for the trajectory is U-shaped.
1. Draw the sketch for the trajectory and then add constraints and dimensions shown in
Figure 7-46.
Note that an arrow is attached at the start point of the trajectory. This arrow points in the
direction of sweep.
2. Choose the Continue with the current section. button.
Drawing the Section for Sweep
After choosing the Continue with the current section button, the viewing direction is
modified such that the start point of the trajectory becomes normal to the screen. A blue color
cross of infinite length appears on the screen. You are prompted to draw a section for the
sweep. The section of the sweep feature is as shown in Figure 7-47. Draw the section for the
trajectory such that the sketch is symmetrical about these lines.
1. Draw the section sketch and then add the constraints and dimensions as shown in
Figure 7-47.
2. Choose the Continue with the current section. button.
Previewing the Sweep Feature
The sweep feature is completed and it can now be previewed.
1. Choose the Preview button from the PROTRUSION dialog box that is displayed on the
top right corner of the window.
Advanced Modeling Tools-I 7-25
© CADCIM T© CADCIM T
© CADCIM T© CADCIM T
© CADCIM T
echnologies, USAechnologies, USA
echnologies, USAechnologies, USA
echnologies, USA
. F. F
. F. F
. F
or engineering seror engineering ser
or engineering seror engineering ser
or engineering ser
vices, contact , contact
vices, contact , contact
vices, contact
2. Choose the Saved view list button from the View toolbar. From the drop-down list choose
the Default option. The model orients on the graphics screen as shown in Figure 7-48.
You can use the CTRL+middle mouse button to change the orientation of the model.
3. Now, choose the OK button from the PROTRUSION dialog box.
Creating the Second Feature
To create the extrude feature, you need to create a datum plane that is offset from the top
surface of the sweep feature. The offset distance is -505 from the top face of the swept feature.
1. Choose the Insert a datum plane. button from the Right Toolchest to create a datum
plane. The DATUM PLANE submenu is displayed. Choose the Offset option from this
submenu. You are prompted to select a datum plane or a coordinate system .
2. Select the top planar face of the base feature using the left mouse button. The OFFSET
submenu is displayed.
3. Choose the Enter Value option from this submenu. The Message Input Window is
displayed and you are prompted to enter the offset value in the direction indicated by the
arrow. Since the arrow points in the opposite direction, therefore, enter a value of -505
and press ENTER.
4. Choose Done from the DATUM PLANE submenu. Choose the Refit the object to fully
display it on the screen button. The datum plane DTM1 is created as shown in the
Figure 7-49.
5. Now, choose Insert > Protrusion > Extrude from the menu bar to invoke the extrude
option and select DTM1 as the sketching plane.
6. Create a circle of 60 diameter as the sketch for the second feature.
Figure 7-47 Sketch for the section of the
sweep feature
Figure 7-46 Sketch for trajectory of the sweep
feature