Virtualization
Bạn đang xem bản rút gọn của tài liệu. Xem và tải ngay bản đầy đủ của tài liệu tại đây (10.68 MB, 12 trang )
621
28
Virtualization
Copyright © 2009 by The McGraw-Hill Companies. Click here for terms of use.
622
Linux Administration: A Beginner’s Guide
V
irtualization technologies have been around in various forms for a long time. This
technology has been especially pervasive and more commonplace in recent years.
This recent pervasiveness has been due to many factors: necessity, reduction in
cost, new innovations, simpler implementations, etc.
Simply put, virtualization is making something look like something else. Technically
speaking, virtualization refers to the abstraction of computer resources. This abstraction
can be achieved in various ways: via software, hardware, or a mix of both.
In this chapter we discuss some abstraction concepts and techniques that are com-
mon in Linux platforms today.
WHY VIRTUALIZE?
As mentioned in the beginning of this chapter, virtualization has become quite common-
place in recent times. And one of the reasons for this has been the necessity for it.
The necessity for virtualization has been borne out of different reasons, such as firms
and individuals being more environmentally conscious/sensitive (ten virtual machines
running on one server have a smaller carbon footprint than ten physical machines serv-
ing the same purpose), the need to save costs on hardware (ten virtual machines are, or
should be, cheaper than ten physical machines), the need to increase return on invest-
ment on existing hardware or increased server utilization, improved server and applica-
tion availability and reduced server downtimes (achieved by virtualization platforms
that support live host migration), better cross-platform support (for example, virtualiza-
tion makes it possible to run a Microsoft Windows operating system within Linux or a
Linux-based operating system within Microsoft Windows), etc.
Virtualization provides a great environment for testing and debugging new applica-
tions and/or operating systems, since virtual machines can be wiped clean quickly or
restored to a known state. In the same vein, virtual machines can be used to test and run
legacy or old software.
Another reason why virtualization has become so commonplace is due to the ease
with which it can be implemented today. If “ceteris” is “paribus” (if other things are
equal), it is possible for a typical Linux system administrator to set up an environment
for machine virtualization in less than ten minutes.
Virtualization Concepts
In this section we try to lay the groundwork for common virtualization concepts and
terminologies that appear in the rest of this chapter and that are used in everyday discus-
sions about virtualization:
▼ Guest OS (VM) This is also known as a virtual machine (VM). It is the operat-
ing system that is being virtualized.
■ Host OS This is the system or host on which the guest operating systems
(VM) run.
623
Chapter 28: Virtualization
■ Hypervisor (VMM) A hypervisor is also referred to as the virtual machine
monitor (VMM). A hypervisor provides a CPU-like interface to virtual machines
or applications. The hypervisor is at the heart of the entire virtualization concept.
It can be implemented with support built natively into the hardware, purely in
software, or a combination of both.
■ Hardware emulation This is when software is used to emulate the instruc-
tion set of different CPU architectures. The resulting VMs that run in this type
of environment typically run slowly, due to the sheer amount of processing
required for the emulation. An example virtualization solution that provides
hardware emulation is Bochs ().
■ Full virtualization This is also known as bare-metal or native virtualization.
The host CPU(s) has extended instructions that allow the VMs to directly inter-
act with it. Guest operating systems that can use this type of virtualization do
not need any modification. As a matter of fact, the VMs do not know—and
need not know—that they are running in a virtual platform. Hardware virtual
machine (HVM) is a vendor-neutral term used to describe hypervisors that sup-
port full virtualization.
In full virtualization, the virtual hardware seen by the guest OS is functionally
similar to the hardware the host OS is running on.
Examples of vendor CPUs and platforms that support the required extended
CPU instructions are Intel Virtualization Technology (Intel VT), AMD Secure
Virtual Machine (SVM/AMD-V), and IBM System z series.
Examples of virtualization platforms that support full virtualization are kernel-
based virtual machines (KVM), Xen, IBM’s z/VM, VMware, Virtualbox, and
Microsoft’s Hyper-V.
▲ Paravirtualization This is a virtualization technique. Essentially, this class of
virtualization is done via software. Guest operating systems that use this type
of virtualization typically need to be modified. To be precise, the kernel of the
guest OS (VM) needs to be modified to run in this environment. This required
modification is the one big disadvantage of paravirtualization. This type of vir-
tualization is currently relatively faster than its full virtualization counterparts.
Examples of virtualization platforms that support full virtualization are Xen and
UML (User Mode Linux).
VIRTUALIZATION IMPLEMENTATIONS
There are many virtualization implementations that run on Linux-based systems (and
Windows-based systems). Some are more mature than others. Some are easier to set
up and manage than others, but the objective remains pretty much the same across the
board.
We’ll briefly look at some of the more popular virtualization implementations in this
section.
624
Linux Administration: A Beginner’s Guide
QEMU
QEMU falls into the class of virtualization called machine emulators. It can emulate
a completely different machine architecture from the one on which it is running (e.g.,
emulating an ARM architecture on an x86 platform). The code for QEMU is mature and
well tested, and as such, it is relied upon by many other virtualization platforms and
projects.
Xen
This is a popular virtualization implementation, with a large community following. The
code base is quite mature and well tested. It supports both the full and paravirtualization
methods of virtualization. Xen is considered a high-performing virtualization platform.
It is commercially backed by Citrix Systems, and the Xen open source interest is main-
tained at www.xen.org.
User-Mode Linux (UML)
This is one of the earliest virtualization implementations for Linux. As the name implies,
virtualization is implemented entirely in user space. This singular attribute gives it the
advantage of being quite secure, since its components run in the context of a regular user.
Running entirely in user space also gives this implementation the disadvantage of not
being very fast. More information about UML can be found at http://user-mode-linux
.sourceforge.net.
Kernel-based Virtual Machines (KVM)
This is the first official Linux virtualization implementation to be implemented in the
kernel. It currently supports only full virtualization.
KVM is discussed in more detail later on in this chapter.
VMware
This is one of the earliest and most well-known mainstream commercial virtualization
implementations. It offers great cross-platform support, excellent user and management
interface, and great performance. There are several VMware products families designed
to cater to various needs (from desktop needs all the way to enterprise needs). Some ver-
sions of VMware are free (e.g., VMware Server), and some are purely commercial (e.g.,
VMware ESX Server, VMware Workstation, etc.).
Virtualbox
This is a popular virtualization platform. It is well known for its ease of use and nice user
interface. It has great cross-platform support. It supports both full and paravirtualization
625
Chapter 28: Virtualization
virtualization techniques. There are two versions of Virtualbox: a purely commercial ver-
sion and an open source edition, which is free for personal and educational use.
Hyper-V
This is Microsoft’s virtualization implementation. It currently can only be used on hard-
ware that supports full virtualization (i.e., Intel VT and AMD-V processors). It has a
great management interface and is well integrated into the Windows Server 2008 operat-
ing system.
KERNEL-BASED VIRTUAL MACHINES (KVM)
Kernel-based Virtual Machines (aka KVM) is the official Linux answer and contribu-
tion to the virtualization space. KVM works by turning the Linux kernel into a hyper-
visor. Current stable implementations of KVM are supported on the x86 platforms that
support virtualization CPU extensions (like the ones provided in Intel-VT and AMD-V
lines).
Because KVM is implemented right in the Linux kernel, it has great support across
a wide variety of Linux distros. The main difference across the different distros is prob-
ably the virtual machine management tools and user space tools that have been built
around the specific implementation. However, if one chooses to go with a bare-bones
KVM setup, it is possible to use the same set of instructions on any Linux distro.
The /proc/cpuinfo pseudo file system entry provides details about the running CPU
on a Linux system. Among other things, the entry shows the flags/extensions that the
running CPU supports.
On an Intel platform, the flag that shows support for full hardware-based virtualiza-
tion is the vmx flag. To check if an Intel processor has support for vmx, we could grep
for the desired flag in /proc/cpuinfo, like so:
[root@intel-serverA ~]# grep -i "vmx" /proc/cpuinfo
flags : fpu pae mce cx8 apic <OUTPUT TRUNCATED> vmx
The presence of vmx in the previous sample output shows that necessary CPU exten-
sions are in place on the Intel processor.
On an AMD platform, the flag that shows support for full hardware-based virtualiza-
tion is the Secure Virtual Machine (svm) flag. To check if an Intel processor has support
for svm, we could grep for the desired flag in /proc/cpuinfo, like so:
[root@amd-serverA ~]# grep color -i svm /proc/cpuinfo
flags : fpu vme de pse 3dnowext <OUTPUT TRUNCATED> svm
The presence of svm in the previous sample output shows that necessary CPU exten-
sions are in place on the AMD processor.
626
Linux Administration: A Beginner’s Guide
KVM Example
As mentioned earlier, KVM has great cross-platform/distro support. In this following
section, we will look at a sample KVM implementation on the Fedora distribution of
Linux.
We will be using a set of tools that are based on the Libvirt C library. In particu-
lar, we will be using the “Virtual Machine Manager” (virt-manager) application tool
kit. virt-manager is a desktop user interface for managing virtual machines. It com-
prises both full-blown graphical user interface (GUI) front-ends and command-line
utilities.
In this example, we will use the “Virt Install” tool (virt-install). virt-install
is a command-line tool that provides an easy way to provision virtual machines. It also
provides an application programming interface (API) to the virt-manager application for
its graphical VM creation wizard.
The specifications on our sample host system are
▼ Hardware supports full virtualization (specifically, AMD-V)
■ 4 gigabytes (GB) of RAM
■ Sufficiently free space on the host OS
▲ Host OS is running Fedora flavor of Linux
For our sample virtualization environment, our objectives are
▼ Use the built-in KVM virtualization platform.
■ Set up a guest OS (VM) running a Fedora distribution of Linux. We will install
Fedora using the install media in the DVD drive (/dev/sr0) of the host system.
■ Allocate a total of 10GB of disk space to the VM.
▲ Allocate 1GB RAM to the VM.
We will use the following steps to achieve our objectives:
1. Use Yum to install the “Virtualization” package group. This package group com-
prises the python-virtinst, kvm, qemu, virt-manager, and virt-viewer packages.
Type
[root@serverA ~]# yum groupinstall 'Virtualization'
2. Start the libvirtd service. Type
[root@serverA ~]# service libvirtd start
Starting libvirtd daemon: [ OK ]
627
Chapter 28: Virtualization
3. Use the chkconfig utility to make sure that the libvirtd service starts up
automatically during the next system boot. Type
[root@serverA ~]# chkconfig libvirtd on
4. Use the virsh utility to make sure that virtualization is enabled and running
properly on the system. Type
[root@serverA ~]# virsh -c qemu:///system list
Id Name State
As long as the previous output does not return any errors, we are fine.
5. On our sample server, we will store all the files pertaining to each VM under
their own folder, using the virtual machine name as the parent folder name.
So, for our sample VM with the name fedora-VM, we will begin by creating the
directory structure that will house the VM. Type
[root@serverA ~]# mkdir -p /home/vms/fedora-VM/
6. We will use the virt-install utility that comes with the python-virtinst
package to set up the virtual machine. The virt-install utility will run you
through a quick setup wizard by asking a series of questions at the console.
Launch virt-install by running
[root@serverA ~]# virt-install hvm
7. We will set the name of our virtual machine (VM) to fedora-VM.
What is the name of your virtual machine? fedora-VM
8. We will allocate 1GB, or 1000 megabytes (MB), of RAM to the VM.
How much RAM should be allocated (in megabytes)? 1000
9. We will store the disk image under the /home/vms/fedora-VM/ directory and
name the virtual disk fedora-VM-disk.
What would you like to use as the disk (file path)? \
/home/vms/fedora-VM/fedora-VM-disk.img
10. Specify the virtual disk size to be 10GB when prompted.
How large would you like the disk (/home/vms/fedora-VM/fedora-VM-disk) to
be (in gigabytes)? 10
11. We will enable graphics support for the VM.
Would you like to enable graphics support? (yes or no) yes
628
Linux Administration: A Beginner’s Guide
12. The physical optical drive device on our sample server is at /dev/sr0. We will
specify this as the virtual CD device.
What is the virtual CD image, CD device or install location? \
/dev/sr0
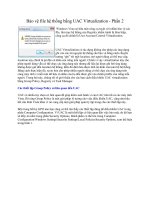
13. The newly configured VM should start up immediately in the “Virt Viewer”
window. The VM will attempt to boot from the install media in the optical drive
referenced by /dev/sr0. A window similar to the one shown here will open.
14. From here on, you can continue the installation as if you were installing on a
regular machine. That’s it!
Setting Up KVM in Ubuntu/Debian
We had mentioned early on that one main difference between the virtualization
implementations on the various Linux distros is in the management tools built
around the virtualization solution.
629
Chapter 28: Virtualization
The KVM virtualization that was set up earlier was done using the manage-
ment tools (virt-manager, ZENworks Virtual Machine Management, etc.) that were
designed to work seamlessly on Fedora, Red Hat Enterprise Linux (RHEL), and
Centos platforms. Here, we will run through a quick and dirty setup of KVM vir-
tualization that should work with little modification on any Linux distro.
NOTE Libvirt and virt-manager have been ported for use on the newest versions of
the Ubuntu Linux distro. Virt-manager can be easily installed with
yyang@ubuntu-serverA:~$ sudo apt-get install virt-manager.
Specifically, we will look at how to set up KVM in a Debian-based distro,
like Ubuntu. The processor on our sample Ubuntu server supports the neces-
sary CPU extensions. We will be installing on a computer with an Intel-VT–based
processor.
The target virtual machine will be a desktop version of Ubuntu and will be
installed using the ISO image downloaded from />releases/8.04/ubuntu-8.04-desktop-i386.iso.
1. Install the KVM and QEMU packages. On the Ubuntu server, type
yyang@ubuntu-server:~$ sudo apt-get -y install kvm qemu
2. Manually load the kvm-intel module. Type
yyang@ubuntu-server:~$ sudo modprobe kvm-intel
NOTE Loading the kvm-intel module will also automatically load the required kvm
module. On an AMD-based system, the required module is instead called kvm-amd.
3. We are going to run KVM as a regular user, so we need to add our sample
user (yyang) to the kvm system group. Type
yyang@ubuntu-server:~$ sudo adduser yyang kvm
4. Log out of the system and log back in as the user yyang so that the new
group membership can take effect.
5. Create a folder in the user’s home directory to store the virtual machine,
and change into that directory. Type
yyang@ubuntu-server:~$ mkdir -p /home/yyang/vms/ubuntu-VM
yyang@ubuntu-server:~$ cd /home/yyang/vms/ubuntu-VM
630
Linux Administration: A Beginner’s Guide
6. We will use the qemu-img utility to create a disk image for the virtual
machine. The image will be 10GB in size. The file that will hold the virtual
disk will be named “disk.img.” Type
yyang@ubuntu-server:~/vms/ubuntu-VM$ qemu-img create disk.img -f qcow2 10G
TIP The -f option specified with the qemu-img command is used to specify the
disk image format. Here we use the -qcow2 format. This format offers space-saving
options by not allocating the entire disk space specified up front. Instead, a small file
is created, which grows as data is written to the virtual disk image. Another interesting
virtual image disk format is the -vmdk option, which allows the creation of virtual disks
that are compatible with VMware virtual machines.
7. Once the virtual disk image is created, we can fire up the installer for the
VM by passing the necessary options to the kvm directly. The command to
do this is
yyang@ubuntu-server:~/vms/ubuntu-VM$ kvm -m 1024 \
-cdrom ubuntu-8.04-desktop-i386.iso \
-boot d disk.img
NOTE The options that were passed to the kvm command are
-m Specifies the amount of memory to allocate to the VM. In this case, we specified
1024MB, or 1GB.
-cdrom Specifies the virtual CD-ROM device. In this case, we point to the ISO
image that was downloaded earlier and saved under the current working directory.
-boot d Specifies the boot device. In this case, “d” means CD-ROM. Other options
are floppy (a), hard disk (c), and network (n).
disk.img Specifies the raw hard disk image. This is the virtual disk that was
created earlier using qemu-img.
TIP Due to some issues with the graphical boot screen found on some installers, you
may have to add the -no-kvm switch to the kvm command used to start the installation
of the operating system into the VM.
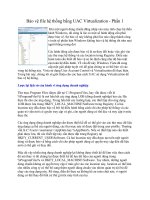
8. The newly configured VM should start up immediately in the QEMU win-
dow. The VM will attempt to boot from the ISO image specified by the
-cdrom option. A window similar to the one shown here will open.
631
Chapter 28: Virtualization
SUMMARY
Numerous virtualization technologies and implementations exist today. Some of them
have been around much longer than others, but the ideas and needs remain almost the
same. Virtualization is obviously not a panacea for every information technology prob-
lem, but its use and value is also too great to be ignored.
9. From here on, you can continue the installation as if you were installing on
a regular machine.
10. Once the operating system has been installed into the VM, you can boot
the virtual machine by using the kvm command:
yyang@ubuntu-server:~/vms/ubuntu-VM$ kvm -m 1024 disk.img
You will notice in the preceding steps that we didn’t need to specify the ISO
image as the boot media anymore since we are done with the installation. That’s it!
632
Linux Administration: A Beginner’s Guide
We had a high-level walkthrough of virtualization and common virtualization con-
cepts in this chapter. We looked at common virtualization offerings in the Linux world.
We paid particular attention to the KVM platform because of its native and complete
integration into the Linux kernel. Finally, we gave two examples of actually setting up
and using KVM. The first example used the “Virtual Machine Manager” toolset, which
is based on the Libvirt library. The second example demonstrated setting up and using
KVM in other Linux distros that don’t use the Virtualization Manager toolset.