Tài liệu Nghệ thuật xếp hình Nhật Bản:pot_with_leaves_and_stem_2 docx
Bạn đang xem bản rút gọn của tài liệu. Xem và tải ngay bản đầy đủ của tài liệu tại đây (34.85 KB, 4 trang )
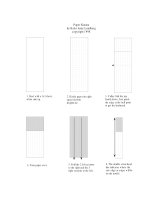
Pot with Leaves and Stem
by Kalei Anne Lundberg
copyright 2001
This model was designed to make use of variegated paper. If you want to experiment
with your own paper design, either affix a square the color you would like the pot to
be (using acid-free glue stick) or dye the paper, following the coloring design. The
diagrams are offered for personal use; for any other use please contact me for permission
at
Flower Pot page 1 of 4
Coloring design.
2. Squash fold. Repeat
on the back side.
3. Valley fold top flap
to the right. Repeat on
the back side.
1500
5. Petal fold. Repeat
on the back side.
1. Collapse into a colored
preliminary fold. Turn model so
free points are on the bottom.
4. Squash fold.
Repeat on back side.
450
Flower Pot page 2 of 4
14. There should be
3 free points on the
bottom right and one
on the bottom left.
Valley fold one layer
to the left.
6. Valley fold the
small point
downward. Repeat
on the back side.
7. Valley fold the top two
left hand flaps to the right
and the back two right
hand flaps to the left.
(Minor Miracle)
8. Repeat steps 5
and 6.
9. (Lilly/Frog base)
Fold and unfold to
mark then open
sink the top point.
10. Inside reverse
fold the small point
to the inside of the
model.
11. Valley fold
one flap to the
right.
12. Valley fold
another flap to the
right.
13. Repeat step 10.
15. Valley fold
flap upward.
Turn model
over.
16. Valley fold one
layer to the right.
17. Rotate model so
the sink is at the
bottom.
1800
Flower Pot page 3 of 4
18. Valley fold
one layer to the
left.
19. Pull out
paper.
20. Open flap and
mountain fold along the
center line. Pull to the
right. This will spread
squash the interior folds.
21. Inside reverse. Note
the corner of this fold
should be tucked behind
the interior triangular flap
created in step 20.
22. Repeat steps 18-
21 on the other side.
23. Valley folds. 24. Valley fold top left
layer to the right and
two back right layers
to the left.
25. Valley fold
downward. Repeat
on back side.
Notes: I found that the easiest way to perform steps 18-22 was to do both sides at the
same time. Because the hidden paper movement is beyond my diagramming capabilities,
the following instructs you to fold one side at a time. This works, but is not the quickest
method.
Basically, what needs to be done is to return the face of the lily base (that will become
the stem in the model) back to a bird base form by pulling out the paper and spread
squashing the sink folds of the lily/frog base.
The inside reverse fold in step 21 needs to be slipped behind the resulting triangular
shaped sink fold (dotted line in step 21) so as not to be trapped by the valley folds in
step 23.
26. Valley fold to narrow
the stem. Repeat on back
side. Note this fold extends
into the pocket.
27. Valley fold the
three leaf flaps
upward.
28. Rabbit ear. 29. Squash fold.
STEM
30. Repeat steps 28 &
29 on the other two
leaves.
31. This step will make the model 3D. Mountain fold the leaf
flaps to the inside of the model. Care should be taken to loosen
the central sink just enough to slide the leaves inside as the
tension of the sink is used to hold the form of the pot. The two
leaf flaps that are adjacent to the stem should be folded over
the interior flap inside the model to lock the back corners of the
pot and the leaf flap opposite the stem just folds to the inside.
Shape the leaves
by curling, add a
flower and you are
done.
Several different leaf shapes can be formed
from the squash fold in step 29 to suit the
type of flower or the squashes can be
narrowed to make extra smaller stems.
The stem can be rabbit eared or double rabbit
eared to give it a rounder shape.
6” paper will make a model about 1” wide at
the base and 3” tall.
If necessary the
stem corner can
be locked from
the bottom.
Flower Pot page 4 of 4