Tài liệu Nghệ thuật xếp hình Nhật Bản:vase_lundberg docx
Bạn đang xem bản rút gọn của tài liệu. Xem và tải ngay bản đầy đủ của tài liệu tại đây (48.55 KB, 5 trang )
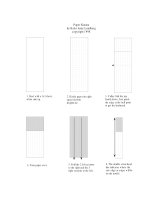
Weighted Vase
by Kalei Anne Lundberg
copyright 2001
This model was heavily inspired by a discussion on the Origami List and the Rose by
Toshikazu Kawasaki from Origami for the Connoisseur. A 10” square will make a vase
about 4” tall. Fender washers or coins are used for the weight.
The diagrams are offered for personal use; for any other use please contact me for
permission at
Weighted Vase page 1 of 5
1. Valley fold and unfold. 2. Book fold and unfold. Turn
paper over.
3. Line up the two mountain fold and
crease between.
4. Repeat step 3 for the
other flap.
Weighted Vase page 2 of 5
900
5. Open paper upwards to preserve the center
pleat.
6. Inside reverse fold the bottom left
and top right corner of the pleat. Valley
fold the other two corners.
7. Unfold all and turn paper
90 degrees.
8. Repeat steps 1-7 to complete the basic grid. Note: I
will color the inside reverse folds from step 6 to identify
their placement so they may be used as a landmark for
the twist.
Weighted Vase page 3 of 5
9. Mountain fold and unfold the two
diagonals.
10. Collapse into a colored waterbomb
fold.
11. Valley fold and unfold the
tip to the first crease line.
Open up the paper.
12. Pinch the four sides of the center square
into mountain folds. Then preserving the
mountain folds that rise from the corners valley
fold just the center square in half along one
of its diagonals. (A half sink)
Weighted Vase page 4 of 5
13. Once the half sink is collapsed
there will be extra paper on the front
and the back. Valley fold this paper
to align along the edge of the inside
reverse from step 6 on both sides
and flatten.
14. While opening up the paper,
valley fold the top two edges to
align with their respective inside
reverses, and flatten.
15. Completed twist.
Turn paper over.
16. Insert a coin or a metal fender washer or two into
the twisted pocket to weight the vase. The diameter
of the weight should be just a bit less than the length
of one side of the twisted pocket.
Form the box corners by valley folding along existing
creases. The mountain fold indicated by the white
circle will be a new crease and complete the accordion
pleat in the corner.
Weighted Vase page 5 of 5
17. Step 16 in progress. Note that
the accordion pleat radiating from
the corner will align with the center
line of the inside reverse.
18. Make the corners on
the other 3 sides. Note:
This diagram shows only
one face as the model is
now 3D.
19. Valley fold the top left
corner along existing
crease and reform the
inside reverse.
20. Valley fold the top over and
insert into the pocket formed by
the valley fold. Repeat for each
corner. Note: If necessary a
paper clip can be used to hold
the lock in place until after the
elongation.
21. Holding the four points together
push along the center creases of
the four sides until they meet in
the center to form a channel to hold
the stems. This will elongate the
model and partially untwist the
bottom pocket.
22. Fold the top
layer to the right
on all four sides.
23. Finish the elongation by
pinching a mountain fold
though both layers from the
bottom of the folded over
flap to the corner on the left
for each of the four sides.
24. Valley fold the top point
down through all layers at the
indicated angle on each side.
This just helps to keep the flap
in the open position.
25. Pinch the center opening
together all done. If more
weight is needed, the
pyramidal void in the bottom
of the vase can be filled with
small ball bearings or BBs.