Tài liệu Internetworking Case Studies - CCIE pptx
Bạn đang xem bản rút gọn của tài liệu. Xem và tải ngay bản đầy đủ của tài liệu tại đây (833.32 KB, 256 trang )
About This Manual xi
About This Manual
Document Objectives
This publication provides internetworking design and implementation case studies and examples,
with the intent to help you identify and implement practical internetworking strategies that are both
flexible and scalable.
This publication was developed to assist professionals preparing for Cisco Certified Internetwork
Expert (CCIE) candidacy, though it is a valuable resource for all internetworking professionals. It is
designed for use in conjunction with otherCiscomanuals or as a standalone reference. You may find
it helpful to refer to the Cisco CCIE Fundamentals: Network Design, which provides detailed
descriptions of the internetworking strategies and technologies used in this publication.
Audience
This publication is intended to support the network administrator who designs and implements
router- or switched-based internetworks, and describes practical examples of how to apply Cisco
features to meet internetworking needs. Readers should know how to configure a Cisco router and
should be familiar with the protocols and media that their routers have been configured to support.
Readers will better understand the material in this publication if they are familiar with networking
terminology. The Cisco Internetworking Terms and Acronyms publication is a useful reference for
those with minimal knowledge of networking terms.
Document Organization
This manual contains twelve chapters, which are described below:
Chapter 1 “RIP and OSPF Redistribution,” which addresses the issue of integrating Routing
Information Protocol (RIP) networks with Open Shortest Path First (OSPF) networks
Chapter 2, “Dial-on-Demand Routing,” which addresses the dial-on-demand routing (DDR) feature
that allows you to use existing telephone lines to form a wide-area network (WAN).
Chapter 3, “Increasing Security on IP Networks,” which addresses the broad topic of network
security.
Chapter 4, “Integrating Enhanced IGRP into Existing Networks,” which addresses the Enhanced
Interior Gateway Routing Protocol (IGRP).
Chapter 5, “Reducing SAP Traffic in Novell IPX Networks,” which addresses how to deal with the
nuances of Novel IPX networks.
Chapter 6, “UDP Broadcast Flooding,” which addresses he interworkings of broadcast data packets.
Document Conventions
xii
Internetworking Case Studies
Chapter 7, “STUN for Front-End Processors,” which addresses serial tunneling (STUN) and the
integration of traditional systems network architecture (SNA) networks with multiprotocol
networks.
Chapter 8,“Using ISDN Effectively in Multiprotocol Networks,” which addresses how,as telephone
companies make Integrated Services Digital Network (ISDN) services available, ISDN is becoming
an increasingly popular way of connecting remote sites.
Chapter 9, “Using HSRP for Fault-Tolerant IP Routing,”
which addresses Cisco’s Hot Standby Routing Protocol (HSRP), which provides automatic router
backup whenyou configureit on Cisco routers that run the Internet Protocol(IP) overEthernet, Fiber
Distributed Date Interface (FDDI), and Token Ring local-area networks (LANs).
Chapter 10, “LAN Switching,” which addresses how to deal with the fact that today’s local-area
networks LANs) are becoming increasingly congested and overburdened.
Chapter 11, “Multicasting in IP and AppleTalk Networks,”which addresses the concept ofend-users
being able to send and receive audio and video (known collectively as multimedia) at the desktop has
gained considerable attention and acceptance that has become increasingly common in the past few
years.
Chapter 12, “Scaling Dial-on-Demand Routing,” which addresses the design of an access network
that allows a large number of remote sites to communicate with an existing central-site network.
Document Conventions
In this publication, the following conventions are used:
• Commands and keywords are in boldface.
• New, important terms are italicized when accompanied by a definition or discussion of the term.
• Protocol names are italicized at their first use in each chapter.
Note Means reader take note. Notes contain helpful suggestions or references to materials not
contained in this manual.
CHAPTER
RIP and OSPF Redistribution 1-1
1
RIP and OSPF Redistribution
This case study addresses the issue of integrating Routing Information Protocol (RIP) networks with
Open Shortest Path First (OSPF) networks. Most OSPF networks also use RIP to communicate with
hosts or to communicate with portions of the internetwork that do not use OSPF.Cisco supports both
the RIP and OSPF protocols and provides a way to exchange routing information between RIP and
OSPF networks. This case study provides examples of how to complete the following phases in
redistributing information between RIP and OSPF networks, including the following topics:
• Configuring a RIP Network
• Adding OSPF to the Center of a RIP Network
• Adding OSPF Areas
• Setting Up Mutual Redistribution
Configuring a RIP Network
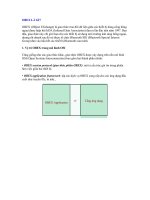
Figure 1-1 illustrates a RIP network. Three sites are connected with serial lines. The RIP network
uses a Class B address and an 8-bit subnet mask. Each site has a contiguous set of network numbers.
Figure 1-1 A RIP network.
Token
Ring
Router A
Token
Ring
Router B
S0
S0
E0
E0
S0 S1
E0
130.10.62.1
255.255.255.0
130.10.63.1
255.255.255.0
130.10.24.3
255.255.255.0
S1
S1
130.10.17.2
255.255.255.0
130.10.16.2
255.255.255.0
130.10.9.1
255.255.255.0
T0
T0
130.10.8.1
255.255.255.0
130.10.63.3
255.255.255.0
130.10.64.3
255.255.255.0
130.10.62.2
255.255.255.0
130.10.64.2
255.255.255.0
Site A
Site B
Site C
Configuring a RIP Network
Cisco CCIE Fundamentals: Case Studies
1-2
Table 1-1 lists the network address assignments for the RIP network, including the network number,
subnet range, and subnet masks. All interfaces indicate network 130.10.0.0; however, the specific
address includes the subnet and subnet mask. For example, serial interface 0 on Router C has an IP
address of 130.10.63.3 with a subnet mask of 255.255.255.0.
Table 1-1 RIP Network Address Assignments
Configuration File Examples
The following commands in the configuration file for Router A determine the IP address for each
interface and enable RIP on those interfaces:
interface serial 0
ip address 130.10.62.1 255.255.255.0
interface serial 1
ip address 130.10.63.1 255.255.255.0
interface ethernet 0
ip address 130.10.8.1 255.255.255.0
interface tokenring 0
ip address 130.10.9.1 255.255.255.0
router rip
network 130.10.0.0
The following commands in the configuration file for Router B determine the IP address for each
interface and enable RIP on those interfaces:
interface serial 0
ip address 130.10.62.2 255.255.255.0
interface serial 1
ip address 130.10.64.2 255.255.255.0
interface ethernet 0
ip address 130.10.17.2 255.255.255.0
interface tokenring 0
ip address 130.10.16.2 255.255.255.0
router rip
network 130.10.0.0
The following commands in the configuration file for Router C determine the IP address for each
interface and enable RIP on those interfaces:
interface serial 0
ip address 130.10.63.3 255.255.255.0
interface serial 1
ip address 130.10.64.3 255.255.255.0
interface ethernet 0
ip address 130.10.24.3 255.255.255.0
router rip
network 130.10.0.0
Network Number Subnets Subnet Masks
130.10.0.0 Site A: 8 through 15 255.255.255.0
130.10.0.0 Site B: 16 through 23 255.255.255.0
130.10.0.0 Site C: 24 through 31 255.255.255.0
130.10.0.0 Serial Backbone: 62 through 64 255.255.255.0
RIP and OSPF Redistribution 1-3
Adding OSPF to the Center of a RIP Network
Adding OSPF to the Center of a RIP Network
A common first step in converting a RIP network to OSPF is to add backbone routers that run both
RIP and OSPF, while the remaining network devices run RIP. These backbone routers are OSPF
autonomous system boundary routers. Each autonomous system boundary router controls the flow
of routing information between OSPF and RIP. In Figure 1-2, Router A is configured as the
autonomous system boundary router.
Figure 1-2 RIP network with OSPF at the center.
RIP does not need to run between the backbone routers; therefore, RIP is suppressed on Router A
with the following commands:
router rip
passive-interface serial 0
passive-interface serial 1
The RIP routes are redistributed into OSPF by all three routers with the following commands:
router ospf 109
redistribute rip subnets
The subnets keyword tells OSPF to redistribute all subnet routes. Without the subnets keyword,
only networks that are not subnetted will be redistributed by OSPF. Redistributed routes appear as
external type 2 routes in OSPF. Each RIP domain receives information about networks in other RIP
domains andin the OSPF backbone area from the following commands that redistribute OSPF routes
into RIP:
router rip
redistribute ospf 109 match internal external 1 external 2
default-metric 10
The redistribute command uses the ospfkeyword to specify that OSPFroutes are to be redistributed
into RIP. The keyword internal indicates the OSPF intra-area and interarea routes: External 1 is the
external route type 1, and external 2 is the external route type 2. Because the command in the
example uses the default behavior, these keywords may not appear when you use the write terminal
or show configuration commands.
E0
RIP
autonomous system
Router A
S0
E0
T0
S0 S1
Router B
S0
E0
S1
Token
Ring
Token
Ring
S1
130.10.17.2
255.255.255.0
130.10.16.2
255.255.255.0
130.10.9.1
255.255.255.0
130.10.8.1
255.255.255.0
130.10.64.2
255.255.255.0
130.10.63.1
255.255.255.0
130.10.62.1
255.255.255.0
Autonomous system
boundary router
RIP
autonomous
system
RIP
autonomous system
OSPF
130.10.62.2
255.255.255.0
Adding OSPF to the Center of a RIP Network
Cisco CCIE Fundamentals: Case Studies
1-4
Because metrics for different protocols cannot be directly compared, you must specify the default
metric in order to designate the cost of the redistributed route used in RIP updates. All routes that
are redistributed will use the default metric.
In Figure 1-2, there are no paths directly connecting the RIP clouds. However, in typical networks,
these paths, or “back doors,” frequently exist, allowing the potential for feedback loops. You can use
access lists to determine the routes that are advertised and accepted by each router. For example,
access list 11 in the configuration file for Router A allows OSPF to redistribute information learned
from RIP only for networks 130.10.8.0 through 130.10.15.0:
router ospf 109
redistribute rip subnet
distribute-list 11 out rip
access-list 11 permit 130.10.8.0 0.0.7.255
access-list 11 deny 0.0.0.0 255.255.255.255
These commands prevent Router A from advertising networks in other RIP domains onto the OSPF
backbone, thereby preventing other boundary routers from using false information and forming a
loop.
Configuration File Examples
The full configuration for Router A follows:
interface serial 0
ip address 130.10.62.1 255.255.255.0
interface serial 1
ip address 130.10.63.1 255.255.255.0
interface ethernet 0
ip address 130.10.8.1 255.255.255.0
interface tokenring 0
ip address 130.10.9.1 255.255.255.0
!
router rip
default-metric 10
network 130.10.0.0
passive-interface serial 0
passive-interface serial 1
redistribute ospf 109 match internal external 1 external 2
!
router ospf 109
network 130.10.62.0 0.0.0.255 area 0
network 130.10.63.0 0.0.0.255 area 0
redistribute rip subnets
distribute-list 11 out rip
!
access-list 11 permit 130.10.8.0 0.0.7.255
access-list 11 deny 0.0.0.0 255.255.255.255
RIP and OSPF Redistribution 1-5
Adding OSPF Areas
The full configuration for Router B follows:
interface serial 0
ip address 130.10.62.2 255.255.255.0
interface serial 1
ip address 130.10.64.2 255.255.255.0
interface ethernet 0
ip address 130.10.17.2 255.255.255.0
interface tokenring 0
ip address 130.10.16.2 255.255.255.0
!
router rip
default-metric 10
network 130.10.0.0
passive-interface serial 0
passive-interface serial 1
redistribute ospf 109 match internal external 1 external 2
!
router ospf 109
network 130.10.62.0 0.0.0.255 area 0
network 130.10.64.0 0.0.0.255 area 0
redistribute rip subnets
distribute-list 11 out rip
access-list 11 permit 130.10.16.0 0.0.7.255
access-list 11 deny 0.0.0.0 255.255.255.255
The full configuration for Router C follows:
interface serial 0
ip address 130.10.63.3 255.255.255.0
interface serial 1
ip address 130.10.64.3 255.255.255.0
interface ethernet 0
ip address 130.10.24.3 255.255.255.0
!
router rip
default-metric 10
!
network 130.10.0.0
passive-interface serial 0
passive-interface serial 1
redistribute ospf 109 match internal external 1 external 2
!
router ospf 109
network 130.10.63.0 0.0.0.255 area 0
network 130.10.64.0 0.0.0.255 area 0
redistribute rip subnets
distribute-list 11 out rip
access-list 11 permit 130.10.24.0 0.0.7.255
access-list 11 deny 0.0.0.0 255.255.255.255
Adding OSPF Areas
Figure 1-3 illustrates how each of the RIP clouds can be converted into an OSPF area. All three
routers are area border routers. Area border routers control network information distribution
between OSPF areas and the OSPF backbone. Each router keeps a detailed record of the topology
of its area and receives summarized information from the other area border routers on their
respective areas.
Adding OSPF Areas
Cisco CCIE Fundamentals: Case Studies
1-6
Figure 1-3 Configuring route summarization between OSPF areas.
Figure 1-3 also illustrates variable-length subnet masks (VLSMs). VLSMs use different size
network masks in different parts of the network for the same network number. VLSM conserves
address space by using a longer mask in portions of the network that have fewer hosts. Table 1-2 lists
the network address assignments for the network, including the network number, subnet range, and
subnet masks. All interfaces indicate network 130.10.0.0.
Table 1-2 OSPF Address Assignments
To conserve address space, a mask of 255.255.255.248 is used for all the serial lines in area 0. If an
area contains a contiguous range of network numbers, an area border router uses the range keyword
with the area command to summarize the routes that are injected into the backbone:
router ospf 109
network 130.10.8.0 0.0.7.255 area 1
area 1 range 130.10.8.0 255.255.248.0
These commands allow Router A to advertise one route, 130.10.8.0 255.255.248.0, which covers all
subnets in Area 1 into Area 0. Without the range keyword in the area command, Router A would
advertise each subnet individually; for example, one route for 130.10.8.0 255.255.255.0, one route
for 130.10.9.0 255.255.255.0, and so forth.
Network Number Subnets Subnet Masks
130.10.0.0 Area 0: 62 through 64 255.255.255.248
130.10.0.0 Area 1: 8 through 15 255.255.255.0
130.10.0.0 Area 2: 16 through 23 255.255.255.0
130.10.0.0 Area 3: 24 through 31 255.255.255.0
Router C
E0
S0 S1
Router A
E0
TRO
S1
S0
Router B
S0
E0
S1
TRO
Token
Ring
Token
Ring
130.10.17.2
255.255.255.0
130.10.16.2
255.255.255.0
130.10.8.1
255.255.255.128
130.10.64.2
255.255.255.248
130.10.63.1
255.255.255.248
130.10.62.1
255.255.255.248
Area 1
Area 3
Area 2
Area border
router
Area border router
Area border
router
Area 0
130.10.62.2
255.255.255.248
130.10.63.3
255.255.255.248
130.10.64.3
255.255.255.248
RIP and OSPF Redistribution 1-7
Adding OSPF Areas
Because Router A no longer needs to redistribute RIP routes, the router rip command can now be
removed from the configuration file; however, it is common in some environments for hosts to use
RIP to discover routers. When RIP is removed from the routers, the hosts must use an alternative
technique to find the routers. Cisco routers support the following alternatives to RIP:
• ICMP RouterDiscovery Protocol(IRDP)—This techniqueis illustrated in the example at the end
of this section. IRDP is the recommended method for discovering routers. The ip irdp command
enables IRDP on the router. Hosts must also run IRDP.
• Proxy Address Resolution Protocol (ARP)—If the router receives an ARP request for a host that
is not on the same network as the ARP request sender, and if the router has the best route to that
host, the router sends an ARP reply packet giving the router’s own local data link address. The
host that sent the ARP request then sends its packets to the router, which forwards them to the
intended host. Proxy ARP is enabled on routers by default. Proxy ARP is transparent to hosts.
Configuration File Examples
The full configuration for Router A follows:
interface serial 0
ip address 130.10.62.1 255.255.255.248
interface serial 1
ip address 130.10.63.1 255.255.255.248
interface ethernet 0
ip address 130.10.8.1 255.255.255.0
ip irdp
interface tokenring 0
ip address 130.10.9.1 255.255.255.0
ip irdp
router ospf 109
network 130.10.62.0 0.0.0.255 area 0
network 130.10.63.0 0.0.0.255 area 0
network 130.10.8.0 0.0.7.255 area 1
area 1 range 130.10.8.0 255.255.248.0
The full configuration for Router B follows:
interface serial 0
ip address 130.10.62.2 255.255.255.248
interface serial 1
ip address 130.10.64.2 255.255.255.248
interface ethernet 0
ip address 130.10.17.2 255.255.255.0
ip irdp
interface tokenring 0
ip address 130.10.16.2 255.255.255.0
ip irdp
router ospf 109
network 130.10.62.0 0.0.0.255 area 0
network 130.10.64.0 0.0.0.255 area 0
network 130.10.16.0 0.0.7.255 area 2
area 2 range 130.10.16.0 255.255.248.0
Setting Up Mutual Redistribution
Cisco CCIE Fundamentals: Case Studies
1-8
The full configuration for Router C follows:
interface serial 0
ip address 130.10.63.2 255.255.255.248
interface serial 1
ip address 130.10.64.2 255.255.255.248
interface ethernet 0
ip address 130.10.24.3 255.255.255.0
ip irdp
router ospf 109
network 130.10.63.0 0.0.0.255 area 0
network 130.10.64.0 0.0.0.255 area 0
network 130.10.24.0 0.0.0.255 area 3
area 3 range 130.10.24.0 255.255.248.0
Setting Up Mutual Redistribution
It is sometimes necessary to accommodate more complex network topologies such as independent
RIP and OSPF clouds that must perform mutual redistribution. In this scenario, it is critically
important to prevent potential routing loops by filtering routes. The router in Figure 1-4 is running
both OSPF and RIP.
Figure 1-4 Mutual redistribution between RIP and OSPF networks.
With the following commands, OSPF routes will be redistributed into RIP. You must specify the
default metric to designate the cost of the redistributed route in RIP updates. All routes redistributed
into RIP will have this default metric.
! passive interface subcommand from previous example is left out for clarity!
router rip
default-metric 10
network 130.10.0.0
redistribute ospf 109
It is a good practice to strictly control which routes are advertised when redistribution is configured.
In the following example, a distribute-list out command causes RIP to ignore routes coming from
the OSPF that originated from the RIP domain.
router rip
distribute-list 10 out ospf 109
!
access-list 10 deny 130.10.8.0 0.0.7.255
access-list 10 permit 0.0.0.0 255.255.255.255
RIP OSPF
RIP and OSPF Redistribution 1-9
Summary
Router A
The full configuration for the router follows:
interface serial 0
ip add 130.10.62.1 255.255.255.0
!
interface serial 1
ip add 130.10.63.1 255.255.255.0
!
interface ethernet 0
ip add 130.10.8.1 255.255.255.0
!
interface tokenring 0
ip add 130.10.9.1 255.255.255.0
!
router rip
default-metric 10
network 130.10.0.0
passive-interface serial 0
passive-interface serial 1
redistribute ospf 109
distribute-list 10 out ospf 109
!
router ospf 109
network 130.10.62.0 0.0.0.255 area 0
network 130.10.63.0 0.0.0.255 area 0
redistribute rip subnets
distribute-list 11 out rip
!
access-list 10 deny 130.10.8.0 0.0.7.255
access-list 10 permit 0.0.0.0 255.255.255.255
access-list 11 permit 130.10.8.0 0.0.7.255
access-list 11 deny 0.0.0.0 255.255.255.255
Summary
Because it is common for OSPF and RIP to be used together, it is important to use the practices
described here in order to provide functionality for both protocols on an internetwork. You can
configure autonomous system boundary routers that run both RIP and OSPF and redistribute RIP
routes into the OSPF and vice versa. You can also create OSPF areas using area border routers that
provide route summarizations. Use VLSM to conserve address space.
Summary
Cisco CCIE Fundamentals: Case Studies
1-10
CHAPTER
Dial-on-Demand Routing 2-1
2
Dial-on-Demand Routing
Cisco’s dial-on-demand routing (DDR) feature allows you to use existing telephone lines to form a
wide-area network (WAN). While using existing telephone lines, you can analyze traffic patterns to
determine whether the installation of leased lines is appropriate. DDR provides significant cost
savings over leased lines for links that are utilized for only a few hours each day or that experience
low traffic flow.
DDR over serial lines requires the use of dialing devices that support V.25bis. V.25bis is an
International Telecommunication Union Telecommunication (ITU-T) Standardization Sector
standard for in-band signaling to bit synchronous data communications equipment (DCE) devices.
A variety of devices support V.25bis, including analog V.32 modems, ISDN terminal adapters, and
inverse multiplexers. Cisco’s implementation of V.25bis supports devices that use the 1984 version
of V.25bis (which requires the use of odd parity), as well as devices that use the 1988 version of
V.25bis (which does not use parity).
Note The ITU-T carries out the functions of the former Consultative Committee for International
Telegraph and Telephone (CCITT).
This case study describes the use of DDR to connect a worldwide network that consists of a central
site located in San Francisco and remote sites located in Tokyo, Singapore, and Hong Kong. The
following scenarios and configuration file examples are described:
• Having the Central Site Dial Out
Describes the central and remote site configurations for three setups: a central site with one
interface per remote site, a single interface for multiple remote sites, and multiple interfaces for
multiple remote sites. Includes examples of the usage of rotary groups and access lists.
• Having the Central and Remote Sites Dial In and Dial Out
Describes the central and remote site configurations for three setups: central site with one
interface per remote site, a single interface for multiple remote sites, and multiple interfaces for
multiple remote sites. Also describes the usage of Point-to-Point Protocol (PPP) encapsulation
and the Challenge Handshake Authentication Protocol (CHAP).
• Having Remote Sites Dial Out
A common configuration is one in which the remote sites place calls to the central site but the
central site does not dial out. In a “star” topology, it is possible for all of the remote routers to
have their serial interfaces on the same subnet as the central site serial interface.
• Using DDR as a Backup to Leased Lines
Internetworking Case Studies
2-2
Describes the use of DDR as a backup method to leased lines and provides examples of how to
use floating static routes on single and shared interfaces.
• Using Leased Lines and Dial Backup
Describes the use of Data Terminal Ready (DTR) dialing and V.25bis dialing with leased lines.
Figure 2-1 shows the topology of the DDR network that is the subject of this case study.
Figure 2-1 DDR internetwork topology.
Note All examples and descriptions in this case study refer to features available in Software
Release 9.1(9)or later. Some features are available inearlier releases.Features thatare available only
in Software Release 9.21 are indicated as such.
128.10.204.1
128.10.200.55
128.10.200.1
Serial 1
128.10.202.1
128.10.200.66
128.10.202.66
128.10.202.66
Serial 1
128.10.204.55
Serial 1
128.10.204.55
E0
E0
E0
E0
Tokyo
Hong Kong
Singapore
CGS
CGS
CGS
San Francisco
16741
Dial-on-Demand Routing 2-3
Having the Central Site Dial Out
Having the Central Site Dial Out
In this example, the central site calls the remote sites. The cost of initiating a call from the United
States to international sites is often lower than if the remote sites initiate the call, and it is expected
that remote offices need to connect to the central site network only periodically. This section
provides the following configuration examples in which the central site is configured to dial out:
• Configuring One Interface Per Remote Site
• Configuring a Single Interface for Multiple Remote Sites
• Configuring Multiple Interfaces for Multiple Remote Sites
Configuring One Interface Per Remote Site
For the initial configuration, the San Francisco central site is configured to have one interface per
remote site.
Central Site: Dial Out Only
In the following configuration, the central site places the calls with a separate interface configured
for each remote site. There is no support for answering calls in this configuration.
interface serial 5
description DDR connection to Hong Kong
ip address 128.10.200.66 255.255.255.192
dialer in-band
dialer wait-for-carrier-time 60
dialer string 0118527351625
pulse-time 1
dialer-group 1
!
interface serial 6
description DDR connection to Singapore
ip address 128.10.202.66 255.255.255.192
dialer in-band
dialer wait-for-carrier-time 60
dialer string 011653367085
pulse-time 1
dialer-group 1
!
interface serial 7
description DDR connection to Tokyo
ip address 128.10.204.66 255.255.255.192
dialer in-band
dialer wait-for-carrier-time 60
dialer string 0118127351625
pulse-time 1
dialer-group 1
!
router igrp 1
network 128.10.0.0
redistribute static
! route to Hong Kong
ip route 128.10.200.0 255.255.255.192 128.10.200.65
! route to Singapore
ip route 128.10.202.0 255.255.255.192 128.10.202.65
! route to Tokyo
ip route 128.10.204.0 255.255.255.192 128.10.204.65
access-list 101 deny igrp 0.0.0.0 255.255.255.255 255.255.255.255 0.0.0.0
access-list 101 permit ip 0.0.0.0 255.255.255.255 0.0.0.0 255.255.255.255
dialer-list 1 list 101
Having the Central Site Dial Out
Internetworking Case Studies
2-4
Interface Configuration
The configurationof the individual interfaces and Internet Protocol (IP) addresses isstraightforward.
The IP address for each interface is provided. The example uses a 6-bit host portion in IP addresses.
The dialer in-band command enables DDR and V.25bis dialing on the interface. V.25bis is a ITU-T
standard forin-band signalingto bitsynchronous DCEdevices.A variety of devices supportV.25bis,
ranging from analog V.32 modems to ISDN terminal adapters to inverse multiplexers.
The dialer wait-for-carrier-time command is set to 60 seconds. When using V.25bis, the router
does not parse any responses it receives from the DCE. Instead, the router depends on the modem’s
Carrier Detect (CD) signal to indicate that a call has been connected. If the modem’s CD signal is
not activated before the time allotted with the dialer wait-for-carrier-time command, the router
assumes that the call has failed and disconnects the line. Because the calls are international, and thus
take longer to connect than local calls, the wait for carrier time is set to 60 seconds. Even for local
calls, analog modems can take 20 to 30 seconds to synchronize to each other, including the time to
dial and answer.
The dialer string command identifies the telephone number of the targeted destination. Because the
central site is calling only a single destination, this dialer string is the simplest possible
configuration. The pulse-time command specifies how long Data Terminal Ready (DTR) is held
inactive. When using DDR and V.25bis modems, the router disconnects calls by deactivating DTR.
This command is automatically inserted into the configuration when the dialer in-band command
is entered.
The dialer-group command is used to identify each interface with a dialer list set. The dialer-list
command associates each interface with access lists that determine which packets are “interesting”
versus “uninteresting” for an interface. For details on access lists and dialer lists, see the “Access
List Configuration” section that follows.
Routing Configuration
The Interior Gateway Routing Protocol (IGRP) is used to route traffic on the network. The first two
commands in the routing section of the configuration file are router igrp and network. These define
the IGRP number and the network over which IGRP runs.
The redistribute command causes the static route information (defined with the ip route commands
shown in the configuration example) to be sent to other routers in the same IGRP area. Without this
command, other routers connected to the central site will not have routes to the remote routers. The
three static routes define the subnets on the Ethernet backbone of the remote routers. DDR tends to
use static routes extensively because routing updates are not received when the dial-up connection
is not active.
Access List Configuration
The last section of the configuration file provides the access lists that DDR uses to classify
“interesting” and “uninteresting” packets. Interesting packets are packets that pass the restrictions of
the access lists. These packets either initiate a call (if one is not already in progress) or reset the idle
timer if a call is in progress. Uninteresting packets are transmitted if the link is active, but dropped
if the link is not active. Uninteresting packets do not initiate calls or reset the idle timer. Access list
101 provides the following filters:
• IGRP packets that are sent to the broadcast address (255.255.255.255) do not cause dialing.
• All other IP packets are interesting and thus may cause dialing and reset the idle timer.
Dial-on-Demand Routing 2-5
Configuring a Single Interface for Multiple Remote Sites
Remote Sites: Dial In Only
Except for the IP address and the default route, each of the remote sites is configured identically as
an answer-only site. The following example lists Hong Kong’s configuration:
interface serial 1
description interface to answer calls from San Francisco
ip address 128.10.200.65 255.255.255.192
dialer in-band
!
ip route 0.0.0.0 0.0.0.0 128.10.200.66
The answering site will not disconnect the call. It is up to the calling site to disconnect the call when
the line is idle. In this case, the answering site is using static routing. The default route points to the
serial interface at the central site.
Configuring a Single Interface for Multiple Remote Sites
It is possible to use a single interface to call multiple destinations, such as a site in Hong Kong and
a site in Paris, France. Because of the time differences, these sites would never need to be connected
at the same time. Therefore, a single interface could be used for both sites without the possibility of
contention for the interface and without the cost of dedicating a serial port and modem to each
destination.
Central Site: Dial Out Only
In the following configuration, the central site places the calls. A single interface is configured to call
multiple remote sites. There is no support for answering calls in this configuration.
interface serial 5
description DDR connection to Hong Kong and Singapore
ip address 128.10.200.66 255.255.255.192
ip address 128.10.202.66 255.255.255.192 secondary
dialer in-band
dialer wait-for-carrier-time 60
! map Hong Kong to a phone number
dialer map ip 128.10.200.65 0118527351625
! map Singapore to a phone number
dialer map ip 128.10.202.65 011653367085
pulse-time 1
dialer-group 1
!
router igrp 1
network 128.10.0.0
passive-interface serial 5
redistribute static
! route to Hong Kong
ip route 128.10.200.0 255.255.255.192 128.10.200.65
! route to Singapore
ip route 128.10.202.0 255.255.255.192 128.10.202.65
!
access-list 101 deny igrp 0.0.0.0 255.255.255.255 255.255.255.255 0.0.0.0
access-list 101 permit ip 0.0.0.0 255.255.255.255 0.0.0.0 255.255.255.255
dialer-list 1 list 101
Having the Central Site Dial Out
Internetworking Case Studies
2-6
Interface Configuration
The configurationof theinterface in this example is slightly more complicated thanthe configuration
described in the “Configuring One Interface Per Remote Site” section. In addition to the original IP
address, there is a secondary IP address configured for serial interface 5 because the Singapore and
Hong Kong offices are on different subnets.
The dialer in-band, dialer wait-for-carrier-time, pulse-time, and dialer-group commands are
used inthe same manner as describedpreviously in the “ConfiguringOne Interface Per Remote Site”
section. However, the previous dialer string command has been removed and replaced with two
dialer map commands.
The first dialer map command maps the telephone number for Hong Kong to its next hop address,
which is the IP address of the serial port of the router in Hong Kong. The second dialer map
command maps the telephone number for the Singapore router to the next hop address for Singapore.
Routing Configuration
The IP static routes define the next hops used in the dialer map commands. When a packet is
received for a host on network 128.10.200.0, it is routed to a next hop address of 128.10.200.65. This
route goes out serial interface 5. DDR uses the next hop address to obtain the telephone number of
the destination router.
Note The use of the passive-interface command states that routing updates are not to be sent out
serial interface 5. Because the remote sites are using a default route, there is no need to send routing
updates over the wire.
Access List Configuration
The use of dialer map commands provides anadditional level of filtering. When apacket is received
for a host on network 128.10.200.0, it is routed to a next hop address of 128.10.200.65. This route
goes out serial interface 5. The packet is compared to the access lists. If the packet is deemed
“interesting,” the packet’s next hop address is compared to the dialer map commands defined for
that interface. If a match is found, the interface is checked to determine whether it is connected to
the telephone number for that next hop address. If the interface is not connected, a call is placed to
the telephone number. If the interface is currently connected to that number, the idle timer is reset.
If the interface is connected to another number (from another dialer map command), the fast-idle
timer is started due to contention for the interface. If there is no match of the next hop address to any
of the dialer maps and there is no dialer string defined (which matches all next hop addresses), the
packet is dropped.
This additional layer of filtering for the next hop address causes problems for broadcast packets such
as routing updates. Because a broadcast packet is transmitted with a next hop address of the
broadcast address, the check against the dialer map commands will fail. If you want broadcast
packets transmitted to telephone numbers defined by dialer map commands, additional dialer map
commands must specify the broadcast address as the next hop address with the same telephone
number. For example, you might add the following dialer map commands:
dialer map ip 255.255.255.255 0118527351625
dialer map ip 255.255.255.255 011653367085
If the interface is currently connected to one of these telephone numbers, and if it receives an IGRP
broadcast packet, that packet will now be transmitted because it matches a dialer map command to
an already connected telephone number. (If the connection is already established, both “interesting”
Dial-on-Demand Routing 2-7
Configuring Multiple Interfaces for Multiple Remote Sites
and “uninteresting” packets are sent.) If a connection is not already established, adding the dialer
map commands will not cause an IGRP packet sent to the broadcastaddress to cause dialing because
the access lists determine that the IGRP packet is uninteresting.
Note In the configuration example described in the “Configuring a Single Interface for Multiple
Remote Sites” section, the dialer string command permits broadcast packets to be sent when the
link is connected because the dialer string matches all next hop addresses that did not have a dialer
map.
Remote Sites: Dial In Only
Except for the IP address and the default route, each of the remote sites is configured identically as
an answer-only site. The following example illustrates the Hong Kong configuration:
interface serial 1
description interface to answer calls from San Francisco
ip address 128.10.200.65 255.255.255.192
dialer in-band
!
ip route 0.0.0.0 0.0.0.0 128.10.200.66
The answering site will not disconnect the call. It is up to the calling site to disconnect the call when
the line is idle. A default route is defined back to the central site.
Configuring Multiple Interfaces for Multiple Remote Sites
When using a single interface with dialer maps, contention for the interface can occur. This
contention starts a fast-idle timer that causes lines to remain connected for a shorter idle time than
usual, allowing other destinations to use the interface. Dialer rotary groups prevent contention by
creating a set of interfaces that can be used to dial out. Rather than statically assigning an interface
to a destination, dialer rotary groups allow dynamic allocation of interfaces to telephone numbers.
Before a call is placed, the rotary group is searched for an interface that is not in use to place the call.
It is not until all of the interfaces in the rotary group are in use that the fast-idle timer is started.
Note The following configurations appear as they would be entered at the command line. Due to
the way dialer rotary groups function, the output from a write terminal command on the router may
differ slightly from what is shown here.
Having the Central Site Dial Out
Internetworking Case Studies
2-8
Central Site: Dial Out Only
The following configuration defines dialer rotary groups on the central site router:
interface dialer 1
description rotary group for Hong Kong, Tokyo, and Singapore
ip address 128.10.200.66 255.255.255.192
ip address 128.10.202.66 255.255.255.192 secondary
ip address 128.10.204.66 255.255.255.192 secondary
dialer in-band
dialer wait-for-carrier-time 60
! map Hong Kong to a phone number
dialer map ip 128.10.200.65 0118527351625
! map Singapore to a phone number
dialer map ip 128.10.202.65 011653367085
! map Tokyo to a phone number
dialer map ip 128.10.204.65 0118127351625
pulse-time 1
dialer-group 1
!
interface serial 5
dialer rotary-group 1
!
interface serial 6
dialer rotary-group 1
!
router igrp 1
network 128.10.0.0
passive-interface dialer 1
redistribute static
!
! route to Hong Kong
ip route 128.10.200.0 255.255.255.192 128.10.200.65
! route to Singapore
ip route 128.10.202.0 255.255.255.192 128.10.202.65
! route to Tokyo
ip route 128.10.204.0 255.255.255.192 128.10.204.65
!
access-list 101 deny igrp 0.0.0.0 255.255.255.255 255.255.255.255 0.0.0.0
access-list 101 permit ip 0.0.0.0 255.255.255.255 0.0.0.0 255.255.255.255
dialer-list 1 list 101
Interface Configuration
Specifying a dialer interface is the first step in defining a dialer rotary group. While a dialer interface
is not a physical interface, all of the configuration commands that can be specified for a physical
interface can be used for a dialer interface. For example, the commands listed under the
interface dialer command are identical to those used for physical serial interface 5 as described in
the “Configuring a Single Interface for Multiple Remote Sites” section. Also, an additional dialer
map command has been added to map the next hop address for Tokyo to the telephone number.
The dialer rotary-group command places physical serial interface 5 and serial interface 6 in the
rotary group. Either of these interfaces can be used to dial any of the destinations defined by the
interface dialer command.
As mentioned earlier, when you look at the configuration on the router using the write terminal
command, the configuration may look slightly different from your input. For example, the
pulse-time command associated with the dialer interface will appear with all of the serial interfaces
that were added with the dialer rotary-group command. Certain configuration information
associated with the dialer interface is propagated to all of the interfaces that are in the rotary group.
Dial-on-Demand Routing 2-9
Having the Central and Remote Sites Dial In and Dial Out
Routing Configuration
The routing section of this configuration has not changed from the example in the “Configuring a
Single Interface for Multiple Remote Sites” section. But if you were to examine the routing table for
one of the remote networks using the show ip route command (for example, show ip route
128.10.200.0), you would see that the output interface for packets sent to this subnet is interface
dialer 1. The actual physical interface over which the packet will be transmitted is not determined
until the DDR steps described in the following paragraph are performed.
Before a packet is sent out the dialer interface, DDR checks to determine whether the packet is
“interesting” or “uninteresting.” DDR then checks the dialer map. Next, all of the physical interfaces
in the rotary group are checked to determine whether they are connected to the telephone number. If
an appropriate interface is found, the packet is sent out that physical interface. If an interface is not
found and the packet is deemed interesting, the rotary group is scanned for an available physical
interface. The first available interface found is used to place a call to the telephone number.
Note To use dynamic routing, in which two of the remote sites communicate with each other via
the central site, the no ip split-horizon command is required and the passive-interface command
must be removed.
Access List Configuration
This configuration uses the same access lists as the example in the “Configuring a Single Interface
for Multiple Remote Sites” section. A default route is defined back to the central site.
Remote Sites: Dial In Only
Except for the IP address and the default route, each of the remote sites is configured identically as
an answer-only site. The following example illustrates the Hong Kong configuration:
interface serial 1
description interface to answer calls from San Francisco
ip address 128.10.200.65 255.255.255.192
dialer in-band
!
ip route 0.0.0.0 0.0.0.0 128.10.200.66
The answering site will not disconnect the call. It is up to the calling site to disconnect the call when
the line is idle.
Having the Central and Remote Sites Dial In and Dial Out
It is often more convenient to have the remote sites call the central site as its users require, instead
of depending on the central site to poll the remote sites. This section provides the following
configuration examples in which both the central site and the remote sites are placing calls:
• Configuring One Interface Per Remote Site
• Configuring a Single Interface for Multiple Remote Sites
• Configuring Multiple Interfaces for Multiple Remote Sites
Having the Central and Remote Sites Dial In and Dial Out
Internetworking Case Studies
2-10
Configuring One Interface Per Remote Site
In order to support dial-in and dial-out for both the central and remote sites using one interface per
remote site, each remote site must call in on the specific central site interface that has the dialer string
corresponding to the respective remote site telephone number.
Central Site: Dial In and Dial Out
In the following example, the central San Francisco site is configured to place and answer calls. One
interface is configured per remote site.
interface serial 5
description DDR connection to Hong Kong
ip address 128.10.200.66 255.255.255.192
dialer in-band
dialer wait-for-carrier-time 60
dialer string 0118527351625
pulse-time 1
dialer-group 1
!
interface serial 6
description DDR connection to Singapore
ip address 128.10.202.66 255.255.255.192
dialer in-band
dialer wait-for-carrier-time 60
dialer string 011653367085
pulse-time 1
dialer-group 1
!
interface serial 7
description DDR connection to Tokyo
ip address 128.10.204.66 255.255.255.192
dialer in-band
dialer wait-for-carrier-time 60
dialer string 0118127351625
pulse-time 1
dialer-group 1
!
router igrp 1
network 128.10.0.0
redistribute static
!
! route to Hong Kong
ip route 128.10.200.0 255.255.255.192 128.10.200.65
! route to Singapore
ip route 128.10.202.0 255.255.255.192 128.10.202.65
! route to Tokyo
ip route 128.10.204.0 255.255.255.192 128.10.204.65
!
access-list 101 deny igrp 0.0.0.0 255.255.255.255 255.255.255.255 0.0.0.0
access-list 101 permit ip 0.0.0.0 255.255.255.255 0.0.0.0 255.255.255.255
dialer-list 1 list 101
Remote Sites: Dial In and Dial Out
All of the remote configurations are similar. Each defines a default route back to the central site and
a dialer string that contains the telephone number of the central site.
Dial-on-Demand Routing 2-11
Configuring One Interface Per Remote Site
Hong Kong
In the following example, the remote Hong Kong site is configured to place and answer calls. Hong
Kong’s configuration file contains a dialer string of 14155551212, which should call serial
interface 5 in San Francisco.
interface serial 1
description DDR connection to San Francisco
ip address 128.10.200.65 255.255.255.192
dialer in-band
dialer wait-for-carrier-time 60
dialer string 14155551212
pulse-time 1
dialer-group 1
!
router igrp 1
network 128.10.0.0
!
ip route 128.10.0.0 255.255.0.0 128.10.200.66
!
access-list 101 deny igrp 0.0.0.0 255.255.255.255 255.255.255.255 0.0.0.0
access-list 101 permit ip 0.0.0.0 255.255.255.255 0.0.0.0 255.255.255.255
dialer-list 1 list 101
Singapore
In the following example, the remote Singapore site is configured to place and answer calls. The
Singapore configuration file contains a dialer string of 14155551213, which should call serial
interface 6 in San Francisco.
interface serial 1
description DDR connection to San Francisco
ip address 128.10.202.65 255.255.255.192
dialer in-band
dialer wait-for-carrier-time 60
dialer string 14155551213
pulse-time 1
dialer-group 1
!
router igrp 1
network 128.10.0.0
!
ip route 128.10.0.0 255.255.0.0 128.10.202.66
!
access-list 101 deny igrp 0.0.0.0 255.255.255.255 255.255.255.255 0.0.0.0
access-list 101 permit ip 0.0.0.0 255.255.255.255 0.0.0.0 255.255.255.255
dialer-list 1 list 101
Having the Central and Remote Sites Dial In and Dial Out
Internetworking Case Studies
2-12
Tokyo
In the following example, the remote Tokyo site is configured to place and answer calls. The Tokyo
configuration file contains a dialer string of 14155551214, which should call serial interface 7 in San
Francisco.
interface serial 1
description DDR connection to San Francisco
ip address 128.10.204.65 255.255.255.192
dialer in-band
dialer wait-for-carrier-time 60
dialer string 14155551214
pulse-time 1
dialer-group 1
router igrp 1
network 128.10.0.0
!
ip route 128.10.0.0 255.255.0.0 128.10.204.66
!
access-list 101 deny igrp 0.0.0.0 255.255.255.255 255.255.255.255 0.0.0.0
access-list 101 permit ip 0.0.0.0 255.255.255.255 0.0.0.0 255.255.255.255
dialer-list 1 list 101
Because all incoming calls are assumed to be from the telephone number configured with the dialer
string command, it is important to configure the central and remote sites correctly. For example, if
the Singapore dialer string uses the telephone number that Hong Kong uses to call the central site,
packets from the central site intended for Hong Kong would be sent to Singapore whenever
Singapore called in because Singapore called in using the Hong Kong interface.
Configuring a Single Interface for Multiple Remote Sites
When multiple sites are calling into a central site, an authentication mechanism must be used unless
that central site has one interface dedicated to each incoming call. Without the authentication
mechanism, the central site router has no way of identifying the sites to which it is currently
connected and cannot ensure that additional calls are not made. Point-to-Point Protocol (PPP)
encapsulation with CHAP or Password Authentication Protocol (PAP) provides the mechanism to
identify the calling party.
Note A router with a built-in ISDN port may be able to use calling party identification. Because
calling party identification is not available everywhere, PPP with CHAP provides the identification
mechanism. In Software Release 9.21, PPP and Password Authentication Protocol (PAP) can be
used in place of CHAP, although PAP is less secure than CHAP. The configuration of PAP would
differ slightly from the configuration for CHAP illustrated in this section.
Dial-on-Demand Routing 2-13
Configuring a Single Interface for Multiple Remote Sites
Central Site: Dial In and Dial Out
In the following example, the central San Francisco site is configured to place and answer calls. A
single interface is configured for multiple remote sites.
hostname SanFrancisco
interface serial 5
description DDR connection to Hong Kong and Singapore
ip address 128.10.200.66 255.255.255.192
ip address 128.10.202.66 255.255.255.192 secondary
encapsulation ppp
ppp authentication chap
dialer in-band
dialer wait-for-carrier-time 60
dialer map ip 128.10.200.65 name HongKong 0118527351625
dialer map ip 128.10.202.65 name Singapore 011653367085
pulse-time 1
dialer-group 1
!
router igrp 1
network 128.10.0.0
passive-interface serial 5
redistribute static
!
! route to Hong Kong
ip route 128.10.200.0 255.255.255.192 128.10.200.65
! route to Singapore
ip route 128.10.202.0 255.255.255.192 128.10.202.65
access-list 101 deny igrp 0.0.0.0 255.255.255.255 255.255.255.255 0.0.0.0
access-list 101 permit ip 0.0.0.0 255.255.255.255 0.0.0.0 255.255.255.255
dialer-list 1 list 101
!
username HongKong password password1
username Singapore password password2
The command encapsulation ppp enables PPP encapsulation. The command ppp authentication
chap enables CHAP authentication. In addition, username commands are entered for each of the
remote sites that place calls. The username command defines the name of the remote router and a
password to be associated with that router. When ppp authentication chap is configured,
authentication must be verified or else network traffic will not be transmitted.
The dialer map command contains the host name of the remote router. This associates the remote
router with a next hop address and a telephone number. When a packet is received for a host on
network 128.10.200.0, it is routed to a next hop address of 128.10.200.65 via serial interface 5. The
packet is compared to the access lists and then the packet’s next hop address is compared to the
dialer map commands for serial interface 5.
If the packet is “interesting” and a connection to the number in the dialer map command is already
active on the interface, the idle timer is reset. If a match is found, DDR checks the interface to
determine whether it is connected to the telephone number for the next hop address. The comparison
to the telephone number is useful only if the router placed the call or if the telephone number was
received via calling party ID on an ISDN router. With CHAP and the name keyword included in the
dialer map command, both the telephone number and the name for a given next hop address are
compared to the names of the routers already connected. In this way, calls to destinations to which
connections are already established can be avoided.
Remote Sites: Dial In and Dial Out
In the following configuration examples, the remote sites are configured to place and receive calls to
or from a single interface at the central site.