Tài liệu Module 2: Strategies for Administering a Windows 2000 Network pptx
Bạn đang xem bản rút gọn của tài liệu. Xem và tải ngay bản đầy đủ của tài liệu tại đây (504.34 KB, 58 trang )
Contents
Overview 1
Windows 2000 Administrative Strategies 2
Customizing MMC Consoles 4
Installing Windows 2000 Snap-Ins 9
Setting Up Taskpads 10
Lab A: Customizing MMC Consoles 14
Using Secondary Logon for
Administration 28
Using Terminal Services for
Administration 32
Lab B: Administering a Windows 2000
Network 36
Best Practices 47
Review 48
Module 2: Strategies for
Administering a
Windows 2000 Network
Information in this document is subject to change without notice. The names of companies,
products, people, characters, and/or data mentioned herein are fictitious and are in no way intended
to represent any real individual, company, product, or event, unless otherwise noted. Complying
with all applicable copyright laws is the responsibility of the user. No part of this document may
be reproduced or transmitted in any form or by any means, electronic or mechanical, for any
purpose, without the express written permission of Microsoft Corporation. If, however, your only
means of access is electronic, permission to print one copy is hereby granted.
Microsoft may have patents, patent applications, trademarks, copyrights, or other intellectual
property rights covering subject matter in this document. Except as expressly provided in any
written license agreement from Microsoft, the furnishing of this document does not give you any
license to these patents, trademarks, copyrights, or other intellectual property.
??1999 Microsoft Corporation. All rights reserved.
Microsoft, Active Directory, PowerPoint, and Windows are either registered trademarks or
trademarks of Microsoft Corporation in the U.S.A. and/or other countries.
The names of companies, products, people, characters, and/or data mentioned herein are fictitious
and are in no way intended to represent any real individual, company, product, or event, unless
otherwise noted.
Other product and company names mentioned herein may be the trademarks of their respective
owners.
Project Lead and Instructional Designer: Mark Johnson
Instructional Designers : Aneetinder Chowdhry (NIIT Inc.), Kathryn Yusi
(Independent Contractor)
Lead Program Manager: Ryan Calafato
Program Manager: Joern Wettern (Wettern Network Solutions)
Graphic Artist: Julie Stone (Independent Contractor)
Editing Manager: Tina Tsiakalis
Substantive Editor: Kelly Baker (Write Stuff)
Copy Editor: Wendy Cleary (S&T OnSite)
Online Program Manager: Nikki McCormick
Online Support: Arlo Emerson (MacTemps)
Compact Disc Testing: Data Dimensions, Inc.
Production Support: Arlene Rubin (S&T OnSite)
Manufacturing Manager: Bo Galford
Manufacturing Support: Mimi Dukes (S&T OnSite)
Lead Product Manager, Development Services: Elaine Nuerenberg
Lead Product Manager: Sandy Alto
Group Product Manager: Robert Stewart
Module 2: Strategies for Administering a Windows 2000 Network iii
Introduction
This module provides students with the knowledge and skills to efficiently
perform network administration of Microsoft® Windows® 2000, both locally
and remotely. Students will learn how to create customized tools to match
specific administrative responsibilities. They will also learn the different
methods and strategies to use when performing administrative tasks.
In the two hands-on labs in this module, students will have a chance to create
and customize tools and perform administrative tasks both locally and remotely.
In the first lab, students will create and customize MMC consoles and taskpads,
some of which they will use from their partners’ computers. In the second lab,
students will set up Terminal Services and use it to perform administrative tasks
on their partners’ computers. They will also run applications by using
secondary logon.
Materials and Preparation
This section provides you with the materials and preparation needed to teach
this module.
Materials
To teach this module, you need the following materials:
?? Microsoft PowerPoint® file 1558a_02.ppt
Preparation
To prepare for this module, you should:
?? Read all the materials for this module.
?? Complete the labs.
?? Study the review questions and prepare alternative answers to discuss.
?? Anticipate questions that students may ask. Write out the questions and
provide the answers.
?? Read the Using Secondary Logon (Run As) in Windows 2000 technical
walkthrough on the Student Materials compact disc.
Presentation:
60 Minutes
Labs:
90 Minutes
iv Module 2: Strategies for Administering a Windows 2000 Network
Instructor Setup for the Labs
Perform the following setup on your instructor computers for the labs.
Lab A: Customizing MMC Consoles
No setup required for the instructor computer.
Lab B: Administering a Windows 2000 Network
??To prepare for the lab
1. Ensure that students can access the shared folder \\london\Setup\Winsrc and
that this folder contains the contents of the i386 folder from the
Windows 2000 Advanced Server CD-ROM. This folder should have been
created during classroom setup.
2. Ensure that students can access the shared folder \\london\TSClient and that
this folder contains the Terminal Services client installation files. This
folder should have been created during classroom setup.
Module 2: Strategies for Administering a Windows 2000 Network v
Module Strategy
Use the following strategy to present this module:
?? Windows 2000 Administrative Strategies
In this topic, you will introduce the characteristics of Windows 2000
administration and the different Windows 2000 administrative tools and
methods that students can implement to perform administration. Emphasize
to students that they can customize administrative tools to match the
administrative tasks that specific administrators perform.
?? Customizing MMC Consoles
In this topic, you will explain how to customize consoles in Microsoft
Management Console (MMC). First, present what an MMC console is,
including the explanation that a console is an .msc file that holds snap-ins.
Emphasize that there are preconfigured and customized consoles. Next, tell
students how to create a customized console; demonstrate the process.
Finally, present the procedure for distributing customized MMC consoles. If
students ask about Windows Installer or Group Policy, refer them to
module 6, “Using Group Policy to Manage Software,” in course 1558A,
Advanced Administration for Microsoft Windows 2000.
?? Installing Windows 2000 Snap-Ins
In this topic, you will explain how to install all Windows 2000 snap-ins on a
computer running Windows 2000 Professional. Tell students that the
Windows 2000 Administrative Tools package includes the complete set of
snap-ins. Mention where they can obtain the Adminpak.msi Windows
Installer package for the installation.
?? Setting Up Taskpads
In this topic, you will explain how to set up customized taskpads. First
explain what a taskpad is, emphasizing that it is a simplified interface that
novice administrators and users can use. Open the User Admin taskpad to
present the different parts of a taskpad. Next, explain how to create a
taskpad; demonstrate doing so. Finally, present how to create a task in
a taskpad. Emphasize that a task is a shortcut to a command in the MMC
console. Demonstrate how to create a task associated with the console tree
and one associated with the details pane.
?? Lab A: Customizing MMC Consoles
Prepare students for the lab in which they will create customized MMC
consoles and taskpads and also install Windows 2000 Administration Tools.
Make sure that students run the command file for the lab, and tell them
that they will work with their partners’ computers. After students have
completed the lab, ask them whether they have any questions concerning
the lab.
?? Using Secondary Logon for Administration
In this topic, you will explain how to use secondary logon to perform
administrative tasks. First, explain what secondary logon is. Emphasize that
a user can start a second logon without logging off from the first logon
session, and emphasize the advantages of using a secondary logon when
performing administrative tasks. Then, present the different Run as methods
to use to start an application.
vi Module 2: Strategies for Administering a Windows 2000 Network
?? Using Terminal Services for Administration
In this topic, you will introduce how to use Terminal Services to perform
administrative tasks on remote computers. First, explain what Terminal
Services is and why it is advantageous for remote administration.
Emphasize that you can perform all administrative tasks on a server from a
remote computer, including software installation. Then present what to
configure in Terminal Services so that it is optimized for remote
administration. Emphasize what you need to configure to enhance
performance and security.
?? Lab B: Administering a Windows 2000 Network
Prepare students for the lab in which they will perform administrative tasks
by using a secondary logon and Terminal Services. Make sure that students
run the command file for the lab, and tell them they will work with their
partners’ computers. After students have completed the lab, ask them
whether they have any questions concerning the lab.
?? Best Practices
Present best practices for using Windows 2000 to administer a network.
Module 2: Strategies for Administering a Windows 2000 Network vii
Customization Information
This section identifies the lab setup requirements for a module and the
configuration changes that occur on student computers during the labs. This
information is provided to assist you in replicating or customizing Microsoft
Official Curriculum (MOC) courseware.
The labs in this module are also dependent on the classroom
configuration that is specified in the Customization Information section at the
end of the Classroom Setup Guide for course 1558A, Advanced Administration
for Microsoft Windows 2000.
Lab Setup
The following list describes the setup requirements for the labs in this module.
Setup Requirement 1
The labs in this module require the C:\MOC\Win1558A\Labfiles\Lab02\Tools
folder, shared as Tools to allow students to save customized consoles. To
prepare student computers to meet this requirement, perform one of the
following actions:
?? Run C:\MOC\Win1558A\Labfiles\Lab02\Setup\Lab0201.cmd.
?? Create the folder manually and share it.
Setup Requirement 2
The labs in this module require a Package Handling OU and a Human
Resources OU with several computer and user objects in it. To prepare student
computers to meet this requirement, perform one of the following actions:
?? Run C:\MOC\Win1558A\Labfiles\Lab02\Setup\Lab0201.cmd.
?? Create the OUs manually. Add the Don Hall and Jae Pak user objects, and
the Computer1, Computer2, Computer3, and Computer4 computer objects.
Setup Requirement 3
The labs in this module require the Log on locally right on domain controllers
to be assigned to the Everyone group. To prepare student computers to meet
this requirement, perform one of the following actions:
?? Run C:\MOC\Win1558A\Labfiles\Lab02\Setup\Lab0202.cmd.
?? Assign the right manually.
Setup Requirement 4
The labs in this module require a customized MMC console named
DomainAdmin2 that contains Active Directory Users and Computers and Disk
Defragmenter. To prepare student computers to meet this requirement, perform
one of the following actions:
?? Run C:\MOC\Win1558A\Labfiles\Lab02\Setup\Lab0202.cmd.
?? Create the console file manually and place it in
C:\MOC\Win1558A\Labfiles\Lab02\Tools.
Important
viii Module 2: Strategies for Administering a Windows 2000 Network
Setup Requirement 5
The labs in this module require a regular user account for the student.
To prepare student computers to meet this requirement, perform the
following action:
?? Create the user account manually.
Lab Results
Performing the labs in this module introduces the following configuration
change:
?? Students install and then remove Terminal Services.
You can run
C:\MOC\Win1558A\Labfiles\Lab02\Setup\Lab02Rm.cmd to remove most
configuration changes introduced during the labs in the module. Make sure that
students uninstall Terminal Services at the end of Lab B. Remove the Log on
locally right from the Everyone group manually
Important
Module 2: Strategies for Administering a Windows 2000 Network 1
Overview
? Windows 2000 Administrative Strategies
? Customizing MMC Consoles
? Installing Windows 2000 Snap-Ins
? Setting Up Taskpads
? Using Secondary Logon for Administration
? Using Terminal Services for Administration
? Best Practices
After a network is set up and configured, you need to ensure that administrative
tasks are efficiently carried out. Microsoft® Windows® 2000 provides
administrators with the appropriate tools to perform the tasks that you delegate
to them, and allows you to administer centrally from one computer without
having to log on to each local computer that you administer. Consequently,
not only are you able to ensure that administrative tasks are efficiently
completed and that your network runs smoothly, but the administrative
process is simplified.
At the end of this module, you will be able to:
?? Identify the characteristics of Windows 2000 administration and the
different administrative tools and methods in Windows 2000.
?? Customize consoles in Microsoft Management Console (MMC).
?? Install Windows 2000 snap-ins on a computer running Windows 2000
Professional.
?? Set up customized taskpads.
?? Use secondary logon to perform administrative tasks.
?? Use Terminal Services to perform administrative tasks on
remote computers.
?? Apply best practices for using administrative tools and performing network
administration tasks.
Slide Objective
To provide an overview
of the module topics
and objectives.
Lead-in
In this module, you will learn
about Windows 2000
administrative tools and
different administrative
strategies to use.
Do not go into detail on this
topic, because the content
will be covered in
following topics.
2 Module 2: Strategies for Administering a Windows 2000 Network
Windows 2000 Administrative Strategies
? Customize Tools to
Match Administrators’
Responsibilities
? Administer Locally
or Remotely
? Delegate
Administration
Windows 2000
Provides a Variety of
Tools and Methods
for Administration
Windows 2000
Provides a Variety of
Tools and Methods
for Administration
Windows 2000 provides the tools and means to administer your network,
whether it is a single domain, a domain tree, or a forest. With Windows 2000
you can:
?? Administer computers and their services by using the computer (locally) or
remotely. Remote administration is when you are using one computer and
then connect to another computer to administer the local computer. Remote
administration allows you to administer from any computer centrally, rather
than administering at each computer. This allows you to place network
servers in a secured location.
?? Delegate administrative responsibilities to other administrators. You can
delegate responsibility for entire sections of your network, such as an entire
domain, or for one organizational unit (OU) in the domain. You can
delegate all of the administrative tasks for a domain or OU, or you
can delegate specific tasks (for example, resetting passwords). This is
possible because the structure of the Active Directory
™
directory service
allows you to assign permissions and grant user rights in very specific ways.
You must always ensure that the administrator has the permission required
to perform the tasks.
?? Customize administrative tools so that administrators always have the
appropriate tools for the administrative tasks for which they are responsible.
If a user is responsible for changing only selected attributes of user
accounts, that user does not have to use a tool that is more complex than is
required to complete the task.
Slide Objective
To introduce Windows 2000
administration and the
different methods that you
can use to administer
a network.
Lead-in
Windows 2000 provides the
tools and methods that
facilitate administration, both
locally and remotely, as well
as the ability to provide the
appropriate tools to those
administrators and users to
whom you delegate
administrative
responsibilities.
After mentioning the
characteristics of
Windows 2000
administration, briefly
mention the tools and
methods that Windows 2000
provides to help in the
administration of a network.
Key Points
You can sit at one
computer and administer
another computer.
When you delegate
administrative
responsibilities to
administrators and users,
Windows 2000 provides the
means for you to create the
appropriate tools for these
administrators and users.
Module 2: Strategies for Administering a Windows 2000 Network 3
Windows 2000 provides you with a great deal of flexibility when setting up the
way that your network is administered. The tools and methods that
Windows 2000 provides are:
?? Customized MMC consoles. You can create customized consoles that
correspond directly to specific administrative responsibilities.
?? Windows 2000 Administration Tools. You can install the Administration
Tools package, which is a complete set of all snap-ins, on client computers
so that you have the snap-ins necessary to perform remote administration.
?? Taskpads. You can create and customize tools with easy-to-use interfaces
for users with limited administrative responsibilities.
?? Secondary Logon. When logged on with a non-administrative user account,
you can start an additional logon session by using your administrative
user account.
?? Terminal Services. You can run interactive sessions on a remote server that
is running Windows 2000 Server so that you can administer that server.
4 Module 2: Strategies for Administering a Windows 2000 Network
? Customizing MMC Consoles
? What Is an MMC Console?
? Creating a Customized MMC Console
? Distributing a Customized MMC Console
Windows 2000 provides you with preconfigured MMC consoles that contain
the components you need to perform administrative tasks. Each preconfigured
console includes a snap-in and its associated extensions. Windows 2000 also
provides you with the ability to create customized MMC consoles that fit your
administrative responsibilities or the responsibilities of other administrators.
Slide Objective
To introduce the topics
related to customizing
MMC consoles.
Lead-in
To ensure that
administrators have the
administrative tools that they
require to perform
administrative tasks, you
can customize MMC
consoles and
distribute them.
Module 2: Strategies for Administering a Windows 2000 Network 5
What Is an MMC Console?
An MMC Console:
? Is an .msc File That Holds Snap-Ins
? Can Be Preconfigured or Customized
? Is an Administrative Tool That Corresponds to Specific
Responsibilities
compmgmt - [Computer Management (Local)\System Tools\Event Viewer]
Computer Management (Local)
System Tools
Performance Logs and Alerts
Local Users and Groups
System Information
Services
Shared Folders
Device Manager
Storage
Server Applications and Services
Event Viewer
Name
Application Log
Directory Service
DNS Server
File Replication Service
Security Log
System Log
Log
Log
Log
Log
Log
Log
Application Error
Custom Log Error
Custom Log Error
Custom Log Error
Security Audit Re
System Error Rec
Type Description
Action View
Action View
Console Tree
Console Tree
Details Pane
Details Pane
Snap-In
Snap-In
Extension
Extension
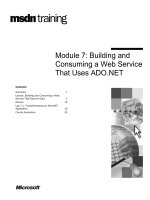
An MMC console is a file that holds snap-ins. A snap-in is a management
application that you use from within an MMC console to perform
administrative tasks. Console files have an .msc file name extension.
Windows 2000 provides preconfigured MMC consoles that you can access
from the Start menu, under Administrative Tools. Most of these snap-ins are
located in systemroot\System32. You can also create customized consoles that
match specific administrative responsibilities.
A snap-in can have extensions. Extensions are snap-ins that are attached to a
parent snap-in and that provide additional administrative functionality. Some
snap-ins can function as both a stand-alone snap-in and as an extension snap-in.
For example, Event Viewer can function as a stand-alone snap-in or as an
extension in Computer Management.
MMC consoles have several common interface elements. The following list
provides some of these elements:
?? Console tree and details pane. Each MMC console has these two panes. The
console tree on the left provides the snap-in and its extensions, which are
organized in a tree. The details pane on the right lists the content of the
selected item in the console tree.
?? Action and View menus. Each MMC console has these two menus. The
options on these menus vary depending on the selected item in either the
console tree or the details pane. The options on both menus affect the tasks
that you can perform with the console. Options on the Action menu
typically refer to the selected items in the console. Options on the View
menu typically provide display options.
Slide Objective
To explain the basic
concepts of MMC consoles.
Lead-in
MMC consoles contain the
snap-ins that you use to
perform most of your
administrative tasks.
Define snap-ins and
extensions.
Mention to students that in
customized consoles they
can have multiple versions
of the same snap-in (such
as Computer Management),
with each version applying
to a different computer.
Delivery Tip
Open Computer
Management and show
students the different parts
of this preconfigured MMC
console. Point out that
Event Viewer is an
extension here, but that it
can be a stand-alone
snap-in. Do not show a
customized console yet.
Key Points
An MMC console is a file
that holds snap-ins.
A snap-in is a management
application.
Most preconfigured
consoles are located in
systemroot\System32.
6 Module 2: Strategies for Administering a Windows 2000 Network
Creating a Customized MMC Console
Tasks for Customizing an MMC Console
Tasks for Customizing an MMC Console Tasks for Customizing an MMC Console
Open MMC
Open MMC
Add and configure the required
snap-ins in the MMC console
Add and configure the required
snap-ins in the MMC console
Configure the MMC console mode
Configure the MMC console mode
Configure the MMC console view
Configure the MMC console view
Save the MMC console
Save the MMC console
To Prevent a Console from Being Changed, Do Not
Assign the NTFS Write Permission to the .msi File
Customizing an MMC console allows you create consoles that fit the
responsibilities of administrators. This means that after you delegate
administrative control, you can ensure that administrators have only
the administrative tools that they require to perform their jobs. You can also
customize a console to fit your own needs. For example, you can create a
console that contains all of the snap-ins that you typically use to perform one
task or a set of related tasks, such all tasks for administering an OU.
To customize an MMC console, perform the following tasks:
1. Open MMC by typing mmc in the Run box.
2. Add the snap-ins that you require and their extensions. You can choose to
add only some of the extensions for a snap-in. You add snap-ins and
extensions in the Add/Remove Snap-ins dialog box.
3. Configure the mode for the MMC console. You configure the mode on
the Console tab of the Option dialog box. You can select one of the
following modes:
?? Author mode. Use this mode if you want other administrators to be able
to easily modify the console as their administrative responsibilities
change.
?? User mode. Use this mode when you want to limit the ability of other
administrators to modify the console. You can determine the amount of
the console tree to which the user can gain access and, therefore, the
tasks that the user can perform. User mode does not prevent a user from
changing consoles, but rather from accidentally changing consoles.
To prevent MMC from prompting users to save the console after each
use, click the Do not save changes to this console option on the
Console tab of the Option dialog box.
Slide Objective
To list the tasks involved
in creating a customized
MMC console.
Lead-in
Customizing MMC consoles
allows you to adapt the tools
that you and others use to
perform administrative
responsibilities.
Delivery Tip
Demonstrate creating and
customizing an MMC
console. Add the Computer
Management snap-in and
the Event Viewer snap-in.
Explain that you can point
the snap-ins to the local
computer or to another
computer. In addition, point
out that Event Viewer can
be both a stand-alone
snap-in and an extension of
Computer Management.
Key Points
An administrator or user can
always open an MMC
console in Author mode,
even if it is saved in
User mode.
Prevent changes to
customized consoles by not
assigning the NTFS Write
permission to the .msc file.
Module 2: Strategies for Administering a Windows 2000 Network 7
Regardless of whether you save an MMC console in Author or
User mode, you can still modify it by opening it in Author mode. To open a
console in Author mode, right-click the console, and then click Author. The
only way to prevent changes to customized consoles is to not assign the
NTFS file system Write permission to the .msc file.
4. Configure the MMC console view. You can control the parts of the console
to which the user can gain access by removing the console tree and toolbars.
You can configure these on the View menu of the console.
5. Save the MMC console.
If you configure a customized MMC console in user mode, ensure that you
also have a version that you saved in Author mode so that you can easily make
modifications if required.
Important
Tip
8 Module 2: Strategies for Administering a Windows 2000 Network
Distributing Customized MMC Consoles
Requirements:
? The Read permission for the
MMC console
? Snap-ins installed on the
computer where the administrator
uses the console
Requirements:
? The Read permission for the
MMC console
? Snap-ins installed on the
computer where the administrator
uses the console
Group Policy
Can Prevent
Changes
Can Prevent
Changes
Shared
Folder
There are several methods that you can use to centrally distribute customized
MMC consoles. The most common methods are:
?? Sending the console through e-mail as you would any file. This is the
quickest way to distribute a console file. However, you cannot prevent the
administrator from changing the file after receipt.
?? Placing the console file in a shared folder on a network server. The
advantage of this method is that the console is accessible from any computer
in the network. In addition, you can use NTFS file system permissions to
prevent administrators from changing the console file.
?? Packaging the console for distribution so that you can distribute it by using
Group Policy. This method guarantees that an administrator always has
access to the customized console, but it does not prevent the administrator
from changing the file after receipt.
For an administrator to use an MMC console successfully that you have
distributed, the following conditions must be met:
?? The administrator must have at least the Read permission for the
console file.
?? All snap-ins that the console references must be installed on the computers
on which the administrator uses the console.
For more information about distributing software by using Group Policy,
see module 6, “Using Group Policy to Manage Software,” in course 1558A,
Advanced Administration for Microsoft Windows 2000.
Slide Objective
To illustrate the procedure
for distributing customized
MMC consoles.
Lead-in
After you have created
customized MMC consoles
for other administrators, you
can choose one of several
methods to distribute
these consoles.
If students ask about
Windows Installer or Group
Policy, refer them to
module 6, “Using Group
Policy to Manage Software,”
in course 1558A, Advanced
Administration for Microsoft
Windows 2000.
Key Points
If you place the console file
in a shared folder, it is
accessible from any
computer in the network.
To use a console, an
administrator must have the
Read permission for the
console file, and the
appropriate snap-ins must
be installed on the computer
that the administrator uses.
Note
Module 2: Strategies for Administering a Windows 2000 Network 9
Installing Windows 2000 Snap-Ins
Snap-Ins:
? Are Contained in Windows 2000 Administrative Tools
? Are Required for Remote Administration from a Client
Computer Running Windows 2000 Professional
Windows 2000
Professional
Windows 2000
Professional
Windows 2000
Administration Tools
(Adminpak.msi)
Windows 2000
Administration Tools
(Adminpak.msi)
Install
Install
Install
Administer
Administer
Administer
Windows 2000 Administration Tools is a complete set of all of
the Windows 2000 snap-ins that are a part of Windows 2000 Server. You must
install these snap-ins to perform network administration remotely from a client
computer running Windows 2000 Professional. Windows 2000 Professional has
only the snap-ins required to perform routine administrative tasks on the
client computer.
Even if an administrator has an MMC console to use on a client computer, the
console is useless without the required snap-ins installed on this computer. To
install Windows 2000 Administration Tools, you use the Windows 2000
Administration Tools Setup wizard.
To install Windows 2000 Administration Tools, perform the following:
1. In Control Panel, click Add/Remove Programs, and then click Add.
The Windows 2000 Administration Tools Setup wizard guides you through
the process of selecting the installation mode.
2. You must provide the location of the Adminpak.msi file. You can get
this file:
?? From a computer running Windows 2000 Server in
systemroot\System32.
?? On the Windows 2000 Server compact disc.
Slide Objective
To explain the requirements
for installing snap-ins on
client computers running
Windows 2000 Professional.
Lead-in
After you have customized
and distributed MMC
consoles, you need to
ensure that the computers
on which you or other
administrators use these
consoles have the required
snap-ins.
Delivery Tip
Open Add/Remove
Programs in Control Panel.
Show students where they
would install Windows 2000
Administration Tools on a
computer running
Windows 2000 Professional.
Key Points
Windows 2000 Professional
does not have the
required snap-ins for
network administration; an
administrator must
install them.
Windows 2000
Administration Tools
contains the complete set of
Windows 2000 Server snap-
ins and is contained in the
Windows Installer package,
Adminpak.msi. If students
do not know what a
Windows Installer package
is, provide a brief definition.
10 Module 2: Strategies for Administering a Windows 2000 Network
? Setting Up Taskpads
? What Is a Taskpad?
? Creating a Taskpad
? Creating Tasks in a Taskpad
A taskpad is an administrative tool that you set up for novice administrators
and users whose primary job responsibility is not network administration. After
you delegate administrative tasks, set up a taskpad that provides the ability
to perform the specific tasks for which a novice administrator or user
is responsible.
To set up taskpads, you must create a customized MMC console, create a
taskpad in the console, and then define the specific tasks that the user
can perform.
Slide Objective
To introduce taskpads and
how they are created.
Lead-in
Creating taskpads is
another means of providing
the appropriate
administrative tools for
novice administrators and
users to whom you have
delegated administrative
responsibilities.
Module 2: Strategies for Administering a Windows 2000 Network 11
What Is a Taskpad?
A Taskpad:
? Is a Customized Administrative Tool Created for Users
and Novice Administrators
? Contains Tasks That Are Shortcuts to Specific
Commands in an MMC Console
? Provides Advantages:
? You can specifically define the taskpad task to
correspond to one administrative tasks
? A taskpad hides the complexity of MMC
? Has an Easy to Use Interface
A taskpad is an administrative tool that you create for users whose primary
responsibility is not network administration, or for novice administrators. A
taskpad is a simplified interface that contains one or more tasks. Each task is a
shortcut to a specific administrative task or command in an MMC snap-in.
The advantages of creating a taskpad are:
?? You can specifically define the task to correspond to the one administrative
task for which a user is responsible.
?? It hides the complexity of MMC. Because the taskpad provides a shortcut to
each task, users do not have to navigate through an MMC console to
perform one or two tasks.
The taskpad interface is simplified and easy to use. It can contain several
elements. The following list provides some of these elements:
?? A button for each shortcut to a task. All taskpads contain at least one button.
?? A list of items that appear in the details pane of the MMC console from
which the taskpad was created. Users perform the task on these items. A
taskpad may or may not contain this list.
?? The Change button. This button is optional and allows the user to select
different items in the console tree to administer.
To use a taskpad successfully, a user must have the appropriate permissions to
perform the task for which the taskpad is designed.
Slide Objective
To describe a taskpad.
Lead-in
Create taskpads for novice
administrators and users
whose primary responsibility
is not administration.
Delivery Tip
Open the User Admin
taskpad that is the user
Admin.msc file on the
Trainer Materials compact
disc. Show students what a
completed taskpad looks
like. Point out the task
buttons, the list of items,
and the Change button.
Explain the purpose of each
of these items. Then create
a user account.
Create a user account by
using Active Directory Users
and Computers to provide a
comparison.
Key Point
Each task is a shortcut to a
specific administrative task
or command in an MMC
snap-in.
A taskpad hides the
complexity of MMC.
A user must have the
appropriate permissions
to perform the task in
the taskpad.
12 Module 2: Strategies for Administering a Windows 2000 Network
Creating a Taskpad
Create and Configure a Taskpad
Create and Configure a Taskpad
Create and Configure a Taskpad
Create a customized MMC console
Create a customized MMC console
Create a taskpad
Create a taskpad
Configure a task in the taskpad
Configure a task in the taskpad
Customize the taskpad view
Customize the taskpad view
Creating a taskpad is a further customization of an MMC console. To create a
taskpad, perform the following steps:
1. Create an MMC console and add the required snap-in.
2. Create a taskpad by using the Taskpad Creation wizard. To open the
Taskpad Creation wizard, right-click the item in the console tree to which
the task applies, and then click New Taskpad.
The wizard guides you through the process of defining a taskpad’s
appearance, name, description, and the item in the console tree to which it
applies. The following table provides a description of the important options
in the wizard.
Option Description
Taskpad Type
How the items are displayed in the taskpad.
Single Item: The taskpad displays task icons and the list items
that appear in the details pane of the MMC console. This allows
you to select an item on which to perform a task. For example,
select a user account when resetting a password.
Stand-alone: The taskpad displays task icons only. A task can
only apply to a selected item in the console tree. For example,
you can create a user account in a specific OU, but not select a
user account on which to perform a task.
Add a Change
Button
Add a Change button to permit the user to use this taskpad on
other items in the console tree.
3. Configure a task by using the Task Creation wizard. The next topic provides
more information on this process.
4. Customize the taskpad by removing the console tree and changing the
console to User mode. To remove the console tree, on the View menu, make
sure that Console Tree is cleared.
Slide Objective
To describe the procedure
for creating and configuring
a taskpad.
Lead-in
A taskpad is a further
customization of an
MMC console.
Delivery Tip
Demonstrate creating a
taskpad, but do not present
all of the details on step 3.
Explain to students that you
will present the details in the
next topic.
Key Points
To create a taskpad you
use two wizards. They are
the Taskpad Creation
wizard and the Task
Creation wizard.
In the Taskpad Creation
wizard, you determine the
appearance, name, and
descriptions of the taskpad.
Module 2: Strategies for Administering a Windows 2000 Network 13
Creating Tasks in a Taskpad
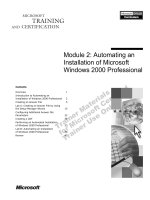
Each Task Is a Shortcut to a Command in the MMC Console
Associate with an item in
the details pane
Associate with an item in
the details pane
Associate with an item in
the console tree
Associate with an item in
the console tree
Disable AccountNew -> User
Launch a shortcut menu
command
Launch a shortcut menu
command
nwtraders.msft
Accounting
Builtin
Computers
Domain Controllers
Sales
Human Resources
Manila
Kim Yoshida
Luis Bonifaz
You can create tasks in taskpads for users who have limited administrative
responsibilities. In this way, users do not have to use the MMC console
interface to complete their administrative tasks. Each task in a taskpad is a
shortcut to a command in the MMC console. These are the same commands
that are available when you right-click an item in the console tree or the
details pane.
To set up a task that corresponds to a shortcut menu command, you use the
Task Creation wizard to launch and select either of the following options:
?? Console tree. This option allows you to select an item in the console tree
and then a command that a user can perform on that item.
For example, you can select an OU in the console tree and then select a
command available for OUs, such as creating new user accounts. The user
of the taskpad can then create user accounts only in that OU.
?? List in details pane. This option allows you to select an item that appears in
the details pane, and then select a command that the user can perform on
the item.
For example, you can select a user account in an OU and then select a
command available for that object type (such as resetting passwords). The
user of the taskpad can then reset passwords for any user account that he or
she selects in the details pane for that OU.
This option is not available if you selected the stand-alone option in the
Taskpad Creation wizard when creating the taskpad.
You can also set up a task that runs an application from the command
prompt (for example, batch files and scripts). A user can then run an application
by clicking a task icon rather than typing a command at the command line. You
must provide the command and any arguments that are required.
Slide Objective
To show the procedure for
creating tasks in a taskpad.
Lead-in
A taskpad is not complete
until you have created at
least one task for it. This
task is a shortcut to a
command in the
MMC console.
Delivery Tip
Demonstrate adding an
additional task to the
taskpad that you created in
the last section.
Show students how to
create a shortcut associated
with an item in the console
tree and how to create a
shortcut associated with an
item in the details pane.
Illustrate the fact that the
tasks correspond to
commands on shortcut
menus in a snap-in by right-
clicking the item in the
console tree for which you
created a task in the Task
Creation wizard. Perform
the same procedure for the
task that you created for an
item in the details pane.
Key Point
A task in a taskpad is a
shortcut to a command on
the MMC console. The
same command is available
if you right-click an item in
the console tree or in the
details pane.
Note
14 Module 2: Strategies for Administering a Windows 2000 Network
Lab A: Customizing MMC Consoles
Objectives
After completing this lab, you will be able to:
?? Customize consoles in the Microsoft Management Console (MMC).
?? Set up customized taskpads.
Prerequisites
Before working on this lab, you must have:
?? Knowledge of the capabilities of snap-ins included with Windows® 2000,
such as Active Directory Users and Computers and Computer Management.
?? Conceptual knowledge of MMC, including snap-ins and taskpads.
Lab Setup
To complete this lab, you need the following:
?? A computer running Microsoft® Windows® 2000 Server configured as a
domain controller in a child domain of nwtraders.msft.
?? To obtain your partner’s computer name.
?? To log on as (where domain is your
domain name) with a password of password, and run
C:\MOC\Win1558A\Labfiles\Lab02\Setup\Lab0201.cmd. This file:
?? Creates the C:\MOC\Win1558A\Labfiles\Lab02\Tools folder and shares
this folder as Tools.
?? Creates a Package Handling organizational unit (OU) and a Human Resources OU.
?? Creates user and computer objects in the Package Handling and Human
Resources OUs.
Estimated time to complete this lab: 60 minutes
Slide Objective
To introduce the lab.
Lead-in
In this lab, you will create a
customized MMC consoles
and taskpads.
Explain the lab objectives.
Make sure that students run
the command file for the lab,
and tell them that they will
work with their partners’
computers.
Module 2: Strategies for Administering a Windows 2000 Network 15
Exercise 1
Customizing an MMC Console
Scenario
Some administrators in your organization need to perform diverse configuration
tasks on domain controllers. These tasks include:
?? Reviewing event logs on all domain controllers in your domain.
?? Creating shared folders on all domain controllers in your domain.
?? Defragmenting disks on the computer on which they work.
?? Administering user accounts.
You want to enable these administrators to perform all of these tasks without
switching between administrative tools. You also want to ensure that the
administrators do not see commands and options that are not related to these
tasks. In this exercise, you will add snap-ins that allows administrators to
perform these administrative tasks to an MMC console.
Your Tasks
Your tasks are to create a customized console and add snap-ins to it, save the
customized console in Author mode, remove the Group Policy extension from
the console, save the console in User mode in a shared folder to prepare it for
distribution to other administrators, and use the console from a shared folder.
??To create a customized console and add snap-ins to it
1. Log on as (where domain is your
domain name) with a password of password.
2. Click the Start button, and then click Run.
3. In the Open box, type mmc and then click OK.
MMC starts and displays an empty console.
Maximize the Console1 and Console Root windows to simplify working
with the console.
4. On the Console menu, click Add/Remove Snap-in.
5. In the Add/Remove Snap-in dialog box, click Add.
6. In the Add Standalone Snap-in dialog box, select Event Viewer, and then
click Add.
MMC displays the Select Computer dialog box, allowing you to specify
the computer on which you want to view events. You will add an instance of
Event Viewer that points to your computer.
7. In the Select Computer dialog box, click Another computer, and in the
box, type the name of your computer.
Before continuing, you need to specify that the snap-in will always point to
your computer, and not to the local computer where you start the console.
8. Check the Allow the selected computer to be changed when launching
from the command line check box, and then click Finish.
Tip
16 Module 2: Strategies for Administering a Windows 2000 Network
9. In the Add Standalone Snap-in dialog box, add the following snap-ins:
?? Event Viewer for your partner’s computer
?? Shared Folders for your computer
?? Shared Folders for your partner’s computer
?? Disk Defragmenter
?? Active Directory Users and Computers
Notice that MMC did not display the Select Computer dialog box when
you added Disk Defragmenter. This is because you can run Disk
Defragmenter only on your local computer.
Why did MMC not display the Select Computer dialog box when you
added the Active Directory Users and Computers snap-in?
Administrative tasks in Active Directory Users and Computers apply to
the entire domain and not to a specific computer.
_____________________________________________________________
_____________________________________________________________
10. In the Add Standalone Snap-in dialog box, click Close, and in the
Add/Remove Snap-in dialog box, click OK.
Notice that the entries for Event Viewer and Shared Folders in the console
tree indicate which computer you can administer with them.
To see the entire folder name, drag the border between the console
panes to the right.
??To save the customized console in Author mode
1. On the Console menu, click Save As.
Notice that by default Windows 2000 saves customized consoles in the My
Documents folder, which is part of your user profile. You will instead save
the console that you created in a shared folder so that other administrators
can access it.
2. Save the console in C:\MOC\Win1558A\Labfiles\Lab02\Tools as
DomainAdmin - Author Mode.
??To remove the Group Policy extension from the Domain
Administration console
1. In the console tree, expand Active Directory Users and Computers, right-
click your domain, and then click Properties.
Notice that the Properties dialog box for domain contains a Group
Policy tab.
2. Click Cancel.
3. On the Console menu, click Add/Remove Snap-in.
4. In the Add/Remove Snap-in dialog box, click the Extensions tab.
Tip
Module 2: Strategies for Administering a Windows 2000 Network 17
5. On the Extensions tab, in the Snap-ins that can be extended box, select
Active Directory Users and Computers.
Notice that by default all extensions are included.
6. Clear the Add all extensions check box.
7. In the Available extensions box, clear Group Policy.
8. Click OK.
9. In DomainAdmin - Author Mode, in the console tree, under Active
Directory Users and Computers, right-click your domain, and then click
Properties.
Notice that the Properties dialog box for domain contains no Group
Policy tab.
10. Click Cancel.
11. On the Console menu, click Save.
??To save the console in User mode in a shared folder to prepare it for
distribution to other administrators
1. On the Console menu, click Options.
2. In the Options dialog box, click the Console tab.
3. In the Console mode box, select User mode –limited access,
single window.
4. Click Do not save changes to this console, and then click OK.
Preventing the saving of changes ensures that users will not be prompted to
save changes after navigating the console in User mode. It will not prevent
you from saving changes to the console while editing the console.
5. Save the console in C:\MOC\Win1558A\Labfiles\Lab02\Tools as
DomainAdmin.
6. Close DomainAdmin.
Before you start the following procedure, make sure that your partner has
finished the previous procedure.
Note