Tài liệu Module 3: Configuring File and Print Servers docx
Bạn đang xem bản rút gọn của tài liệu. Xem và tải ngay bản đầy đủ của tài liệu tại đây (1.3 MB, 52 trang )
Contents
Overview 1
Configuring a File Server 2
Configuring Disks 3
Configuring Shared Resources 12
Lab A: Configuring a File Server 24
Installing and Configuring a Print Server 32
Lab B: Configuring a Print Server 39
Review 43
Module 3: Configuring
File and Print Servers
Information in this document is subject to change without notice. The names of companies,
products, people, characters, and/or data mentioned herein are fictitious and are in no way intended
to represent any real individual, company, product, or event, unless otherwise noted. Complying
with all applicable copyright laws is the responsibility of the user. No part of this document may
be reproduced or transmitted in any form or by any means, electronic or mechanical, for any
purpose, without the express written permission of Microsoft Corporation. If, however, your only
means of access is electronic, permission to print one copy is hereby granted.
Microsoft may have patents, patent applications, trademarks, copyrights, or other intellectual
property rights covering subject matter in this document. Except as expressly provided in any
written license agreement from Microsoft, the furnishing of this document does not give you any
license to these patents, trademarks, copyrights, or other intellectual property.
2000 Microsoft Corporation. All rights reserved.
Microsoft, Active Directory, BackOffice, MS-DOS, PowerPoint, Visual Studio, Windows,
Windows Media, and Windows NT are either registered trademarks or trademarks of Microsoft
Corporation in the U.S.A. and/or other countries.
The names of companies, products, people, characters, and/or data mentioned herein are fictitious
and are in no way intended to represent any real individual, company, product, or event, unless
otherwise noted.
Other product and company names mentioned herein may be the trademarks of their respective
owners.
Project Lead and Instructional Designer: Rick Selby
Project Revision Leads: Red Johnston; Jaswinder Singh Lamba (NIIT [USA] Inc.)
Revision Development: NIIT (USA) Inc.
Instructional Designers: Victoria Fodale (ComputerPREP, Inc); Barbara Pelletier (S&T OnSite)
Program Manager: Rodney Miller
Testing Leads: Sid Benavente, Keith Cotton
Testing Developer: Greg Stemp (S&T OnSite)
Courseware Test Engineers: Jeff Clark; Jim Toland (ComputerPREP, Inc)
Graphic Artist: Julie Stone (Independent Contractor)
Editing Manager: Lynette Skinner
Editor: Kelly Baker (Write Stuff)
Copy Editor: Kathy Toney (S&T Consulting)
Online Program Manager: Debbi Conger
Online Publications Manager: Arlo Emerson (Aquent Partners)
Online Support: Eric Brandt (S&T OnSite)
Multimedia Development: Kelly Renner (Entex)
Compact Disc and Lab Testing: Data Dimensions, Inc.
Production Support: Irene Barnett (S&T Consulting)
Manufacturing Manager: Rick Terek (S&T OnSite)
Manufacturing Support: Laura King (S&T OnSite)
Lead Product Manager, Development Services: Bo Galford
Lead Product Manager: Gerry Lang
Group Product Manager: Robert Stewart
Simulations and interactive exercises were built by using Macromedia Authorware
Module 3: Configuring File and Print Servers iii
Instructor Notes
This module provides students with the knowledge and skills necessary to
configure Microsoft
® Windows® 2000 as a file or print server in a Microsoft
Windows NT® version 4.0 network.
At the end of this module, students will be able to:
Configure a file server.
Configure disks.
Configure shared resources.
Install and configure a print server.
Materials and Preparation
This section provides you with the materials and preparation needed to teach
this module.
Materials
To teach this module, you need the Microsoft PowerPoint® file 1594B_03.ppt.
Preparation
To prepare for this module, you should:
Read all the materials for this module.
Complete the lab.
Presentation:
90 Minutes
Lab:
75 Minutes
iv Module 3: Configuring File and Print Servers
Module Strategy
Use the following strategy to present this module:
Configuring a File Server
This topic introduces the Configuring Your Server page on the
Administrative Tools menu. Explain to students that when they click File
Server in the left pane of this page, the right pane will provide information
about the tasks that are necessary for configuring a file server. It also
provides hyperlinks to the Shared Folder wizard, Computer Management,
and information about shared folders in Windows 2000 Help. This page
consolidates all of the necessary tools for configuring a file server, and
eliminates the need to locate and open each tool individually.
Configuring Disks
This topic provides information on configuring disks to manage storage on a
file server. Describe the storage types that are available in Windows 2000,
and explain how to configure basic and dynamic disks. Explain the
procedures for upgrading basic disks to dynamic disks, and how to revert
back to a basic disk. Describe volume mount points and the procedure for
mounting a local drive, partition, or volume at any empty folder on a local
partition or volume formatted with the NTFS file system. Finally, explain
how to configure disk quotas to monitor and limit disk space on a per-user,
per-volume basis.
Configuring Shared Resources
This topic describes the necessary tasks for configuring shared resources.
Explain how to create shared folders, assign permissions, and control the
way that files and subfolders inherit permissions. Next, explain how to
configure shared folders for offline use, and how to increase security by
using Encrypting File System (EFS). Finally, explain how to configure
Distributed file system (Dfs) to organize shared folders.
Installing and Configuring a Print Server
This topic provides information about installing and sharing printers to
allow multiple users to use the same print device. Explain the procedure for
installing a printer by using the Add Printer wizard, and then explain the
procedure for sharing printers across a network. It is important that students
understand that clients on a variety of computers and operating systems can
send print jobs to printers that are attached locally to a print server running
Windows 2000. Next, explain the Internet printing feature in
Windows 2000. Describe the benefits and requirements of Web-based
printing, and then explain the procedure for installing and connecting to
printers using a Web browser.
Module 3: Configuring File and Print Servers v
Customization Information
This section identifies the lab setup requirements for a module and the
configuration changes that occur on student computers during the labs. This
information is provided to assist you in replicating or customizing Microsoft
Official Curriculum (MOC) courseware.
The labs in this module are also dependent on the classroom
configuration that is specified in the Customization Information section at the
end of the Classroom Setup Guide for course 1594B, Installing and
Configuring Microsoft Windows 2000 File, Print, and Web Servers.
Lab Setup
The labs in this module require that you perform the procedure specified in the
Classroom Setup Guide before performing the lab.
Lab Results
Performing the labs in this module introduces the following configuration
changes:
The hard disk is configured for dynamic storage.
The CD-ROM drive is mounted at the folder C:\Cdrom and the drive letter
assigned to the CD-ROM drive is removed.
A simple volume of 200 megabytes (MB) is created and mounted at a folder
C:\Users. A new user quota limit of 50 MB is assigned to this volume.
The folder C:\Products is shared with a share name of Products.
A new folder, named Northwind, is created in the root directory of drive C.
This folder is then shared as a new stand-alone Dfs root.
Two printers, a Canon BJC-800 and an Epson EPL-8000, are installed with
drivers for Windows 95, Windows 98, Windows NT 4.0, and
Windows 2000. The printers are shared as CanonBJC800 and
EpsonEPL8000.
A simple volume of 400 MB is created and mounted at a folder C:\Spool.
The spool directory for this server is set to C:\Spool.
Importan
t
Module 3: Configuring File and Print Servers 1
Overview
Configuring a File Server
Configuring Disks
Configuring Shared Resources
Installing and Configuring a Print Server
Enhancements to file services in Microsoft® Windows® 2000 improve file
sharing—making Windows 2000 ideal for use on a file server. Windows 2000
makes it easier to manage and store information across a network, and makes it
easier for users to locate that information. A file server running Windows 2000
provides transparent access to network resources, access to resources on
different network platforms, and easier management of large numbers of shared
resources.
Enhancements to print services in Windows 2000 make it easier to install and
configure printers. This also makes Windows 2000 ideal for use on a print
server. A print server running Windows 2000 provides an easy-to-use interface
for locating printers on a network, easier management of printers on a network,
and access to printers and print queue status by using a Web browser.
At the end of this module, you will be able to:
Configure a file server.
Configure disks.
Configure shared resources.
Install and configure a print server.
Slide Objective
To provide an overview of
the module topics and
objectives.
Lead-in
In this module, you will learn
about the process for
configuring Windows 2000
on a file or print server in a
Windows NT 4.0 network.
2 Module 3: Configuring File and Print Servers
Configuring a File Server
Windows 2000 Configure Your Server
Home
Register Now
Active Directory
File Server
Print Server
Web/Media Server
Networking
Application Server
Advanced
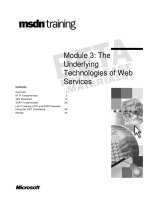
File Server
Use the Shared Folder wizard to create shared folders. Computers
running Windows, Novell NetWare, or Apple Macintosh operating
systems can gain access to files placed in a shared folder.
Start
the Shared Folder wizard.
1. Open
Computer Management.
2. In the console tree, expand System tools, expand Shared
Folders, and click Shares.
Learn more
about shared folders.
To manage shared folders
The Windows 2000 Setup program automatically installs disk and file
management features, but you must manually configure the file server disks and
shared resources to make the appropriate data available to users on the network.
The Configure Your Server page contains links to other tools in
Windows 2000. It contains information on the tasks that are necessary for
configuring a file server, and provides a single interface from which to create
and manage shared folders.
After you install Windows 2000 and log on to the computer as an administrator,
the Configure Your Server page opens. This page allows you to register your
copy of Windows 2000, and makes it easier to perform further configuration
tasks on a file server.
When you configure a file server, you can use the Configure Your Server
page to gain access to the Shared Folder wizard to create shared folders, and to
open Computer Management to manage shared folders. The Configure Your
Server page also provides a link to information in Windows 2000 Help about
shared folders.
You can open the Configure Your Server page at any time by clicking Start,
pointing to Programs, pointing to Administrative Tools, and then clicking
Configure Your Server.
Slide Objective
To introduce the file server
interface of the Configure
Your Server page.
Lead-in
The Configure Your Server
page consolidates and
provides access to the tools
and information that are
necessary for configuring a
file server.
Delivery Tip
Demonstrate the procedure
for opening the Configure
Your Server page, and
describe the information and
links that it contains for
configuring a file server.
Module 3: Configuring File and Print Servers 3
Configuring Disks
Configuring Basic Disks
Configuring Dynamic Disks
Mounting Volumes
Configuring Disk Quotas
Windows 2000 offers two disk storage types: basic disks, which use the same
partitions as earlier versions of Windows and MS-DOS
®, and dynamic disks,
which use volumes that provide more efficient use of space than multiple
partitions on hard disks. Disks that have been in use to date are now referred to
as basic disks to distinguish them from dynamic disks, which have been
introduced with Windows 2000. The storage type of a hard disk determines
how you can use the space on the hard disk.
A hard disk must be either basic or dynamic. You cannot combine the storage
types on one disk. You can, however, combine the different types of disk
storage on a computer with multiple disks.
Removable storage devices contain primary partitions only. You cannot
create extended partitions or dynamic volumes on removable storage devices.
You cannot mark a primary partition on a removable storage device as active.
Windows 2000 also provides the ability to create volume mount points, which
allow you to mount a local drive, partition, or volume at any empty folder on a
local partition or volume that is formatted with the NTFS file system. In
addition, you can configure disk quotas to specify the amount of disk space that
a user is allowed to use.
Slide Objective
To introduce the concepts
and configuration tasks
involved in configuring
disks.
Lead-in
Windows 2000 includes
basic disks and dynamic
disks. The disk type
determines how the space
on a hard disk is used.
Note
4 Module 3: Configuring File and Print Servers
Configuring Basic Disks
Extended
Partition with
Logical Drives
H:
H:
G:
G:
F:
F:
E:
E:
D:
D:
C:
C:
F:
F:
E:
E:
D:
D:
C:
C:
-or-
-
-
or
or
-
-
Primary
Partitions
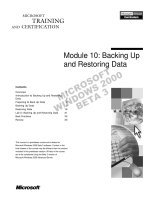
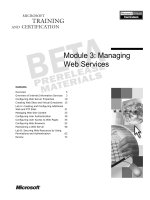
A Basic Disk Can Contain Up To :
Four primary partitions, or
Three primary partitions and one extended partition
A basic disk contains primary partitions and extended partitions with logical
drives. New disks that you add to a computer running Windows 2000 first
appear as basic disks. Basic disks in Windows 2000 are compatible with disk
partitions and sets in Microsoft Windows NT
® version 4.0.
A basic disk can contain up to four primary partitions, or up to three primary
partitions and one extended partition. In Windows 2000, you can create, delete,
and format basic partitions without having to restart your computer to make the
changes effective.
When you create partitions, you should leave a minimum of 1 megabyte (MB)
of unallocated space on the disk in case you decide to convert the basic disk to a
dynamic disk. The conversion process uses 1 MB of space in which it stores a
database that tracks the configuration of all dynamic disks in the computer.
When you create a partition by using Windows 2000, 1 MB of space is
automatically reserved. However, when you create a partition by using any
other operating system, you need to ensure that 1 MB of free space remains
unallocated.
Windows 2000 recognizes legacy volumes that exceed a single
partition on multiple disks. Legacy volumes are volumes that were created by
using Windows NT 4.0 or earlier. However, you cannot create new volume sets,
stripe sets, mirror sets, or stripe sets with parity on basic disks. In addition, you
cannot create and delete volumes, extend simple or spanned volumes, repair
mirrored or redundant array of independent disks (RAID)-5 volumes, or
reactivate a missing or offline disk on basic disks.
Slide Objective
To illustrate the partitions on
a basic disk.
Lead-in
Basic disks contain primary
partitions and extended
partitions with logical drives,
and are compatible with disk
partitions and sets in
Windows NT 4.0.
Importan
t
Module 3: Configuring File and Print Servers 5
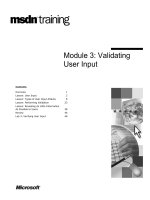
Configuring Dynamic Disks
Dynamic Storage
Striped Volume RAID-5 VolumeMirrored VolumeSpanned VolumeSimple Volume
Computer Management
A
ction View
Computer Management (Local)
System Tools
Storage
Removable Storage
Disk Defragmenter
Logical Drives
Services and Applications
Disk 1
Basic
2.00 GB
Online
Simple VolumePrimary Partition
2.00 GB FAT
Healthy
2.00 GB NTFS
Healthy (System)
(C:)
Volume Layout Type
Partition Basic
Select
Disk
Select
Disk
Select
Partition or
Volume
Select
Partition or
Volume
Reactivate Volume
Reactivate Volume
(D:)
Help
Properties
Delete Partition…
Format…
Change Drive Letter and Path…
Disk 0
(D:)
Dynamic
2.00 GB
Online
Simple Dynamic
File System
NTFS
FAT
Upgrade to Dynamic Disk…
Properties
Help
(C:)
Disk Management
Mark Partition Active
Open
Explore
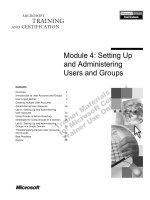
Dynamic disks allow you to extend volumes to include noncontiguous space on
the available hard disks. A volume is a portion of a hard disk that functions as
though it were a physically separate hard disk. Each dynamic disk has a
database that is stored in the 1 MB of unallocated space on the disk. This
database stores the information that the partition table previously stored. This
database is replicated on all disks in a computer.
There is no limit to the number of volumes that you can create per hard disk.
Windows 2000 stores disk configuration information on the hard disk, rather
than in the registry, where it might not be accurately updated. Windows 2000
also replicates disk configuration information to all other dynamic disks so that
one hard disk failure will not obstruct access to data on other hard disks.
Selecting a Volume Type
Dynamic disks offer the following volume types:
A simple volume. Contains disk space from a single hard disk.
A striped volume. Combines areas of free space from two or more hard disks
(up to 32 disks) into one volume. When data is written to a striped volume,
64 kilobytes (KB) is written to the first disk in the striped volume, and then
64 KB is written to the next hard disk in the striped volume.
A spanned volume. Includes disk space from two or more disks (up to 32
disks). When data is written to a spanned volume, the portion of the spanned
volume that resides on the first hard disk that is used is filled up first, then
data is written to the next hard disk in the volume.
You can extend an existing spanned volume that has been formatted
with NTFS. However, you cannot delete a portion of a spanned volume.
You can only delete a spanned volume in its entirety.
Slide Objective
To illustrate the volume
types for dynamic disks and
the interface for configuring
dynamic disks.
Lead-in
On a dynamic disk, storage
is divided into volumes
instead of partitions.
Delivery Tip
Briefly describe the volume
types for dynamic disks.
Note
6 Module 3: Configuring File and Print Servers
Mirrored volumes. Two identical copies of a simple volume, each on a
separate hard disk. This provides fault tolerance if a hard disk fails. It is
advisable to use disks that are of the same size, model, and manufacturer to
create mirrored volumes.
RAID-5 volumes. These are fault-tolerant striped volumes. Windows 2000
adds a parity stripe to each hard disk in the volume. Parity is a calculated
value that is used to reconstruct data when a disk fails. RAID-5 volumes
require a minimum of three hard disks.
Creating Dynamic Volumes
There is no limit to the number of volumes that you can create on a dynamic
disk. This can be useful when organizing large hard disks. You can also extend
volumes over multiple hard disks. Consider which volume type best suits your
organization’s needs for efficient use of disk space, performance, and fault
tolerance. To create fault-tolerant volumes, you must use volumes on dynamic
disks.
To create a dynamic volume, right-click the unallocated space on the dynamic
disk upon which you want to create the volume in Disk Management, and then
click Create Volume. In the Create Volume wizard, click Next, and then
specify the volume type. The Create Volume wizard will guide you through the
remainder of the process for creating a dynamic volume.
Upgrading Basic Disks to Dynamic Disks
You can convert a basic disk to a dynamic disk at any time with no loss of data.
To upgrade a basic disk to a dynamic disk, open Disk Management, right-click
the basic disk that you want to upgrade, and then click Upgrade to Dynamic
Disk. A wizard provides on-screen instructions. If the hard disk that you are
upgrading contains either the boot or system partition, or both, you must restart
the computer to complete the upgrade process.
You should always back up the data on a hard disk before you convert
the storage type from basic to dynamic. This will prevent loss of data if the
conversion is not successful.
When you convert a basic disk to a dynamic disk, any existing partitions on the
basic disk become volumes. The following table describes the results of
converting a basic disk to a dynamic disk.
Basic disk organization
(before conversion)
Dynamic disk organization
(after conversion)
System and boot partitions Simple volumes
Primary partition Simple volume
Extended partition Any logical drives become simple volumes and any
free space becomes unallocated space
Stripe set Striped volume
Volume set Spanned volume
Mirror set Mirrored volume
Stripe set with parity RAID-5 volume
Delivery Tip
Demonstrate the procedure
for upgrading a basic disk to
a dynamic disk.
Note
Module 3: Configuring File and Print Servers 7
Reverting to a Basic Disk
You must delete all volumes from the dynamic disk before it reverts back to a
basic disk. After deleting all volumes on the hard disk, to change a dynamic
disk back to a basic disk, open Disk Management, right-click the dynamic disk
that you want to change back to a basic disk, and then click Revert To Basic
Disk.
8 Module 3: Configuring File and Print Servers
Mounting Volumes
New Volume
New Volume
C:
C:
Mount
Point
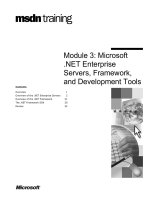
Volume Mount Points Allow You to Mount the Following Items at Any
Empty Folder on a Local NTFS-Formatted Partition or Volume:
Local drives
Partitions
Volumes
You can use Disk Management to create a volume mount point. Volume mount
points allow you to mount a local drive, partition, or volume at any empty
folder on a local NTFS-formatted partition or volume.
Mounted drives are not subject to the 26-drive limit that is imposed by drive
letters. You can use mounted drives to gain access to more than 26 drives on
your computer. Mounting a drive to a folder allows you to use an intuitive name
for the folder, such as Project Data. Users can save their documents in the
Project Data folder rather than to a drive letter. Windows 2000 ensures that
drive paths retain their association to the drive so that you can add or rearrange
storage devices without the drive path failing.
For example, if a server has many CD-ROMs attached to it and you want to
share the CD-ROM drives for use over the network, you can mount the
CD-ROM drives in a folder called CDFolder. This will help overcome the
26-drive limit. The CD-ROM drives will appear as sub-folders in the folder
CDFolder.
To create a volume mount point, perform the following steps:
1. Open Computer Management.
2. In the console tree, expand Storage, and then click Disk Management.
3. In the details pane, right-click an NTFS volume, and then click Change
Drive Letter and Path.
Slide Objective
To describe the purpose of
a volume mount point.
Lead-in
You can mount a volume or
local drive at any empty
folder on a local NTFS-
formatted volume, enabling
you to add more disk space
without using drive letters.
Delivery Tip
Demonstrate the procedure
for mounting a volume.
Module 3: Configuring File and Print Servers 9
4. In the Change Drive Letter and Paths for dialog box, click the drive that
you want to mount at an NTFS folder, and then click Add.
5. In the Add New Drive Letter or Path dialog box, type the name of the
NTFS folder at which you want to mount the volume or click Browse to
locate it, and then click OK.
The NTFS folder that you specify in the Add New Drive Letter
or Path dialog box must already exist.
Im
p
ortan
t
10 Module 3: Configuring File and Print Servers
Configuring Disk Quotas
NTFS Volume
User1
100 MB
User1
100 MB
User2 35 MB
User2 35 MB
Configure Disk Quotas to:
Track and control disk usage on a per-user, per-volume basis
Enforce disk quota warnings and limits for all users, or
individual users
Windows 2000 disk quotas track and control disk usage on a per-user,
per-volume basis. Each user’s disk space is tracked regardless of the folder in
which files are stored. You can configure disk quotas to enforce disk quota
warnings and limits for all users and for individual users. You can also set a
disk quota warning to specify when Windows 2000 should log an event,
indicating that the user is nearing the specified limit.
Enabling Disk Quotas
To enable disk quotas, in Disk Management, right-click on the required NTFS
volume, and click Properties. Then, click the Quota tab and configure the
options that are described in the following table.
Option Description
Enable quota
management
Select this check box to enable disk quota management.
Deny disk space to users
exceeding quota limit
Select this check box so that when users exceed their hard
disk space allocation, they receive an “out of disk space”
message and cannot write to the volume.
Do not limit disk usage Click this option when you do not want to limit the
amount of hard disk space for users.
Limit disk space to Click this option to configure the amount of disk space
that users can use.
Set warning level to When you select the Limit disk space to option, you can
use this option to configure the amount of disk space that
users can fill before Windows 2000 logs an event,
indicating that a user is nearing his or her limit.
Quota Entries Click this button to open the Quota Entries for dialog
box, where you can add a new entry, delete an entry, and
view the properties for a quota entry.
Slide Objective
To highlight the reasons for
configuring disk quotas.
Lead-in
You can use disk quotas to
monitor and limit disk space
use on a per-user,
per-volume basis.
Delivery Tip
Demonstrate the procedure
for enabling disk quotas,
and describe the
configuration options that
are available.
Module 3: Configuring File and Print Servers 11
Enforcing Quota Limits
You can enforce disk quota limits and deny users access if they exceed their
limit, or you can allow them continued access. Disk quota limits can be set for
all users, or for a specific user.
Enforcing Quota Limits for All Users
To enforce quota limits for all users, perform the following steps:
1. In the Limit disk space to and Set warning level to boxes, enter the values
for the limit and warning level that you want to set.
2. Select the Deny disk space to users exceeding quota limit check box.
Windows 2000 will monitor usage and will not allow users to create files or
folders on the volume when they exceed the limit.
Enforcing Quota Limits for a Specific User
To enforce quota limits for a specific user, perform the following steps:
1. In the Properties dialog box for an NTFS volume, on the Quota tab, click
the Quota Entries button.
2. In the Quota Entries for dialog box, create an entry by clicking New
Quota Entry on the Quota menu and then selecting a user.
3. In the Add new Quota Entry dialog box, specify the disk space limit for
the selected user. You can also specify the warning level for the selected
user.
Delivery Tip
Demonstrate the procedures
for enforcing quota limits.
12 Module 3: Configuring File and Print Servers
Configuring Shared Resources
Creating Shared Folders
Assigning Permissions to Folders
Configuring Shared Folders for Offline Use
Increasing Security with EFS
Configuring Dfs
To share resources across a network after installing a file server, you must first
share folders. You can then assign permissions to specify the level of access for
users and groups.
Windows 2000 also allows you to configure shared folders for offline use,
which provides users with continuous access to network files even when a
user's computer is not connected to the network. You can use the Encrypting
File System (EFS) to encrypt files to prevent unauthorized access to data (for
example, in the event that a portable computer is stolen).
In addition, you can configure the Distributed file system (Dfs) in
Windows 2000 to organize shared folders and simplify navigation of those
shared folders.
Slide Objective
To introduce the concepts
and configuration tasks
involved in configuring
shared resources.
Lead-in
To share resources across a
network, share the folder
and then specify access
permissions in that folder.
You can also configure
shared folders for offline
use, encrypt files with EFS,
and configure Dfs to
organize shared resources.
Module 3: Configuring File and Print Servers 13
Creating Shared Folders
Create Shared Folders to:
Share resources across a network
Control access to resources
Permissions
Permissions
When you share a folder on your computer, you make that folder available to
other users on the network. After you share a folder, it is important to assign
access permissions, which specify the users that can access files in that folder
and the level of access that users have to those files.
To share folders in Windows 2000, perform the following steps:
1. Open Windows Explorer.
2. Right-click the folder that you want to share, and then click Sharing.
3. On the Sharing tab in the Properties dialog box for the folder, click Share
this folder.
4. If you want to assign a share name other than the folder name (default), type
a name in the Share name box, and then click OK.
You can add a comment to a folder by customizing it. You can add
information such as owner contact details, purpose of the folder and links to
Web sites. For example, if the shared folder called Products contains several
subfolders that have names like 0021X1, 0021X2 and 0021X3, you can
customize these folders by adding comments that describe the folders. The
comment specified for a folder is visible to users when they click the folder
over the network. You can customize a folder by opening the folder in
Windows Explorer, clicking View, and then selecting Customize This Folder.
Slide Objective
To highlight the purpose of
creating shared folders.
Lead-in
Creating shared folders
allows you to share
resources across a network
and control access to those
resources.
Delivery Tip
Demonstrate the procedure
for sharing folders.
Ti
p
14 Module 3: Configuring File and Print Servers
Assigning Permissions to Folders
FolderA
FolderA
FolderB
FolderB
Read / Write
Read / Write
Access to FolderB
FolderC
FolderC
FolderA
FolderA
FolderB
FolderB
No access to FolderB
Read / Write
Read / Write
Prevent Inheritance
Prevent Inheritance
Inherit Permissions
Inherit Permissions
There are several ways that users can obtain permissions to access files and
folders. You can assign permissions directly to individual users to access files
and folders. Permissions assigned to groups also apply to user accounts that
have been added to the groups. Permissions can also be assigned in
Windows 2000 the same way that they are assigned in Windows NT 4.0.
When you assign permissions for a folder, the subfolders and files contained in
the folder inherit the permissions by default. It is important to understand how
subfolders and files inherit NTFS permissions from parent folders so that you
can use inheritance to propagate permissions to files and folders.
When you create files and folders, and when you format a partition with NTFS,
Windows 2000 automatically assigns default NTFS permissions.
Inheriting NTFS Permissions
By default, permissions that you assign to a parent folder are inherited by and
propagated to the subfolders and files that are contained in the parent folder.
The permissions that you assign to a parent folder also apply to the subfolders
and files that are contained within the parent folder. When you assign NTFS
permissions to give access to a folder, you assign permissions for the folder, for
any existing files and subfolders, and for any new files and subfolders that are
created in the folder.
In Windows 2000, when you change the permissions for the parent folder
FolderA, the subfolder FolderB automatically inherits the permissions of
FolderA unless the inheritance has been blocked. This makes administration
less complex than in Windows NT 4.0. In Windows NT 4.0, when permissions
of FolderA are modified, the only way of making that change propagate to
FolderB was to explicitly replace the subfolder permissions with the
permissions of FolderA.
Slide Objective
To illustrate permissions
and how they are inherited.
Lead-in
Assign permissions to
folders to specify the level of
access for users and
groups.
Key Points
Files and folders contained
within a folder inherit the
permissions assigned to that
folder.
NTFS permissions are
assigned automatically to
files, folders, and partitions
when you create them.
Note
Module 3: Configuring File and Print Servers 15
Controlling Permissions Inheritance
You can prevent subfolders and files from inheriting permissions that are
assigned to the parent folder. When you prevent permissions inheritance, you
can either:
Copy inherited permissions from the parent folder, or
Remove the inherited permissions and retain only the permissions that were
explicitly assigned.
The folder at which you prevent permissions inheritance becomes the new
parent folder, and the subfolders and files that are contained within it inherit the
permissions assigned to it.
In the slide illustration, inheritance is prevented at FolderB. FolderB will not
inherit any changes that you make to the permissions of FolderA. Any
subfolders and files that are contained within FolderB will inherit the
permissions that you have assigned to it.
Propagating Permissions
In general, you should allow Windows 2000 to propagate permissions from a
parent folder to subfolders and files contained in the parent folder. Permissions
propagation simplifies the assignment of permissions for resources. However,
there are times when you may want to prevent inheritance so that permissions
do not propagate from a parent folder to subfolders and files.
For example, you may need to keep all Sales department files in one Sales
folder to which everyone in the Sales department has the Write permission.
However, for a few files in the folder, you need to limit the permissions to
Read-only. To do so, prevent inheritance so that the Write permission does not
propagate to the files contained in the folder.
By default, subfolders and files inherit permissions that you assign to their
parent folders. This is indicated on the Security tab in the Properties dialog
box when the Allow inheritable permissions from parent to propagate to
this object check box is selected. To prevent a subfolder or file from inheriting
permissions from a parent folder, clear the Allow inheritable permissions
from parent to propagate to this object check box. Then, select one of the
two options described in the following table.
Option Description
Copy Copies previously inherited permissions that are assigned to the parent
folder to the subfolder or file, and denies subsequent permissions
inheritance from the parent folder.
Remove Removes the inherited permission that is assigned to the parent folder from
the subfolder or file, and retains only the permissions that you explicitly
assign to the subfolder or file.
Delivery Tip
Describe the procedure for
preventing permissions
inheritance to a subfolder or
file.
16 Module 3: Configuring File and Print Servers
Configuring Shared Folders for Offline Use
Configure Shared Folders for Offline Use to:
Provide continuous access to network files and programs
Increase data availability to mobile users
Offline Files provide continuous access to network files and programs, even
when your computer is not connected to the network. While offline, your view
of shared network items, and the access permissions to those files and folders,
remains the same as when you were connected to the network. When a file or
folder has been marked as being available offline, the following events occur:
When a user logs on, any marked files that have been updated on the user’s
local computer are copied to the network, and any marked files that the user
opens from the server will be copied to the local hard disk.
Users work with a local copy of the marked file, rather than a server copy.
When a user logs off, the local files and the server files are automatically
synchronized. Any documents that the user worked on during this last
session will be copied to the server.
Slide Objective
To highlight the purpose of
configuring shared folders
for offline use.
Lead-in
Configure shared folders for
offline use to provide users
with continuous access to
resources, even when their
computer is not connected
to the network.
Delivery Tip
Explain the events that
occur when a file or folder is
made available for offline
use.
Module 3: Configuring File and Print Servers 17
Configuring Files for Offline Use
By default, any folder that you share on a computer running Windows 2000 is
enabled for offline file use. However, you have several options for determining
how to implement offline files in a shared folder.
To change offline file options for a shared folder, perform the following steps:
1. In Windows Explorer, right-click the folder, click Sharing, and then click
Caching.
2. If you do not want the contents of this folder cached, clear the Allow
caching of files in this shared folder check box. (For example, to disable
offline file use for a folder that many users share.)
3. If you want to enable offline files, leave the check box selected, choose one
of the options described in the following table, and then click OK.
Option Description
Manual caching
for documents
Requires users to specify the files to be cached. This is the
default setting for shared folders. Select this option when you
want to share documents, bitmaps, etc.
Automatic
caching for
documents
Files that are opened by a user are cached automatically. These
files continue to be available to the user even if the network
connection breaks. Select this option when you want users to be
able to cache all files present in the shared folder simply by
opening the files.
Automatic
caching for
programs
Provides caching for read-only files or applications that start
from the network. Files that are stored on the server are cached
on local hard disks. Select this option when you want to share
applications to be used over the network.
Configuring a Client Computer for Offline Files
Offline Files must be enabled before a file or folder can be made available for
use offline. In computers running Windows 2000 Server, the Offline Files
feature is disabled by default. Computers running Windows 2000 Professional
are enabled to use offline files by default. However, it is important to know how
to enable or disable the Offline Files feature. To enable or disable Offline Files
on computers running Windows 2000 Professional, perform the following
steps:
1. In Windows Explorer, on the Tools menu, click Folder Options.
2. In the Folder Options dialog box, click the Offline Files tab.
3. Select the Enable Offline Files check box to enable offline files, or clear
the Enable Offline Files check box to disable them, and then click OK.
If manual caching is enabled, you must further configure the shared file
or folder. To make a specific file or folder available offline, click the shared
network file or folder that you want to make available offline, click File, and
then click Make available offline.
Delivery Tip
Demonstrate the procedure
for configuring files for
offline use.
Delivery Tip
Describe the procedure for
enabling offline files in
Windows 2000 Professional.
Note
18 Module 3: Configuring File and Print Servers
Synchronizing Offline Folders
Synchronization Manager compares items on the network to those that you
opened or updated while working offline, and makes the most current version
available both to your computer and to the network. It provides a single location
from which you can synchronize files that have been made available offline.
You can use Synchronization Manager to control when offline files are
synchronized with the network, and perform either a full or quick
synchronization. You can use full synchronization to ensure that you have the
current version of network files that have been made available offline. Even
though quick synchronization is faster than full synchronization, it does not
ensure that you have the most current version of network files.
When two users on the network have made changes to the same file, the second
user that attempts to synchronize the file receives the option of saving his
version to the network, keeping the other version, or saving both versions.
To synchronize files, perform the following steps:
1. Open Windows Explorer, click Tools, and then click Synchronize.
2. In the Items to Synchronize dialog box, click Synchronize.
Delivery Tip
Describe the procedure for
synchronizing files.
Module 3: Configuring File and Print Servers 19
Increasing Security with EFS
EFS Provides:
Transparent encryption
Strong protection of encryption keys
Integral data recovery system
Secure temporary and paging files
~~~~
~~~~
~~~~
~~~~
~~~~
~~~~
EFS allows users to encrypt NTFS files and folders by using a strong public
key-based cryptographic scheme that encrypts all files in a folder. Backups and
copies of encrypted files are also encrypted if they are on NTFS volumes. Files
also remain encrypted if you move or rename them.
You can use EFS to encrypt and decrypt files on remote file servers, but not to
encrypt data that is transferred over a network. Windows 2000 provides
network protocols, such as Secure Sockets Layer /Private Communications
Technology (SSL/PCT) and Internet Protocol Security (IPSec) to encrypt data
over a network. EFS provides the following benefits:
Transparent encryption. With EFS, file encryption does not require the file
owner to decrypt and re-encrypt the file on each use. Decryption and
encryption happen transparently when a user reads or writes to a file.
Strong protection of encryption keys. The encryption key for a file is also
encrypted by using the user’s public key corresponding to the EFS
certificate.
Integral data recovery system. If the file encryption certificate and private
key to a file or folder is lost, EFS allows you to decrypt files by using a
special recovery agent.
Secure temporary and paging files. Many applications create temporary
files while you edit a document. If you encrypt folders instead of files in a
folder, the temporary files and temporary copies of an encrypted file will
also be encrypted, provided that all files are on NTFS volumes.
Slide Objective
To highlight the benefits of
EFS.
Lead-in
You can use EFS to encrypt
files to prevent unauthorized
access to data.
Delivery Tip
Describe the benefits that
are provided by EFS.