Tài liệu Module 6: Creating Cluster Resources pdf
Bạn đang xem bản rút gọn của tài liệu. Xem và tải ngay bản đầy đủ của tài liệu tại đây (1.35 MB, 42 trang )
Contents
Overview 1
Creating a File Share Resource 2
Lab A: Creating Cluster File Shares 7
Creating a Cluster Print Share 15
Lab B: Creating a Print Share 20
Configuring Clustered Applications and
Services 26
Using Cluster Application Wizard 31
Lab C: Creating a WINS Resource 32
Review 36
Module 6: Creating
Cluster Resources
Information in this document is subject to change without notice. The names of companies,
products, people, characters, and/or data mentioned herein are fictitious and are in no way intended
to represent any real individual, company, product, or event, unless otherwise noted. Complying
with all applicable copyright laws is the responsibility of the user. No part of this document may
be reproduced or transmitted in any form or by any means, electronic or mechanical, for any
purpose, without the express written permission of Microsoft Corporation. If, however, your only
means of access is electronic, permission to print one copy is hereby granted.
Microsoft may have patents, patent applications, trademarks, copyrights, or other intellectual
property rights covering subject matter in this document. Except as expressly provided in any
written license agreement from Microsoft, the furnishing of this document does not give you any
license to these patents, trademarks, copyrights, or other intellectual property.
2000 Microsoft Corporation. All rights reserved.
Microsoft, Active Directory, BackOffice, Jscript, PowerPoint, Visual Basic, Visual Studio, Win32,
Windows, Windows NT are either registered trademarks or trademarks of Microsoft Corporation
in the U.S.A. and/or other countries.
Other product and company names mentioned herein may be the trademarks of their respective
owners.
Program Manager: Don Thompson
Product Manager: Greg Bulette
Instructional Designers: April Andrien, Priscilla Johnston, Diana Jahrling
Subject Matter Experts: Jack Creasey, Jeff Johnson
Technical Contributor: James Cochran
Classroom Automation: Lorrin Smith-Bates
Graphic Designer: Andrea Heuston (Artitudes Layout & Design)
Editing Manager: Lynette Skinner
Editor: Elizabeth Reese
Copy Editor: Bill Jones (S&T Consulting)
Production Manager: Miracle Davis
Build Manager: Julie Challenger
Print Production: Irene Barnett (S&T Consulting)
CD Production: Eric Wagoner
Test Manager: Eric R. Myers
Test Lead: Robertson Lee (Volt Technical)
Creative Director: David Mahlmann
Media Consultation: Scott Serna
Illustration: Andrea Heuston (Artitudes Layout & Design)
Localization Manager: Rick Terek
Operations Coordinator: John Williams
Manufacturing Support: Laura King; Kathy Hershey
Lead Product Manager, Release Management: Bo Galford
Lead Technology Manager: Sid Benavente
Lead Product Manager, Content Development: Ken Rosen
Group Manager, Courseware Infrastructure: David Bramble
Group Product Manager, Content Development: Julie Truax
Director, Training & Certification Courseware Development: Dean Murray
General Manager: Robert Stewart
Module 6: Creating Cluster Resources iii
Instructor Notes
This module will provide the students with a basic understanding of how to
create different types of resources in a cluster.
After completing this module, you will be able to:
Configure a file share resource.
Create a cluster print share.
Configure generic applications and services.
Launch the Cluster Application Wizard.
Materials and Preparation
This section provides the materials and preparation tasks that you need to teach
this module.
Required Materials
To teach this module, you need the Microsoft® PowerPoint® file 2087A_02.ppt
Preparation Tasks
To prepare for this module, you should:
Read the materials for this module and anticipate questions students may
ask.
Read “How to Create a DFS Root on a Cluster” on the Student compact
disk.
Read “Information on Groups and Resources Using Cluster Server” on the
Student compact disk.
Practice using the Cluster Application Wizard to create resources, virtual
servers, and groups.
Practice all three labs.
Study the review questions and prepare alternative answers for discussion.
Presentation:
60 Minutes
Lab:
45 Minutes
iv Module 6: Creating Cluster Resources
Module Strategy
Use the following strategy to present this module:
The intent of this module is to teach the students how to create and manage file
shares, print shares, generic applications and services, Microsoft Windows
®
Internet Name Service (WINS), and Dynamic Host Configuration Protocol
(DHCP).
Creating a File Share Resource
The key point when creating a file share resource is that the procedure
begins just like any other new resource that is created in a cluster. Remind
the students that if this file share resource does not have both nodes as
possible owners, it cannot fail over.
• File Share Dependencies: It is important for the students to understand
that although there is no required dependency for a file share resource, it
is highly recommended that it have both the virtual server name and a
disk resource. This is a good opportunity to use a dependency tree that
shows the file share as dependent on the cluster name, with the Internet
Protocol (IP) address next, and the disk resource at the bottom of the
tree.
• File Share Parameters: The main point of file share parameters is that
there are three types of file shares: Normal, Distributed File System
(DFS) and Share Subdirectories. Emphasize to the students how efficient
the share subdirectiories option is compared to multiple normal shares.
Creating a Cluster Print Share: To create a cluster print share, there are more
steps to perform independently from Cluster Administrator than when
creating a file share resource.
Note: Read the document on the Student compact disk titled: “Print Spooler
Support on Windows 2000 Server Cluster.” This article describes an
alternate procedure for creating a cluster print share. In this module we
install the drivers on both nodes prior to the configuration of the printer on
the virtual server. In the article, the driver is installed during the
configuration of the printer, then you fail over the spooler resource and
install the driver again. Make sure that the students understand both
methods.
• Installing Printer Drivers: Note that you install the drivers through the
server properties on each node, and not through Cluster Administrator.
• Creating a Print Spooler Resource: The print spool information is kept in
the cluster registry, not on the local node.
• Adding a Print Share: After you have created the print spooler, you can
add a printer on the virtual server through the Add Printer Wizard.
Module 6: Creating Cluster Resources v
Configuring Clustered Applications and Services
Spend some time discussing the differences between a cluster-aware and
cluster-unaware application and service. In this section students will learn
how to install both types of applications and services.
• Creating Generic Applications and Services: Tell the students that the
difference between installing generic applications and services is that
they must already be installed on the both nodes of the cluster.
Otherwise, the configuration procedure is the same for both. At the end
of the configuration procedure, students will see the Registry
Replication page that replicates registry information about the
applications and services to both nodes.
• Configuring DHCP and WINS: You must pre-install DHCP and WINS
on the nodes and then configure them as a cluster resource type and
manage them on a virtual server.
• Microsoft BackOffice
® Applications: Each BackOffice application
installs differently on a cluster. Students need to know to check with the
Q articles for each type of BackOffice application prior to the
installation.
Using Cluster Application Wizard: Someone who is new to the product will
find this to be an easy tool to use to add virtual servers and resources.
vi Module 6: Creating Cluster Resources
Instructor Setup for a Lab
Lab Strategy
These three labs are designed to reinforce how to create resources after you
have installed Cluster service. It also gives students the opportunity to test
failover policies and to practice Cluster.exe syntax.
Lab A: Creating Cluster File Shares
Lab B: Creating a Cluster Print Share
Lab C: Creating a WINS Resource
To conduct the three labs:
Read though the lab carefully, paying close attention to the instructions and
details.
Students work in teams of two, grouped together by their shared bus.
Help the students determine whether they are Node A or Node B. In these
exercises all of the steps are performed on both servers.
Familiarize the students with the Reference Table and how to find their
computers, their virtual server name, and their virtual server IP in the table.
Module 6: Creating Cluster Resources 1
Overview
Creating a File Share Resource
Creating a Cluster Print Share
Configuring Clustered Applications and Services
Using Cluster Application Wizard
*****************************
ILLEGAL FOR NON-TRAINER USE******************************
In this module you will learn how to add resources, such as a file or print
shares, and configure generic applications and services. You will be using the
Cluster Administrator tool to perform the tasks instead of the Cluster
Application Wizard. However, you can perform the same tasks by using the
Cluster Application Wizard.
After completing this module, you will be able to:
Create a file share resource.
Create a cluster print share.
Configure generic applications and services.
Launch the Cluster Application Wizard.
For more information about how to use the Cluster Administrator tool to
create cluster resources, see Module 5, “Cluster Administration,” in Course
2087A.
Topic Objective
To provide an overview of
module topics and
objectives.
Lead-in
This module discusses how
to create resources in a
cluster.
Note
2 Module 6: Creating Cluster Resources
Creating a File Share Resource
Cluster Administrator – [CLUSTER (server1)]
F
ile View Window Help
Creates a new cluster group
CLUSTER
Groups
Resources
Cluster Co
Resour
Netwo
Clu
Pul
Netwo
SERVER1
Active
Active
Network Interfaces
SERVER2
Active Groups
Active Resources
Network Interfaces
Delete
Rename
Bring Online
Take Offline
Move Group
Name State Owner Resource Type
Cluster IP Address Online DC1 IP Address
er Name Online DC1 Network Name
Online DC1 Physical Disk
New
Configure Application
Group
Resource
Properties
New Resource
Project files share
< B
ack Cancel
N
ext >
N
N
ext >
ext >
Name: Project files share
D
escription:
Resource t
ype: Physical Disk
G
roup: DHCP Service
Distributed Transaction Coordin
File Share
Generic Application
Generic Service
IIS Server Instance
IP Address
Message Queuing
Network Name
NNTP Server Instance
Physical Disk
R
un this resourc
To continue, click N
Possible Owners
Users
< B
ack
Cancel
N
ext >
N
N
ext >
ext >
Possible owners are nodes in the cluster on which this resource can be brought online.
Specify the possible owners for this resource.
Av
ailable nodes:
Name
Possible owners:
Name
SERVER1
SERVER2
A
dd ->
A
dd ->
<- R
emove
<- R
emove
*****************************
ILLEGAL FOR NON-TRAINER USE******************************
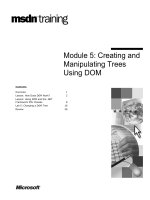
After creating file shares on a cluster, you can configure them to be fault
tolerant. You can use these shares for normal file shares, home folders, and the
Distributed File System (DFS) root. There are three major ways that you can
use this file share resource type:
Use a basic file share for sharing a single folder.
Use share subdirectories to have Cluster service create large numbers of
related shares automatically.
Create a DFS root to provide fault tolerance for a stand-alone DFS root.
Create a file share resource, which is similar to creating other resources by
using Cluster Administrator.
From Cluster Administrator, select New, and then click Resource.
Enter a name and description of the resource for administrative purposes. Select
File Share, as the Resource type. Identify the group in the cluster to which this
resource will belong.
Select the Possible owners for failover purposes.
You will next establish dependencies and set access permissions and file share
settings.
Topic Objective
To configure a file share
resource type.
Lead-in
The creation of a file share
resource begins the same
way as creating any other
resource. First the New
Resource dialog box
appears, and then the
Possible Owners dialog box
appears.
Module 6: Creating Cluster Resources 3
File Share Dependencies
Cluster Administrator – [CLUSTER (server1)]
F
ile View Window Help
Creates a new cluster group
CLUSTER
Groups
Resources
Cluster Co
Resour
Netwo
Clu
Pul
Netwo
SERVER1
Active
Active
Network Interfaces
SERVER2
Active Groups
Active Resources
Network Interfaces
Delete
Rename
Bring Online
Take Offline
Move Group
Name State Owner Resource Type
Cluster IP Address Online DC1 IP Address
er Name Online DC1 Network Name
Online DC1 Physical Disk
New
Configure Application
Group
Resource
Properties
New Resource
Project files share
< B
ack Cancel
N
ext >
N
N
ext >
ext >
Name: Project files share
D
escription:
Resource t
ype: Physical Disk
G
roup: DHCP Service
Distributed Transaction Coordin
File Share
Generic Application
Generic Service
IIS Server Instance
IP Address
Message Queuing
Network Name
NNTP Server Instance
Physical Disk
R
un this resourc
To continue, click N
Possible Owners
Users
< B
ack
Cancel
N
ext >
N
N
ext >
ext >
Possible owners are nodes in the cluster on which this resource can be brought online.
Specify the possible owners for this resource.
Av
ailable nodes:
Name
Possible owners:
Name
SERVER1
SERVER2
A
dd ->
A
dd ->
<- R
emove
<- R
emove
Dependencies
Users
< B
ack Cancel
N
ext >
N
N
ext >
ext >
Dependencies are resources which must be brought online by the cluster service first.
Specify the dependencies for this resource.
Av
ailable resources:
Resource Reso
Resource dependencies:
Resource Reso
Cluster Name Netw
A
dd ->
A
dd ->
<- R
emove
<- R
emove
Cluster IP Address IP Ad
Disk G: Phys
*****************************
ILLEGAL FOR NON-TRAINER USE******************************
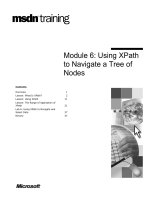
When you set up a file share resource in Cluster Administrator, you are not
required to enter any dependencies for the file share. However, it is
recommended that a file share resource depend on at least a network name
resource and a physical disk resource.
The network name dependency enables the client to access the file share over
the network by using the virtual server name instead of the node name. Using
the virtual server name ensures that the client opens the connection to
whichever node is the current owner of the file share resource. The physical
disk resource dependency ensures that clients have access to the files on the
disk through the share.
It is recommended that the share name be dependent on the virtual server name,
the server name be dependent on the Internet Protocol (IP) address, and the IP
address dependent on the disk. These dependencies create a vertical dependency
tree, which is useful for troubleshooting, and also provide consistency for the
resources in the cluster.
The file share resource does not place a mandatory requirement on a
physical disk resource that corresponds to a device on the shared bus. Not
requiring a mandatory dependency allows you to use other forms of storage for
your file share resource under special circumstances. These alternative forms of
storage may include local storage for nonvolatile data in which the same data
exists on both nodes.
Topic Objective
To explain why network
name and physical disk
dependencies are
recommended for a file
share resource.
Lead-in
A file share dependency
should have a network
name and a disk
dependency.
Delivery Tip
Although a file share should
have a name and disk
dependency, remind the
students to keep
dependency trees vertical.
Therefore, the Share would
depend on the Name, which
depends on the IP, which
could depend on the disk
resource.
Note
4 Module 6: Creating Cluster Resources
File Share Parameters
Cluster Administrator – [CLUSTER (server1)]
F
ile View Window Help
Creates a new cluster group
CLUSTER
Groups
Resources
Cluster Co
Resour
Netwo
Clu
Pul
Netwo
SERVER1
Active
Active
Network Interfaces
SERVER2
Active Groups
Active Resources
Network Interfaces
Delete
Rename
Bring Online
Take Offline
Move Group
Name State Owner Resource Type
Cluster IP Address Online DC1 IP Address
er Name Online DC1 Network Name
Online DC1 Physical Disk
New
Configure Application
Group
Resource
Properties
File Share Parameters
Users
< Back
Cancel
Finish
Finish
Finish
Share name: Users
P
ath: g:\users
C
omment: Users Home Folders
User Limit
M
aximum allowed
Allow
users
Permissions… Advanced…
Permissions for Public (Public)
Security
P
ermissions: Allow Deny
Add…
R
emove
Name
Everyone
Full Control
Change
Read
Advanced File Share Properties
Cancel
N
ormal share
D
fs root
S
hare subdirectories
OK
H
ide subdirectory shares
*****************************
ILLEGAL FOR NON-TRAINER USE******************************
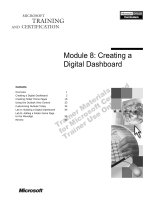
Every resource has a resource name, possible owners, and dependencies, but
depending on the resource type, you will need to configure a different set of
parameters. File share parameters on a virtual server have the same
configurations as a file share on a physical server, with the exception of the
settings for the Advanced File Share Properties dialog box.
The table below shows the specific File Share Parameter options.
Option Description
Share name Unique name for the share.
Path Path for the shared folder, on a shared drive. The folder on the
shared drive must already exist.
Comment Description for the share (optional).
User Limit Maximum number of concurrent users.
Permissions Configuration of the file share permissions.
Advanced Specify whether subdirectories of the shared folder should be
available through the single share resource.
Topic Objective
To illustrate how to set file
share permissions and
create a DFS root or
dynamic shares.
Lead-in
File share resources can be
normal shares, DFS roots,
or Dynamic Shares. You
configure file share
permissions at the same
time and on the same tab.
Delivery Tip
For example, you could
share a folder w:\Users as
Users, and a subdirectory
w:\Users\Peter as Peter.
Both shares appear
independently to network
clients
(\\virtual_server\Users and
\\virtual_server\Peter are
available), yet are part of
only one file share resource.
Selecting Hide
subdirectory shares would
share w:\Users\Peter as
Peter$ and would not
appear in the browser list.
Module 6: Creating Cluster Resources 5
Permissions for the File Share
Use Cluster Administrator and Microsoft Windows 2000 security to limit
access to files and folders that reside on drives on the cluster storage device.
When setting access permission for file shares, it is recommended that you base
file share permissions on domain local groups, not on local user or local group
accounts. On member servers, local users and local groups have a security
context only on the local computer. The security context of these accounts and
groups is meaningless when failed from one node to another. For this reason,
you cannot give local users or local groups permissions to administer the
cluster. The single exception to this rule is the local Administrator group. The
local Administrator group is not a problem on domain controllers because the
local accounts and groups have security context on all domain controllers in the
domain. It is recommended that you also set NTFS permissions through domain
local groups.
If you change file share permissions by using Windows Explorer or
My Computer instead of using Permissions on the Parameters tab in Cluster
Administrator, the permissions are lost when the resource is taken offline.
Advanced File Share Properties
A normal file share is the default option. If you want to share subdirectories or
create a DFS root, click the Advanced button. There are three options: Normal
Share, Dfs root, and Share subdirectories (dynamic shares).
DFS Root
A DFS root is the highest level of a DFS topology, and is the starting point for
the hierarchy of shared folders. A domain DFS root can have replicas for fault
tolerance, but a stand-alone DFS root is lost if the server hosting the DFS root
goes offline. Cluster service can provide a fault tolerant DFS root by placing the
DFS root on a virtual server. The DFS root that Cluster service configures is a
stand-alone DFS root, not a domain DFS root.
The DFS root that uses Active Directory
™
directory service supports automatic
file replication. Stand-alone DFS root configurations are not automatically
replicated outside of the server cluster. The server cluster provides failover of
the DFS root for availability rather than relying on replicas of the DFS
topology.
If there is an existing DFS root that you have configured on any node
in the server cluster, you must either remove it or migrate it to the cluster.
Im
p
ortan
t
Caution
6 Module 6: Creating Cluster Resources
Share Subdirectories (Dynamic Shares)
Every cluster resource has a performance impact; Cluster service must
periodically poll all of the resources to determine if they have failed. Because of
this poll, you may notice that your cluster’s performance decreases as you
increase the number of resources that it manages. The worst-case scenario is
that a very busy cluster may drop connections because of the amount of time
that is being used to manage a high volume of cluster resources. Large
quantities of file share resources also increase the length of the failover time.
The optimal way to use a server cluster for home folders is to use the Share
subdirectories (dynamic shares) feature. Cluster service allows you to
configure multiple shares as a single resource. The resource parameters permit
you to share subdirectories separately from the parent.
Furthermore, it is possible to configure the resource so that you create the
subdirectory shares as hidden shares that do not appear in browse lists. This
feature prevents the need to use multiple file share resources to create large
numbers of shares, which in turn dramatically reduces overhead and simplifies
manageability of large numbers of shares.
Module 6: Creating Cluster Resources 7
Lab A: Creating Cluster File Shares
*****************************
ILLEGAL FOR NON-TRAINER USE******************************
Objectives
After completing this lab, you will be able to:
Create a file share resource.
Configure a dynamic share.
Create home folders without dynamic shares.
Create home folders with dynamic shares.
Prerequisites
Before working on this lab, you must be familiar with the concepts in the
section Creating a File Share Resource in Module 6, “Creating Cluster
Resources,” of Course 2087A. You must also have a server cluster that is
installed and running on both nodes.
Lab Setup
To complete this lab, you need the following:
Two computers running Microsoft Windows 2000 Advanced Server, each
with a small computer system interface (SCSI) adapter installed. Each
computer in a student pair must have a different SCSI ID.
A shared external SCSI disk. Each computer is connected to the shared disk
with SCSI cables. The shared external SCSI disk ID must be different than
either of the SCSI cards of the computers in the student pair.
Two network adapter cards in each node of the cluster.
The following files: usrfldr.bat, makeshare.vbs, and removeshare.vbs
Topic Objective
To introduce the lab.
Lead-in
In this lab, you will create a
file share on a virtual server,
and configure a file share as
a dynamic share. You will
also create home folders
with and without dynamic
shares.
8 Module 6: Creating Cluster Resources
Scenario
In this exercise, you have been asked to create a file share for a public folder on
a virtual server. You are then to configure this file share resource as a dynamic
share. You need to create file share resources for 50 user home folders and test
the failover time of these resources. You will remove the 50 user home folders
and create one dynamic share for 200 user home folders and test the failover
time of this resource.
The following exercises will refer to your computers as Node A and Node B.
For Exercise 1, you will take turns creating different parts of a file share
resource. In Exercise 2, you will take turns configuring a dynamic share from
the file share resource that is created in Exercise 1. In Exercise 3, you will take
turns creating multiple file share resources that are used for user home folders
and converting these shared resources into dynamic shares. You will work
together to time the failover of the file share resources.
Estimated time to complete this lab: 20 minutes
Module 6: Creating Cluster Resources 9
Exercise 1
Creating a File Share Resource
In this exercise you will create a file share for a virtual server.
To create a folder on the shared disk
Complete this task from Node A.
1. Click Start, point to Programs, point to Accessories, and then click
Windows Explorer.
2. In Windows Explorer, expand My Computer, and then click Shared Disk
1 (W:).
3. On the File menu, point to New, and then click Folder.
4. Type Public to create the folder name.
5. Close Windows Explorer.
To create a file share resource
Complete this task from Node B.
1. Click Start, point to Programs, point to Administrative Tools, and then
click Cluster Administrator.
2. In the console tree, expand Cluster Name, and then expand Groups.
3. Right-click Cluster Group, point to New, and then click Resource.
4. Use the following information to complete the New Resource dialog box:
Name: Public Share
Description: Public Share
Resource Type: File Share
Group: Cluster Group
5. Click Next.
6. In the Possible Owners dialog box, click Next.
7. In the Dependencies dialog box, under Available resources:, select Disk
W:, and then click Add.
8. Click Next.
9. Use the following information to complete the File Share Parameters
dialog box:
Share Name: Public
Path: W:\Public
Comment: Public Share on W:
10. Click Finish.
11. In the Cluster Administrator dialog box, click OK.
12. In Cluster Administrator, right-click Cluster Group, and then click Bring
Online.
10 Module 6: Creating Cluster Resources
To test a file share resource
Complete this task from Node A.
1. Click Start, and then click Run.
2. In the Run dialog box, type \\Virtual_Server\Public and then click OK.
3. Close Windows Explorer.
Module 6: Creating Cluster Resources 11
Exercise 2
Configuring a Dynamic Share
In this exercise you will create additional folders in the Public folder. The
dynamic share feature of Cluster service will share out the newly-created Public
folders on the virtual server.
To create a dynamic share
Complete this task from Node A.
1. Click Start, point to Programs, point to Administrative Tools, and then
click Cluster Administrator.
2. Expand Groups, select Cluster Group, and in the details pane right-click
Public Share, and then click Properties.
3. In the Public Share Properties dialog box, click the Parameters tab.
4. Click Advanced.
5. In the Advanced File Share Properties dialog box, click Share
subdirectories, and then click OK.
6. Click OK to close the Public Share Properties dialog box.
7. Click OK to accept the Cluster Administrator Standard Extension error
message.
8. Right-click Public Share, and then click Take Offline.
9. Right-click Public Share, and then click Bring Online.
To create folders on the Public Share
Complete this task from Node B.
1. On the Start menu, click Run.
2. In the Run dialog box, type \\Virtual_Server\Public
3. From the Windows Explorer window, click File, select New, and then select
Folder to create the following folders; repeat this step each time until the
three folders have been created.
Engineering
Sales
Marketing
To test the dynamic share on the Public Share
Complete this task from Node A and Node B.
1. On the Start menu, click Run.
2. In the Run dialog box, type \\Virtual_Server and click OK.
3. Verify that in the Windows Explorer windows you have three additional
shares named Engineering, Sales, and Marketing.
12 Module 6: Creating Cluster Resources
Exercise 3
Configuring User Home Folders
In this exercise you will use a batch file to create 200 folders to be used for
home folders on your W: drive. You will then run another script to create a file
share resource for 50 of the 200 home folders. You will test the failover time of
the 50 file share resources and run another script to remove the 50 file share
resources. You will then configure a file share resource for dynamic shares to
provide 200 user home folders and test the failover time of the dynamic share
feature of Cluster service.
To create 200 user folders on the shared disk
Complete this task from Node B.
1. Click Start, point to Programs, point to Administrative Tools, and then
click Cluster Administrator.
2. Expand Groups, and then select Cluster Group.
3. In the details pane, verify that the owner is Node B. If the Owner is not
Node B, right-click Cluster Group, and then click Move Group.
4. Click Start, and then click Run.
5. In the Run dialog box, type c:\moc\2087a\labfiles\mscs\usrfldr.bat and
then click OK.
6. To verify that the batch file ran successfully, in the Run dialog box, type
w:\users and then click OK
7. Verify that there are 200 folders that were created in the users folder. You
should see user1 through user200.
8. Close Windows Explorer.
9. Leave Cluster Administrator running.
To create 50 file share resources in the cluster
Complete this task from Node A.
1. In the Run dialog box, type c:\moc\2087a\labfiles\mscs\makeshare.vbs
and then click OK
2. Wait until a message box appears saying that the file creation is complete,
and then click OK.
To move 50 file share resources from one node to the other
Complete this task from Node B.
1. Write down the time from the system tray at the bottom right corner of your
desktop._______________
2. In Cluster Administrator, right-click Cluster Group, and click Move
Group. This step could take more than three minutes to complete.
3. Write down the time from the system tray at the bottom right corner of your
desktop._______________
4. How long did it take to move the 50 file share resources?_________
Module 6: Creating Cluster Resources 13
To remove the 50 file share resources from the cluster
Complete this task from Node A.
1. In the Run dialog box, type c:\moc\2087a\labfiles\mscs\removeshare.vbs
and then click OK.
2. When the message dialog box appears that says that all of the users file
shares have been successfully removed, click OK.
To create a dynamic share for 200 user home folders
Complete this task from Node A.
1. Click Start, point to Programs, point to Administrative Tools, and then
click Cluster Administrator.
2. In the console tree, expand Cluster Name, and then expand Groups.
3. Right-click Cluster Group, point to New, and then click Resource.
4. Use the following information to complete the New Resource dialog box:
Name: Users Share
Description: Users Share
Resource Type: File Share
Group: Cluster Group
5. Click Next.
6. In the Possible Owners dialog box, click Next.
7. In the Dependencies dialog box, under Available resources:, select Disk
W:, then click Add.
8. Click Next.
9. Use the following information to complete the File Share Parameters
dialog box:
Share Name: Users
Path: W:\Users
Comment: Users Share on W:
10. Click Advanced.
11. In the Advanced File Share Properties dialog box, click Share
subdirectories, and then click OK.
12. Click Finish.
13. In the Cluster Administrator dialog box, click OK.
14. In the Cluster Administrator dialog box, right-click Cluster Group, and
then click Bring Online.
To verify that the dynamic shares were created
Complete this task from Node B.
1. Click Start, and then click Run.
2. In the Run dialog box, type \\Virtual_Server and then click OK.
Notice that Cluster service created a file share for every user in the w:\users
folder.
3. Close Windows Explorer.
14 Module 6: Creating Cluster Resources
To move 200 file share resources from one node to the other node
Complete this task from Node B.
1. Write down the time from the system tray at the bottom right corner of your
desktop._______________
2. From Cluster Administrator, right-click Cluster Group, and then click
Move Group.
3. Write down the time from the system tray at the bottom right corner of your
desktop._______________
4. How long did it take to move the 200 dynamic shares from one file share
resource?______________
Module 6: Creating Cluster Resources 15
Creating a Cluster Print Share
Installing Printer Drivers
Creating a Print Spooler Resource
Adding a Print Share
*****************************
ILLEGAL FOR NON-TRAINER USE******************************
Cluster service supports the clustering of print services by using the print
spooler resource. A cluster can have multiple print spooler resources, but each
group can only have one print spooler resource. Clients access clustered printers
in exactly the same way that they access nonclustered printers. Clients can use
either the network name or Internet Protocol (IP) address as the server name.
Creating a print spooler on a cluster is a more involved process than creating a
file share. A cluster print spooler uses a network printing device or remote print
server, not a locally attached device, because any peripherals that are local to
one node will not be available if that node is offline.
One method for creating a print spooler on a cluster requires that you install the
printer drivers on both nodes before installing them on the virtual server. The
steps are as follows:
1. Install printer drivers on each node.
2. Create a print spooler resource.
3. Add a print share.
An alternate method for creating a print spooler on a cluster is
described in the Q Article Q228904: Print Spooler Support on Windows 2000
Server Cluster, on the Student compact disk. In this method you configure the
port, the drivers, and the printer share name on the virtual server, fail over the
spooler resource to the other node, and reconfigure the drivers and print share
on the virtual server. The port will already exist on the virtual server.
Topic Objective
To introduce the three steps
that are required to create a
cluster print share.
Lead-in
Clients can print to a virtual
server by adding a printer
share to the cluster.
Delivery Tip
Explain the differences
between the method
described in this module
and the Q Article indicated
in the Important note.
Both procedures will work.
Point the students to the Q
article and review this
method with them. Then go
over the steps outlined on
this page and explain that if
the driver already exists on
the other node, they will not
have to configure the print
share again.
Im
p
ortan
t
16 Module 6: Creating Cluster Resources
Installing Printer Drivers
Printers
File Edit View Favorites Tools Help
Displays properties for this server.
Create Shortcut
Delete
Rename
Properties
Server Properties
Add Printer
Close
Search Folders History
Go
HP LaserJet
4050 Series PS
This folder contains information
about printers that are currently
installed, and a wizard to help you
install new printers.
To get information about a printer
that is currently installed, right-click
the printer’s icon.
To install a new printer, click the
Add Printer icon.
Print Server Properties
Forms
OK Cancel
MOCMOC-DC1
Ports
Drivers Advanced
Apply
A
pply
A
dd…
Installed printer drivers:
Name Environment Version
Remove Update Properties…
Add Printer Driver Wizard
N
ext >
Cancel
< B
ack
< B
ack
Welcome to the Add Printer
Driver Wizard
This wizard helps you install printer drivers for various
platforms on a print server.
After the printer drivers are installed on the print server, the
appropriate printer drivers are automatically downloaded to
clients when they connect to the printer server.
To continue, click Next.
*****************************
ILLEGAL FOR NON-TRAINER USE******************************
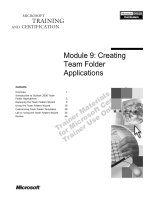
You must install printer drivers on each cluster node that will be a potential
owner of a spooler resource. When you install the printer driver on a node, the
printer driver is copied to the Print$ share. Each node can use the printer driver
to print to the print device and supply clients with the driver if requested.
You can publish printers that are hosted on a server cluster running
Windows 2000 to Active Directory. This option is selected by default and the
printer is published under the node that owned the print spooler resource when
you created the printer.
To install a print driver on a node of the cluster, you need to configure the print
server properties. From the Printers icon in the Control Panel, select Server
Properties from the File menu. Click the Drivers tab, click Add, and select the
appropriate driver for the printer that you are configuring.
Each node in a clustered print server running Windows 2000 can perform
print shares outside of the cluster; however, the print share name must be
different from all of the print share names in the cluster.
Topic Objective
To illustrate how to install
printer drivers by configuring
the print server properties
on each node of the cluster.
Lead-in
A cluster print share must
have the drivers installed on
each node so that during fail
over the print share can still
print to the print device.
Note
Module 6: Creating Cluster Resources 17
Creating a Print Spooler Resource
Cluster Administrator – [CLUSTER (server1)]
F
ile View Window Help
Creates a new cluster group
CLUSTER
Groups
Resources
Cluster Co
Resour
Netwo
Clu
Pul
Netwo
SERVER1
Active
Active
Network Interfaces
SERVER2
Active Groups
Active Resources
Network Interfaces
Delete
Rename
Bring Online
Take Offline
Move Group
Name State Owner Resource Type
Cluster IP Address Online DC1 IP Address
er Name Online DC1 Network Name
Online DC1 Physical Disk
New
Configure Application
Group
Resource
Properties
New Resource
Project files share
< B
ack Cancel
N
ext >
N
N
ext >
ext >
Name: Project files share
D
escription:
Resource t
ype: Physical Disk
G
roup: DHCP Service
Distributed Transaction Coordin
File Share
Generic Application
Generic Service
IIS Server Instance
IP Address
Message Queuing
Network Name
NNTP Server Instance
Physical Disk
R
un this resourc
To continue, click N
Possible Owners
Users
< B
ack
Cancel
N
ext >
N
N
ext >
ext >
Possible owners are nodes in the cluster on which this resource can be brought online.
Specify the possible owners for this resource.
Av
ailable nodes:
Name
Possible owners:
Name
SERVER1
SERVER2
A
dd ->
A
dd ->
<- R
emove
<- R
emove
Dependencies
Users
< B
ack Cancel
N
ext >
N
N
ext >
ext >
Dependencies are resources which must be brought online by the cluster service first.
Specify the dependencies for this resource.
Av
ailable resources:
Resource Reso
Resource dependencies:
Resource Reso
Cluster Name Netw
Disk G: Phys
A
dd ->
A
dd ->
<- R
emove
<- R
emove
Cluster IP Address IP Ad
Print Spooler Parameters
Print Spooler
< B
ack Cancel
Finish
Finish
Finish
Spool folder: G:\Spool
J
ob completion timeout: 160 seconds
*****************************
ILLEGAL FOR NON-TRAINER USE******************************
You use the print spooler resource type to create a print spooler for the cluster
so that you can use the cluster as a print server. Without a print spooler
resource, it is not possible to add printers to a cluster. This resource has two
dependencies, a cluster name and a disk dependency. Multiple print spooler
resources can exist in a cluster, but each group can have no more than one print
spooler resource.
The Print Spooler Parameters property page contains the following
configuration options.
Option Description
Spool folder The drive letter and path to where the spool files will
be stored.
Job completion timeout How long the document can take to move from the
computer to the printer before the printer stops trying
to print the document.
When a group containing a print spooler resource fails over to another node, the
document that is currently being spooled to the printer is restarted from the
other node after failover. When you move a print spooler resource or take it
offline, Cluster service waits until all of the jobs that are spooling to the printers
are finished (or until the configured wait time has elapsed). If the group
containing the print spooler resource fails over before the application has
finished spooling, documents that are spooling from an application to a print
spooler resource are discarded. These documents must be respooled (or
reprinted) to the print spooler resource.
Topic Objective
To illustrate how to create
and configure a print spooler
resource.
Lead-in
The next step in adding a
print share to the cluster is
to create a print spooler
resource. This spooler
resource has a disk and
network name dependency.
18 Module 6: Creating Cluster Resources
Print Spooler Entries in the Cluster Registry
Two resource-specific entries are stored under the resource’s globally unique
identifier (GUID) in HKEY_LOCAL_MACHINE\Cluster\Resources:
JobCompletionTimeout. The amount of time (in milliseconds) that the print
spooler will wait for the currently printing jobs to complete before the print
spooler resource goes offline. This value should be less than the
PendingTimeout for the resource, so that the spooler has time to delete the
pending jobs.
DefaultSpoolDirectory. The full path of the folder in which spool files are
kept. The location of the spool folder will default to a directory called Spool
on the physical disk resource on which the print spooler resource depends,
for example, W:\Spool.
Your spool directory should be different from your data and application
directories to reduce fragmentation on your spool directory.
Note
Module 6: Creating Cluster Resources 19
Adding a Print Share
\\cluster
F
ile Edit View Favorites Tools Help
Adds, removes, and configures local and network printers
NETLOGON
Search Folders History
Go
Printers on cluster
Comment: Adds, removes, and
configures local and network
printers.
Back
Back
Back
cluster
SYSVOL
Users
Printers
Scheduled
Tasks
\\cluster
Printers on cluster
F
ile Edit View Favorites Tools Help
1 object(s)
Add Printer
Search Folders History
Go
This folder contains information
about printers that are currently
installed, and a wizard to help you
install new printers.
Back
Back
Printers
Printers on cluster
Add Printer Wizard
N
ext >
Cancel
< B
ack
< B
ack
Welcome to the Add Printer
Wizard
This wizard helps you install a printer or make printer
connections.
To continue, click Next.
*****************************
ILLEGAL FOR NON-TRAINER USE******************************
Adding a print share to a virtual server is the same process as adding a print
share to a remote physical server. Each node also needs to have the appropriate
drivers installed.
After you have installed the drivers on both nodes, browse the network
resources of the virtual server containing the print queue resource. Double-click
the Printers icon and double-click the Add Printer icon to start the Add
Printer Wizard. The wizard will give you the option to create a port to redirect
print jobs to a network print device. You will need to provide a driver and then
a share name for the printer. Each printer share must be unique in every virtual
server and on every node in the cluster. You will also have the option to add
this printer share to Active Directory.
You cannot use all of the printer ports in a server cluster. You can use
LprMon and Standard Transmission Control Protocol/Internet Protocol
(TCP/IP) Port, both provided with Windows 2000, in a server cluster. You
cannot use local ports in a cluster because they do not provide failover
capability.
Port Configuration Stored in Cluster Registry
It is not necessary to create locally defined printers on each node in the cluster.
The port configuration is stored in the cluster registry and therefore replicated
to the other node of the cluster.
Topic Objective
To illustrate how to add a
print share to a virtual
server.
Lead-in
After you have added the
print spooler resource, you
add the printer port
information to the virtual
server.
Note