Tài liệu Configuring Telnet in Linux ppt
Bạn đang xem bản rút gọn của tài liệu. Xem và tải ngay bản đầy đủ của tài liệu tại đây (45.58 KB, 5 trang )
1 - 5 IT Essentials II v2.0 - Lab 10.4.5 Copyright 2002, Cisco Systems, Inc.
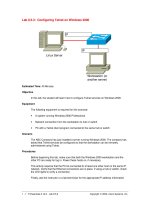
Lab 10.4.5: Configuring Telnet in Linux
Estimated Time: 25 Minutes
Objective
In this lab, the student will learn how to configure Telnet services on a system so that the
user can remotely administer a Linux server.
Equipment
The following equipment is required for this exercise:
• A system running Linux Red Hat 7.2 or greater
• Another system, either Linux or Windows, to attempt to Telnet into the Linux
server
Scenario
The student is setting up a Linux server that will need to be administered and accessed
remotely. To do this, Telnet services will be installed on the Linux Red Hat 7.2 computer.
Procedures
In Linux Red Hat 7.2, the Telnet services are not started by default. In this lab, the
student will first have to navigate to the configuration file to start the Telnet services.
Second, the student will need to make sure that the proper accounts are created to
access the server through Telnet. In the last part of the lab, the student will test the
Telnet services to confirm that the Telnet services are properly installed and started on
the server.
Step 1: Configuring Telnet Services
1. Login with the root account. Make sure to be at the CLI command prompt. If in the
KDE interface, open up a terminal emulator window.
2. From a terminal windows, type:
cd/etc/xinetd.d
This will change the user to the directory where the Telnet configuration file is
located.
3. Next, type:
2 - 5 IT Essentials II v2.0 - Lab 10.4.5 Copyright 2002, Cisco Systems, Inc.
ls
This will display a list of all the configuration files in the xinetd.d directory.
Example of the /etc/xinetd.d directory
4. Locate the Telnet file. Is it present? Y/N
________________________________
5. Next, check the confirmation of the Telnet file:
vi telnet
This will allow the user to use the vi Editor to change the Telnet configuration file.
6. Once the vi Editor window opens, press i on the keyboard to enter “insert” mode.
Locate the “disable = yes” line in the configuration file. Use the arrow keys on the
keyboard to move the cursor to delete the word “yes” and replace it with “no”. This
will change the configuration file to allow Telnet access to the server.
Example of the Telnet configuration file, change disable to no.
7. To exit the vi Editor press the Esc first, then press the “:” key. Next type “wq”. This
will save the changes that have been made.
3 - 5 IT Essentials II v2.0 - Lab 10.4.5 Copyright 2002, Cisco Systems, Inc.
Step 2: Starting the Telnet xinetd Daemon
1. Before testing the Telnet service, make sure that the Telnet daemon is running. The
daemon that runs the Telnet services is called xinetd (the same daemon that worked
with FTP). From the command prompt, type:
/etc/rc.d/init.d/xinetd stop
2. Next, start the xinetd daemon:
/etc/rc.d/init.d/xinetd start
3. Check the status of the xinetd daemon:
/etc/rc.d/init.d/xinetd status
In the space below, write down the status of the xinetd daemon?
__________________________________________________________________
__________________________________________________________________
Step 3: Testing Telnet Access to the Localhost
1. To test Telnet services, type:
telnet localhost
This will use the system to access the Telnet services on the system.
At this point the system will attempt to make a Telnet to the system through the local
loopback address, 127.0.0.1. It will run through the login procedure and prompt the
user to enter a username and password.
2. A user cannot login to a remote site with the root account. Use one of the other
student accounts to log on and test the Telnet configuration.
If a connection to the system is established, then the Linux server has been
successfully configured for Telnet access.
What directory are you in? To find out, type:
pwd
In the space below, write down the current working directory:
_______________________________________________________________
_______________________________________________________________
4 - 5 IT Essentials II v2.0 - Lab 10.4.5 Copyright 2002, Cisco Systems, Inc.
Example of a Telnet session to the localhost and running the pwd command.
Step 4: Connecting to Other Systems via Telnet (optional)
1. As in the FTP lab, use the ifconfig command to get an IP address. Exchange IP
addresses with a classmate.
2. Telnet to their computer and have them Telnet to the one being used. Telnet cannot
be used with the root account, so use a student account created in previous labs.
3. The student can also use a MS Windows computer to Telnet to a Linux computer.
The example below shows the output of the command line in a windows computer.
To Telnet from a Windows computer, go to the run command and type Telnet and
the IP address.
When prompted, type in the correct user account and password.
5 - 5 IT Essentials II v2.0 - Lab 10.4.5 Copyright 2002, Cisco Systems, Inc.
Troubleshooting
Configuring services like Telnet for a Linux operating system can be somewhat confusing
to the inexperienced user. Editing the configuration files can be a difficult task, so it is
important to remember where these files are located and how to navigate to them. Telnet
can be a useful troubleshooting tool, which will allow access to the system from virtually
any operating system that has an Internet connection. As a system administrator, this can
help with troubleshooting efforts.
Reflection
1. What security risks does enabling Telnet pose to a system?
__________________________________________________________________
2. What are some precautions that would allow a users to provide security while having
Telnet access enabled on a system?
__________________________________________________________________
__________________________________________________________________