Tài liệu Pro Oracle Application Express P2 docx
Bạn đang xem bản rút gọn của tài liệu. Xem và tải ngay bản đầy đủ của tài liệu tại đây (416.76 KB, 10 trang )
22
CHAPTER 1
■ DEVELOPMENT BEST PRACTICES
Report Pagination Style
Different report pagination styles will affect the performance in displaying the report. For
example, some of the pagination styles will display something like “Row Ranges X to Y of Z,”
If you do not need to display how many total rows are returned from the query, you should
choose to use a pagination style that displays only “Row Ranges X to Y.”
Error and Exception Handling
Your APEX application can use many different anonymous PL/SQL blocks, functions, proce-
dures, and packages when it is executing. If an error or exception occurs during the execution
of some code, you need to be able to handle that error or exception gracefully, in such a fashion
that flow of execution by the APEX engine is not broken. For example, the following code
catches the exception and sets the value of an application item:
declare
v_salary INTEGER;
begin
select
salary
into
v_salary
from
emp
where
empno = :P1_EMPNO;
return v_salary;
:APP_ERROR_MSG := null;
exception
when no_data_found then
:APP_ERROR_MSG := 'Could not find the employee record.';
end;
You can then display the application item on the page in an HTML region using this
syntax:
&APP_ERROR_MSG.
You would then create a branch on the page to branch back to itself if the value of the
application item is not null, thereby enabling the user to see the error and correct it.
Packaged Code
APEX allows you to write SQL and PL/SQL code directly in a number of places via the Applica-
tion Builder interface. For example, suppose you create the following after-submit process in
your login page to audit that a user logged in to the application.
CHAPTER 1 ■ DEVELOPMENT BEST PRACTICES
23
begin
insert into tbl_audit
(id, user_name, action)
values
(seq_audit.nextval, :APP_USER, 'Logged On');
end;
Now, while this would work, it also means that if you ever want to modify the logic of the
auditing, you need to change the application. For example, notice that you aren’t currently
storing a timestamp of when the audit action was performed. To add that functionality, you
would need to modify the tbl_audit table and add an extra column to store the timestamp
information (if that column did not already exist), and then edit the application to change the
PL/SQL page process to include the timestamp information, like this:
begin
insert into tbl_audit
(id, ts, user_name, action)
values
(seq_audit.nextval, sysdate, :APP_USER, 'Logged On');
end;
So, potentially for a very simple change, you might need to modify the application in
development, export a new version of the application, import that version into a test environ-
ment, and so on through to production.
A much more efficient way is to try to isolate the number of places you directly code logic
into your application by placing that code into a package, and then calling the packaged pro-
cedure or function from your application. For example, you could change the PL/SQL page
process to simply do this:
begin
pkg_audit.audit_action('Logged On');
end;
This allows you to encapsulate all of the logic in the packaged code. Assuming you are not
making fundamental changes to the package signature, you can modify the internal logic with-
out needing to change the application. This design would allow you to change the table that the
audit information is stored in or to add new columns and reference session state items without
needing to change anything in the application itself. All you would need to do is recompile the
new package body in the development, test, or production environment. This would result in
much less downtime for the application, since you no longer must remove the old version of
the application and import the new version. Using this method really does allow downtimes of
just a few seconds (the time it takes to recompile the package body), as opposed to minutes, or
potentially hours, while new versions of the applications are migrated.
Obviously, you won’t always be able to completely encapsulate your logic in packages.
And sometimes, even if you do encapsulate the logic, you may need to change something in the
application (for example, to pass a new parameter to the packaged code). However, it is good
practice to use packaged logic where you can. Using packaged code can save you a lot of time
later on, as well as encourage you to reuse code, rather than potentially duplicating code in a
number of places throughout your application.
24
CHAPTER 1
■ DEVELOPMENT BEST PRACTICES
Summary
This chapter covered some best practices for using APEX. You don’t need to follow our advice.
Many people just charge in and begin coding without thinking to lay a solid foundation for
their work. Some of what we advocate in this chapter may actually slow you down at first, but
it will save you time in the long run. Helping you to work more efficiently, and taking a long-
term view of doing that, is one of the reasons we’ve written this book.
25
■ ■ ■
CHAPTER 2
Migrating to APEX from Desktop
Systems
Many organizations come to rely on systems that have been built using desktop applications
such as Microsoft Excel, Access, and similar tools. For example, employees might store their
own timekeeping data in an Excel spreadsheet, which is sent to the payroll department each
month, or the sales department might keep all its customer details in an Access database.
These applications often begin as simple data-entry systems, but evolve over time as more
functionality is added or the business rules regarding the data change. Using desktop-based
systems to manage data has a number of drawbacks, such as the following:
• Each person who wants to work with the data needs to install the client software (for
example, Excel) on his machine.
• Data cannot be easily shared with other applications.
• In the case of Excel, only one person can be in control of the data at once.
• It is difficult to manage the changes made by people working with their own copy of the
data.
• The data might not be backed up as part of any regular backup procedures.
• It can be difficult to establish and restrict exactly who has access to the data.
• There is no fine-grained control over what data a user is allowed to view and modify.
• Confidential data can be taken off-site by a user, via an e-mail attachment or by copying
a spreadsheet onto a USB key, for example.
By using APEX, you can avoid many of these issues. Users won’t need to install any dedi-
cated client software, because all they will need to use your APEX application is a supported
browser. You can store the data centrally within the Oracle database, which enables it to be
backed up as part of your regular database backup policy (for example, if you perform database
backups using RMAN, the application data will also be backed up).
You can also use features such as Fine-Grained Access Control (FGAC) to control the data
users are allowed to access. When you combine this with auditing, you will not only be able to
control exactly what data users can access, but you will also have an audit trail of what data
they did access.
26
CHAPTER 2
■ MIGRATING TO APEX FROM DESKTOP SYSTEMS
We want to stress that APEX is capable of far more than just being an Excel or Access
replacement. You really are limited only by your imagination in the applications that you can
create. However, many existing Excel and Access systems could benefit from being replaced by
APEX applications, so it can be a great place to begin learning how to take advantage of this
powerful and rapid development tool.
Excel Migration
In this section, we will demonstrate how you can take an existing Excel spreadsheet and
convert it into an APEX application. The sample spreadsheet, shown in Figure 2-1, is used
to document the status of bugs that have been reported in another application. Each bug is
assigned to a developer, and the status of the bug is changed from open to closed when that
bug has been fixed.
Figure 2-1. Bug report spreadsheet
The existing spreadsheet solution suffers from many of the drawbacks mentioned at the
beginning of this chapter, particularly the fact that only one person at a time can be in control
of changing the spreadsheet. Typically in this sort of scenario, one person is tasked with main-
taining the spreadsheet, and might receive the bug reports from the testing team via e-mail.
When a bug report e-mail message is received, the person in charge of maintaining the spread-
sheet adds the bug to the list and looks for a developer to assign the bug to, usually based on
who has the least number of open bugs (which is far from an ideal way to measure how busy
the developers are!). The spreadsheet maintainer might send weekly or monthly updates to let
people know the status of the bugs at that point in time.
Clearly, this sort of system could be improved by removing the potential bottleneck of the
spreadsheet maintainer needing to collate all of the data. If the testing team members were
allowed to enter new bugs directly into the system themselves, the bugs would appear in the
report immediately. Also, if the developers could select which bugs to work on, rather than
having bugs assigned to them, they would likely pick ones related to the areas of the system
they know well.
CHAPTER 2 ■ MIGRATING TO APEX FROM DESKTOP SYSTEMS
27
Creating a New Application Based on a Spreadsheet
One of the quickest and easiest ways to migrate your existing spreadsheet to an APEX applica-
tion is to use the Create Application wizard to base the application on an Excel spreadsheet, as
shown in Figure 2-2.
Figure 2-2. Creating an application from a spreadsheet
When you use the wizard to create an application based on a spreadsheet, the wizard will
create a lot of functionality to manage the data automatically for you. The application will con-
tain methods for querying, inserting, deleting, and modifying the data, without you having to
write a single line of code.
Importing the Data
You are given two options for importing the data from the spreadsheet:
Copy and paste the data: If you have a relatively small amount of data, you can choose the
copy-and-paste method, which will allow you to paste up to 30KB of data.
Upload the data as a file: If your spreadsheet contains more data than the 30KB copy-and-
paste method allows, you will need to upload the data as a comma-separated value (CSV)
or tab-delimited file instead.
In this example, we will use the file-upload method. You can use the Save As option in
Excel to save the data in CSV or tab-delimited files. You will need to do this for the data on each
worksheet individually. Make sure you give each worksheet file a unique name; otherwise, you
will overwrite your previous file.
Once you have saved your data in a suitable format, you can select that file in the Create
Application wizard and specify some options that will be used when the wizard parses the file,
as shown in Figure 2-3.
28
CHAPTER 2
■ MIGRATING TO APEX FROM DESKTOP SYSTEMS
Figure 2-3. Uploading a CSV file
The following are some of the options that can be specified:
Separator: By default, the separator is set to a comma. If you have a tab-delimited file,
you can specify \t (a backslash followed by a lowercase T). You can actually specify any
separator here, such as a colon, but generally it’s best to stick to the well-known CSV or
tab-delimited format, unless you have no control over the source data.
Optionally Enclosed By: You can use this setting to specify a character that marks the start
and end of a particular column of data. This can be useful if you are using a CSV file and
some of your data values include commas (for example, addresses might have commas).
You can enclose the data values with quotation marks, which would prevent the embed-
ded commas from being interpreted as the start of a new column.
First row contains column names: Check this option if the first row of the imported data
includes text that you want to use as the column names.
File Character Set: This is the character set encoding of the file that you are uploading.
■Caution Excel does not export CSV or tab-delimited data in UTF-8 by default. There is the possibility for
data corruption if you export from Excel using either of those formats and subsequently load that data into a
UTF-8 database. If your database uses UTF-8, make sure to export from Excel in UTF-8.
The Globalization settings are not displayed by default, and it is quite easy to miss them.
Clicking the Globalization heading expands the page, making these options visible. These
options allow you to define the currency symbol, group separator, and decimal character. For
example, if your spreadsheet data contains prices that include a currency symbol (such as the
euro or yen symbol), you will need to specify that symbol; otherwise, the wizard will not cor-
rectly identify that column as a numeric field.
CHAPTER 2 ■ MIGRATING TO APEX FROM DESKTOP SYSTEMS
29
Setting Table Properties
The next page of the Create Application wizard, shown in Figure 2-4, lets you set the table
properties for the data that will be imported. Here, you can select the schema and table name,
and rename columns. There is a Preserve Case option, but we don’t recommend enabling it,
since it can be the cause of many problems when people try to perform a query against your
table and don’t use the same case for the column names that you have specified here.
Figure 2-4. Setting the table properties during the import
The wizard generally does a good job of working out the data type that should be used for
each column, based on the data in that column. However, you can modify the data type, for-
mat, or column length of any of the columns. You can also choose whether or not to upload
individual columns, which can be very useful when you want to import only certain columns
from the original data file. For this example, the only change we made on this page was to set
the table name to BUGLIST.
Selecting Settings for Forms, Reports, and Charts
After clicking the Next button, you are taken to a page that lets you set the singular and plural
names for the items of the data. These plural and singular names are used in forms and reports
that you develop later. We used “Bug” as the singular and “Bugs” as the plural. You can also
change the text that will be used for labels for each of the columns. We changed the BugId col-
umn label to read Bug Id.
30
CHAPTER 2
■ MIGRATING TO APEX FROM DESKTOP SYSTEMS
The next page in the wizard lets you select columns on which to base reports and charts. It
can sometimes be a bit confusing at this point to pick exactly which columns you want to use,
but you can always modify the reports and charts later. We selected the REPORTED, STATUS,
REPORTED_BY, and ASSIGNED_TO columns, as shown in Figure 2-5.
Figure 2-5. Choosing the summary columns for reports and charts
On the next page of the wizard, you can select any columns whose values you wish to have
aggregated (for example, calculating the sum or average) in a report. Since that sort of report
doesn’t make sense in the context of this example, we did not select any columns on this page.
The next few pages of the wizard let you specify the name of the application and give you
the option of using a pie chart or vertical bar chart.
Selecting the Theme
The final page in the wizard lets you select the theme to be used for the application. In APEX
version 2.2, you can select from 18 built-in themes (you can also create your own themes). We
selected the Light Blue theme (theme 15).
After you have selected a theme, the wizard will create the application, and you will then
be taken to a page where you can choose to run or edit the application.
Running the New Application
If you run the application you just created, you will be presented with a page asking for your
username and password. This is because the application was created using APEX authentica-
tion. This authentication method means that you will need to log in using the credentials of an
APEX user that has been created by a workspace administrator. Figure 2-6 shows the page that
is displayed once you have logged in to the application.
CHAPTER 2 ■ MIGRATING TO APEX FROM DESKTOP SYSTEMS
31
Figure 2-6. Home page of the application based on the spreadsheet
Using the Developer Toolbar
Because we ran the application from within the Application Builder environment, you can
see the Developer toolbar displayed at the bottom of the screen. This toolbar gives you quick
access to certain actions. You can edit the application, edit the current page, create new
elements on the current page, and view the current session information. You can use Show
Edit Links to place a link next to each element on the page that, when clicked, will give you a
pop-up page that lets you edit the properties of that particular page element directly.
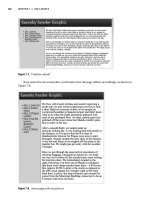
The Debug option on the toolbar is a great feature. It will run the page and include
detailed debugging information, showing precisely what the APEX engine is doing, along
with detailed timing information, allowing you to identify exactly how much time each ele-
ment of the page is taking to process. Figure 2-7 shows a small section from the home page
with debugging enabled.
The timing information displayed when you run the page in debug mode is cumulative.
For example, in Figure 2-7, you can see that before the report is displayed, the timing shows
0.20 second; after the report is displayed, the timing shows 0.37 second. Therefore, you can
conclude that the report took 0.17 second to process (0.37 – 0.20). Using debug mode can be
a very quick and easy way to home in on any performance problems in your application.
When you have finished looking at the page in debug mode, simply click the No Debug
option, and the page will be displayed without any debug information.