Tài liệu 19.5. Reading Email p1 pdf
Bạn đang xem bản rút gọn của tài liệu. Xem và tải ngay bản đầy đủ của tài liệu tại đây (41.37 KB, 9 trang )
19.5. Reading Email
Mail puts all incoming email into your Inbox; the statistic after the word Inbox lets you
know how many messages you haven't yet read. New messages are also marked with
light blue dots in the main list.
Tip: The Mail icon in the Dock also shows you how many new messages you have
waiting; it's the number in the red circle.
Click the Inbox folder to see a list of received messages. If it's a long list, press Control-
Page Up and Control-Page Down to scroll. Click the name of a message once to read it in
the Preview pane, or double-click a message to open it into a separate window. (If a
message is already selected, pressing Return or Enter also opens its separate window.)
Tip: Instead of reading your mail, you might prefer to have Mac OS X read it to you, as
you sit back in your chair and sip a strawberry daiquiri. Highlight the text you want to
hear (or choose Edit Select All), and then choose Edit Speech Start Speaking.
You'll hear the message read aloud, in the voice you've selected on the Speech pane of
System Preferences (Section 4.5.1
).To stop the insanity, choose Edit Speech Stop
Speaking.
Once you've viewed a message, you can respond to it, delete it, print it, file it, and so on.
The following pages should get you started.
19.5.1. Threading
Threading is one of the most useful mail-sorting methods to come along in a long time—
and it's available in Mail. When threading is turned on, Mail groups emails with the same
subject (like "Raccoons" and "Re: Raccoons") as a single item in the main mail list.
To turn on threading, choose View Organize by Thread. If several messages have the
same subject, they all turn light blue to indicate their membership in a thread (Figure 19-
10).
Here are some powerful ways to use threading:
• View a list of all the messages in a thread by clicking its heading. In the Preview
pane, you see a comprehensive inventory of the thread (Figure 19-10
). You can
click a message's name in this list to jump right to it.
UP TO SPEED
All the Little Symbols
The first column of the main email list shows little symbols that let you know at
a glance how you've processed certain messages. The most common one is, of
course, the light-blue dot , which means "new message." (After reading a
message, you can mark it once again as an unread message by choosing
Message Mark As Unread [Shift- -U]—or by Control-clicking the
message's name and then choosing Mark As Unread from the shortcut
menu.)
You might also see these symbols, which represent messages that you've replied
to , forwarded , redirected , or flagged .
A well-guarded secret, however, is that the "replied to" and "forwarded"
symbols aren't just indicators—they're buttons.
When you see one of these symbols next to your original message, click it to
jump straight to your reply (or forwarded message). You're spared the trouble of
having to search through all your mailboxes.
Incidentally, you may have noticed that Mail marks a message as having been
read the moment you click it. You can change it back to unread by using its
shortcut menu—but there's also a more permanent workaround.
If you hide the Preview pane by double-clicking the divider bar just above it,
Mail no longer marks messages "read" just because you clicked them in the list.
(You can bring back the Preview pane by double-clicking just above the vertical
scroll bar, or by dragging the divider bar back up from the bottom.)
•
• Move all the members of a thread to a new mailbox simply by moving its heading.
You might find this useful, for example, when you've just finished a project and
want to file away all the email related to it quickly. (As a bonus, a circled number
tells you how many messages you're moving as you drag the heading.) You can
even delete all the messages in a thread at once by deleting its heading.
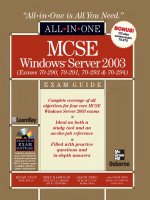
Figure 19-10. Threads have two parts: a heading (the subject of the thread,
listed in dark blue when it's not selected) and members (the individual
messages in the thread, listed in light blue and indented). Often, the main list
shows only a thread's heading; click the flippy triangle to reveal its members.
• Examine thread members from multiple mailboxes. Normally, threads only
display messages held in the samemailbox, but that's not especially convenient
when you want to see both messages (from your Inbox) and your replies (in your
Sent box). To work around that problem, click Inbox, and then -click the Sent
mailbox (or any other mailboxes you want to include). Your threads seamlessly
combine related messages from all of the selected mailboxes.
• Quickly collapse all threads by choosing View Collapse All Threads. If your
main list gets cluttered with too many expanded threads, this is a quick way to
force it into order. (If, on the other hand, your main list isn't cluttered enough,
choose View Expand All Threads.)
• Send someone all the messages in a thread by selecting the thread's heading and
clicking Forward. Mail automatically copies all the messages of the thread into a
new message, putting the oldest at the top. You might find this useful, for instance,
when you want to send your boss all the correspondence you've had with someone
about a certain project.
19.5.2. Adding the Sender to Your Address Book
When you choose the Message Add Sender To Address Book command, Mail
memorizes the email address of the person whose message is on the screen. In fact, you
can highlight a huge number of messages and add all the senders simultaneously using
this technique.
Thereafter, you'll be able to write new messages to somebody just by typing the first few
letters of the name or email address.
19.5.3. Data Detectors
Here's a cool step-saver, new in Leopard: a little something Apple likes to call data
detectors.
In short, Mail recognizes commonly used bits of information that may appear in a
message: a physical address, a phone number, a date and time, and so on. With one quick
click, you can send that information into the appropriate Mac OS X program, like iCal,
Address Book, or your Web browser (for looking an address up on a map).
Here's how it works. When you spot a name, address, date, or time, point to it without
clicking. Mail draws a dotted rectangle around it. Control-click inside the rectangle, or
right-click, or click the pop-up at the right side.
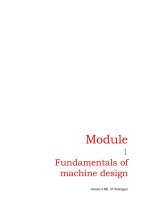
Figure 19-11. Mail can detect street addresses, phone numbers, dates, and times.
When it spots something you may want to add to another program like Address
Book or iCal, it draws a dotted line around the info when you point to it without
clicking. Click the little to get a shortcut menu for further options—like
automatically adding the address to your Address Book program or seeing the
address pinpointed on a Google map.
As shown in Figure 19-11
, a shortcut menu appears. Its contents vary depending on what
you're pointing to:
• A mailing address. You can choose Show Map from the shortcut menu; your Web
browser opens automatically and shows you that address on a Google map.
Alternatively, you can choose Create New Contact (to add an Address Book entry
for this address) or Add to Existing Contact (if the person is in your Address
Book—just not the address). Like magic, a little editing box sprouts out of the
data-detected rectangle, prefilled with the information from the message, so that
you can approve it.
Tip: If you highlight some text in the message and then click the pop-up
menu, Mail also fills in the Notes field in this person's Address Book entry with
the highlighted text. Wicked cool.
• A date and time. The shortcut menu offers two useful commands. Create New iCal
Event opens Mac OS X's calendar program and creates a new appointment at the
date and time identified in the message. It's up to you to type a name for the date,
set an alarm, and do all the other appointment-setting things described in Chapter
10.
Tip: If, while working in iCal, you ever forget where this event came from,
double-click it. In the Info balloon, you'll see a link that takes you right back to the
original Mail message that started it all.
If you choose Show This Date in iCal, though, you go to iCal, which opens
directly to the specified date and/or time. The logic of this feature is
overwhelming; after all, when someone emails you to ask if you're free for drinks
next Thursday at 10, what's the first thing you usually want to do? Check your
calendar, of course.
19.5.4. Opening Attachments
Just as you can attach files to a message, so people often send files to you. Sometimes
they don't even bother to type a message; you wind up receiving an empty email message
with a file or two attached. Only the presence of the file's icon in the message body tells
you that there's something attached.
Tip: Mail doesn't ordinarily indicate the presence of attachments in the Messages list. It
can do so, however. Just choose View Columns Attachments. A new column
appears in the email list—at the far right—where you'll see a paper-clip icon and the
number of file attachments listed for each message.
Mail doesn't store downloaded files as normal file icons on your hard drive. They're
actually encoded right into the .mbox mailbox databases described on Section 19.5.11.2
.
To extract an attached file from this mass of software, you must proceed in one of these
ways:
• New in Leopard: Click the Quick Look button in the message header. Instantly,
you're treated to a nearly full-size preview of the file's contents. Yes, Quick Look
has come to email. Its strengths and weaknesses here are exactly as described
Chapter 1
.
Tip: If the attachments are pictures, clicking Quick Look gives you a full-screen
slideshow of every attached image.If you jiggle the mouse a little during the
slideshow, you get a useful row of buttons along the bottom of the screen, too;
they're described on Section 1.8.3
.
• Click the Save button in the message header to save it to the Mac's Downloads
folder, nestled within easy reach in the Dock.
Tip: If you don't want to use the Downloads folder, you can choose a new
autosave location for attachments by choosing Mail Preferences General
Downloads.
• Control-click (or right-click) the attachment's icon, and choose Save Attachment
from the shortcut menu. You'll be asked to specify where you want to put it. Or
save time by choosing Save to Downloads Folder, meaning the Downloads folder
in the Dock.
• Drag the attachment icon out of the message window and onto any visible portion
of your desktop (or any visible folder).
• Click the Save button at the top of the email, or choose File Save Attachments.
(If the message has more than one attachment, this maneuver saves all of them.)
Tip: The Save button at the top of the Preview pane doubles as a pop-up menu; if
you click it and keep the mouse button pressed, you can select from several other
options for saving the attachments—like importing them into iPhoto or
downloading only one of them.
WORKAROUND WORKSHOP
Dial-up Blues
If you're among the few, the proud, who still connect to the Internet with a dial-
up modem, you may find that Mail is painfully slow at opening and reading
email—and that it slows down other Internet programs, like your Web browser,
whenever it checks for new mail.
Fortunately, you can take a few steps to speed up Mail (and, indirectly, your
other Internet programs):
Cut back on mail checks. Choose Mail Preferences, click General, and
change the "Check for new mail" pop-up to "Every hour," or even "Manually."
That way, Mail won't tie up your phone line by trying to connect every five
minutes.
Whenever you have a choice, don't sign up for HTML email. HTML mail takes
far longer to arrive than plain email. Therefore, if you ever sign up for
companies' email updates (like Apple's eNews bulletin or the New York Times's
Circuits newsletter), choose to receive the messages as text, not HTML.
Turn off graphics in formatted mail. If you have no choice but to receive HTML
messages, the least you can do is block the pictures, which are the biggest and
slowest elements of a formatted message.
To do that, choose Mail Preferences, click Viewing, and then turn off
"Display remote images in HTML messages." From now on, you'll see a special
Load Images button at the top of the Preview pane whenever you select an
HTML message. If you feel that the empty boxes (where the graphics would
have appeared) really deprive the message of its oomph, click that button to
make Mail download all the images in the current message—this time only,
because you've asked for them.
Don't auto-download attachments. If you use an IMAP, .Mac, or Exchange
account, you can set up Mail so it won't download attachments until you tell it
to.
Open the Accounts pane of Mail's preferences, select your account, click
Advanced, and choose "All messages, but omit attachments" from the pop-up
menu in the middle. From now on, Mail won't download attachments unless you
command it to do so.
• Double-click the attachment's icon, or single-click the blue link underneath the
icon. If you were sent a document (a photo, Word file, or Excel file, for example),
it now opens in the corresponding program.
Note: After the attachment is open, use the File Save As command to save the
file into a folder of your choice. Otherwise, any changes you make to the
document won't be visible except when you open it from within Mail.
• Control-click the attachment's icon. From the shortcut menu, you can specify
which program you want to use for opening it, using the Open With submenu.
19.5.4.1. When attachments don't open
If you're unable to open a file attachment, there are several possible reasons. For starters,
your correspondent's email program may have compressed or encoded the file so it takes
less time to send.
Mac OS X can open .zip and other common compressed formats with a simple double-
click. But if the format is some wacky off-brand scheme, try dragging the attachment's
icon onto that of StuffIt Expander, a little program that can gracefully decode just about
any geeky Internet file. (You can download it for free fromwww.stuffit.com
.)
Some mysterious attachment types aren't necessarily hard to open. For example:
• .exe. This denotes an executable file—more specifically, a Windows program.
Mac OS X itself can't run Windows programs. If you have an Intel-based Mac and
you've installed Boot Camp, Parallels, or VMW are Fusion (Chapter 8
), of course,
you can copy the file to the Dark Side and deal with it there.
• .html. A file whose name ends in .html or .htm is a Web page. In the beginning,
Web pages hung out only on the Internet. These days, however, you're
increasingly likely to find that you've downloaded one to your Mac's hard drive.
(It may be a software manual for some shareware, for example.) You can open it
by double-clicking; Mac OS X comes set to open all .htm and .html files in Safari.
• .vcf. A "business-card" file; see Section 19.10.1.2.
If you've received a file with a three-letter code not listed here, you may well have a file
that can be opened only by a Windows program that you don't own. You might consider
asking your correspondent to resend it in one of the more universal formats, such as the
graphics formats JPEG and TIFF, or the text formats RTF and TXT. In addition, any
layout, graphics, or text file can be turned into a PDF; if you're still having trouble
opening the attachment, ask your correspondent to send the attachment in that format
instead.
19.5.5. Replying to a Message
To answer a message, click the Reply button on the message toolbar (or choose Message
Reply, or press -R). If the message was originally addressed to multiple
recipients, you can send your reply to everyone simultaneously by clicking Reply All
instead.
A new message window opens, already addressed. As a courtesy to your correspondent,
Mail places the original message at the bottom of the window, set off by a vertical bar, as
shown in Figure 19-12
.
Tip: If you highlight some text before clicking Reply, Mail pastes only that portion of the
original message into your reply. That's a great convenience to your correspondent, who
now knows exactly which part of the message you're responding to.
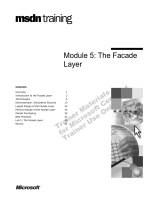
Figure 19-12. In Rich Text–formatted Mail messages (not to be confused with RTF
[Rich Text Format] word processing format, which is very different), a reply
includes the original message, marked in a special color (which you can change in
Mail Preferences) and with a vertical bar to differentiate it from the text of your
reply.
(In plain-text messages, each line of the reply is >denoted >with >brackets, although
only your recipient will see them.) The original sender's name is automatically
placed in the "To:" field. The subject is the same as the original subject with the
addition of Re: (shorthand for Regarding). You're now ready to type your response.
At this point, you can add or delete recipients, edit the Subject line or the original
message, attach a file, and so on.