Tài liệu Programming Microsoft SQL Server 2000 with Microsoft Visual Basic .Net - P9 pdf
Bạn đang xem bản rút gọn của tài liệu. Xem và tải ngay bản đầy đủ của tài liệu tại đây (1.21 MB, 50 trang )
•
• End Sub
•
•
• Private Sub Button1_Click(ByVal sender As System.Object, _
• ByVal e As System.EventArgs) Handles Button1.Click
•
• ’Move to first row and populate text boxes.
• Session(“MyRowID”) = 0
• MoveToRow()
•
• End Sub
•
• Private Sub Button2_Click(ByVal sender As System.Object, _
•
ByVal e As System.EventArgs) Handles Button2.Click
•
• ’Move to previous row and populate text boxes.
• If Session(“MyRowID”) > 0 Then
• Session(“MyRowID”) -= 1
• End If
• MoveToRow()
•
• End Sub
•
•
• Private Sub Button3_Click(ByVal sender As System.Object, _
• ByVal e As System.EventArgs) Handles Button3.Click
•
• ’Move to next row and populate text boxes.
• If Session(“MyRowID”) < _
• Ds1.Tables(“Products”).Rows.Count - 1 Then
•
Session(“MyRowID”) += 1
• End If
• MoveToRow()
•
• End Sub
•
•
• Private Sub Button4_Click(ByVal sender As System.Object, _
• ByVal e As System.EventArgs) Handles Button4.Click
•
• ’Move to last row and populate text boxes.
• Session(“MyRowID”) = Ds1.Tables(“Products”).Rows.Count - 1
• MoveToRow()
•
• End Sub
•
Creat ing Da ta base Obj ect s fr om W eb Pa ges
Your applications will sometim es need the availability of custom database objects.
For exam ple, stored procedures, which store precompiled, optim ized SQL code,
are great for managing data manipulation tasks, such as inserting new records
Please purchase PDF Split-Merge on www.verypdf.com to remove this watermark.
into a table, and data definition tasks, such as dynam ically creating a new table.
If you happen to create a custom table for your application, your application can
probably also benefit from one or more stored procedures performing data
manipulation tasks for t he table. For exam ple, your application can pass the
stored procedure param eters specifying the column values for a new row, and the
stored procedure can execute the I NSERT INTO statem ent. I f your application
needs the value for a colum n with an Identit y property created on the SQL Server
instance, the stored procedure can return it as an output param et er.
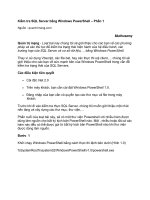
The sam ple for this section dem onstrat es the creation of a table and a stored
procedure. The sample is the setup program for the next section that
dem onstrates how to program data manipulation tasks. Specifically, you will learn
how to create a table and a stored procedure on a SQL Server instance from an
ASP.NET application. Figure 11-20 shows the Web page for the sam ple. The
page’s nam e is WebFrom1.aspx, and it resides in the SetupForWebUpdateSample
project. The page includes two buttons and a hyperlink. The buttons have Text
property settings reflecting the text they show. The button I D property settings
are Button1 for t he top button and Button2 for the one below it. The hyperlink
control has two design-t im e property settings. First, its Text property specifies
the message to display when rendered on a Web page. Second, the Navigat eUrl
property designates the URL of t he page to which to pass control when a user
clicks the hyperlink. If you are running the application against another Web
server besides t he local one on your workstation, you will need to update t he
Navigat eUrl property for the hyperlink control.
Figure 1 1 - 2 0 . W ebForm 1 .a spx in t h e Set upFor W ebUpdat eSa m ple p roj ect .
The sam ple’s new table is essent ially a scratch copy of the Shippers table in the
Northwind database. By creating a scratch copy of the table, you will be able to
make changes against the new sam ple table without destroying the original data
in the sample database. The But t on1_Click event procedure perform s three
subtasks as it creates a new table named ASPNETShippers. First it rem oves the
ASPNETShippers table if it already exists in the database. Next it creates the
ASPNETShippers table. Third it populates the rows of the ASPNETShippers table
with rows from the Shippers table.
Please purchase PDF Split-Merge on www.verypdf.com to remove this watermark.
The listing that follows starts by declaring and instantiating a SqlConnect ion
object (cnn1) and a SqlCom m and object (cm d1 ). By declaring the objects at the
module level, I can use them in event procedures for each button in Figure 11-
20. The Button1_Click event procedure starts by specifying the connection string
for cnn1 and opening the object. Next the procedure assigns cnn1 to the
Connection property for cm d1, the SqlCom m and obj ect. After these prelim inary
steps, the procedure successively repeats two statem ents for assigning a
Com m andText property to cm d1 and then invoking t he ExecuteNonQuery m ethod
for cm d1. Apply the Execut eNonQuery m et hod of a SqlCom m and object when the
object’s Com m andText property doesn’t return a result set. The three
Com m andText property settings rem ove any prior version of the ASPNETShippers
table, create a new ASPNETShippers table, and populate the ASPNETShippers
table with rows from t he Shippers table in the Northwind database. The
But t on1_Click event procedure concludes by closing cnn1.
The logic for the Button2_Click event procedure follows the same basic design as
that in the Button1_Click event procedure. The overall process is: (1) m ake a
connection, (2) run one or m ore SQL statem ent s with a SqlCom m and object, and
(3) close the connection. The objective of the But t on2_Click event procedure is to
create a new stored procedure nam ed udpI nsertANewASPNETShipper. The event
procedure execut es two SQL statements to achieve this objective. First it runs
one statem ent to remove any prior version of the connection in the Northwind
database. Second it runs a procedure t o create a new version of the
udpI nsertANewASPNETShipper stored procedure. We discussed the logic for this
stored procedure in Chapter 10. That chapter demonstrated how to create the
stored procedure in Query Analyzer and discussed the logic that the SQL
statements express. This chapter extends the earlier treatm ent of the topic by
dem onstrating how to create t he stored procedure program matically from within
ASP.NET.
N ot e
For data definition SQL statements to function properly, such
as those in the But ton1_Click and Button2_Click event
procedures, you must run them from a login with appropriate
permission to create database objects on the SQL Server
instance to which you connect. See Chapter 7 for detailed
coverage of SQL Server security, including logins and
permissions. Alternatively, you can use the SQL Server sa
login. However, this is poor application design because it
allows users unrestricted authority on a SQL Server.
Dim cnn1 As New SqlClient.SqlConnection()Dim cmd1 As New SqlClient.Sq
lCommand()
Private Sub Button1_Click(ByVal sender As System.Object, _
ByVal e As System.EventArgs) Handles Button1.Click
’Make connection to northwind database.
cnn1.ConnectionString = “Data Source=(local);” & _
“Initial Catalog=northwind;” & _
“Integrated Security=SSPI"
cnn1.Open()
’Assign connection to cmd1.
cmd1.Connection = cnn1
’Execute query to drop prior version of table.
Please purchase PDF Split-Merge on www.verypdf.com to remove this watermark.
cmd1.CommandText = “IF EXISTS (“ & _
“SELECT * FROM INFORMATION_SCHEMA.TABLES “ & _
“WHERE TABLE_NAME = ’ASPNETShippers’) “ & _
“DROP TABLE dbo.ASPNETShippers"
cmd1.ExecuteNonQuery()
’Execute query to create new version of table.
cmd1.CommandText = “CREATE TABLE dbo.ASPNETShippers “ & _
“(“ & _
“ShipperID int IDENTITY (1, 1) NOT NULL, “ & _
“CompanyName nvarchar (40) NOT NULL, “ & _
“Phone nvarchar (24) NULL, “ & _
“CONSTRAINT PK_ASPNETShippers “ & _
“PRIMARY KEY CLUSTERED (ShipperID)” & _
“)"
cmd1.ExecuteNonQuery()
’Populate table based on Shippers.
cmd1.CommandText = _
“SET IDENTITY_INSERT dbo.ASPNETShippers ON “ & _
“INSERT INTO ASPNETShippers “ & _
“(ShipperID, CompanyName, Phone) “ & _
“SELECT * FROM Shippers “ & _
“SET IDENTITY_INSERT dbo.ASPNETShippers OFF"
cmd1.ExecuteNonQuery()
cnn1.Close()
End Sub
Private Sub Button2_Click(ByVal sender As System.Object, _
ByVal e As System.EventArgs) Handles Button2.Click
’Make connection to northwind database.
cnn1.ConnectionString = “Data Source=(local);” & _
“Initial Catalog=northwind;” & _
“Integrated Security=SSPI"
cnn1.Open()
’Assign connection to cmd1.
cmd1.Connection = cnn1
’Drop any prior version of udpInsertANewASPNETShipper.
cmd1.CommandText = “IF EXISTS (“ & _
“SELECT ROUTINE_NAME “ & _
“FROM INFORMATION_SCHEMA.ROUTINES “ & _
“WHERE ROUTINE_TYPE = ’PROCEDURE’ AND “ & _
“ROUTINE_NAME = ’udpInsertANewASPNETShipper’) “ & _
“DROP PROCEDURE dbo.udpInsertANewASPNETShipper"
cmd1.ExecuteNonQuery()
’Create a new version of udpInsertANewASPNETShipper.
cmd1.CommandText = _
“CREATE PROCEDURE udpInsertANewASPNETShipper “ & _
“@CompanyName nchar(40), “ & _
“@Phone nvarchar (24), “ & _
“@Identity int OUT “ & _
“AS “ & _
“INSERT INTO ASPNETShippers “ & _
“(CompanyName, Phone) “ & _
Please purchase PDF Split-Merge on www.verypdf.com to remove this watermark.
“VALUES(@CompanyName, @Phone) “ & _
“SET @Identity = SCOPE_IDENTITY()"
cmd1.ExecuteNonQuery()
cnn1.Close()
End Sub
Dat a Manipulat ion from ASP.N ET
After running the application in t he preceding section, you will have a new copy of
the ASPNETShippers table in the Northwind database as well as a stored
procedure, udpI nsert ANew ASPNETShipper, to facilitate inserting new rows into
the ASPNETShippers table. The sample application in this section illustrates how
to m odify, insert, and delet e rows in the ASPNETShippers table from an ASP.NET
application. The application builds on the browsing sample illustrated by the
WebForm 1.aspx page in the NavTextBoxes proj ect. The addition of data
manipulation to that earlier application is particularly interesting because that
application used an unbound form to display colum n values from the Shippers
table. I n other words, the form field values don’t bind t o any data source.
Therefore, all data manipulation tasks must be performed in code. The sam ple in
this section is im portant for another reason. The application enables users to
update a SQL Server database over the Web.
N ot e
As with the sample in the preceding section, users of this
application must have permission to perform a task before
the application autom ating that task will work. In this
section, the tasks are the classic three data manipulation
ones of m odifying, inserting, and deleting records.
W e b Page Layou t a nd Opera t ion
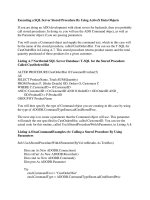
Figure 11-21 shows the Web page layout for this application. The page’s name is
WebForm 1.aspx in the UpdateWithWebForm project. Except for four new buttons
at the bottom of the page, the page layout looks similar to the one in Figure 11-
18 for browsing records with text box controls. The four new buttons facilitate
changes to the row currently appearing on t he Web page, delete the row
currently appearing, and clear t he fields and insert a new row int o the database
based on new form field values. The Web page in Figure 11-21 connects to the
ASPNETShippers, instead of the Shippers, table in the Northwind database. This
distinction enables application users of the sam ple in this section to m anipulate
the data appearing on the Web page without changing the original data in the
sample database. By contrasting the Design views of the two pages, you will also
notice that the new Web page has no ADO.NET objects created at design tim e.
You can tell t his because the system tray doesn’t appear in Figure 11-21.
Figure 1 1 - 2 1 . W ebForm 1 .a spx in t h e Upda t eW ithW ebForm proj ect .
Please purchase PDF Split-Merge on www.verypdf.com to remove this watermark.
The entire reason for this sample is to dem onstrate that you can enable data
manipulation tasks from a Web page with ASP.NET. Figure 11-22 starts to
dem onstrate this capability by showing two views of the Web page in operation.
The top window shows the Web page aft er a click of the Clear button (its name is
cm dClear) and then the addition of new text in two of the text boxes. The
cm dClear button clears the form on the Web page so the user can enter a new
row of data. I n this top window, you can see that the Com panyNam e and Phone
values for a new shipper have been entered but that the top text box for
ShipperI D is em pty. That’s because the SQL Server instance assigns a value to
this field. Clicking the I nsert button (its nam e is cm dI nsert) changes the browser
to look like the window in the bottom port ion of Figure 11-22. Notice that the
Com panyNam e and Phone text boxes are the sam e. However, you now have a
ShipperID text box value. SQL Server generated this value on the server, and the
UpdateWithWebForm application retrieved the value by capturing the return
parameter value from the udpInsertANewASPNETShipper stored procedure.
Figure 1 1 - 2 2 . W ebForm 1 .a spx in t h e Upda t eW ith W ebForm proj ect before
and aft er com m itting an in sert t o the ASPN ETSh ippe rs t a ble.
Please purchase PDF Split-Merge on www.verypdf.com to remove this watermark.
Figure 11-23 shows the row entered in the preceding sample in the process of
being m odified. Notice that the user changed the last digit in the telephone
num ber from 7 to 8. The application doesn’t comm it this change until the user
clicks the Modify button. (I ts nam e is cm dModify.) After the user clicks
cm dModify, the application conveys the new value to the SQL Server instance and
refreshes the local copy of the data set on t he Web page with the table of values
from the SQL Server instance.
Figure 1 1 - 2 3 . W ebForm 1 .a spx in t h e Upda t e W ithW ebForm project j u st
befor e a m od ifica t ion t o the t eleph on e n um be r for t he r ow adde d in
Figure 1 1 - 2 2 .
Please purchase PDF Split-Merge on www.verypdf.com to remove this watermark.
Figure 11-24 shows the Delete button (its name is cm dDelet e) in operation. I n
the top window, you can see the new row with its edited Phone value. The cursor
rests on the cm dDelet e button. Clicking this button removes the row appearing
on the Web page from the ASPNETShippers table in the SQL Server instance and
updates the data set on the Web page to reflect this result. Because the click to
the cm dDelet e button rem oved the former last row in the Shippers data set, the
Web page shows the new last row with a ShipperID column value of 3. The Click
event procedure behind the cm dDelet e button m anages the display of which row
appears on the page after the rem oval of a row. For exam ple, if a user rem oved
the first row (with a ShipperID colum n value of 1), the row appearing on the Web
page would be the new first row in the data set with a ShipperID value of 2.
Figure 1 1 - 2 4 . W ebForm 1 .a spx in t h e Upda t e W ithW ebForm project j u st
befor e and just after t h e rem ova l of t h e row t hat h ad it s Ph on e v alu e
edit ed in Figur e 1 1 - 2 3 .
Please purchase PDF Split-Merge on www.verypdf.com to remove this watermark.
Please purchase PDF Split-Merge on www.verypdf.com to remove this watermark.
Code Be hind t h e W eb Page
The code for performing data manipulation on a Web page parallels that for
perform ing data manipulation in a Windows form. However, one important
difference is that in a Windows form, your code has to create most of the
ADO.NET obj ects, such as a SqlDat aAdapter and a data set, just once. I n the case
of a Web application, your code will typically have to re-create these objects each
time a Web page does a round-trip between a browser and a Web server— for
exam ple, every t ime the user clicks a butt on on the Web page. As mentioned
previously, you should keep the size of the data set on a Web page sm all for this
reason. In our case, the ASPNETShippers table is already a sm all table of j ust
three original rows. I f your original data source is large, consider pulling down
just a small portion of it on successive round-trips by using a stored procedure or
a user-defined function that ret urns a customizable result set based on input that
you pass it through a paramet er.
The following listing includes those parts of the code behind the Web page that
pertain directly to the data m anipulation part of the sample. The data display and
navigation code closely follow the code appearing in the section tit led “Navigating
Text Boxes Through a Data Set”. In order to conserve space in this book for fresh
information, I direct you to the code samples for this book, where the complete
listing is available for the code behind the Web page.
The listing starts by declaring and instantiating at the m odule level four ADO.NET
objects: a SqlConnection object (cnn1), a SqlCom m and object (cm d1), a
SqlDat aAdapter object (dap1), and a DataSet object (das1). The Page_Load
event procedure uses each of these objects, and the objects find selective use in
other event procedures throughout the code behind the page.
After m aking a connection to the Northwind dat abase, the Page_Load event
procedure declares the dap1 data adapter dependent on all the colum ns from all
the rows of the ASPNETShippers table. Next the procedure defines the
Updat eCom m and property for the data adapter. A SQL UPDATE statem ent with
parameters specifies the items to update. After the SQL statem ent for the
Updat eCom m and property, two additional statem ents add param eters to the
command for the Updat eCom m and property. These param eters allow the Web
page to pass values from the entries in its text boxes. The next parameter is for
the text box holding a ShipperID value on the Web page. Whereas the param eter
ties to the ShipperID value in the data set behind the Web page, it uses the row
currently appearing in the first text box on the Web page.
The next several lines of code in the Page_Load event procedure define the
I nsertCom m and property for the dap1 data adapter and its associated
parameters. I n this case, the procedure designates the perform ance of the insert
via the udpI nsertANew ASPNETShipper stored procedure. Recall that the
preceding section dem onstrated how to create this stored procedure in the code
behind a separate stand-alone Web page. The statem ents adding parameters
illustrate t he syntax for passing param eters to a stored procedure and capturing a
return value from a stored procedure. Notice that you designate a Direct ion
property for prm 2 with the Param et erDirect ion.Output enum eration value. This
parameter (prm2) returns the Identit y value for the inserted row by the SQL
Server instance.
The next block of code in the Page_Load event procedure defines the
Delet eCom m and property and its parameter for the dap1 object. This block of
code uses a SQL DELETE statem ent to designate which row to drop from the
ASPNETShippers table along wit h the row’s copy in the data set behind the Web
page. Because the ShipperID value is the primary key of the ASPNETShippers
table, t he code uniquely identifies a row to remove from the table by specifying a
value for this column.
After defining the dap1 data adapter and its data manipulation properties, the
Page_Load event procedure perform s two more essential tasks. First the
Please purchase PDF Split-Merge on www.verypdf.com to remove this watermark.
procedure fills the das1 data set with the values from the ASPNETShippers table.
Second the procedure populates the text boxes on the page with values from the
first row of t he das1 data set.
Users m ake a change by m odifying the CompanyNam e or Phone text box values
on the Web page and t hen clicking the cm dModify button. In the Click event for
this button, the procedure declares and instant iates a data view (dav1) based on
the ASPNETShippers Dat aTable in the das1 data set. The procedure defines a sort
key for dav1 based on the ShipperID column. Then t he procedure uses the data
view’s Find m ethod to return the row index for t he row with a ShipperID colum n
value matching the current ShipperI D value displayed on the Web page. Defining
the sort key is a necessary step for using the Find m ethod (because the
ASPNETShippers Dat aTable in das1 doesn’t have a primary key constraint). With
the index reflecting the row displayed on the Web page, the procedure creates a
DataRow based on the data table’s schema and data that points to the row from
the data table displayed on the Web page. Then the procedure updates the row’s
colum n values wit h those from the Web page. This modifies the data table. Finally
the procedure closes by invoking the Updat e method for the dap1 data adapter.
This method transfers the changes from the local table to the m atching one on
the SQL Server instance.
The cmdClear and cm dInsert buttons work together. I n general, a user should
click the cm dClear button before clicking the cm dI nsert button. The cm dClear
button’s Click event procedure blanks the text box controls on the Web page.
Next the user should insert values in those blank controls. The Click event
procedure for the cm dInsert button declares a new row to add to the
ASPNETShippers data table and then populates the row with values from text
boxes on the Web page. At this point, updating the local data table is as easy as
invoking the Add m ethod. This step appends the new row to the end of the
ASPNETShippers data table. Next the procedure invokes the Update m ethod to
upload the new row t o the ASPNETShippers table in the SQL Server instance and
to download the ShipperID value created on the SQL Server instance. The output
parameter statem ents for the dap1 I nsertCom m and property in the Page_Load
event procedure autom atically assure the proper handling of the return value
from the udpI nsertANewASPNETShipper stored procedure. Finally the procedure
updates the MyRowI D Session variable to point to the last row in t he data table
and shows this row (where ADO.NET perform s the insert) on the Web page.
N ot e
The cm dModify button Click event procedure doesn’t update
the MyRowI D Session variable or the values on the Web
page. At the end of the modify update, the correct row
already appears on the Web page. Therefore, there is no
need to show another record.
The cm dDelet e_Click event procedure borrows from the logic of the two preceding
event procedures and adds a new wrinkle or two. First the procedure defines a
data view to find an index value for the row displayed on the Web page, which is
the row a user wants to delete. The second step is new. I n this step, the
procedure invokes the Delete m et hod for the row in the data table that m atches
the row displayed on the Web page. This method doesn’t physically rem ove the
row from the local data table. I nstead, it m arks the row for delet ion. When the
procedure invokes the Updat e method in the third step, it finds all rows m arked
for delet ion and rem oves them from the SQL Server version of the
ASPNETShippers table. I n this application, there will always be just one such row.
After rem oving the row on the server, the Updat e method automatically removes
the row locally. This tim e the procedure physically removes the row from the local
data table. After completing the delet ion, t he procedure displays on the Web page
Please purchase PDF Split-Merge on www.verypdf.com to remove this watermark.
the previous row before the one just deleted. If that row (the one just deleted)
was the first row, the procedure shows the old second row, which is the new first
row.
Dim cnn1 As New SqlClient.SqlConnection()Dim cmd1 As New SqlClient.Sq
lCommand()
Dim dap1 As New SqlClient.SqlDataAdapter()
Dim das1 As New DataSet()
Private Sub Page_Load(ByVal sender As System.Object, _
ByVal e As System.EventArgs) Handles MyBase.Load
’Make connection to northwind database and
’point data adapter (dap1) at it
cnn1.ConnectionString = “Data Source=(local);” & _
“Initial Catalog=northwind;” & _
“Integrated Security=SSPI"
dap1 = _
New SqlClient.SqlDataAdapter( _
“SELECT * FROM ASPNETShippers", cnn1)
’Set the UpdateCommand property for dap1.
dap1.UpdateCommand = _
New SqlClient.SqlCommand _
(“UPDATE ASPNETShippers “ & _
“SET CompanyName = @CompanyName, “ & _
“Phone = @Phone “ & _
“WHERE ShipperID = @ShipperID", _
cnn1)
’Add two parameters that take source columns
’from the ASPNETShippers table in the dataset for the
’dap1 adapter and feed the parameters in the SQL
’string for the UpdateCommand property.
dap1.UpdateCommand.Parameters.Add _
(“@CompanyName", SqlDbType.NVarChar, 40, _
“CompanyName”)
dap1.UpdateCommand.Parameters.Add _
(“@Phone", SqlDbType.NVarChar, 24, _
“Phone”)
’Specify matching criterion values based on the
’original version of the ShipperID column in the
’local ASPNETShippers table.
Dim prm1 As SqlClient.SqlParameter = _
dap1.UpdateCommand.Parameters.Add _
(“@ShipperID", SqlDbType.Int)
prm1.SourceColumn = “ShipperID"
prm1.SourceVersion = DataRowVersion.Original
’Point InsertCommand at a SQL Server stored procedure;
’you must have the stored procedure on the server.
dap1.InsertCommand = New _
SqlClient.SqlCommand(“udpInsertANewASPNETShipper", cnn1)
dap1.InsertCommand.CommandType = CommandType.StoredProcedure
’Specify input parameters for the stored procedure.
dap1.InsertCommand.Parameters.Add _
(“@CompanyName", SqlDbType.NVarChar, 40, _
“CompanyName”)
dap1.InsertCommand.Parameters.Add _
(“@Phone", SqlDbType.NVarChar, 24, _
Please purchase PDF Split-Merge on www.verypdf.com to remove this watermark.
“Phone”)
’Designate an output parameter for the identity
’value assigned within SQL Server so that your
’local ASPNETShippers table can have a matching
’ShipperID column value.
Dim prm2 As SqlClient.SqlParameter = _
dap1.InsertCommand.Parameters.Add _
(“@Identity", SqlDbType.Int, 0, “ShipperID”)
prm2.Direction = ParameterDirection.Output
’Specify the SQL string for the DeleteCommand
’property of dap1.
dap1.DeleteCommand = _
New SqlClient.SqlCommand(“DELETE “ & _
“FROM ASPNETShippers “ & _
“WHERE ShipperID = @ShipperID", cnn1)
’Specify matching criterion values based on the
’original version of the ShipperID column in the
’local ASPNETShippers table.
Dim prm3 As SqlClient.SqlParameter = _
dap1.DeleteCommand.Parameters.Add _
(“@ShipperID", SqlDbType.Int)
prm3.SourceColumn = “ShipperID"
prm3.SourceVersion = DataRowVersion.Original
’Fill dataset.
das1 = New DataSet()
dap1.Fill(das1, “ASPNETShippers”)
’On initial page load move to first row and
’populate text boxes; this code segment must
’appear after you create the local ASPNETShippers
’table.
If Not Me.IsPostBack Then
Session(“MyRowID”) = 0
MoveToRow()
End If
End Sub
Private Sub cmdModify_Click(ByVal sender As System.Object, _
ByVal e As System.EventArgs) Handles cmdModify.Click
’Use dav1 to find the row in ASPNETShippers
’that appears in the text boxes from the local
’ASPNETShippers table.
Dim dav1 As DataView = _
New DataView(das1.Tables(“ASPNETShippers”))
dav1.Sort = “ShipperID"
Dim rowindex As Integer = _
dav1.Find(TextBox1.Text)
’Create a DataRow object pointing at the row
’to update in the local table.
Dim IndexedRow As DataRow = _
das1.Tables(“ASPNETShippers”).Rows(rowindex)
’Update the local table with the text boxes.
Please purchase PDF Split-Merge on www.verypdf.com to remove this watermark.
IndexedRow(“CompanyName”) = TextBox2.Text
IndexedRow(“Phone”) = TextBox3.Text
’Invoke Update method for dap1 to synchronize
’the local table with the one in northwind.
dap1.Update(das1, “ASPNETShippers”)
End Sub
Private Sub cmdClear_Click(ByVal sender As System.Object, _
ByVal e As System.EventArgs) Handles cmdClear.Click
’Clear text boxes for data entry.
TextBox1.Text = “"
TextBox2.Text = “"
TextBox3.Text = “"
End Sub
Private Sub cmdInsert_Click(ByVal sender As System.Object, _
ByVal e As System.EventArgs) Handles cmdInsert.Click
’Add text box values to new row in dataset Shippers table.
Dim newRow As DataRow = das1.Tables(“ASPNETShippers”).NewRow()
newRow(“CompanyName”) = TextBox2.Text
newRow(“Phone”) = TextBox3.Text
das1.Tables(“ASPNETShippers”).Rows.Add(newRow)
’Update method synchronizes inserted local row
’with its copy in northwind and returns the identity
’column value added by the northwind database.
dap1.Update(das1, “ASPNETShippers”)
’Move to last row and populate text boxes.
Session(“MyRowID”) = das1.Tables(“ASPNETShippers”).Rows.Count - 1
MoveToRow()
End Sub
Private Sub cmdDelete_Click(ByVal sender As System.Object, _
ByVal e As System.EventArgs) Handles cmdDelete.Click
’Create a dataview based on the ASPNETShippers table
’in the dataset and find the row index that matches
’the current ShipperID.
Dim dav1 As DataView = _
New DataView(das1.Tables(“ASPNETShippers”))
dav1.Sort = “ShipperID"
Dim rowIndex As Integer = _
dav1.Find(TextBox1.Text)
’Mark the row for deletion in the dataset.
das1.Tables(“ASPNETShippers”).Rows(rowIndex).Delete()
’Invoke the Update method to complete the deletion
’in both the SQL Server and dataset Shippers tables.
dap1.Update(das1, “ASPNETShippers”)
Please purchase PDF Split-Merge on www.verypdf.com to remove this watermark.
’Move to previous row and populate textboxes.
If Session(“MyRowID”) > 0 Then
Session(“MyRowID”) -= 1
End If
MoveToRow()
End Sub
Validat ing t he D ata on a W eb Page
ASP.NET introduces som e powerful controls for facilitat ing validation of the data
in controls on Web pages. You can use these powerful controls graphically or both
graphically and program matically. This section introduces you to the controls
overall and t hen presents a series of three samples to demonstrate how to apply
validator controls in your Web applications.
Bu ilt - I n Dat a Valida t ion Tools
ASP.NET offers five special Web server controls to facilitate validating the data
users enter into other controls on a Web page. You can use these special Web
server controls without any program m ing, or you can use the Page object model
for programmatically responding to the validation controls individually or
collect ively. I n addition, the five validation cont rols enable you to dictate how to
display errors. Basically, there are two display options with som e variations in
between. First, you can show error m essages individually near t he controls to
which the messages apply. Second, you can choose to display error m essages
collect ively in a central area.
You can drag to a Web page any of the five types of validator Web server controls
from the Web Forms tab on the Toolbar. For each control, you m ust specify the
Cont rolToValidate property, which designates the control to which the Web server
validator control applies. You can optionally specify a custom error m essage or
accept the default error message associated with the validator control, and
selected validator controls may have other mandatory or optional properties to
set. Brief summaries of the five types of validator cont rols appear below.
• The RequiredFieldValidator control detects a m issing value for a validat ed
control. This is the only validator control that checks for em pty controls,
and you might therefore want t o use RequiredFieldValidator controls with
other Web server validator controls.
• The CompareValidator control uses a com parison operator, such as less
than, equal to, or greater than, to determine how a property for a target
control compares with another value. You can also use Com pareValidator
to check the data type of an entry.
• The RangeValidator control can check to ensure that a target control’s
property is in a specified range. This validator control lets you set lower
and upper boundary values for validating a control.
• The RegularExpressionValidator control enables you to check that entries
follow a pattern, such as for telephone numbers or social security
num bers. The Validat ionExpression property in t he Properties window for
this validator control offers a selection of prespecified regular expressions
for such entries as phone num ber, postal code, e-m ail address, and social
security number. I n addition, you can program custom regular
expressions.
Please purchase PDF Split-Merge on www.verypdf.com to remove this watermark.
• With the Custom Validator control, you can develop custom checks for data
that aren’t covered by t he preceding controls.
You have several display options for showing error m essages associated with the
Web server validator controls. Assign a string to the ErrorMessage property for a
validator control to specify a custom error message, such as “Enter a company,”
instead of a default m essage, which happens to be “RequiredFieldValidator,“ the
same text as t he name of the control type. The error m essages associated with a
validator control will always appear where you place the control on a Web page
unless you also add a ValidationSummary control to the page. With a
ValidationSumm ary control on a page, you can have error messages appear
collect ively in the ValidationSummary control by assigning an HTML character,
such as an asterisk, to the Text property for a validator control. I n this scenario,
the HTML character appears where you have the validator control and the error
message appears in t he ValidationSum mary control. By setting the Display
property for the validator control to None, you can cause no error indicator to
appear where the validator control is on a page. The only indication of an error
for the validator will be the message in the ValidationSum mary control. I f you
prefer to have the error m essage for a validator control appear at the control and
in the Validat ionSum mary control, leave the Text property for the validator
control empty.
With I nternet Explorer 4 and later browsers, the validat ion controls verify the
data on the client workstation and at the server unless you explicitly specify
otherwise. I n cases in which you want to send an improperly validated Web page
to a Web server, client-side validation can cause a problem. Som e validator
controls might be on a Web page to encourage compliance with data entry forms,
but you m ight not want to decline a form from a user just because they fail to
comply with all the validator controls on a Web page. This is especially the case in
e-com merce applications or any situation in which the user is doing your
organization a favor by ret urning t he form . I n such situations, you can explicitly
disable client-side script validat ion by setting the EnableClientScr ipt property for
the validator control to False.
One of the great feat ures of validator controls is that they provide a lot of
functionality without any programm ing. However, you can also program the
validator controls and derive even m ore funct ionality from them . If the data for
any validator control on a page doesn’t sat isfy the validator, the page’s IsValid
property becom es False. As a consequence, you can use the page’s I sValid
property to execute blocks of code conditionally. I n addition, ASP.NET supports a
Validat orCollect ion object for each page. With this object, you can iterate through
the validator controls on a page and check each m ember’s IsValid property. This
capability enables you to respond selectively to errors from individual validator
controls on a page.
Using Va lida t or Cont rols on W eb Pages
Adding validator controls to a Web page is a sim ple matter of dragging them to a
Web page in Design view from the Web Form s tab of the Toolbox. Figure 11-25
shows a Web page with three validator controls. The basic Web page design is an
adaptation of the one used in t he preceding sam ple. Aside from the validator
controls, the main distinction is the om ission of the button for m odifying text box
values. The Web page is WebForm1.aspx in the ValidatorUI Sam ple project.
Figure 11-25 shows a selected validator control next t o the CompanyName t ext
box. The right panel in Figure 11-25 displays the Properties window for the
selected control. The Properties window for the selected validator control shows
the default ID name RequiredFieldValidator1. The Cont rolToValidate property
reads TextBox2. You m ust always set the ControlToValidat e property for a
Please purchase PDF Split-Merge on www.verypdf.com to remove this watermark.
validator control because the sole purpose of a validator control is to check the
validity of another control. The validator control I D and Contr olToValidat e settings
indicate that the form isn’t valid without an entry for the Com panyNam e text box,
which is TextBox2. I nstead of the default error message returned by the
RequiredFieldValidator control, the Properties window shows the setting “Enter a
company name” for the ErrorMessage property.
Figure 1 1 - 2 5 . See the valid ator con t rol indica t or s ( * ) and th e
Validation Sum m ary con t rol in Desig n view for t h e W eb For m 1 .a spx page
in t he ValidatorUI Sa m ple project .
Turn your attention again to the Design view of the Web page. You can see two
additional validator controls next to the text box for Phone text box values. One
of these, a RequiredFieldValidator, necessitates a Phone text box entry, and the
other, a RegularExpressionValidator, specifies a format for the telephone num ber.
By using both of these validator controls together, the application specifies not
only that the user input a phone number but that he input it in a designated
format. If you specified a format for the phone number by using a
RegularExpressionValidator control without also designating a
RequiredFieldValidator, users could subm it a valid form without ent ering anything
in the Phone text box. I specified a designated format by using the
Validat edExpression property in the Properties window for the
RegularExpressionValidator control. Clicking the Build button for this property
opens a window of prespecified regular expressions, from which I chose U.S.
Phone Num ber. The regular expression for this designation accepts numbers in
these two formats: (123) 123-1234 and 123-1234.
A ValidationSumm ary control appears below the buttons on the Web page.
Because the Text property settings for all the validator controls equal * , all the
error messages appear in the ValidationSummary control. The only indicator of an
error next to the control is an * at the location where the validator control
appears on the page. The default format for listing error messages in a
ValidationSumm ary control is with bullets. You can select from eit her of two other
Please purchase PDF Split-Merge on www.verypdf.com to remove this watermark.
prespecified form ats or program your own custom layout for showing error
messages in the ValidationSum mary control.
Figure 11-26 shows the validator controls depicted in Figure 11-25 operating for
some sam ple input. Notice that the CompanyName text box is blank and that t he
Phone t ext box has an improper value for a phone number. (It ends in the letter r
instead of a num ber.) The ValidationSum mary control area of the Web page
properly reports both errors, and asterisks next to the text boxes further signal
the need to fix the entries for the text boxes.
Figure 1 1 - 2 6 . Error m e ssa ges a nd indica tor s from the W eb Form 1 .asp x
pag e in t h e Valid atorUI Sa m ple project based on im p roper inpu t in the
Com pany N am e a nd Ph on e text boxes.
N ot e
There’s a second problem with the Web page sh
own in Figure
11-26 besides the fact that the text box entries are invalid.
We’ll highlight this second issue in the next section when we
refer back to the figure.
Program m ing t he Pa ge I sV a lid Propert y
Validator controls will pass a Web page to the browser if you set the
EnableClient Script property to False, even if one or more controls on a page make
the page invalid. The same action also takes place if the client workstation
Please purchase PDF Split-Merge on www.verypdf.com to remove this watermark.
disables client-side scripting or if the client-side scripting capability for a browser
is incompatible with ECMAScript 1.2, a subset of Microsoft JScript. Although the
validator controls do operate on a Web server when client-side validation doesn’t
take place, event procedures for t he page also operate. The operat ion of these
event procedures, such as for a procedure to insert a new row in a table, can
enter invalid data in a database.
Despite the issues highlighted in the preceding paragraph, using server-side
validation is cleaner than client-side validation because it doesn’t depend on the
capabilities of a browser (or even whether client-side scripting is disabled in a
browser that has the capability). However, t o take advantage of server-side
validation, you need the Web server to be able to detect whether a page has valid
controls and then conditionally execut e data m anipulat ion or data access tasks
based on the validity of the controls.
N ot e
If you use server-side validation without m aking data
manipulation tasks, such as inserts and updates, conditional
on the validity of the controls on a page, you run the risk of
entering invalid data in your database. When you combine
server-side validation with invalid data, a related problem
emerges. The error messages for data will be one row out of
synchrony with the invalid data. As a result, error messages
will appear on pages with valid data, and pages with invalid
data will appear without error messages.
You can use the I sValid property for a Page obj ect to detect on a Web server
whether the page to which a Page object points has any invalid controls before
committing an insert or an update to a database. If any cont rols are invalid, you
can bypass the code to insert a new row or update an existing row with the data
from the invalid controls. WebForm1.aspx in the I sValidSam ple project
dem onstrates the syntax for using the I sValid property for a Page object. The
IsValidSam ple project is identical to the ValidatorUISam ple project in the
preceding section except for the following Visual Basic code to implement the
cm dI nsert _Click event procedure. Both projects assign False to the
EnableClient Script property for all validator controls, which forces server-side
validation. The ValidatorUI Sam ple project uses the logic from t he “Data
Manipulation from ASP.NET” section to im plem ent the cm dI nsert_Click event
procedure.
The IsValidSam ple project inserts a new row with the following adaptation of the
code from the ValidatorUI Sam ple project. Notice the use of the Me nam e to point
to the current page. If any control on the page is invalid, the I sValid property is
False, and the procedure doesn’t invoke the Update m et hod. Instead, the page
returns to the browser with t he error m essage or messages showing. I f the
page’s I sValid property is True, the procedure executes the Updat e m et hod and
the browser shows the last row in the local ASPNETShippers Dat aTable, which
contains the m ost recently inserted row.
Private Sub cmdInsert_Click(ByVal sender As System.Object, _
ByVal e As System.EventArgs) Handles cmdInsert.Click
’Add text box values to new row in dataset Shippers table.
Dim newRow As DataRow = das1.Tables(“ASPNETShippers”).NewRow()
newRow(“CompanyName”) = TextBox2.Text
newRow(“Phone”) = TextBox3.Text
das1.Tables(“ASPNETShippers”).Rows.Add(newRow)
Please purchase PDF Split-Merge on www.verypdf.com to remove this watermark.
’Update method synchronizes inserted local row
’with its copy in northwind and returns the identity
’column value added by the northwind database.
If Me.IsValid Then
dap1.Update(das1, “ASPNETShippers”)
’Move to last row and populate text boxes
Session(“MyRowID”) = _
das1.Tables(“ASPNETShippers”).Rows.Count - 1
MoveToRow()
End If
End Sub
Figures 11-27 and 11-28 show the WebForm 1.aspx page from the I sValidSample
project in operation. Figure 11-27 shows the result from an attem pt to insert a
new row with an invalid Phone field value. (It ends with t he letter r instead of a
num ber.) Notice that the error message at the bottom of the screen and the
asterisk highlight the problem and instruct the user what to do (fix the error and
reinsert). Also, notice that the ShipperI D text box is empty. This is because the
procedure didn’t attem pt to execute the I nsert statem ent with invalid data
according to the Web page validator controls. Figure 11-28 shows the Web page
returned by the Web server after the user changes the last character in the Phone
text box from r to 4. Notice that this version includes a ShipperI D value,
indicating that the Web server submitted t he new row to the SQL Server instance
and received a new colum n value as an output param et er value from the stored
procedure that performed the insert.
Figur e 1 1 - 2 7 . W e bForm 1 .aspx from t h e I sValidSa m ple proj e ct w it h an
in valid value in t he Ph one t ext box .
Please purchase PDF Split-Merge on www.verypdf.com to remove this watermark.
Figure 1 1 - 2 8 . W ebForm 1 .a spx from the I sValid Sa m ple project aft er its
fix.
Please purchase PDF Split-Merge on www.verypdf.com to remove this watermark.
Now’s a good time to focus on the second problem with Figure 11-26. Notice that
it comm itted the row with invalid Com panyNam e and Phone colum n values to the
ASPNETShippers table. The reason you can tell is that the Web page shows a
ShipperI D value, which SQL Server assigns only after it inserts a record into a
table. Unless the user deletes the faulty row, the error m essages can com e out of
sync with t he data showing on a Web page. The user can get rid of the faulty row
by clicking the Delete button on the Web page. However, this action requires the
user to start entering the new row over again from scratch. I f the Web page had
a Modify button, which I rem oved to sim plify the sam ple, the user could use that
button to fix the page. However, the real problem with WebForm1.aspx in the
ValidatorUISam ple project is that the Web page inserts the new row
unconditionally (whether or not the data on t he page is invalid). I t is this problem
that the I sValidSam ple project corrects.
Dynam ically D isabling a Valida tor Control
Sometim es you m ay want the option t o disable a validator control dynamically.
This sit uation can arise in cases in which a user can’t figure out the right format
for all the fields but she has filled out enough of the form on a Web page for your
organization to contact her and resolve any inconsistent data. For example, if you
have a valid phone num ber, you m ay be willing to accept an invalid e-mail
address or URL. To be able to perform a task like t his, you need the ability to
reference program mat ically the individual validators on a form. The sample in this
section demonstrates how t o disable a validator control at run t im e.
Figures 11-29 and 11-30 show a pair of windows that illustrates the disabling of a
validator control at run tim e. Figure 11-29 shows WebForm1.aspx in t he
ValidatorCollectionSam ple project after an attem pt to insert a new row into the
Please purchase PDF Split-Merge on www.verypdf.com to remove this watermark.
ASPNETShippers table with a faulty Phone value. (It ends wit h an r instead of a
num ber.) Businesses use validators to obtain clean data. On the other hand,
some transactions may benefit a business m ore if they accept partially faulty
data. This exam ple offers the user a button for entering a row even if the Phone
value is in the wrong format. Figure 11-30 shows the Web page after a click of
the Insert Bad Phone button. Notice that the record enters the table (because it
shows a ShipperI D value), even though the record has invalid data in the Phone
text box.
While the sam ple shown in Figures 11-29 and 11-30 isn’t very compelling,
selected high-priority Web applications, such as e-commerce and gathering
contact data, can benefit from accepting partially faulty data m ore than losing a
site visitor or potential customer because they get frustrated by the data
validation process. For example, your code might give visitors one or two
attem pts to enter an e-mail address in a valid format and then accept the row so
long as the phone number and URL values are in a valid format.
Figure 1 1 - 2 9 . Th e Regu la rExpr ession Validat or cont rol for Ph one valu es
blocking t he entry of a row .
Figure 1 1 - 3 0 . Th e Regu la rExpr essionV alida t or cont r ol disa bled so tha t
t he sa m e row can enter a t a ble in a SQL Se rve r d ataba se.
Please purchase PDF Split-Merge on www.verypdf.com to remove this watermark.
The following listing shows the Click event procedure behind the button (its nam e
is cm dI nsertAnyway) that allows the insertion of a row with an invalidly formatted
Phone value. Recall that the objective of this application is to disable a selected
validator control. Therefore, you need to be able to address the validator cont rols
individually. Happily, t he Validat ors property in the Page obj ect contains objects
pointing to all the validator controls on a page. ASP.NET permits the declaration
of an object based on the Validator Collect ion class that contains the it ems in the
Page. Validators property. A Dim statem ent toward the top of the program listing
illustrates the syntax for declaring an object pointer, m yCollection, for the
validators on the page. You can reference the objects within myCollect ion by an
index value. The comm ent ed code block im mediately after the Dim statem ent for
m yCollect ion shows one approach to enumerating the m embers of the collection.
It displays the item number, which serves as an index value, and the
ErrorMessage property for the objects in the m yCollect ion object. From running
code like this, I was able to determ ine that the RegularExpressionValidator for the
Phone value was m yCollect ion(0).
After adding a row to the local data table with the text box values and declaring
the myCollect ion object, the procedure opens an I f…Then…ElseI f statement. The
procedure takes the Then clause if t he user successfully fixed the Phone value on
the Web page. I f t he Phone value isn’t in the correct format, the procedure still
enters the record in the ElseI f clause. The condition for the ElseI f clause is True
when the IsValid property for m yCollect ion(0) is False, but the other two
mem bers of the m yCollect ion object have IsValid property values of True. This
syntax shows how to disable temporarily just the RegularExpressionValidator
control for the Phone t ext box. The next time the user tries to enter a new row,
the validator for the Phone text box will operate (unless the user disables it
again).
Please purchase PDF Split-Merge on www.verypdf.com to remove this watermark.
Private Sub cmdInsertAnyway_Click(ByVal sender As System.Object, _
ByVal e As System.EventArgs) Handles cmdInsertAnyway.Click
’Add text box values to new row in dataset Shippers table.
Dim newRow As DataRow = das1.Tables(“ASPNETShippers”).NewRow()
newRow(“CompanyName”) = TextBox2.Text
newRow(“Phone”) = TextBox3.Text
das1.Tables(“ASPNETShippers”).Rows.Add(newRow)
’ Get ’Validators’ of the page to myCollection.
Dim myCollection As ValidatorCollection = Page.Validators
’Uncomment from next Dim to the Next statement
’in the For loop to match ValidatorCollection index
’numbers to validator controls.
’Dim int1 As Integer
’Dim str1 As String
’For int1 = 0 To myCollection.Count - 1
’str1 = CStr(int1) & “, “ & _
’ myCollection.Item(int1).ErrorMessage & “<br>"
’Response.Write(str1)
’Next
’Update method synchronizes inserted local row
’with its copy in northwind and returns the identity
’column value added by the northwind database.
If Me.IsValid Then
’Do normal Insert if Phone OK
dap1.Update(das1, “ASPNETShippers”)
’Move to last row and populate text boxes
Session(“MyRowID”) = _
das1.Tables(“ASPNETShippers”).Rows.Count - 1
MoveToRow()
ElseIf (Not (myCollection.Item(0).IsValid) _
And (myCollection.Item(1).IsValid)) _
And (myCollection.Item(2).IsValid) Then
’Do insert anyway if just phone format bad
dap1.Update(das1, “ASPNETShippers”)
’Move to last row and populate text boxes
Session(“MyRowID”) = _
das1.Tables(“ASPNETShippers”).Rows.Count - 1
MoveToRow()
End If
End Sub
Please purchase PDF Split-Merge on www.verypdf.com to remove this watermark.