Tài liệu ASP.NET 1.1 Insider Solutions- P8 pdf
Bạn đang xem bản rút gọn của tài liệu. Xem và tải ngay bản đầy đủ của tài liệu tại đây (868.39 KB, 50 trang )
The problem you have with Mozilla 1.5 and
the
SpinBox
control is also related to the speci-
fications of CSS2 not being totally compre-
hensive. Recall that the structure generated
for the
SpinBox
control (see Figure 8.13) is a
root
<span>
element that is relatively posi-
tioned. The contained
TextBox
control is
not positioned (it simply appears in the flow
of the page within the
<span>
control). However, the two
ImageButton
controls carry the
position:absolute
selectors so that they will be located at the right side of the
TextBox
control.
8
Building Adaptive Controls
338
The Drop-Down Lists in Internet Explorer
Interestingly, in Internet Explorer 5.5, the
drop-down lists open on top of the text boxes,
but not always on top of each other in the
correct order—depending on the order in
which they are opened.
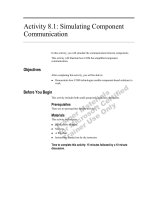
Textbox
ImageButtons
position:absolute
<span> element position:relative
FIGURE 8.13 The structure of the standard
SpinBox control.
What happens is that the
ImageButton
controls (which are rendered as
<input type=”image”>
elements in the page) are removed from the flow of the page by the
position:absolute
selectors.
This means that the
<span>
element is only sized to contain the
TextBox
control, so the two
ImageButton
controls lie outside the
<span>
element in terms of location—even though they are
still child controls.
Internet Explorer and Opera take into account the control hierarchy, and the buttons work fine.
However, Mozilla does not consider the buttons to be part of the rendered page as far as the
mouse pointer is concerned, and it ignores mouse clicks on them. But if you place the cursor on
the text box and press the Tab key, you do in fact move the focus to them and can click them
by pressing the Spacebar.
Creating an Alternative Structure for the SpinBox Control
One solution for the various problems with the
SpinBox
control is to offer an alternative struc-
ture for the controls that provides wider support for older browsers. The obvious approach is to
use an HTML table to locate the
TextBox
and
ImageButton
controls. But this leads to another
problem.
The reason you used a
<span>
element in the first place was so that the control could be used
like a
TextBox
control or other standard controls within the flow layout of the page. For
example, the user should be able to place a text caption to the left and more content after it,
without causing the caption or the following content to wrap to a new line. If you use an HTML
table to locate the constituent controls, it will cause preceding and following content to wrap,
forcing the user to insert the whole lot into an HTML table (or use absolute positioning) to get
the layout desired.
Another possibility is to use a
<div>
element as the root control for the
SpinBox
control, but this
has the same problem as using an HTML table. In the end, this example uses the HTML table
but adds an extra cell to the left, where you insert a user-supplied value for the caption (see
Figure 8.14). It’s not ideal because preceding and following content will still wrap, but at least
11 0672326744 CH08 5/4/04 12:24 PM Page 338
Please purchase PDF Split-Merge on www.verypdf.com to remove this watermark.
339
Making the SpinBox Control Adaptive
the caption will appear in the correct position. And it seems to be the only solution for older
browsers.
TextboxCaption
ImageButtons
with <br />
HTML <table> element
HTML <td> table cells
FIGURE 8.14
The structure of the adaptive
SpinBox
control for older browsers.
To maintain the interface and behavior of the control across all browser types, you need to
support the caption in more recent browsers that work with the up-level version of the control.
You can expose the caption as a property of the control, and if the user sets this property, he or
she will expect to see it appear in all browsers. Figure 8.15 shows the updated structure of the
SpinBox
control for these newer browser types.
TextboxCaption
ImageButtons
position:absolute
<span> element
<span> element
position:relative
FIGURE 8.15
The structure of the adaptive
SpinBox
control for more recent browsers.
Adaptability Changes to the SpinBox Control Class
The following sections briefly review the changes required in the
SpinBox
control to implement
the dual behavior for up-level and down-level clients. When you look at the
CreateChildControls
method, you’ll see how you decide what output to send to each type of browser.
Changes to the Private and Public Declarations
You need to make a couple minor changes to the variable and property declarations of the
SpinBox
control. You must import the
System.Web.UI.HtmlControls
namespace because you’re
using the
HtmlGenericControl
class that it defines to create the nested
<span>
element for the up-
level version of the control. You also use a different class name this time (
AdaptiveSpinBox
).
You can add an enumeration to the control to define the “modes” it can run in. This allows a
user to specify, for example, down-level behavior, even if their browser supports the up-level
features:
‘ enumeration of target browser types
Public Enum ClientTargetType
AutoDetect = 0
11 0672326744 CH08 5/4/04 12:24 PM Page 339
Please purchase PDF Split-Merge on www.verypdf.com to remove this watermark.
UpLevel = 1
DownLevel = 2
End Enum
You also need a few more internal variables and the property declarations for the two new prop-
erties
Caption
and
ClientTarget
. The first two internal variables,
_usetable
and
_usecss2
, default
to
False
and are used in other routines within the control to manage the type of output you
send to the client. Notice that the
ClientTarget
property is read-only and is defined as a value
from the
ClientTargetType
enumeration. The internal
_client
variable that shadows the value of
the
ClientTarget
property sets the default to
AutoDetect
(see Listing 8.20).
LISTING 8.20 Registering for Postbacks in the Init Event
Private _usetable As Boolean = True
Private _usecss2 As Boolean = False
Private _caption As String = “”
Private _client As ClientTargetType = ClientTargetType.AutoDetect
Public Property Caption As String
Get
Return _caption
End Get
Set
_caption = value
End Set
End Property
Public WriteOnly Property ClientTarget As ClientTargetType
Set
_client = value
End Set
End Property
Changes to the CreateChildControls Method
The largest number of changes occur in the
CreateChildControls
method, where you
generate the control tree for the
SpinBox
control. In it, you add code that uses the ASP.NET
BrowserCapabilities
object (which you met in Chapter 7) to detect the current browser type
and decide what features it supports.
Listing 8.21 assumes that the client is a down-level device and then checks whether it supports
JavaScript. If it does not, there’s no point in generating the interactive version of the control
that uses CSS2 scripting. If JavaScript is supported, you can use the browser name and major
version number to decide what to do next. Notice that for Internet Explorer 5 and higher, and
for Opera 6 and higher, you specify that it’s an up-level device and that you’ll use CSS2 script-
ing, but you will not generate an HTML table.
8
Building Adaptive Controls
340
11 0672326744 CH08 5/4/04 12:24 PM Page 340
Please purchase PDF Split-Merge on www.verypdf.com to remove this watermark.
341
Making the SpinBox Control Adaptive
LISTING 8.21 Detecting the Browser Type and Capabilities
‘ check if the current browser supports features
‘ required for “smart” operation and if user specified
‘ the mode they want (Version6 or Downlevel)
If _client <> ClientTargetType.DownLevel Then
‘ start by assuming DownLevel
_client = ClientTargetType.DownLevel
‘ get reference to BrowserCapabilities object
Dim oBrowser As HttpBrowserCapabilities = Context.Request.Browser
‘ must support client-side JavaScript
If oBrowser(“JavaScript”) = True Then
‘ get browser type and version
Dim sUAType As String = oBrowser(“Browser”)
Dim sUAVer As String = oBrowser(“MajorVersion”)
‘ see if the current client is IE5 or above
If (sUAType = “IE”) And (sUAVer >= 5) Then
_client = ClientTargetType.UpLevel
_usetable = False
_usecss2 = True
End If
‘ see if the current client is Netscape 6.0/Mozilla 1.0
If (sUAType = “Netscape”) And (sUAVer >= 5) Then
_client = ClientTargetType.UpLevel
_usetable = True
_usecss2 = True
End If
‘ see if the current client is Opera 6.0
If (sUAType = “Opera” And sUAVer >= 6) Then
_client = ClientTargetType.UpLevel
_usetable = False
_usecss2 = True
End If
End If
End If
11 0672326744 CH08 5/4/04 12:24 PM Page 341
Please purchase PDF Split-Merge on www.verypdf.com to remove this watermark.
‘ save current value of _client in viewstate
ViewState(sCID & “target”) = _client.ToString()
‘ display detected client type value in Trace
Context.Trace.Write(“CreateChildControls:” & Me.UniqueID, _
“Saved target ‘“ & _client.ToString() & “‘ in viewstate”)
The odd ones out as far as browsers go are Netscape and Mozilla. If the current browser is
Netscape or Mozilla, with a version number of 5 or higher (which actually equates to Netscape
6.0 and Mozilla 1.0), it is up-level, and you can use CSS2 scripting. However, due to the problem
with the
<span>
element and the absolute-positioned
ImageButton
controls shown earlier, you
have to generate the structure of the control as an HTML table. It will still be interactive because
you’ll inject the client-side script and add the client-side event handlers.
You also need to save the client target value (the value of the
_client
variable) in the viewstate
of the page so that you can extract it next time. This is a property of the control that users will
expect to be maintained across postbacks. If they have set it to
DownLevel
, they won’t expect the
code to perform the detection again after each postback and reset the value.
Creating Browser-Specific Output
Now you can build the control tree needed. To make it easier to manage, the tasks required to
create the control output have been separated into three routines:
n
CreateCSS2Controls
—This routine creates basically the same control tree as the standard
version of the
SpinBox
control you saw earlier in this chapter. The only differences are that
the root
<span>
control is no longer relative positioned, and it contains the caption text
and the nested
<span>
control that is relative positioned (refer to Figure 8.14 for more
details).
n
CreateHTMLTable
—This routine creates the control structure shown in Figure 8.13. This is
the HTML table version, consisting of three cells that contain the caption, the text box,
and the two image buttons. One interesting point here is that you have to use a
LiteralControl
instance to create the
<br />
element that is required to wrap the second
ImageButton
under the first one in the right-hand cell. If you use an
HtmlGenericControl
instance, you actually get the string
“<br></br>”
, which causes most browsers to insert two
line breaks.
n
InjectClientScript
—This routine uses exactly the same code that is used in the standard
version of the
SpinBox
control to generate the
<script>
element that references the client-
side script file for the control (which must be located in the
/aspnet_client/custom/
folder
of the Web site). It also adds the client-side event handler attributes to the
TextBox
control
and the two
ImageButton
controls.
We don’t describe the three routines in detail here because they are generally repetitive and do
not introduce anything new to the discussion. You can view the source code to see these
8
Building Adaptive Controls
342
LISTING 8.21 Continued
11 0672326744 CH08 5/4/04 12:24 PM Page 342
Please purchase PDF Split-Merge on www.verypdf.com to remove this watermark.
343
Making the SpinBox Control Adaptive
routines. (Remember that each sample contains a [view source] link at the foot of the page. See
www.daveandal.net/books/6744/
.)
Listing 8.22 shows the next section of the
CreateChildControls
method, where the
_usetable
and
_usecss2
variables are used to decide which of the three routines just described are executed. The
result is that the control generates output that is suitable for the current browser and provides
the best possible support it can, depending on the features of that browser. Next, although not
shown in Listing 8.22, the values of the properties are displayed in the
Trace
object in exactly
the same way as in the standard
SpinBox
control example.
LISTING 8.22 Creating the Appropriate Control Tree
‘ now ready to create the appropriate set of controls
If _usetable = False Then
‘ serving to version-6 client, use absolute positioning
‘ (but not for Netscape 6.x or Mozilla 1.x)
CreateCSS2Controls()
Else
‘ serving to down-level client, create HTML table
‘ (including Netscape 6.x or Mozilla 1.x)
CreateHTMLTable()
End If
If _usecss2 = True Then
‘ serving to client that supports CSS2 so inject script
InjectClientScript()
End If
Changes to the LoadPostData Method
For the
SpinBox
control example, the only other changes required to provide behavior that
adapts to different clients are to the code in the
LoadPostData
routine. You have to extract the
value from the postback and compare it to the existing value of the control, as stored in the
viewstate of the page. If these two values differ from one another, you raise the
ValueChanged
event. If they are the same, you use the existing value from the viewstate to populate the
control.
The issue with the adaptive control is that, in down-level clients, clicking the up and down
buttons does not automatically change the value in the text box—because there is no client-side
11 0672326744 CH08 5/4/04 12:24 PM Page 343
Please purchase PDF Split-Merge on www.verypdf.com to remove this watermark.
script to do that. Such clicks will always cause postbacks to the server. So you have to check for
a click on either of the two
ImageButton
controls, and you have to see if the value in the text box
has been changed.
Listing 8.23 shows the
LoadPostData
method. After it extracts the value for the text box from the
postback collection, it gets the value when the page was originally created from the viewstate
and the value of the client target type. (Both of these values are saved in the viewstate in the
CreateChildControls
method.)
LISTING 8.23 The LoadPostData Method in the Adaptive SpinBox Control
Overridable Function LoadPostData(key As String, _
vals As NameValueCollection) _
As Boolean _
Implements IPostBackDataHandler.LoadPostData
‘ occurs when data in postback is available to control
‘ get value of control from postback collection
Dim sNewValue As String = vals(key & “_textbox”)
Context.Trace.Write(“LoadPostData:” & key, _
“Loaded postback value ‘“ & sNewValue & “‘ from Request”)
‘ get value from viewstate - i.e. when page was last created
Dim sExistingValue As String = ViewState(key & “_textbox”)
Context.Trace.Write(“LoadPostData:” & key, _
“Loaded existing value ‘“ & sExistingValue & “‘ from viewstate”)
‘ get client target type from viewstate
Dim sClientType As String = ViewState(key & “_target”)
Context.Trace.Write(“LoadPostData:” & key, _
“Loaded target ‘“ & sClientType & “‘ from viewstate”)
If (sClientType = ClientTargetType.UpLevel.ToString()) _
Or (sNewValue <> sExistingValue) Then
‘ either client type is “UpLevel” and value was
‘ incremented by client-side script, or user typed
‘ new value in Textbox in “DownLevel” client
If sNewValue <> sExistingValue Then
‘ value in control has been changed by user
‘ set internal member to posted value and return True
‘ so that PostDataChangedEvent will be raised
_text = sNewValue
8
Building Adaptive Controls
344
11 0672326744 CH08 5/4/04 12:24 PM Page 344
Please purchase PDF Split-Merge on www.verypdf.com to remove this watermark.
345
Making the SpinBox Control Adaptive
Return True
Else
‘ value in control has not changed
‘ set internal member to viewstate value and write message
‘ return False because no need to raise ValueChanged event
_text = sExistingValue
Return False
End If
Else
‘ client type may be “DownLevel” and value was not incremented
‘ so check if “up” or “down” button caused the postback
If vals(key & “_imageup.x”) <> “” Then
‘ “up” image button was clicked so increment value
‘ new value will be checked in CreateChildControls event
‘ to ensure its within maximum and minimum value limits
‘ use Try Catch in case viewstate empty or text not a number
Try
_text = CType(Int32.Parse(sExistingValue) + _increment, _
String)
Context.Trace.Write(“LoadPostData:” & key, _
“Incremented value to ‘“ & _text)
Catch
Context.Trace.Write(“LoadPostData:” & key, _
“Error reading viewstate: “ & sExistingValue)
End Try
‘ return True so that PostDataChangedEvent will be raised
Return True
End If
If vals(key & “_imagedown.x”) <> “” Then
‘ “down” image button was clicked so decrement value
Try
_text = CType(Int32.Parse(sExistingValue) - _increment, _
String)
Context.Trace.Write(“LoadPostData:” & key, _
“Decremented value to ‘“ & _text)
LISTING 8.23 Continued
11 0672326744 CH08 5/4/04 12:24 PM Page 345
Please purchase PDF Split-Merge on www.verypdf.com to remove this watermark.
Catch
Context.Trace.Write(“LoadPostData:” & key, _
“Error reading viewstate: “ & sExistingValue)
End Try
‘ return True so that PostDataChangedEvent will be raised
Return True
End If
End If
End Function
Then you can see if this is an up-level client or if the value of the text box has been changed.
Remember that for down-level clients, the user could have typed a new value into the text
box and then submitted the page. If the value has changed, you save it in the internal
_text
variable and return
True
to indicate that you want the page framework to call the
RaisePostBackDataChangedEvent
method, where you’ll raise the
ValueChanged
event.
If the text box value has not changed, you must check whether the user submitted the page
from a down-level client by clicking the up or down button. You can detect whether one of
these buttons was clicked by looking for its value in the postback collection.
ImageButton
controls send the x and y coordinates of the mouse pointer within the image when they are
clicked, or they send zero for both coordinates when the spacebar is used to click the image. All
you have to do is try to increment or decrement the current value (stored in the
_text
variable)
by the current value of the
Increment
property (stored in the
_increment
variable) and return
True
to cause the
ValueChanged
event to be raised.
If you turn on tracing for the page and initiate a postback by clicking the up or down button,
you’ll see the messages that the code writes to the
Trace
object. In Figure 8.16, you can see
the values in the postback collection and the viewstate being loaded, and you can see the
ValueChanged
event being raised. You can also see the points at which the value and the client
target type are saved back into the viewstate and the values of the other properties of the
control.
Testing and Using an Adaptive SpinBox Control
The demonstration page for the adaptive
SpinBox
control that is provided with the samples for
this book is just about identical to the one shown for the standard
SpinBox
control earlier in this
chapter. The page allows the new
Caption
property to be set and shows that caption next to the
control. Of course, the classname is different this time, so the
Register
directive looks like this:
<%@ Register TagPrefix=”ahh” Namespace=”Stonebroom”
Assembly=”adaptive-spinbox” %>
8
Building Adaptive Controls
346
LISTING 8.23 Continued
11 0672326744 CH08 5/4/04 12:24 PM Page 346
Please purchase PDF Split-Merge on www.verypdf.com to remove this watermark.
347
Making the SpinBox Control Adaptive
The adaptive version of the
SpinBox
control looks and behaves the same in Internet Explorer and
Opera as the standard version does. However, it now works in other browsers as well. For
example, Figure 8.17 shows it in Mozilla, where the up and down buttons now work as
expected.
FIGURE 8.16
The trace output from the adap-
tive
SpinBox control following a
postback.
FIGURE 8.17 The adaptive SpinBox control
in Mozilla 1.5.
Figure 8.18 shows the adaptive
SpinBox
control demonstration page in Netscape Navigator 4.5.
The original version of the control fails to show the text box or position the up and down
buttons correctly in this browser—but the adaptive version works as it should.
11 0672326744 CH08 5/4/04 12:24 PM Page 347
Please purchase PDF Split-Merge on www.verypdf.com to remove this watermark.
Finally, in Amaya, the standard version of the
SpinBox
control fails to work at all, even though it
displays okay. The modifications in the adaptive version allow it to operate without requiring
client-side script, and the result (shown in Figure 8.19) is that it is completely usable in Amaya.
8
Building Adaptive Controls
348
FIGURE 8.18 The adaptive SpinBox control
in Netscape Navigator 4.5.
FIGURE 8.19 The adaptive SpinBox control
in Amaya.
Installing a SpinBox Control in the GAC
To end this chapter, you’ll adapt the
SpinBox
control so that it can be placed in the GAC, and
you’ll follow the steps required to achieve this. You need to make some minor changes to the
class file to allow it to be registered in the GAC. Then you just have to create a key pair for the
class file, compile it, and install it in the GAC.
11 0672326744 CH08 5/4/04 12:24 PM Page 348
Please purchase PDF Split-Merge on www.verypdf.com to remove this watermark.
349
Installing a SpinBox Control in the GAC
Changes to the SpinBox Control Class File for GAC Installation
In order for the assembly that is generated when you compile the
SpinBox
control class to be
registered in the GAC, it has to contain version information. You achieve this by adding attrib-
utes that specify (at a minimum) the location of the key pair file that will be used to digitally
sign the assembly and the assembly version to the class. These attributes are defined in the
System.Reflection
namespace, so you must import that namespace into the class first:
Imports System.Reflection
The following are the two required attributes, which are added before the
Namespace
declaration:
<assembly:AssemblyKeyFileAttribute(“GACSpinBox.snk”)>
<assembly:AssemblyVersionAttribute(“1.0.0.0”)>
Namespace Stonebroom
Public Class GACSpinBox
In this example, the key pair file is named
GACSpinBox.snk
, and it is located in the same
folder as the class file. This class is also
declared as being version 1.0.0.0.
Compiling the SpinBox Control Class File
The remainder of the
SpinBox
control class file is identical to the adaptive
SpinBox
control you
just built. The only changes you have to make are those shown in the preceding section. The
next step is to create the key pair file referenced in
AssemblyKeyFileAttribute
. The
sn.exe
utility
provided with the .NET Framework does this for you. You can run a batch file named
createkey.bat
(included in the samples you can download from
www.daveandal.net/books/6744/
)
in a command window when the current folder contains the source class file. The following
command is required:
“C:\Program Files\Microsoft.NET\SDK\v1.1\Bin\sn” -k GACSpinBox.snk
Notice that you provide the full path to the
sn.exe
utility to make sure that you use the correct
version if you have more than one version of the .NET Framework installed. If all is well, you’ll
see the response “Key pair written to GACSpinBox.snk.”
Now you can compile the class file in the usual way. The batch file
make.bat
(also in the samples
you can download from
www.daveandal.net/books/6744/
) does this for you, by executing the
following command:
C:\WINNT\Microsoft.NET\Framework\v1.1.4322\vbc /t:library
➥/out:GACSpinBox.dll /r:System.dll,System.Web.dll gac-spinbox.vb
Adding Other Attributes to a Class
You can add plenty of other attributes to an
assembly. You can specify your company
name, copyright statement, product name,
description, and culture information. Look at
the topic “System.Reflection Namespace” in
the Reference, Class Library section of the
SDK for a full list of attributes and a descrip-
tion of each one.
11 0672326744 CH08 5/4/04 12:24 PM Page 349
Please purchase PDF Split-Merge on www.verypdf.com to remove this watermark.
Installing the SpinBox Assembly into the GAC
After you compile the class file, you install the assembly into the GAC. The batch file named
addtogac.bat
(in the samples you can download from
www.daveandal.net/books/6744/
) contains
the command required:
“C:\Program Files\Microsoft.NET\SDK\v1.1\Bin\gacutil” /i GACSpinBox.dll
If all goes well, you’ll see the message “Assembly successfully added to the cache.”
The alternative to using the command-line
gacutil.exe
utility is to run the .NET
Configuration program provided with the
.NET Framework. To do this, you select Start,
Programs, Administrative Tools and then
select Microsoft .NET Framework 1.1
Configuration. This useful program provides
access to many features of the .NET
Framework, including the GAC (shown as
Assembly Cache in the left tree-view window).
To add an assembly, you simply right-click the Assembly Cache entry in the left window of the
.NET Configuration tool and select Add; then you locate the assembly. In Figure 8.20, the assem-
bly DLL has been copied into the
Framework\v1.1.4322
(version 1.1) folder of the
Winnt\Microsoft.
NET\
folder tree.
8
Building Adaptive Controls
350
Listing and Removing the Assembly from
the GAC
The samples for this book, which you can
download from
www.daveandal.net/books/
6744/, also contain batch files that remove
the assembly from the GAC (
removefromgac.
bat) and list the contents of the GAC
(
viewgac.bat).
FIGURE 8.20
Adding an assembly to the
GAC with the .NET
Configuration tool.
After the assembly is installed, either through the command-line utility or with the .NET
Configuration tool, you’ll see the assembly in the list of installed assemblies on the right. If you
right-click it and select Properties, as shown in Figure 8.21, you can see the assembly name and
version, the location, the public key token, any culture details, and other information. You can
also use the context menu to remove the assembly from the GAC.
11 0672326744 CH08 5/4/04 12:24 PM Page 350
Please purchase PDF Split-Merge on www.verypdf.com to remove this watermark.
351
Installing a SpinBox Control in the GAC
Testing the GAC-Installed Control
After you have installed the assembly for the
SpinBox
control in the GAC, you can use it in an
ASP.NET page. The demonstration page provided for this is identical to the one for the adaptive
version of the control, with the exception of the
Register
directive. To register an assembly that
is in the GAC, you have to provide the fully qualified name rather than just the assembly name.
In other words, you have to specify the version, the culture details, and the public key token of
the assembly you want to use, as in the following example:
<%@Register TagPrefix=”ahh” Namespace=”Stonebroom”
Assembly=”GACSpinBox,Version=1.0.0.0,Culture=neutral,
➥PublicKeyToken=07745d8202680a03” %>
This is how the .NET Framework supports multiple versions and allows each application to
specify the version of the control or assembly it wants to use. And if the assembly has been
changed (perhaps a malicious or tampered version is installed), the public key token will not
match the hash value calculated for the assembly at runtime, and that will prevent the code
from running and protecting the application.
Instead of declaring the fully qualified name in every page, you can add the assembly to the
default set for ASP.NET by declaring it in the
<assemblies>
section of
machine.config
or
web.config
:
<system.web>
<compilation>
<assemblies>
<add assembly=”GACSpinBox,Version=1.0.0.0,Culture=neutral,
➥PublicKeyToken=744000b7e77ec1a6”/>
</assemblies>
<compilation debug=”false” explicit=”true” defaultLanguage=”vb”>
</system.web>
FIGURE 8.21
Viewing details of an assem-
bly in the GAC with the .NET
Configuration tool.
11 0672326744 CH08 5/4/04 12:24 PM Page 351
Please purchase PDF Split-Merge on www.verypdf.com to remove this watermark.
Then your ASP.NET pages can use the simple
Register
directive:
<%@Register TagPrefix=”ahh” Namespace=”Stonebroom”
Assembly=”GACSpinBox” %>
Now, if the version or public key token of the assembly is changed, you don’t have to update
every page. You only have to change the entry in the corresponding
machine.config
or
web.config
file.
Summary
This chapter focuses on what is generally considered the best way to create reusable content, in
the form of controls that provide a user interface or methods you can use in multiple pages,
applications, and Web sites. Building server controls and compiling them into an assembly is
not nearly as simple as building user controls, but it does open up opportunities that aren’t
available with user controls. For example, with a server control you can do the following:
n
Hide the implementation from the user in a far more comprehensive manner than with
user controls.
n
Easily raise events that can be handled in the hosting page just like the events of the stan-
dard ASP.NET controls.
n
Install the controls in the GAC so that they are available to any application running on
the machine.
This chapter looks at the basic issues involved in building server controls, including the choice
of base classes to inherit from and the different approaches to the design of simple and compos-
ite controls. Also covered are how you can generate output directly during the rendering phase
of a control’s life cycle and how you can build a control tree and allow the .NET Framework to
look after rendering it instead.
This chapter also demonstrates the building of two different server controls—the simple
MaskedEdit
control and the composite
SpinBox
control. These two controls demonstrate the tech-
niques that are involved, the methods you can override to generate your own output, and the
way that events can be raised from a control.
In this chapter you have learned how custom controls might behave in a range of browsers, and
you discovered that in most cases it’s necessary to build in some kind of adaptive behavior so
that a control generates different output, depending on the current browser. You did this with
the
SpinBox
control and demonstrated it working in several quite different types of browsers.
To finish off, you looked at how you can adapt controls so that you can install them into the
GAC and use them in any application on the machine. As you have seen, this isn’t difficult to
do, and it does make it easier to maintain and update a control when (unlike with user controls)
you have only one copy installed.
8
Building Adaptive Controls
352
11 0672326744 CH08 5/4/04 12:24 PM Page 352
Please purchase PDF Split-Merge on www.verypdf.com to remove this watermark.
9
Page
Templates
This chapter is all about site design—not
in the “how to make it look good” way but
in the “how to make it consistent” way.
One of the problems you face when build-
ing a site is ensuring that all pages of the
site look and perform in a similar manner.
Consistency is a key goal in building any
application, and given that Web sites are far
reaching and liable to be used by people of
all abilities, consistency is especially impor-
tant here.
This chapter shows several solutions for
building consistency into a site. It focuses
on the solutions you can use to allow all
pages (if that’s what you require) to look the
same. The aim is to make Web site develop-
ment easier and more maintainable—not
only for adding features or fixing bugs but
also for site redesigns.
IN THIS CHAPTER
Designing for Consistency 354
Templating Solutions 355
A Simple Layout Server Control 355
BEST PRACTICE:
Creating Controls Versus Rendering 365
A Server Control That Uses Templates 365
Creating Default Content for Templates 371
Creating Dynamic Regions for Page
Content 372
Using a Custom Page Class for a Page
Template 373
Using Custom Controls in Visual
Studio .NET 380
Summary 381
12 0672326744 CH09 5/4/04 12:21 PM Page 353
Please purchase PDF Split-Merge on www.verypdf.com to remove this watermark.
Designing for Consistency
When you create a Web site, there are areas that often need to look the same across the whole
site: corporate logo, menus, areas for user login, and so on. The problem you face is how to
create this structure so that you gain consistency across pages without losing the ease of devel-
opment that ASP.NET brings. What you want is the master pages scenario that ASP.NET 2.0
provides, but for ASP.NET 1.1. Master pages give you the ability to use some sort of template to
define the content that should appear on all pages, and at runtime this content is combined
with the content on individual pages, as shown in Figure 9.1.
9
Page Templates
354
Page Header
Page Footer
Master Page
Menu
Page Header
Page Footer
Menu
Welcome to our wonderful
site. Here you’ll find lots of
really interesting things. And
perhaps a few dull things, too.
Actually there are quite a lot
of dull things. But then I’m
quite dull, so that’s only to be
expected.
Welcome to our wonderful
site. Here you’ll find lots of
really interesting things. And
perhaps a few dull things, too.
Actually there are quite a lot
of dull things. But then I’m
quite dull, so that’s only to be
expected.
Page Header
Menu
A product
description goes
here.
A product
description goes
here.
Page Footer
A product
description goes
here.
A product
description goes
here.
Default.aspx Products.aspx
FIGURE 9.1
Combining a master
template page with
content pages.
Unfortunately, ASP.NET 1.1 has no built-in support for master pages, so you have to build a
solution yourself. The simplest way is to define a site layout and simply enforce it—tell
your developers “this is what it must look like” and then check it when it’s done. It’s not a very
12 0672326744 CH09 5/4/04 12:21 PM Page 354
Please purchase PDF Split-Merge on www.verypdf.com to remove this watermark.
355
A Simple Layout Server Control
high-tech solution, but it works. However, this method is rather labor intensive as well as error
prone—it’s easy to leave something out or make a simple mistake in the layout. It also means a
lot of work because the parts of the site that are the same have to be coded onto each page.
To get around this repetitive use of code and content, some form of template is needed. It’s easy
enough to create a template ASP.NET page that becomes the starting point for all other pages:
You just copy it and rename it for the new page and implement the new content. However, this
method still leaves lots of repeated content, which is particularly bad if you need to redesign the
site. A common way around this is to use include files or user controls to define the regions of a
page that should be the same. This way, you have reusable content that can be simply included
on every page. You still need to ensure that the include files or user controls are actually
included on the page, and it’s possible for different controls to be placed on the page or in
different areas of the page.
Templating Solutions
The two best ways to provide reusable content and consistency are to use a custom server
control or a custom page class. With a custom server control, you still face the drawback of a
control being required on each page, but you can use that control to provide all the mandatory
content. A custom server control is easy for developers to use because all they need to do is drop
it onto a page. However, it lacks really good designer support—you can create a custom designer,
but there are issues, which we’ll look at later in this chapter in the section “Using Custom
Controls in Visual Studio .NET.”
Using a custom page class is similar to using a custom control, but it doesn’t require the addi-
tion of a custom control to the page; the underlying class provides the mandatory content. This
isn’t a perfect solution—again, it lacks designer support, and it requires a few changes to page
classes created by Visual Studio .NET.
The following sections look at how you can implement custom user controls and custom page
classes. In the process, you’ll see how to add support in Visual Studio .NET.
A Simple Layout Server Control
Using a server control as a template is fairly easy. The process of creating custom server controls
seems very scary to many developers, but it’s actually a fairly simple process. The aim is to have
a control that outputs all the mandatory content but that has an area where customized content
can be added. Such a control might look something like this:
<sams:MasterPageControl runat=”server” id=”tctl1”>
Server controls and page content can go here
</sams:MasterPageControl>
You can simply drop this control onto every page and add the controls for the page within the
MasterPageControl
tags.
MasterPageControl
will output all the default content for the page.
12 0672326744 CH09 5/4/04 12:21 PM Page 355
Please purchase PDF Split-Merge on www.verypdf.com to remove this watermark.
Before you create a control like this, you first have to understand a bit about the control life
cycle, and Figure 9.2 shows the methods called during the various phases of the life of a control.
9
Page Templates
356
Constructor
Onlnit and Init
TrackViewState
OnLoad and Load
PreRender
SaveViewState
Render
Unload
Dispose
CreateChildControls
LoadViewState
LoadPostData
RaisePostDataChangedEvent
RaisePostBackEvent
FIGURE 9.2
A control’s life cycle.
Because this chapter isn’t explicitly about control creation, it doesn’t go into detail about all the
methods shown in Figure 9.2, but it’s worth seeing a quick description of them all before you
begin coding:
12 0672326744 CH09 5/4/04 12:21 PM Page 356
Please purchase PDF Split-Merge on www.verypdf.com to remove this watermark.
357
A Simple Layout Server Control
n
Constructor
—This method is called
when the control is added to the
control tree.
n
OnInit
and
Init
—At the stage at which
these methods are called, all properties
of the control have been set, and all
child controls have been instantiated.
n
TrackViewState
—This method is automatically invoked by the page to ensure that property
changes are saved with the viewstate of the control.
n
LoadViewState
—This method is called only during postback, allowing you to restore the
control to its state at the end of processing the previous request.
n
LoadPostData
—This method is called only during postback and only if the control partici-
pates in postback, and it allows you to update its state from the posted data.
n
OnLoad
and
Load
—At the stage at which these methods are called, all controls have been
initialized.
n
RaisePostDataChangedEvent
—This method is called only on postback and only if the control
participates in postback. It allows you to indicate that the control has changed its state
because of postback.
n
RaisePostBackEvent
—This method is called only on postback and only if the control partici-
pates in postback. It allows you to map client events to the server.
n
CreateChildControls
—This method allows you to create child controls and add them to the
control tree.
n
PreRender
—This method allows you to perform any processing before the control is
rendered to the page, such as registering for postback.
n
SaveViewState
—This method allows you to perform any custom viewstate management.
n
Render
—This method writes the markup to the client and by default calls child controls to
allow them to render their contents.
n
Unload
—This method is called when the control is to be unloaded.
n
Dispose
—This method is raised to enable you to clean up and dispose of any resources
used by the control, such as database connections.
In creating a custom template control in this chapter, you aren’t going to use all these methods
because the base implementation is more than adequate, but knowing the order in which the
events are called is useful.
Custom Layout Control Output
The layout of the sample pages in this chapter is tabular in format, as shown in Figure 9.3, so
the layout control must output HTML that generates this structure.
For More Information
For more information on creating custom
controls, see Developing Microsoft ASP.NET
Server Controls and Components, from
Microsoft Press.
12 0672326744 CH09 5/4/04 12:21 PM Page 357
Please purchase PDF Split-Merge on www.verypdf.com to remove this watermark.
To get this structure, you can use an HTML table, with four cells; the header and footer cells
each span two columns and the menu cell is narrow, leaving plenty of room for the content
cell. The controls need to create the following HTML:
<table>
<tr>
<td colspan=”2”> header </td>
</tr>
<tr>
<td> menu </td>
<td> content </td>
</tr>
<tr>
<td colspan=”2”> footer </td>
</tr>
</table>
With the header, footer, and menu cells, you can also output any required HTML.
Creating Content from a
Custom Control
There are two ways a custom control can
create content: It can override the
CreateChildControls
method and add controls
to the control tree, or it can override the
Render
method to directly render output
(HTML, in this case). Both techniques are
easy to implement, but which you use
depends on what the control is going to do.
For example,
CreateChildControls
would be
used like this:
9
Page Templates
358
Page Header
Page Footer
Menu
FIGURE 9.3
The layout created by the Custom Layout
Control.
CSS Versus Table Layout
There are plenty of opponents to the use of
tables for layout; these folks say that CSS
should be used instead. While this is a valid
point and CSS is just as easy to implement
as HTML tables, for the purposes of this
example, the table approach is best. It’s
simple to understand, and there’s one fewer
file (the CSS file) to worry about. Also, CSS
support is not full across all browsers, so the
table approach is guaranteed to work for all
viewers of your page.
12 0672326744 CH09 5/4/04 12:21 PM Page 358
Please purchase PDF Split-Merge on www.verypdf.com to remove this watermark.
359
A Simple Layout Server Control
Protected Overrides Sub CreateChildControls()
Dim tch As New TableCell()
tch.Attributes.Add(“colspan”, “2”)
tch.Controls.Add(New LiteralControl(“heading”))
‘ create more controls
‘
Dim tbl As New Table()
Me.Controls.Add(tbl)
End Sub
In this case, a table cell is created and then is added to the
Controls
collection. (Other controls
would also be created, but they are not shown to reduce the amount of code shown here.) When
the control is rendered, the child controls are also rendered because they are part of the control
tree.
The other way to output content is to override the
Render
method and render the actual contents
yourself (as opposed to the preceding example, where the child controls render themselves). For
example, the
Render
method might look like this:
Protected Overrides Sub Render(ByVal writer As System.Web.UI.HtmlTextWriter)
writer.RenderBeginTag(HtmlTextWriterTag.Table)
writer.RenderBeginTag(HtmlTextWriterTag.Tr)
writer.AddAttribute(HtmlTextWriterAttribute.Colspan, “2”)
writer.RenderBeginTag(HtmlTextWriterTag.Td)
writer.WriteLine(“header content”)
writer.RenderEndTag()
writer.RenderEndTag()
The ASP.NET page framework passes an
HtmlTextWriter
instance to the
Render
method. This
provides a way to write HTML content directly to the output stream. Instead of creating controls
(for example,
Table
,
TableCell
), you actually write out the actual HTML elements.
Using Controls Versus Rendering
The method you use to create the content for a control depends on a few factors:
n
Using controls allows you to reuse the functionality of existing controls. Consider trying to
render a
DataGrid
control, for instance.
n
Controls are instantiated and added to the control tree, which incurs a performance
penalty.
n
Controls are easier to use than rendering if you need child controls to take part in postback.
n
Rendering is quicker than using controls, but it’s harder to implement things such as post-
back handling and validation with rendering.
12 0672326744 CH09 5/4/04 12:21 PM Page 359
Please purchase PDF Split-Merge on www.verypdf.com to remove this watermark.
Ultimately, the choice between using controls and rendering is a trade-off—speed and size
against ease of programming. The example in this chapter uses rendering because the rendered
contents of the control itself (not the children) require no postback or validation; the contents
simply provide a structure for other controls. Using server controls would bring the overhead of
additional controls to be rendered, and those controls also increase the page size due to their
requirements (such as setting attributes that might not be required).
Creating a Custom Layout Control
Creating the custom control is simply a matter of creating a new class—a Web control library, if
you’re using Visual Studio .NET. At the very minimum, the control must output the table struc-
ture, along with any controls that are contained within the control. For example, consider the
control being used like so:
<sams:MasterPageControl runat=”server” id=”tctl1”>
<h1>Welcome to our site</h1>
Please enter your email to subscribe:
<asp:TextBox id=”email” runat=”server” />
<asp:Button id=”btnSubscribe” Text=”Subscribe” runat=”server”
onClick=”btnSubscribe_Click” />
</sams:MasterPageControl>
The contained content must be displayed within the content region of the table. Therefore,
when the custom control is instantiated, it must grab the child controls as they are added to its
Controls
collection. You make this happen by overriding another method (
AddParsedSubObject
)—
so instead of the ASP.NET page framework adding these controls to the collection, you can inter-
cept them and keep your own store. Then, when rendering the page, you can output the
controls in the desired location. The code for the
MasterPageControl
custom control is shown in
Listing 9.1.
LISTING 9.1 The MasterPageControl Custom Control
Imports System.ComponentModel
Imports System.Web.UI
Imports System.Web.UI.WebControls
Public Class MasterPageControl
Inherits System.Web.UI.Control
‘ add client page objects to our own collection
Protected _controlBin As ControlCollection
Protected Overrides Sub AddParsedSubObject(ByVal obj As Object)
If IsNothing(_controlBin) Then
_controlBin = New ControlCollection(Me)
End If
9
Page Templates
360
12 0672326744 CH09 5/4/04 12:21 PM Page 360
Please purchase PDF Split-Merge on www.verypdf.com to remove this watermark.
361
A Simple Layout Server Control
Me._controlBin.Add(CType(obj, System.Web.UI.Control))
End Sub
Protected Overrides Sub Render(ByVal writer As System.Web.UI.HtmlTextWriter)
writer.AddAttribute(HtmlTextWriterAttribute.Width, “100%”)
writer.AddAttribute(HtmlTextWriterAttribute.Border, “1”)
writer.RenderBeginTag(HtmlTextWriterTag.Table)
‘ header
writer.RenderBeginTag(HtmlTextWriterTag.Tr)
writer.AddAttribute(HtmlTextWriterAttribute.Colspan, “2”)
writer.RenderBeginTag(HtmlTextWriterTag.Td)
writer.WriteLine(“header content”)
writer.RenderEndTag() ‘ td
writer.RenderEndTag() ‘ tr
‘ menu
writer.RenderBeginTag(HtmlTextWriterTag.Tr)
writer.AddAttribute(HtmlTextWriterAttribute.Valign, “top”)
writer.AddAttribute(HtmlTextWriterAttribute.Width, “15%”)
writer.RenderBeginTag(HtmlTextWriterTag.Td)
writer.WriteLine(“menu”)
writer.WriteLine(“menu”)
writer.RenderEndTag() ‘ td
‘ content
writer.AddAttribute(HtmlTextWriterAttribute.Valign, “top”)
writer.RenderBeginTag(HtmlTextWriterTag.Td)
‘ render the client controls
Dim i As Integer
For i = 0 To _controlBin.Count - 1
_controlBin(i).RenderControl(writer)
Next
writer.RenderEndTag() ‘ td
writer.RenderEndTag() ‘ tr
‘ footer
writer.RenderBeginTag(HtmlTextWriterTag.Tr)
writer.AddAttribute(HtmlTextWriterAttribute.Colspan, “2”)
writer.RenderBeginTag(HtmlTextWriterTag.Td)
LISTING 9.1 Continued
12 0672326744 CH09 5/4/04 12:21 PM Page 361
Please purchase PDF Split-Merge on www.verypdf.com to remove this watermark.
writer.WriteLine(“footer content”)
writer.RenderEndTag() ‘ td
writer.RenderEndTag() ‘ tr
writer.RenderEndTag() ‘ table
End Sub
End Class
The output from Listing 9.1 is shown in Figure 9.4.
9
Page Templates
362
LISTING 9.1 Continued
FIGURE 9.4
A custom layout control
in use.
Capturing contained controls as they are added to the page involves only two overridden
methods, the first of which is
AddParsedSubObject
:
Protected _controlBin As ControlCollection
Protected Overrides Sub AddParsedSubObject(ByVal obj As Object)
If IsNothing(_controlBin) Then
_controlBin = New ControlCollection(Me)
End If
Me._controlBin.Add(CType(obj, System.Web.UI.Control))
End Sub
The ASP.NET page framework calls
AddParsedSubObject
for each control to be added to the page,
and the control to be added is passed in as a parameter. The
MasterPageControl
control simply
has a
ControlCollection
object (
_controlBin
) into which the control passed in as a parameter is
stored for later use.
12 0672326744 CH09 5/4/04 12:21 PM Page 362
Please purchase PDF Split-Merge on www.verypdf.com to remove this watermark.