Tài liệu SQL Clearly Explained- P6 doc
Bạn đang xem bản rút gọn của tài liệu. Xem và tải ngay bản đầy đủ của tài liệu tại đây (455.36 KB, 50 trang )
252 Chapter 10: Views, Temporary Tables, CTEs, and Indexes
You create indexes with the CREATE INDEX statement:
CREATE INDEX index_name ON
table_name (index_key_columns)
For example, to create an index on the author_last_rst col-
umn in the author table, someone at the rare book store could
use
CREATE INDEX author_name
ON author (author_first_last);
By default the index will allow duplicate entries and sort the
entries in ascending order. To require unique index entries,
add the keyword UNIQUE after CREATE:
CREATE UNIQUE INDEX author_name
ON (author_first_last);
To sort in descending order, insert DESC after the column
whose sort order you to want to change. For example, some-
one at the rare book store might want to create an index on
sale_date in the sale relation in descending order so that the
most recent sales are rst:
CREATE INDEX sale_date
ON sale (sale_date DESC);
If you want to create an index on a concatenated key, you in-
clude all the columns that should be part of the index key in
the column list. For example, the following creates an index
organized by title and author number:
CREATE INDEX book_order ON book (title, author_
numb);
Creating Indexes
Please purchase PDF Split-Merge on www.verypdf.com to remove this watermark.
How Much Faster? 253
Although you do not need to access an index directly unless
you want to delete it from the database, it helps to give indexes
names that tell you something about their keys. is makes
it easier to remember them should you need to get rid of the
indexes.
Please purchase PDF Split-Merge on www.verypdf.com to remove this watermark.
11
255
One of the benets that relational DBMSs have over DBMSs
based on older data models is that the schema is easy to change.
As long as a table isn’t being used at the time you want to
modify it, its design can be changed without aecting other
tables in the database. (is is said with the caveat that the
presence of foreign key constraints may prevent some deletions
and modications or cause other modications to occur.) e
SQL statements that modify database structures are therefore
an important part of a database administrator’s arsenal. In this
chapter, we’ll look at the types of changes that can be made
and how to make them.
With the exception of tables, structural database elements are
largely unchangeable. When you want to modify them, you
must delete them from the database and create them from
scratch. In contrast, just about every characteristic of a table
can be modied without deleting the table using the ALTER
TABLE statement.
Note: DBMS support for the parts of ALTER TABLE varies con-
siderably. It is not unusual to nd that all you can do is add a
column or increase the size of a character column, for example.
As always, you will need to consult the documentation for your
particular DBMS to see exactly what is available.
Keeping the Design
Up to Date
Modifying Tables
©2010 Elsevier Inc. All rights reserved.
10.1016/B978-0-12-375697-8.50011-X
Please purchase PDF Split-Merge on www.verypdf.com to remove this watermark.
256 Chapter 11: Keeping the Design Up to Date
To add a new column to a table, you use the ALTER TABLE
statement with the following syntax:
ALTER TABLE table_name
ADD column_name column_data_type
column_constraints
For example, if someone at the rare book store wanted to add a
telephone number to the publisher table, he or she would use
ALTER TABLE publisher
ADD publisher_phone CHAR (11);
To add more than one column at the same time, simply sepa-
rate the clauses for the new columns with commas:
ALTER TABLE publisher
ADD publisher_phone CHAR (11),
ADD publisher_street CHAR (30),
ADD publisher_city CHAR (30),
ADD publisher_state_prov CHAR (2),
ADD publisher_zip_postcode CHAR (12),
ADD publisher_country CHAR (10);
ere is one caveat that goes along with adding columns: If
you have any application programs that use the SELECT *
syntax, then any new columns that you add to a table will be
included in the output of that query. e result may be either
the disclosure of data you wanted to keep secret or application
programs that no longer work properly. Because SQL allows
you to add columns to tables without restriction, you should
avoid using the SELECT * syntax in application programs.
You can add table constraints such as foreign keys at any time.
To do so, include the new constraint in the ADD clause of an
ALTER TABLE statement:
ALTER TABLE table_name
ADD table_constraint
Adding New
Columns
Adding Table
Constraints
Please purchase PDF Split-Merge on www.verypdf.com to remove this watermark.
Modifying Tables 257
Assume, for example, that someone at the rare book store
created a new table named regions and included all the two-
character U.S. state and Canadian province abbreviations. e
table would then need to add a reference from the customer
table:
ALTER TABLE customer
ADD FOREIGN KEY customer2regions (state_
province)
REFERENCES regions (region_name);
When you add a foreign key constraint to a table, the DBMS
veries that all existing data in the table meet that constraint.
If they do not, the ALTER TABLE will fail.
If you have created a table without a primary key, you can add
one with
ALTER TABLE some_table
ADD PRIMARY KEY (key_columns);
You modify columns by changing any characteristic of the col-
umn, including its type, size, and constraints:
◊ To replace a complete column denition, use an
ALTER clause with the current column and the new
column characteristics:
ALTER TABLE table_name
ALTER COLUMN column_name
TYPE new_data_type
◊ To add or change a default value only (without chang-
ing the data type or size of the column), include the
DEFAULT keyword:
ALTER TABLE table_name
ALTER column_name
SET DEFAULT new_default_value
Modifying Columns
Please purchase PDF Split-Merge on www.verypdf.com to remove this watermark.
258 Chapter 11: Keeping the Design Up to Date
◊ To switch between allowing nulls and not allowing
nulls without changing any other column characteris-
tics, add SET or DROP NOT NULL as appropriate:
ALTER TABLE table_name
ALTER column_name SET NOT NULL
or
ALTER TABLE table_name
MODIFY column_name DROP NOT NULL
When you change the data type of a column, the DBMS will
attempt to convert any existing values to the new data type. If
the current values cannot be converted, then the table modi-
cation will not be performed. In general, most columns can be
converted to characters. However, conversions from a charac-
ter data type to numbers or datetimes require that existing data
represent legal values in the new data type.
You can delete parts of a table as needed:
◊ To delete a column, use a DROP clause in an ALTER
TABLE statement, followed by the name of the col-
umn to be deleted:
ALTER TABLE table_name
DROP COLUMN column_name;
◊ To delete a table constraint such as a primary or foreign
key, use DROP CONSTRAINT:
ALTER TABLE table_name
DROP CONSTRAINT constraint_name;
Although you can delete a table’s primary key, keep in
mind that if you do not add a new one, you may not be
able to modify the contents of the table.
Deleting Table
Elements
Please purchase PDF Split-Merge on www.verypdf.com to remove this watermark.
Modifying Domains 259
◊ To remove a default value from a column use:
ALTER TABLE table_name
DROP column_name DEFAULT;
You can rename both tables and columns:
◊ To rename a table, place the new table name after the
RENAME keyword:
ALTER TABLE current_table_name
RENAME TO new_table_name
◊ To rename a column, include both the old and new
column names separated by the keyword TO:
ALTER TABLE table_name
RENAME current_column_name
TO new_column_name
If you have created custom domains, those domains can be
modied as needed. Keep in mind, however, that if the data
currently in the column don’t meet the criteria of the modied
domain, the modication may not be allowed. (Such behavior
is implementation dependent)
Domain modications use the ALTER statement, much like
modifying tables:
◊ To change a domain’s default value, use
ALTER DOMAIN domain_name
SET DEFAULT default_value
◊ To remove a domain’s default value, use
ALTER DOMAIN domain_name
DROP DEFAULT
Renaming Table
Elements
Modifying
Domains
Please purchase PDF Split-Merge on www.verypdf.com to remove this watermark.
260 Chapter 11: Keeping the Design Up to Date
◊ To change a domain’s NULL or NOT NULL status,
use
ALTER DOMAIN domain_name
SET NOT NULL
or
ALTER DOMAIN domain_name
DROP NOT NULL
◊ To add a new constraint to the domain, use
ALTER DOMAIN domain_name
ADD constraint_name
domain_constraint_expression
◊ To remove a constraint from the domain, use
ALTER DOMAIN domain_name
DROP constraint_name
To delete a structural element from a database, you drop the
element. For example, to delete a table, you would type
DROP TABLE table_name
Dropping a table is irreversible. In most cases, the DBMS will
not bother to ask “Are you sure?” but will immediately delete
the structure of the table and all of its data.
You can remove the following structural elements from a data-
base with the DROP statement:
◊ Tables
◊ Views
DROP VIEW view_name
Deleting
Database
Elements
Please purchase PDF Split-Merge on www.verypdf.com to remove this watermark.
Deleting Database Elements 261
◊ Indexes
DROP INDEX index_name
◊ Domains
DROP DOMAIN domain_name
A DROP of a table or view will fail if the element being
dropped is currently in use by another user.
e action of a DBMS when you attempt to DROP a table
depends to some extent on whether the table contains primary
keys with foreign key references and what action was specied
when the table was created. If the action is RESTRICT, then
the DROP will fail. In contrast, for example, if the action is
CASCADE, related foreign key rows will be deleted from their
table(s) when the primary key table is dropped.
Please purchase PDF Split-Merge on www.verypdf.com to remove this watermark.
12
263
For many network and database administrators, security has
become an almost overwhelming concern. Relational DBMSs
have always had some measure of security separate from that
provided by networks. In this chapter we will look at some
examples of managing database user accounts as well as SQL’s
support for granting and revoking access rights.
Many multiuser DBMSs maintain user names and passwords
that are distinct from any authentication that may be imposed
by a network. A user must supply the DBMS’s authentication
information before being allowed to connect to the database.
Most DBMSs are shipped with only one or two authorized us-
ers (often DBA, SYSTEM, and/or ADMIN) that have access
to the entire database. All other users must be created by one
of these accounts or another account that has been given the
appropriate rights.
Although the specic syntax for creating and maintaining user
names and passwords is not a part of the SQL standard and
therefore implementation dependent, the syntax used by many
products is very similar.
Oracle and the two major open source DBMSs (mySQL and
Postgres) use some type of CREATE USER syntax. mySQL
has the simplest version:
Users and Access
Rights
Managing User
Accounts
©2010 Elsevier Inc. All rights reserved.
10.1016/B978-0-12-375697-8.50012-1
Please purchase PDF Split-Merge on www.verypdf.com to remove this watermark.
264 Chapter 12: Users and Access Rights
CREATE USER user_name IDENTIFIED BY ‘password’
Oracle’s version uses the following pattern:
CREATE USER user_name
IDENTIFIED BY password
DEFAULT TABLESPACE tablespace_name
QUOTA storage_space_allocation
e DEFAULT TABLESPACE and QUOTA clauses set the area
of the database the user will use for temporary storage and the
amount of temporary storage the user can ll.
Postgres varies the syntax slightly:
CREATE USER user_name
PASSWORD ‘password’
Postgres also supports clauses to allow/disallow the creation of
databases and the creation of other users.
SQL Server uses yet another similar syntax:
CREATE LOGIN user_name
WITH PASSWORD = ‘password’
In contrast, DB2 does not provide its own user names and pass-
words. Instead, it uses a person’s account with the operating sys-
tem. In other words, once a user is authenticated by the operating
system, DB2 requires no further account authorization. Access
rights to database elements are therefore linked to OS accounts
rather than to special DB2 accounts.
1
Having a user ID does not necessarily give a user the right to
access the database. Although the details are implementation de-
pendent, you typically will nd that the DBMS has extended the
1 For more information on DB2 security, see abasesecurity.
com/db2/db2cert2v8-a4.pdf.
Please purchase PDF Split-Merge on www.verypdf.com to remove this watermark.
Granting and Revoking Access Rights 265
GRANT command—which we will discuss shortly—to sup-
port user-level access. For example,
GRANT CONNECT TO user_id
grants the user the right to connect to the database. Connect
rights, however, do not give the user the right to create data-
base elements or access existing database elements. e right to
create database elements usually must be granted by someone
with DBA rights, using a syntax similar to
GRANT RESOURCE TO user_id
Rights to database elements such as tables and views are given
using the SQL GRANT command (discussed in the next sec-
tion of this chapter).
DBA rights permit a user to grant connect and resource rights
to others, to create accounts, and access all database elements.
Any user ID with DBA rights also can assign them to another
user ID:
GRANT DBA TO user_name
Because DBA rights have such broad access, in most cases they
will be restricted to only one or two user IDs.
When you create an element of database structure, the user
name under which you are working becomes that element’s
owner. e owner has the right to do anything to that element;
all other users have no rights at all. is means that if tables
and views are going to accessible to other users, you must grant
them access rights.
2
2 Some major DBMSs (for example, Oracle and DB2) also provide
support for multilevel security (MLS). An MLS scheme classies data
into levels, such as top secret, secret, classied, and unclassied. Users are
then given clearance levels. A user can view data at or below his or her
clearance level and cannot change a classication level to anything less
Granting and
Revoking Access
Rights
Please purchase PDF Split-Merge on www.verypdf.com to remove this watermark.
266 Chapter 12: Users and Access Rights
ere are six types of access rights that you can grant:
◊ SELECT: Allows a user to retrieve data from a table or
view.
◊ INSERT: Allows a user to insert new rows into a table
or updatable view. Permission may be granted to spe-
cic columns rather than the entire database element.
◊ UPDATE: Allows a user to modify rows in a table or
updatable view. Permission may be granted to specic
columns rather than the entire database element.
◊ DELETE: Allows a user to delete rows from a table or
updatable view.
◊ REFERENCES: Allows a user to reference a table as a
foreign key in a table he or she creates. Permission may
be granted to specic columns rather than the entire
table.
◊ EXECUTE: Allows the user to execute stored pro-
cedures. (You will read about stored procedures in
Chapter 14.)
◊ ALL PRIVILEGES: Gives a user all of the preceding
rights to a table or view.
By default, granting access rights to another user does not give
that user the ability to pass on those rights to others. If, how-
ever, you add a WITH GRANT OPTION clause, you give the
user the ability to grant the right that he or she has to another
user.
than the data’s current level. MLS is used in many government databases
and to satisfy government regulations surrounding data access.
Types of Access
Rights
Please purchase PDF Split-Merge on www.verypdf.com to remove this watermark.
Granting and Revoking Access Rights 267
Access rights to tables and views are stored in the data dic-
tionary. Although the details of the data dictionary tables vary
from one DBMS to another, you will usually nd access rights
split between two system tables named something like SYS-
TABLEPERM and SYSCOLPERM.
3
e rst table is used when access rights are granted to entire
tables or views; the second is used when rights are granted to
specic columns within a table or view.
A SYSTABLEPERM table has a structure similar to the
following:
Systableperm (table_id, grantee, grantor,
selectauth, insertauth, deleteauth,
updateauth, updatecols, referenceauth)
e columns represent
◊ TABLE_ID: An identier for the table or view.
◊ GRANTEE: e user ID to which rights have been
granted.
◊ GRANTOR: e user ID granting the rights.
◊ SELECTAUTH: e grantee’s SELECT rights.
◊ INSERTAUTH: e grantee’s INSERT rights.
◊ DELETEAUTH: e grantee’s DELETE rights.
◊ UPDATEAUTH: e grantee’s UPDATE rights.
◊ UPDATECOLS; Indicates whether rights have been
granted to specic columns within the table or view.
When this value is Y (yes), the DBMS must also look
3 DB2, for example, uses AUTH (authorization) in its system authori-
zation tables rather than PERM.
Storing Access
Rights
Please purchase PDF Split-Merge on www.verypdf.com to remove this watermark.
268 Chapter 12: Users and Access Rights
in SYSCOLPERM to determine whether a user has the
rights to perform a specic action against the database.
◊ REFERENCEAUTH: e grantee’s REFERENCE
rights.
e columns that hold the access rights take one of three val-
ues: Y (yes), N (no), or G (yes with grant option).
Whenever a user makes a request to the DBMS to manipulate
data, the DBMS rst consults the data dictionary to determine
whether the user has the rights to perform the requested action.
(SQL-based DBMSs are therefore said to be data dictionary
driven.) If the DBMS cannot nd a row with a matching user
ID and table identier, then the user has no rights at all to the
table or view. If a row with a matching user ID and table iden-
tier exists, then the DBMS checks for the specic rights that
the user has to the table or view and—based on the presence
of Y, N, or G in the appropriate column—either permits or
disallows the requested database access.
To grant rights to another user, a user who either created the
database element (and therefore has all rights to it) or who has
GRANT rights issues a GRANT statement:
GRANT type_of_rights
ON table_or_view_name TO user_ID
For example, if the DBA of the rare book store wanted to allow
the accounting manager (who has a user ID of acctg_mgr) to
access the sales_summary view, the DBA would type:
GRANT SELECT
ON sales_summary TO acctg_mgr;
To allow the accounting manager to pass those rights on to
other users, the DBMS would need to add one line to the
SQL:
Granting Rights
Please purchase PDF Split-Merge on www.verypdf.com to remove this watermark.
Granting and Revoking Access Rights 269
GRANT SELECT
ON sales_summary TO acctg_mgr
WITH GRANT OPTION;
If the DBA wanted to give some student interns limited rights
to some of the base tables, the GRANT might be written
GRANT SELECT, UPDATE (selling_price, sale_date)
ON volume TO intern1, intern2, intern3;
e preceding example grants SELECT rights to the entire
table but gives UPDATE rights only on two specic columns.
Notice also that you can grant multiple rights in the same
command as well as give the same group of rights to more
than one user. However, a single GRANT statement applies to
only one table or view.
In most cases, rights are granted to specic user IDs. You can,
however, make database elements accessible to anyone by
granting rights to the special user ID PUBLIC. For example,
the following statement gives every authorized user the rights
to see the sales_summary view:
GRANT SELECT
ON sales_summary TO PUBLIC;
To remove previously granted rights, you use the REVOKE
statement, whose syntax is almost opposite to that of GRANT:
REVOKE access_rights
ON table_or_view_name FROM user_ID
For example, if the rare book store’s summer interns have n-
ished their work for the year, the DBA might want to remove
their access from the database:
REVOKE SELECT, UPDATE (selling_price, sale_
date)
ON volume FROM intern1, intern2, intern3;
Revoking Rights
Please purchase PDF Split-Merge on www.verypdf.com to remove this watermark.
270 Chapter 12: Users and Access Rights
If the user from which you are revoking rights has the GRANT
option for those rights, then you also need to make a decision
about what to do if the user has passed on those rights. In the
following case, the REVOKE will be disallowed if the account-
ing manager has passed on his or her rights:
REVOKE SELECT
ON sales_summary FROM acctg_mgr
RESTRICT;
In contrast, the syntax
REVOKE SELECT
ON sales_summary FROM acctg_mgr
CASCADE;
will remove the rights from the acctg_mgr ID along with any
user IDs to which the acctg_mgr granted rights.
Note: Some DBMSs also support a DENY command, which ex-
plicitly prohibits a user from performing a given action. It is not a
part of the SQL standard, however,
As the number of people working with a database grows, it
becomes dicult to keep track of which rights have been as-
signed to each individual user. SQL therefore lets you group
rights together and assign them as a unit called a role.
You create a role with the CREATE ROLE statement:
CREATE ROLE role_name
e DBA at the rare book store, for example, might create a
role for the summer interns:
CREATE ROLE interns;
en the DBA assigns rights to the role:
GRANT SELECT, UPDATE (selling_price, sale_date)
ON volume TO interns;
Roles
Please purchase PDF Split-Merge on www.verypdf.com to remove this watermark.
Granting and Revoking Access Rights 271
Finally, the role is then assigned to the users that should have
the rights that are grouped into the role:
GRANT interns TO intern1, intern2, intern3;
To revoke privileges that are part of a role, use
REMOVE role_name FROM user_ID
as in
REVOKE interns FROM intern1, intern2, intern;
A role is removed from the database with
DROP ROLE role_name
Please purchase PDF Split-Merge on www.verypdf.com to remove this watermark.
13
273
An end user can interact with a database either by issuing SQL
statements directly by typing them or by running an appli-
cation program in which SQL has been embedded. In either
case, the database must recognize the user as an authorized
database user, the user must connect to the database to estab-
lish a database session, and there must be control of the user’s
transactions. As an introduction, this chapter begins with a
discussion of the environment in which multiple users operate
and what a DBMS has to do to preserve data integrity when
multiple users attempt to modify the same data. e chapter
then turns to SQL specics as a prelude to the discussion of
embedded SQL in Chapter 15.
A transaction is a unit of work submitted as a whole to a data-
base for processing. (A database session consists of one or more
transactions.) When more than one user of an application pro-
gram is interacting with the database at one time, we say that
their transactions are running concurrently. Concurrent trans-
actions can run in one of two ways:
◊ ey may run serially, in which case one transaction
completes its work before the second begins.
◊ ey may run interleaved, in which case the actions of
both transactions alternate.
Users, Sessions,
and Transaction
Control
The Concurrent
Use Data
Environment
©2010 Elsevier Inc. All rights reserved.
10.1016/B978-0-12-375697-8.50013-3
Please purchase PDF Split-Merge on www.verypdf.com to remove this watermark.
274 Chapter 13: Users, Sessions, and Transaction Control
Ideally, the results of interleaved transaction execution should be
the same as that of serial execution (regardless of which trans-
action went rst). If interleaved transaction execution produces
such a result, the transactions are said to be serializable.
Unfortunately, some very nasty thing can happen if no controls
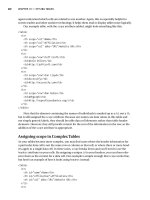
are placed on interleaved execution. As an example, consider what
might happen at the rare book store when two customers call at
the same time and attempt to order the same volume (see Figure
13-1).
e sta member handling the rst customer retrieves data about
the volume and notes that it has not been sold. A short time later,
a second customer calls and is handled by a second sta member,
who also queries the database and sees that the volume is avail-
able. After the second sta member’s query, the rst customer
decides to purchase the volume and the rst sta member updates
the database to indicate that the volume has been sold.
Moments later, the second customer also decides to purchase the
volume. As far as the second sta member and the second cus-
tomer are concerned, the volume is available. e second sta
Figure 13-1: A lost update
Time:
Volume available?:
Staff member 1
Staff member 2
Query database
Y NY
Query database
N
Sell volume;
update database
Sell volume
that has been
sold already
1 2 3 4
Please purchase PDF Split-Merge on www.verypdf.com to remove this watermark.
The Concurrent Use Data Environment 275
member updates the database with the second customer’s pur-
chase, erasing the rst customer’s purchase. It is likely that the
book will be sent to the second customer because no record of
the rst customer’s purchase remains in the database.
is problem, known as a lost update, occurred because the
second sta member’s update was based on old data; the sec-
ond sta member did not see the rst customer’s purchase and
therefore could not know that the book had already been sold.
e most common solution is to use locking, where transac-
tion receive control over database elements they are using to
prevent other transactions from updating and/or viewing the
same data. Transactions that modify data usually obtain exclu-
sive, or write, locks that prevent both viewing and modica-
tion of data by other transactions while the locks are in place.
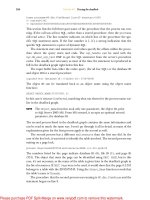
To see how locking solves the book purchasing problem, take
a look at Figure 13-2. is time, when the rst sta mem-
ber retrieves data about the volume, the transaction receives a
lock on the book’s data that prevents the second sta member
from viewing the data. e second sta member’s transaction
is placed in a wait state by the DBMS until the transaction
holding the lock nishes and releases the lock. At this point,
the second sta member’s transaction can proceed, but when
it retrieves the data about the volume, the second sta member
sees that the volume has been sold and does not attempt to sell
it again.
e second customer is unhappy, but this is a far better situa-
tion than what might occur when the rst customer discovers
that the book that he or she thought was purchased was actu-
ally sold to someone else (especially if the rst customer’s credit
card was charged for the book!).
For locking to be eective, a transaction must hold all its locks
for the entire length of the transaction. Part of the process
that ends a transaction is therefore to release all of the locks,
Please purchase PDF Split-Merge on www.verypdf.com to remove this watermark.
276 Chapter 13: Users, Sessions, and Transaction Control
making the data held by the transaction available for other
transactions.
In the preceding example, you saw an exclusive lock used to
prevent both viewing and updating a part of the database.
DBMSs also place shared, or read, locks that allow many trans-
actions to view a part of the database but allow none to modify
it while a shared lock is in place. A DBMS will use a shared
lock instead of an exclusive lock whenever it can because a
shared lock allows more concurrent use of database resources.
In many cases, the DBMS will place a shared lock on data
when a transaction retrieves data and then upgrade that lock to
an exclusive lock only when the transaction issue a data modi-
cation command. is scheme, known as two-phase locking,
helps ensure that exclusive locks are held for as short a time as
possible and thus promotes the highest level of concurrent use.
e size of the database element on which a lock is placed (the
granularity of the lock) varies from one DBMS to another and
with the type of actions you are performing. It may be as large
Figure 13-2: Solving a lost update problem with locking
Time:
Volume available?:
Staff member 1
Staff member 2
Query database
Y Y N
Query database;
info is locked;
wait
N
Sell volume;
update database
Query completes;
note correctly that
volume has been
sold
1 2 3 4
WAIT
Please purchase PDF Split-Merge on www.verypdf.com to remove this watermark.
The Concurrent Use Data Environment 277
as an entire disk page (as in early versions of DB2) or an entire
table, or it may be as small as a single row in a single table.
e smaller the granularity, the more “pieces” there are to lock
and the more concurrent use a database can support. However,
the DBMS must spent time maintaining locks and keeping
track of which transactions are waiting for locks. erefore,
the smaller the granularity and the more locks in place, the
more processing time the DBMS must devote to locks rather
than data manipulation.
At rst glance, it may seem that concurrency control is straight-
forward: Either you have serializable transactions or you don’t.
However, the SQL standard muddies the water a bit by allow-
ing you to specify that a transaction can read data modied
by another, uncommitted transaction. e degree to which a
transaction has access to such data is known as its isolation
level.
ere are four isolation levels:
◊ SERIALIZABLE: A serializable transaction—the de-
fault isolation level—is fully isolated from other trans-
actions. It acts exactly as described in the preceding sec-
tion of this chapter.
◊ REPEATABLE READ: A repeatable read transaction
can read the same data more than once, retrieving rows
that satisfy a WHERE predicate. If another transaction
has inserted or updated rows and been committed be-
tween the rst transaction’s reads, then the repeated read
of the data may return dierent rows than the rst. De-
pending on the nature of the transaction, such behav-
ior may be desirable. is eect is known as a phantom
read.
◊ READ COMMITTED: A read committed transaction
can also read the same data more than once, but in this
case the read returns the same rows. However, the sec-
Muddying the
Waters: Isolation
Levels
Please purchase PDF Split-Merge on www.verypdf.com to remove this watermark.
278 Chapter 13: Users, Sessions, and Transaction Control
ond read may produce dierent values if the data have
been updated by another transaction that committed
between the rst and second reads by the transaction in
question. Again, depending on the nature of the trans-
action, this may be something that you want. is eect
is known as a nonrepeatable read. Such transactions
also permit phantom reads.
◊ READ UNCOMMITTED: A read uncommitted
transaction can read the same data more than once and
read updates made to data by other uncommitted trans-
actions. e danger here is that the uncommitted trans-
action may be rolled back, voiding their updates. is
eect is known as a dirty read. Such transactions also
permit nonrepeatable reads and phantom reads.
As mentioned earlier, the default isolation level is SERIALIZ-
ABLE. To set a lower level, you use the SET TRANSACTION
command:
SET TRANSACTION
ISOLATION LEVEL isolation_level
Choose the isolation level from one of the four just discussed,
as in
SET TRANSACTION
ISOLATION LEVEL REPEATABLE READ;
To interact with a database, a user connects to it. When the
user is nished, he or she disconnects. e time between the
connection and disconnection is a database session.
To establish a connection to a database, you use the keyword
CONNECT. For example, to connect under a specic user
ID, a user or application would enter
CONNECT TO USER user_id
Database
Sessions and
Connections
SQL for Connecting
and Disconnecting
Please purchase PDF Split-Merge on www.verypdf.com to remove this watermark.
Database Sessions and Connections 279
e SQL standard includes considerable exibility in the
CONNECT command syntax. If the DBMS has its own way
of naming connections, then CONNECT may be enough. If
the DBMS requires you to name connections, then you might
use
CONNECT AS connection_identifier
You should consult your DBMS’s documentation for the spe-
cic syntax required for a database connection.
Note: e CONNECT command assumes that there is some im-
plementation-specic way to identify the database with which a
user will interact once connected and that the database specica-
tion occurs before the user attempts to make a connection.
To terminate a connection you use the DISCONNECT com-
mand. If you specied a connection name, then the command
is written
DISCONNECT connection_identifier
If you took the default connection with a user name, then
DISCONNECT by itself is usually enough.
ere are two possible strategies governing the length of a da-
tabase connection that come with their own set of trade-os:
◊ An end user working with a SQL command processor
or an application program can connect to the database
at the beginning of work and stay connected until work
is completed. is eliminates the overhead of repeated
connections and disconnections but prevents another
user from taking advantage of the connection when the
connected user is idle. is strategy is therefore a prob-
lem if the number of concurrent users authorized for
your DBMS is considerably smaller than the number of
people who need to access the database.
Session Length
Considerations
Please purchase PDF Split-Merge on www.verypdf.com to remove this watermark.