Tài liệu 3D Game Programming All in One- P8 pdf
Bạn đang xem bản rút gọn của tài liệu. Xem và tải ngay bản đầy đủ của tài liệu tại đây (437.66 KB, 30 trang )
if (%scale < 5.0) // and hasn't gotten too big
%scale += 0.3; // make it bigger
else
$grow = false; // if it's too big, don't let it grow more
}
else // if it's shrinking
{
if (%scale > 3.0) // and isn't too small
%scale -= 0.3; // then make it smaller
else
$grow = true; // if it's too small, don't let it grow smaller
}
%shape.setScale(%scale SPC %scale SPC %scale);
%shape.setTransform(%lx SPC %ly SPC %lz SPC %rx SPC %ry SPC %rz SPC %rd);
schedule(200,0,AnimShape, %shape, %dist, %angle, %scale);
}
function DoAnimTest()
//
// a function to tie together the instantiation
// and the movement in one easy to type function
// call.
//
{
%as = InsertTestShape();
$grow = true;
AnimShape(%as,0.2, Ϫ1, Ϫ2);
}
This module is almost identical to the
MoveShape()
module we worked with earlier.
The function
AnimShape
accepts a shape handle in
%shape
, a distance step as
%dist
, an angle
value as
%angle
, and a scaling value as
%scale
and uses these to transform the shape indi-
cated by the
%shape
handle.
First, it obtains the current position of the shape using the
%shape.getTransform()
method
of the Item class.
As with the earlier
MoveShape()
function, the
AnimShape()
function fetches the transform of
the shape and updates one of the axis values.
Then it updates the rotation value stored
%rd
.
3D Programming 117
Team LRN
Please purchase PDF Split-Merge on www.verypdf.com to remove this watermark.
Then it adjusts the scale value by determining if the shape is growing or shrinking.
Depending on which way the size is changing, the scale is incremented, unless the scale
exceeds the too large or too small limits. When a limit is exceeded, the change direction is
reversed.
Next, the scale of the shape is changed to the new values using the
%shape.setScale()
method for the shape.
Finally, the function sets the item's transform to be the new transform values within the
%shape.setTransform()
statement.
The
DoAnimTest()
function first inserts the new instance of the shape object using the
InsertTestShape()
function and saves the handle to the new object in the variable
%as
.It
then calls the
AnimShape()
function, specifying which shape to animate by passing in the
handle to the shape as the first argument and also indicating the discrete movement step
distance, the discrete rotation angle, and the discrete size change value with the second,
third, and fourth arguments.
To use the program, follow these steps:
1. Make sure you've saved the file as 3DGPAi1\CH3\animshape.cs.
2. Run the Chapter 3 demo using the shortcut in the 3DGPAi1 folder.
3. Press the Start button when the demo screen comes up.
4. Make sure you don't move your player-character after it spawns into the game
world.
5. Bring up the console window.
6. Type in the following, and press Enter after the semicolon:
exec("CH3/animshape.cs");
You should get a response in the console window similar to this:
Compiling CH3/animshape.cs
Loading compiled script CH3/animshape.cs.
This means that the Torque Engine has compiled your program and then loaded it
into memory. The datablock definition and the three functions are in memory,
waiting to be used.
7. Now, type the following into the console, and close the console quickly afterward:
DoAnimTest();
What you should see now is the heart dropping from the air to the ground; it then
begins moving away from you toward the right. Go chase after it if you like, to get
a sense of how fast it is moving.
Chapter 3
■
3D Programming Concepts118
Team LRN
Please purchase PDF Split-Merge on www.verypdf.com to remove this watermark.
Go ahead and experiment with the program. Try moving the item through several axes at
once, or try changing the distance.
3D Audio
Environmental sounds with a 3D component contribute greatly to the immersive aspect
of a game by providing positional cues that mimic the way sounds happen in real life.
We can control 3D audio in the scene in much the same way we do 3D visual objects.
Type the following program and save it as 3DGPAi1\CH3\animaudio.cs.
// ========================================================================
// animaudio.cs
//
// This module contains the definition of an audio emitter, which uses
// a synthetic water drop sound. It also contains functions for placing
// the test emitter in the game world and moving the emitter.
// ========================================================================
datablock AudioProfile(TestSound)
//
// Definition of the audio profile
//
{
filename = "~/data/sound/testing.wav"; // wave file to use for the sound
description = "AudioDefaultLooping3d"; // monophonic sound that repeats
preload = false; // Engine will only load sound if it encounters it
// in the mission
};
function InsertTestEmitter()
//
// Instantiates the test sound, then inserts it
// into the game world to the right and offset somewhat
// from the player's default spawn location.
//
{
// An example function which creates a new TestSound object
%emtr = new AudioEmitter() {
position = "0 0 0";
rotation = "1 0 0 0";
scale = "1 1 1";
profile = "TestSound"; // Use the profile in the datablock above
3D Programming 119
Team LRN
Please purchase PDF Split-Merge on www.verypdf.com to remove this watermark.
useProfileDescription = "1";
type = "2";
volume = "1";
outsideAmbient = "1";
referenceDistance = "1";
maxDistance = "100";
isLooping = "1";
is3D = "1";
loopCount = "-1";
minLoopGap = "0";
maxLoopGap = "0";
coneInsideAngle = "360";
coneOutsideAngle = "360";
coneOutsideVolume = "1";
coneVector = "0 0 1";
minDistance = "20.0";
};
MissionCleanup.add(%emtr);
// Player setup-
%emtr.setTransform("-200 -30 12 0 0 1 0"); // starting location
echo("Inserting Audio Emitter " @ %emtr);
return %emtr;
}
function AnimSound(%snd, %dist)
//
// moves the %snd by %dist amount each time
//
{
%xfrm = %snd.getTransform();
%lx = getword(%xfrm,0); // first, get the current transform values
%ly = getword(%xfrm,1);
%lz = getword(%xfrm,2);
%rx = getword(%xfrm,3);
%ry = getword(%xfrm,4);
%rz = getword(%xfrm,5);
%lx += %dist; // set the new x position
%snd.setTransform(%lx SPC %ly SPC %lz SPC %rx SPC %ry SPC %rz SPC %rd);
schedule(200,0,AnimSound, %snd, %dist);
}
Chapter 3
■
3D Programming Concepts120
Team LRN
Please purchase PDF Split-Merge on www.verypdf.com to remove this watermark.
function DoMoveTest()
//
// a function to tie together the instantiation
// and the movement in one easy to type function
// call.
//
{
%ms = InsertTestEmitter();
AnimSound(%ms,1);
}
DoMoveTest(); // by putting this here, we cause the test to start
// as soon as this module has been loaded into memory
In this program, we also have a datablock, but you'll notice that it is different this time.
This datablock defines an audio profile. It contains the name of the wave file that contains
the sound to be played, a descriptor that tells Torque how to treat the sound, and a flag to
indicate whether the engine should automatically load the sound or wait until it encoun-
ters a need for the sound. In this case, the engine will wait until it knows it needs the file.
The
InsertTestEmitter
function is structured the same as the earlier
InsertTestShape
func-
tion, but this time it creates the object with a call to
new AudioEmitter
, and there are quite
a few properties to be set. These properties will be explained in much greater detail in
Chapters 19 and 20.
Another difference to note is the last line, which is a call to
DoMoveTest
. This allows us to
load and run the program in one go, using the exec call. After the Torque Engine compiles
the program, it loads it into memory and runs through the code. In our earlier program,
like the
AnimShape
module, Torque would encounter the datablock and function defini-
tions. Because they are definitions, they aren't executed, just loaded into memory. The last
line, however, is not a definition. It is a statement that calls a function. So when Torque
encounters it, Torque looks to see if it has the function resident in memory, and if so, it
executes the function according to the syntax of the statement.
To use the program, follow these steps:
1. Make sure you've saved the file as 3DGPAi1\CH3\ animaudio.cs.
2. Run the Chapter 3 demo using the shortcut in the 3DGPAi1 folder.
3. Press the Start button when the demo screen comes up.
4. Make sure you don't move your player-character after it spawns into the game world.
5. Bring up the console window.
6. Type in the following, and press Enter after the semicolon:
exec("CH3/animaudio.cs");
3D Programming 121
Team LRN
Please purchase PDF Split-Merge on www.verypdf.com to remove this watermark.
You should get a response in the console window similar to this:
Compiling CH3/animaudio.cs
Loading compiled script CH3/animaudio.cs.
You should also begin to hear the dripping sound off to the right-hand side. If you
wait without moving your player in any way, not even using the mouse to turn his
head, you will notice the sound slowly approach you from the left, pass over to the
right in front of you, and then pass off into the distance to the left. Pretty neat, huh?
Moving Right Along
So, we've now seen how 3D objects are constructed from vertices and faces, or polygons.
We explored how they fit into that virtual game world using transformations and that the
transformations are applied in particular order—scaling, rotation, and then finally trans-
lation. We also saw how different rendering techniques can be used to enhance the appear-
ance of 3D models.
Then we learned practical ways to apply those concepts using program code written using
Torque Script and tested with the Torque Game Engine.
In the next chapter, we will dive deeper into learning how to use Torque Script.
Chapter 3
■
3D Programming Concepts122
Team LRN
Please purchase PDF Split-Merge on www.verypdf.com to remove this watermark.
123
Game Programming
chapter 4
I
n the preceding two chapters you were introduced to a few new concepts: program-
ming, 3D graphics, manipulating 3D objects, and stuff like that. Most of it was fairly
broad, in order to give you a good grasp of what you can do to make your game.
The next bunch of chapters get down and dirty, so to speak. We're going to muck around
with our own hands examining things, creating things, and making things happen.
In this chapter we're going to hammer at the Torque Script for a while, writing actual code
that will be used to develop our game. We'll examine in detail how the code works in order
to gain a thorough understanding of how Torque works. The game we are going to create
has the rather unoriginal name of Emaga, which is just agame spelled backward. The
Chapter 4 version will be called Emaga4. Of course, you may—and probably should—
substitute whatever name you wish!
Torque Script
As I've said before, Torque Script is much like C/C++, but there are a few differences.
Torque Script is typeless—with a specific exception regarding the difference between
numbers and strings—and you don't need to pre-allocate storage space with variable dec-
larations.
All aspects of a game can be controlled through the use of Torque Script, from game rules
and nonplayer character behavior to player scoring and vehicle simulation. A script com-
prises statements, function declarations, and package declarations.
Most of the syntax in Torque Game Engine (TGE) Script language is similar to C/C++ lan-
guage, with a high correlation of keywords (see Table A.3 in Appendix A) between the two.
Although, as is often the case in scripting languages, there is no type enforcement on the
Team LRN
Please purchase PDF Split-Merge on www.verypdf.com to remove this watermark.
variables, and you don't declare variables before using them. If you read a variable before
writing it, it will be an empty string or zero, depending on whether you are using it in a
string context or a numeric context.
The engine has rules for how it converts between the script representation of values and
its own internal representation. Most of the time the correct script format for a value is
obvious; numbers are numbers (also called numerics), strings are strings, the tokens
true
and
false
can be used for ease-of-code-reading to represent 1 and 0, respectively. More
complicated data types will be contained within strings; the functions that use the strings
need to be aware of how to interpret the data in the strings.
Strings
String constants are enclosed in single quotes or double quotes. A single-quoted string
specifies a tagged string—a special kind of string used for any string constant that needs
to be transmitted across a connection. The full string is sent once, the first time. And then
whenever the string needs to be sent again, only the short tag identifying that string is
sent. This dramatically reduces bandwidth consumption by the game.
A double-quoted (or standard) string is not tagged; therefore, whenever the string is used,
storage space for all of the characters contained in the string must be allocated for what-
ever operation the string is being used for. In the case of sending a standard string across
connections, all of the characters in the string are transmitted, every single time the string
is sent. Chat messages are sent as standard strings, and because they change each time they
are sent, creating tag ID numbers for chat messages would be pretty useless.
Strings can contain formatting codes, as described in Table 4.1.
Chapter 4
■
Game Programming124
Table 4.1 Torque Script String Formatting Codes
Code Description
\r Embeds a carriage return character.
\n Embeds a new line character.
\t Embeds a tab character.
\xhh Embeds an ASCII character specified by the hex number (
hh
) that follows the x.
\c Embeds a color code for strings that will be displayed on-screen.
\cr Resets the display color to the default.
\cp Pushes the current display color onto a stack.
\co Pops the current display color off the stack.
\cn Uses
n
as an index into the color table defined by
GUIControlProfile.fontColors.
Team LRN
Please purchase PDF Split-Merge on www.verypdf.com to remove this watermark.
Objects
Objects are instances of object classes, which are a collection of properties and methods
that together define a specific set of behaviors and characteristics. A Torque object is an
instantiation of an object class. After creation, a Torque object has a unique numeric iden-
tifier called its handle. When two handle variables have the same numeric value, they refer
to the same object. An instance of an object can be thought of as being somewhat like a
copy of an object.
When an object exists in a multiplayer game with a server and multiple clients, the server
and each client allocate their own handle for the object's storage in memory. Note that
datablocks (a special kind of object) are treated differently—more about this a little later.
note
Methods
are functions that are accessible through objects. Different object classes may have some
methods that are common between them, and they may have some methods that are unique to
themselves. In fact, methods may have the same name, but work differently, when you move from
one object class to another.
Properties
are variables that belong to specific objects and, like methods, are accessed through
objects.
Creating an Object
When creating a new instance of an object, you can initialize the object's fields in the
new
statement code block, as shown here:
%handle = new InteriorInstance()
{
position = "0 0 0";
rotation = "0 0 0";
interiorFile = %name;
};
The handle of the newly created
InteriorInstance
object is inserted into the variable
%handle
when the object is created. Of course, you could use any valid and unused
variable you want, like
%obj
,
%disTing
, or whatever. Note in the preceding example that
%handle
is a local variable, so it is only in scope—or valid—within the function where it is
used. Once the memory is allocated for the new object instance, the engine then initial-
izes the object's properties as directed by the program statements embedded inside the
new
code block. Once you have the object's unique handle—as assigned to
%handle
, in this
case—you can use the object.
Torque Script 125
Team LRN
Please purchase PDF Split-Merge on www.verypdf.com to remove this watermark.
Using Objects
To use or control an object, you can use the object's handle to access its properties and
functions. If you have an object handle contained in the local variable
%handle
, you can
access a property of that object this way:
%handle.aproperty = 42;
Handles are not the only way to access objects. You can assign objects a name that can be
used to access the object, if you don't have a handle at hand. Objects are named using
strings, identifiers, or variables containing strings or identifiers. For example, if the object
in question is named
MyObject
, all of the following code fragments (A, B, C, D) are the same.
A
MyObject.aproperty = 42;
B
"MyObject".aproperty = 42;
C
%objname = MyObject;
%objname.aproperty = 42;
D
%objname = "MyObject";
%objname.aproperty = 42;
These examples demonstrate accessing a property field of an object; you invoke object
methods (functions) in the same way. Note that the object name—
MyObject
— is a string
literal, not a variable. There is no
%
or
$
prefixed to the identifier.
Object Functions
You can call a function referenced through an object this way:
%handle.afunction(42, "arg1", "arg2");
Note that the function
afunction
can also be referred to as a method of the object con-
tained in
%handle
. In the preceding example, the function named
afunction
will be execut-
ed. There can be multiple instances of functions named
afunction
in a script, but each
must be part of different namespaces. The particular instance of
afunction
to be executed
will be selected according to the object's namespace and the namespace hierarchy. For
more about namespaces, see the sidebar.
Chapter 4
■
Game Programming126
Team LRN
Please purchase PDF Split-Merge on www.verypdf.com to remove this watermark.
Torque Script 127
Namespaces
Namespaces are means of defining a formal context for variables. Using namespaces allows us to
use different variables that have the same name without confusing the game engine, or ourselves.
If you recall the discussion in Chapter 2 about variable scope, you will remember that there are two
scopes: global and local. Variables of global scope have a "$" prefix, and variables of local scope have
a "%" prefix. Using this notation, we can have two variables—say,
$maxplayers
and
%maxplayers
—
that can be used side-by-side, yet whose usage and meaning are completely independent from each
other.
%maxplayer
can only be used within a specific function, while
$maxplayer
can be used any-
where in a program. This independence is like having two namespaces.
In fact,
%maxplayer
can be used over and over in different functions, but the values it holds only
apply within any given specific function. In these cases, each function is its own
de facto
namespace.
We can arbitrarily assign variables to a namespace by using special prefixes like this:
$Game::maxplayers
$Server::maxplayers
We can have other variables belonging to the namespace as well:
$Game::maxplayers
$Game::timelimit
$Game::maxscores
The identifier between the "$" and the "::" can be completely arbitrary—in essence it is a
qualifier
.
By qualifying the following variable, it sets a context in which the variable is meaningful.
Just as functions have a de facto namespace (the local scope), objects have their own namespaces.
Methods and properties of objects are sometimes called
member functions
and
member variables
.
The "member" part refers to the fact that they are members of objects. This membership defines
the context, and therefore the namespace, of the methods and properties (member functions and
member variables).
So, you can have many different object classes that have properties of the same name, yet they
refer only to the objects that belong to that class. You can also have many different instances of
an object, and the methods and properties of each instance belong to the individual instance.
In these examples:
$myObject.maxSize
$explosion.maxSize
$beast.maxSize
the
maxSize
property could have three entirely different meanings. For
$myObject
,
maxSize
might
mean the number of items it can carry. For
$explosion
, it might mean how large the blast radius
is. For
$beast
, it might mean how tall the creature is.
Team LRN
Please purchase PDF Split-Merge on www.verypdf.com to remove this watermark.
When an object's function is called, the first parameter is the handle of the object con-
taining the function. Therefore, the function definition of the
afunction
method in the
preceding example would actually have four parameters in its parameter list, the first of
which will be the
%this
parameter. Note that only the last three parameters are used when
you call the
afunction
method. The first parameter that corresponds to the
%this
parame-
ter in the definition is automagically inserted by the engine when you call the function.
You may be familiar with the
this
token in C/C++; however, in Torque there is nothing
special about it. By prior convention, that variable name is often used when referring to
an object's handle within one of its methods, but you could call that parameter anything
you want.
If you want to access a field of an object, you always have to use something that evaluates
to an object handle or a name followed by a dot followed by the field name, as in the A,
B, C, and D code fragments seen earlier. The only exception to this rule is in the sequence
of field initialization statements when creating an object with the
new
statement.
Datablocks
A datablock is a special kind of object containing a set of characteristics that are used to
describe another object's properties. Datablock objects exist simultaneously on the server
and all its connected clients. Every copy of a given datablock uses the same handle whether
it is on the server or a client.
By convention, datablock identifiers have the form
NameData
.
VehicleData
,
PlayerData
, and
ItemData
are all examples of datablock identifiers. Although datablocks are objects, we typ-
ically don't explicitly call them objects when referring to them, in order to avoid seman-
tic confusion with regular objects.
A
VehicleData
datablock contains many attributes describing the speed, mass, and other
properties that can be applied to a
Vehicle
object. When created, a
Vehicle
object is ini-
tialized to reference some already-existing
VehicleData
datablocks that will tell it how to
behave. Most objects may come and go throughout the course of the game, but datablocks
are created once and are not deleted. Datablocks have their own specific creation syntax:
datablock ClassIdentifier(NameIdentifier)
{
InitializationStatements
};
The value of this statement is the handle of the created datablock.
ClassIdentifier
is an existing datablock class name, like
PlayerData
.
NameIdentifier
is the
datablock name you've chosen. In both cases you must use valid identifiers.
Initialization-
Statements
is a sequence of assignment statements.
Chapter 4
■
Game Programming128
Team LRN
Please purchase PDF Split-Merge on www.verypdf.com to remove this watermark.
The assignment statements assign values to datablock field identifiers. It's possible for the
contents of these fields to be accessible by both the script code and the engine code—and
in fact that is often the case. In that situation you, of course, need to assign a value to the
field that makes sense for the type of information it's supposed to be holding.
You don't have to restrict yourself to only initializing (and later using) fields that are
accessible by the engine code. An object can have other fields as well; the engine code can't
read them, but the scripts can.
Finally, note that there's a variation on the datablock creation syntax:
datablock ClassIdentifier(NameIdentifier : CopySourceIdentifier)
{
InitializationStatements
};
CopySourceIdentifier
specifies the name of some other datablock from which to copy
field values before executing
InitializationStatements
. This other datablock must be of
the same class as the datablock you are creating, or a superclass of it. This is useful if you
want to make a datablock that should be almost exactly like a previously created data-
block (with just a few changes) or if you want to centralize the definitions of some char-
acteristics in one datablock that can then be copied by multiple other datablocks.
Game Structure
When you create your game, you can use pretty well any organizational structure you like.
Your game will comprise script program modules, graphics images, 3D models, audio
files, and various other data definition modules.
The only real limitation in how you structure your game folders is that the root main mod-
ule must reside in the same folder as the Torque Engine executable, and this folder will be
the game root folder.
The least you should do to sensibly organize your game folders is to have a subtree that
contains common code, code that would be essentially the same between game types and
variations, and another subtree that would contain the control code and specific resources
that pertain to a particular game, game type, or game variation. GarageGames uses these
two basic subtrees, common and control, in its sample games, although the company uses
different names (such as fps, rw, racing, and show) for variations of the control subtree. See
Figure 4.1 for a simple breakdown diagram.
In the game we are creating, we will call the control subtree control.
Source files for Torque Script have the .cs extension. After the source files are compiled,
they have an extension of .cs.dso. There is no way to convert a .cs.dso file back into a
Game Structure 129
Team LRN
Please purchase PDF Split-Merge on www.verypdf.com to remove this watermark.
.cs file, so you must make sure to hang on
to your original source files and back them
up regularly.
When you launch TGE, it looks for the
module main.cs located in the same folder
(the game root folder, shown below, which
shows the general tree format used for the
Emaga set of tutorial sample games used in
this book) as the TGE executable. In this
chapter we will be using a simplified ver-
sion of this tree. In the distribution of TGE
you receive with the CD, the executable is
called tge.exe. The particular main.cs file
located in the game root folder can be
thought of as the root main module. This
expression is useful for distinguishing that particular main.cs module from others with
the same name that aren't in the game root folder.
emaga (game root folder)
common
client
debugger
editor
help
lighting
server
ui
cache
control
client
misc
interfaces
data
maps
models
avatars
items
markers
weapons
particles
sound
structures
Chapter 4
■
Game Programming130
Figure 4.1 General game folder tree.
Team LRN
Please purchase PDF Split-Merge on www.verypdf.com to remove this watermark.
docks
hovels
towers
server
misc
players
vehicles
weapons
These other main.cs modules are the root modules for the packages in the game. Although
it isn't explicitly designated as such, the root main module functions as the root package
of the game.
It's important to realize that the folder structure outlined above is not cast in stone. Note
that although it is similar, it is still not exactly the same as the format used in the Torque
sample games. As long as the root main module is in the same folder as the tge.exe exe-
cutable, you can use whatever folder structure suits your needs. Of course, you will have
to ensure that all of the hard-coded paths in the source modules reflect your customized
folder structure.
Figure 4.2 shows the
simplified folder tree
we will be using for
this chapter's sample
game, Emaga4. The
rectangles indicate
folder names, the
partial rectangles
with the wavy bot-
toms are source files,
and the lozenge
shapes indicate bina-
ry files. Those items
that are not in gray
are the items we will
be dealing with in
this chapter.
Game Structure 131
Figure 4.2 The Emaga4 folder tree.
Team LRN
Please purchase PDF Split-Merge on www.verypdf.com to remove this watermark.
Server versus Client Design Issues
The Torque Engine provides built-in client/server capability. In fact, the engine is
designed and built around the client/server model to such a degree that even if you are
going to create a single-player game, you will still have both a server side and a client side
to your code.
Chapter 4
■
Game Programming132
Packages, Add-ons, Mods, and Modules
If you find the terminology confusing, don't fret—it is a little bit less than straightforward at first
blush.
The first thing to understand is that the term
Mod
is an abbreviated, or truncated, form of the word
modification
. Mods are changes that people make to existing games, customizing the games to
look or play differently. The term is often used in the independent game development scene. The
word
Mod
is often capitalized.
What we are doing when we create the Emaga game is in many ways similar to creating a Mod—
much like a certain kind of Mod that is often called a
Total Conversion
. Torque, however, is not a
game, it is an engine. So we are in reality not modifying an existing game, but, rather, we are cre-
ating our own.
Also, there is a bit of an extra wrinkle here: When we create our game, we are going to provide
some features that will allow other people to modify our game! To avoid total confusion, we are
going to call this capability an
add-on
capability rather than a Mod capability. And we'll refer to
the new or extra modules created by other people for our game as
add-ons
.
A
module
is essentially the melding of a program source file in text form with its compiled version.
Although we usually refer to the source code version, both the source file version and the compiled
(object code, or in the case of Torque, byte code) version are just different forms of the same module.
A
package
is a Torque construct that encapsulates functions that can be dynamically loaded and
unloaded during program execution. Scripts often use packages to load and unload the different
game types and related functions. Packages can be used to dynamically
overload
functions using
the
parent::function()
script mechanism in the packaged function. This is useful for writing
scripts that can work with other scripts without any knowledge of those scripts.
To replace the graphical Help features in the Torque demo, for example, you could create one or
more source code
modules
that define the new Help features and that together could compose a
Mod
to the graphical Help
package
and that could also be considered a
Mod
to the Torque demo
game as a whole.
Clear as mud?
Team LRN
Please purchase PDF Split-Merge on www.verypdf.com to remove this watermark.
A well-designed online multiplayer game puts as much of the decision-making activity
into the hands of the server as possible. This greatly reduces the chances that dishonest
players could modify their clients to enable cheating or otherwise gain advantage over
other more honest players.
Conversely, a well-designed online multiplayer game only uses the client side to manage
the interface with the human player—accepting input, displaying or generating output,
and providing setup and game navigation tools.
This emphasis on server-side decisions has the potential to rapidly drain network band-
width. This can lead to lag, a situation where a player's actions are not reflected on the
server in a timely fashion. Torque has a highly optimized networking system designed to
mitigate against these kinds of problems. For example, most strings of data are transmit-
ted only once between clients and the game server. Anytime a string that has already been
transmitted needs to be sent again, a tag is sent instead of the full string. The tag is noth-
ing more than a number that identifies the string to be used, so the full string need not be
sent again. Another approach is an update masking system that allows the engine to only
provide updates from the server to its clients of data that has actually changed since the
last update.
We will follow these guidelines when designing our sample game.
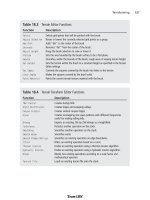
Common Functionality
The common subtree contains code and resources for the following capabilities:
■
Common server functions and utilities, such as authentication
■
Common client functions and utilities, such as messaging
■
In-game world editor
■
Online debugger
■
Lighting management and lighting cache control code
■
Help features and content files
■
User interface definitions, widget definitions, profiles, and images
We will not be using all of these features in the code we'll be looking at in this chapter, but
by the end of the book, we will be using all of it!
Preparation
In this chapter we will be concentrating on the control scripts found in the control sub-
tree, as outlined in Figure 4.2. To prepare for this, you need to set up your development
tree, as follows:
Common Functionality 133
Team LRN
Please purchase PDF Split-Merge on www.verypdf.com to remove this watermark.
1. In your 3DGPAi1\ RESOURCES folder, locate the EmagaCh4KitInstall.exe pro-
gram.
2. Run the kit installer. You can install the chapter kit anywhere you like—the default
will be to put it in the root folder of your C drive, and this is where I'll assume it is
in this book.
You probably won't use more than 15MB of disk space, but you should have the rest avail-
able for backups and temporary files and so on.
You will note that there is no main.cs file in the same folder as tge.exe. This is by design,
because that is one of the files you will be creating. Also note that there are no .cs files in the
control folder either. Again, this is intentional—you will be creating them from this chapter.
The code in Emaga4 is pretty well the bare minimum in terms of the game control code.
In later chapters, we will expand on this skeletal implementation as we add more and
more useful features and flesh out the game.
Root Main
Once it has found the root main module, Torque compiles it into a special binary version
containing byte code, a machine-readable format. The game engine then begins executing
the instructions in the module. The root package can be used to do anything you like, but
the convention established with the GarageGames code is that the root package performs
the following functions:
■
Performs generic initialization
■
Performs the command line parameter parsing and dispatch
■
Defines the command line help package
■
Invokes packages and add-ons (Mods)
Here is the root main.cs module. Type it in and save it as Emaga4\main.cs. You can skip
the comments if you like, in order to minimize your typing.
//
// ./main.cs
//
// root main module for 3DGPAI1 emaga4 tutorial game
//
// Copyright (c) 2003 by Kenneth C. Finney.
//
// ========================================================================
// ========================= Initializations ==============================
// ========================================================================
Chapter 4
■
Game Programming134
Team LRN
Please purchase PDF Split-Merge on www.verypdf.com to remove this watermark.
$usageFlag = false; //help won't be displayed unless the command line
//switch ( -h ) is used
$logModeEnabled = true; //track the logging state we set in the next line.
SetLogMode(2); // overwrites existing log file & closes log file at exit.
// ========================================================================
// ======================= Function Definitions ===========================
// ========================================================================
function OnExit()
//
// This is called from the common code modules. Any last gasp exit
// activities we might want to perform can be put in this function.
// We need to provide a stub to prevent warnings in the log file.
//
{
}
function ParseArgs()
//
// handle the command line arguments
//
// this function is called from the common code
//
//
{
for($i = 1; $i < $Game::argc ; $i++) //loop thru all command line args
{
$currentarg = $Game::argv[$i]; // get current arg from the list
$nextArgument = $Game::argv[$i+1]; // get arg after the current one
$nextArgExists = $Game::argc-$i > 1;// if there *is* a next arg, note that
$logModeEnabled = false; // turn this off; let the args dictate
// if logging should be enabled.
switch$($currentarg)
{
case "-?": // the user wants command line help, so this causes the
$usageFlag = true; // Usage function to be run, instead of the game
$argumentFlag[$i] = true; // adjust the argument count
case "-h": // exactly the same as "-?"
Root Main 135
Team LRN
Please purchase PDF Split-Merge on www.verypdf.com to remove this watermark.
$usageFlag = true;
$argumentFlag[$i] = true;
}
}
}
function Usage()
//
// Display the command line usage help
//
{
// NOTE: any logging entries are written to the file 'console.log'
Echo("\n\nemaga4 command line options:\n\n" @
" -h, -? display this message\n" );
}
function LoadAddOns(%list)
//
// Exec each of the startup scripts for add-ons.
//
{
if (%list $= "")
return;
%list = NextToken(%list, token, ";");
LoadAddOns(%list);
Exec(%token @ "/main.cs");
}
// ========================================================================
// ================ Module Body - Inline Statements =======================
// ========================================================================
// Parse the command line arguments
ParseArgs();
// Either display the help message or start the program.
if ($usageFlag)
{
EnableWinConsole(true);// send logging output to a Windows console window
Usage();
EnableWinConsole(false);
Quit();
}
Chapter 4
■
Game Programming136
Team LRN
Please purchase PDF Split-Merge on www.verypdf.com to remove this watermark.
else
{
// scan argument list, and log an Error message for each unused argument
for ($i = 1; $i < $Game::argc; $i++)
{
if (!$argumentFlag[$i])
Error("Error: Unknown command line argument: " @ $Game::argv[$i]);
}
if (!$logModeEnabled)
{
SetLogMode(6); // Default to a new log file each session.
}
// Set the add-on path list to specify the folders that will be
// available to the scripts and engine. Note that *all* required
// folder trees are included: common and control as well as the
// user add-ons.
$pathList = $addonList !$= "" ? $addonList @ ";control;common" : "control;common";
SetModPaths($pathList);
// Execute startup script for the common code modules
Exec("common/main.cs");
// Execute startup script for the control specific code modules
Exec("control/main.cs");
// Execute startup scripts for all user add-ons
Echo(" Loading Add-ons ");
LoadAddOns($addonList);
Echo("Engine initialization complete.");
OnStart();
}
This is a fairly robust root main module. Let's take a closer look at it.
In the Initializations section, the
$usageFlag
variable is used to trigger a simple Help dis-
play for command line use of tge.exe. It is set to
false
here; if the user specifies the
-?
or
-h
flags on the command line, then this flag will be set to
false
.
After the usage flag, we set the log mode and enable logging. Logging allows us to track
what is happening within the code. When we use the
Echo()
,
Warn()
,or
Error()
functions,
their output is sent to the console.log file, in the root game folder.
Root Main 137
Team LRN
Please purchase PDF Split-Merge on www.verypdf.com to remove this watermark.
The stub routine
OnExit()
is next. A stub routine is a function that is defined but actually
does nothing. The common code modules have a call to this routine, but we have nothing
for it to do. We could just leave it out, but a good policy is to provide an empty stub to
avoid warning messages from appearing in our log file—when the Torque Engine tries to
call a nonexistent function, it generates a warning.
Then there is the
ParseArgs()
function. Its job is to step through the list of command line
arguments, or parameters, and perform whatever tasks you want based upon what argu-
ments the user provided. In this case we'll just include code to provide a bare-bones usage,
or Help, display.
Next is the actual
Usage()
function that displays the Help information.
This is followed by the
LoadAddOns()
routine. Its purpose is to walk through the list of add-
ons specified by the user on the command line and to load the code for each. In Emaga4
there is no way for the user to specify add-ons or Mods, but (you knew there was a but
coming, didn't you?) we still need this function, because we treat our common and con-
trol modules as if they were add-ons. They are always added to the list in such a way that
they get loaded first. So this function is here to look after them.
After the function definitions we move into the in-line program statements. These state-
ments are executed at load time—when the module is loaded into memory with the
Exec()
statement. When Torque runs, after the engine gets itself sorted out, it always loads the
root main module (this module) with an
Exec()
statement. All of the other script mod-
ules are loaded as a result of what this module does.
The first thing that happens is a call to the
ParseArgs()
function, which we saw earlier. It
sets the
$usageFlag
variable for us, you will recall.
Next is the block of code that examines the
$usageFlag
and decides what to do: either dis-
play the usage Help information or continue to run the game program. If we are not dis-
playing the usage information, we move into the code block after the
else
.
The first thing we do in here is check to see if there are any unused arguments from the
command line. If there are, that means the program doesn't understand the arguments
and there was some kind of error, which we indicate with the
Error()
function and a
useful message.
After that we set the log mode, if logging has been enabled.
Next, we build the lists that help Torque find our add-ons. We notify Torque about the
required folder paths by passing the list to the
SetModPaths()
function.
Then we call the main module for the common code. This will proceed to load all the
required common modules into memory, initialize the common functions, and basically get
the ball rolling over there. We will talk about the common code modules in a later chapter.
Chapter 4
■
Game Programming138
Team LRN
Please purchase PDF Split-Merge on www.verypdf.com to remove this watermark.
After that we do the same thing for the control code modules, the details of which we will
cover later in this chapter.
Then we actually start loading the add-ons using the previously defined
LoadAddOns()
function.
Finally, we make a call to
OnStart()
. This will call all versions of
OnStart()
that appear in
the add-on packages in order of their appearance in
$addonList
, with common being first,
control next, and finally this root main module. If there is an
OnStart()
defined in com-
mon, then it gets called. Then the one in control, and so on.
When we get to the end of the module, the various threads initiated by the
OnStart()
calls
are ticking over, doing their own things.
So now what? Well, our next point of interest is the control/main.cs module, which we
called with the
Exec()
function just before we started loading the add-ons.
Control Main
The main.cs module for the control code is next on our tour. Its primary purposes in
Emaga4 are to define the control package and to call the control code initialization func-
tions. (In later chapters we will expand on the role of this module.) Following is the con-
trol/main.cs module. Type it in and save it as Emaga4\control\main.cs.
//
// control/main.cs
// main control module for 3DGPAI1 emaga4 tutorial game
//
// Copyright (c) 2003 by Kenneth C. Finney.
//
//
//
// Load up defaults console values.
// Defaults console values
//
// Package overrides to initialize the mod.
package control {
function OnStart()
//
// Called by root main when package is loaded
//
Control Main 139
Team LRN
Please purchase PDF Split-Merge on www.verypdf.com to remove this watermark.
{
Parent::OnStart();
Echo("\n Initializing control module ");
// The following scripts contain the preparation code for
// both the client and server code. A client can also host
// games, so they need to be able to act as servers if the
// user wants to host a game. That means we always prepare
// to be a server at anytime, unless we are launched as a
// dedicated server.
Exec("./initialize.cs");
InitializeServer(); // Prepare the server-specific aspects
InitializeClient(); // Prepare the client-specific aspects
}
function OnExit()
//
// Called by root main when package is unloaded
//
{
Parent::onExit();
}
}; // Client package
ActivatePackage(control); // Tell TGE to make the client package active
Not a whole lot happens in here at the moment, but it is a necessary module because it
defines our control package.
First, the parent
OnStart()
function is called. This would be the version that resides in root
main, which we can see doesn't have anything to do.
Then the initialize.cs module is loaded, after which the two initialization functions are
called.
Finally, there is the
OnExit()
function, which does nothing more than pass the buck to the
OnExit()
function in the root main module.
All in all, control/main.cs is a fairly lazy, though important, little module.
Chapter 4
■
Game Programming140
Team LRN
Please purchase PDF Split-Merge on www.verypdf.com to remove this watermark.
Initialization
The control/initialize.cs module will, in later chapters, become two different modules—
one for the server code and one for the client code. Right now, we have a fairly limited
amount of work to do, so we'll just house the initialization functions for the two ends in
Initialization 141
Debugging Scripts Using the trace() Function
The engine adds extra commentary to the log file. Extremely useful are the notations that tell you
when the engine execution has just begun executing in a particular function or is just about to
leave a particular function.The trace lines include the values of any arguments used when the func-
tion is entered and the contents of the return value when leaving a function.
Here is a fragmentary example of what the trace output can look like:
Entering GameConnection::InitialControlSet(1207)
Setting Initial Control Object
Entering Editor::checkActiveLoadDone()
Leaving Editor::checkActiveLoadDone - return 0
Entering GuiCanvas::setContent(Canvas, PlayGui)
Entering PlayGui::onWake(1195)
Activating DirectInput
keyboard0 input device acquired.
Leaving PlayGui::onWake - return
Entering GuiCanvas::checkCursor(Canvas)
Entering (null)::cursorOff()
Leaving (null)::cursorOff - return
Leaving GuiCanvas::checkCursor - return
Leaving GuiCanvas::setContent - return
Leaving GameConnection::InitialControlSet - return
Entering (null)::DoYaw(-9)
Leaving (null)::DoYaw - return -0.18
Entering (null)::DoPitch(7)
Leaving (null)::DoPitch - return 0.14
Entering (null)::DoYaw(-6)
To turn on the
trace
function, add the following statement to the first line of your root main.cs file:
trace(true);
To turn off the
trace
function, insert this statement at the place in the code where you would like
to turn tracing off:
Trace(false);
Team LRN
Please purchase PDF Split-Merge on www.verypdf.com to remove this watermark.