Tài liệu 3D Game Programming All in One- P11 ppt
Bạn đang xem bản rút gọn của tài liệu. Xem và tải ngay bản đầy đủ của tài liệu tại đây (385.25 KB, 30 trang )
Now here is where some of the Torque client/server magic elbows its way onto the stage.
The client will already have a
GameConnection
to the server and so will already know where
to send the message. In order to act on our message, the server side needs us to define the
TellEveryone
message handler, which is really just a special purpose function, something
like this:
function ServerCmdTellEveryone(%client,%msg)
{
TellAll(%client,%msg);
}
Notice the prefix
ServerCmd
. When the server receives a message from the client via the
CommandToServer()
function, it will look in its message handle list, which is a list of func-
tions that have the
ServerCmd
prefix, and find the one that matches
ServerCmdTellEveryone
.
It then calls that function, setting the first parameter to the
GameConnection
handle of the
client that sent the message. It then sets the rest of the parameters to be the parameters
passed in the message from the client, which in this case is
%msg
stuffed with the string
"Hello World!"
.
Then we can do what we want with the incoming message. In this case we want to send
the message to all of the other clients that are connected to the server, and we'll do that by
calling the
TellAll()
function. Now we could put the code right here in our
ServerCmdTellEveryone
message handler, but it is a better design approach to break the code
out into its own independent function. We'll cover how to do this in the next section.
CommandToClient
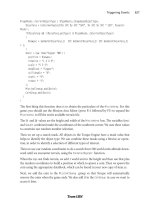
Okay, here we are—we're the server, and we've received a message from a client. We've fig-
ured out that the message is the
TellEveryone
message, we know which client sent it, and
we have a string that came along with the message. What we need to do now is define the
TellAll()
function, so here is what it could look like:
function TellAll( %sender, %msg)
{
%count = ClientGroup.getCount();
for ( %i = 0; %i < %count; %i++ )
{
%client = ClientGroup.getObject(%i);
commandToClient(%client,'TellMessage', %sender, %msg);
}
}
Our intention here is to forward the message to all of the clients. Whenever a client con-
nects to the server, its
GameConnection
handle is added to the
ClientGroup
's internal list. We
Direct Messaging 207
Team LRN
Please purchase PDF Split-Merge on www.verypdf.com to remove this watermark.
can use the
ClientGroup
's method
getCount
to tell us how many clients are connected.
ClientGroup
also has other useful methods, and one of them—the
getObject
method—will
give us the
GameConnection
handle of a client, if we tell it the index number we are inter-
ested in.
If you want to test these example functions, I'll show you how to do that toward the end
of the chapter. If you feel like giving it a go by yourself, I'll give you a small hint: The
CommandToClient
function is called from the server side, and the
CommandToServer
functions
belong on the client side.
As you can see,
CommandToClient
is basically the server-side analogue to
CommandToServer
.The
syntax is as follows:
The primary difference is that although the client already knew how to contact the server
when using
CommandToServer
, the same is not true for the server when using
CommandToClient
.
It needs to know which client to send the message to each time it sends the message. So the
simple approach is to iterate through the
ClientGroup
using the
for
loop, getting the handle
for each client, and then sending each client a message using the
CommandToClient()
function,
by specifying the client handle as the first parameter. The second parameter is the name of
the message handler on the client side this time. Yup—works the same going that way as it
did coming this way! Of course, the third parameter is the actual message to be passed.
So we need that message handler to be defined back over on the client. You can do it like
this:
function clientCmdTellMessage(%sender, %msgString)
{
// blah blah blah
}
Notice that when we called this function there were four parameters, but our definition
only has two in the parameter list. Well, the first parameter was the client handle, and
because we are on the client, Torque strips that out for us. The second parameter was the
message handler identifier, which was stripped out after Torque located the handler func-
tion and sent the program execution here. So the next parameter is the sender, which is
the client that started this whole snowball rolling, way back when. The last parameter is,
finally, the actual message.
Chapter 6
■
Network208
CommandToClient(client, function [,arg1, argn])
Parameters: client
Handle of target client.
function
Message handler function on the server to be executed.
arg1, argn
Arguments for the function.
Return: nothing
Team LRN
Please purchase PDF Split-Merge on www.verypdf.com to remove this watermark.
I'll leave it up to you to decide what to do with the message. The point here was to show
this powerful messaging system in operation. You can use it for almost anything you want.
Direct Messaging Wrap-up
CommandToServer
and
CommandToClient
are two sides of the same direct messaging coin and
give us, as game programmers, a tremendous ability to send messages back and forth
between the game client and the game server.
Direct messaging can also be an important tool in the fight against online cheating in your
game. You can, in theory and in practice, require all user inputs to go to the server for
approval before executing any code on the client. Even things like changing setup options
on the client—which are not normally the sort of thing that servers would control—can
be easily programmed to require server control using the technique we just looked at.
The actual amount of server-side control you employ will be dictated by both available
bandwidth and server-side processing power. There is a lot that can be done, but it is a
never-ending series of tradeoffs to find the right balance.
Triggers
Right off the bat, there is potential for confusion when discussing the term trigger in
Torque, so let's get that out of the way. There are four kinds of triggers that people talk
about when programming with Torque:
■
area triggers
■
animation triggers
■
weapon state triggers
■
player event control triggers
I'll introduce you to all four here but we'll talk about three of them—area triggers, ani-
mation triggers, and weapon state triggers—in more detail in future chapters.
Area Triggers
Area triggers are a special in-game construct. An area in the 3D world of a game is defined
as a trigger object. When a player's avatar enters the bounds of the trigger area, an event
message is posted on the server. We can write handlers to be activated by these messages.
We will be covering area triggers in more depth in Chapter 22.
Animation Triggers
Animation triggers are used to synchronize footstep sounds with walking animation in
player models. Modeling tools that support animation triggers have ways of tagging frames
Triggers 209
Team LRN
Please purchase PDF Split-Merge on www.verypdf.com to remove this watermark.
of animation sequences. The tags tell the game engine that certain things should happen
when this frame of an animation is being displayed. We'll discuss these later in Chapter 20.
Weapon State Triggers
Torque uses weapon state triggers for managing and manipulating weapon states. These
triggers dictate what to do when a weapon is firing, reloading, recoiling, and so on. We'll
look at this in more detail later in Chapter 20 in the section "Weapon Sounds".
Player Event Control Triggers
Finally, there are player event control triggers, which are a form of indirect messaging of
interest to us in this chapter. These mechanisms are used to process certain player inputs
on the client in real time. You can have up to six of these triggers, each held by a variable
with the prefix
$mvTriggerCountn
(where n is an index number from 0 to 5).
When we use a trigger move event, we increment the appropriate
$mvTriggerCountn
vari-
able on the client side. This change in value causes an update message back to the server.
The server will process these changes in the context of our control object, which is usual-
ly our player's avatar. After the server acts on the trigger, it decrements its count. If the
count is nonzero, it acts again when it gets the next change in its internal scheduling algo-
rithm. In this way we can initiate these trigger events by incrementing the variable as
much as we want (up to a maximum of 255 times), without having to wait and see if the
server has acted on the events. They are just automatically queued up for us via the
$mvTriggerCountn
variable mechanism.
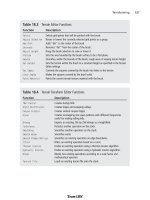
Torque has default support for the first four control triggers built into its player and vehi-
cle classes (see Table 6.1).
Chapter 6
■
Network210
Table 6.1 Default Player Event Control Triggers
Trigger Default Action
$mvTriggerCount0 Shoots or activates the mounted weapon in image slot 0 of the player's
avatar. (The "fire" button, so to speak.)
$mvTriggerCount1 Shoots or activates the mounted weapon in image slot 1 of the player's
avatar. (The "alt fire".)
$mvTriggerCount2 Initiates the "jump" action and animation for the player's avatar.
$mvTriggerCount3 Initiates the "jetting" (extra boost) action and animation for the vehicle on
which a player's avatar is mounted.
$mvTriggerCount4 Unassigned.
$mvTriggerCount5 Unassigned.
Team LRN
Please purchase PDF Split-Merge on www.verypdf.com to remove this watermark.
In the server control code, we can put a trigger handler in our player's avatar for any of
these triggers that override the default action. We define a trigger handler like this:
function MyAvatarClass::onTrigger(%this, %obj, %triggerNum, %val)
{
// trigger activity here
$switch(%triggerNum)
{
case 0:
//replacement for the "fire" action.
case 1:
//replacement for the "alt fire" action.
case 2:
//replacement for the "jump" action.
case 3:
//replacement for the "jetting" action.
case 4:
//whatever you like
case 5:
//whatever you like
}
}
The MyAvatarClass class is whatever you have defined in your player avatar's datablock
using the following statement:
className = MyAvatarClass;
To use these handlers, you merely have to increment one of the player event control trig-
gers on the client, something like this:
function mouseFire(%val)
{
$mvTriggerCount0++;
}
GameConnection Messages
Most of the other kinds of messaging used when making a game with Torque are handled
automatically. However, in addition to the direct messaging techniques we just looked at,
there are other more indirect messaging capabilities available to the Torque game devel-
oper. These are messages related to the
GameConnection
object.
GameConnection Messages 211
Team LRN
Please purchase PDF Split-Merge on www.verypdf.com to remove this watermark.
I call these methods indirect because we, as programmers, don't get to use them in any old
way of our choosing. But we can, nonetheless, use these methods, in the form of message
handlers, when the Torque Engine decides it needs to send the messages.
What GameConnection Messages Do
GameConnection
messages are of great importance to us during the negotiation process
that takes place between the client and server when a client joins a game. They are net-
work messages with game-specific uses, as opposed to being potentially more general-
purpose network messages.
Torque calls a number of
GameConnection
message handlers at different times during the
process of establishing, maintaining, and dropping game-related connections. In the
Torque demo software, many of these handlers are defined in the common code base,
whereas others aren't used at all. You are encouraged to override the common code mes-
sage handlers with your own
GameConnection
message handlers or use the unused handlers,
if you need to.
Specifics
During program execution, the client will at some point try to connect to the server using
a set of function calls like this:
%conn = new GameConnection(ServerConnection);
%conn.SetConnectArgs(%username);
%conn.Connect();
In this example the
%conn
variable holds the handle to the
GameConnection
.The
Connect()
function call initiates a series of network transactions that culminate at the server with a
call to the
GameConnection::OnConnect
handler.
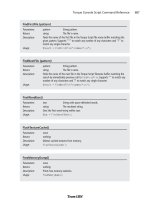
The following descriptions are listed roughly in the order that they are used in the program.
This handler is used to check if the server-player capacity has been exceeded. If not
exceeded, then "" is returned, which allows the connection process to continue. If the serv-
er is full, then
CR_SERVERFULL
is returned. Returning any value other than "" will cause an
error condition to be propagated back through the engine and sent to the client as a call
Chapter 6
■
Network212
onConnectionRequest()
Parameters: none
Return: "" (null string)
Indicates that connection is accepted.
None Indicates rejection for some reason.
Description:
Called when a client attempts a connection, before the connection is accepted.
Usage: Common—Server
Team LRN
Please purchase PDF Split-Merge on www.verypdf.com to remove this watermark.
to the handler
GameConnection:: onConnectRequestRejected
. Any arguments that were passed
to
GameConnection::::Connect
are also passed to this handler by the engine.
This handler is a good place to make last-minute preparations for a connected session.
If you arrive in this handler you should display, or at least log, the fact that the connection
was rejected and why.
In this case the second parameter (
%name
) is the value the client has used, while establishing
the connection, as the parameter to the
%(GameConnection).SetConnectArgs(%username
) call.
When this gets called you probably want to display, or at least log, some message indicat-
ing that the connection has been lost because of a timeout.
GameConnection Messages 213
onConnectionAccepted(handle)
Parameters: handle
GameConnection handle.
Return: nothing
Description:
Called when a Connect call succeeds.
Usage:
Client
onConnectRequestRejected(handle, reason)
Parameters: handle
GameConnection handle.
reason
Indicates why connection was rejected.
Return: nothing
Description:
Called when Connect call fails.
Usage:
Client
onConnect(client, name)
Parameters: client
Client's GameConnection handle.
name
Name of client's account or username.
Return: nothing
Description:
Called when a client has successfully connected.
Usage:
Server
onConnectRequestTimedOut(handle)
Parameters: handle
GameConnection handle.
Return: nothing
Description:
Called when establishing a connection takes too long.
Usage:
Client
Team LRN
Please purchase PDF Split-Merge on www.verypdf.com to remove this watermark.
When this gets called you probably want to display, or at least log, some message indicat-
ing that the connection has been lost because of a timeout.
When this gets called you probably want to display, or at least log, some message indicat-
ing that the connection has been lost because of a timeout.
When this gets called you probably want to display, or at least log, some message indicat-
ing that the connection has been lost because of a timeout.
Chapter 6
■
Network214
onConnectionTimedOut(handle)
Parameters: handle
GameConnection handle.
Return: nothing
Description:
Called when a connection ping (heartbeat) has not been received.
Usage:
Server, Client
onConnectionDropped(handle, reason)
Parameters: handle
GameConnection handle.
reason
String indicating why server dropped the connection.
Return: nothing
Description:
Called when the server initiates the disconnection of a client.
Usage:
Client
onConnectRequestRejected(handle, reason)
Parameters: handle
GameConnection handle.
reason
See Table 6.2 for a list of conventional reason codes defined by
GarageGames in script.
Return: nothing
Description:
Called when a client's connection request has been turned down by the server.
Usage:
Client
onConnectionError(handle, errorString)
Parameters: handle
GameConnection handle.
errorString
String indicating the error encountered.
Return: nothing
Description:
General connection error, usually raised by ghosted objects' initialization problems,
such as missing files. The errorString is the server's connection error message.
Usage:
Client
Team LRN
Please purchase PDF Split-Merge on www.verypdf.com to remove this watermark.
GameConnection Messages 215
Table 6.2 Connection Request Rejection Codes
Reason Code Meaning
CR_INVALID_PROTOCOL_VERSION The wrong version of client was detected.
CR_INVALID_CONNECT_PACKET There is something wrong with the connection packet.
CR_YOUAREBANNED Your game username has been banned.
CR_SERVERFULL The server has reached the maximum number of players.
CHR_PASSWORD The password is incorrect.
CHR_PROTOCOL The game protocol version is not compatible.
CHR_CLASSCRC The game class version is not compatible.
CHR_INVALID_CHALLENGE_PACKET The client detected an invalid server response packet.
onDrop(handle, reason)
Parameters: handle
GameConnection handle.
reason
Reason for connection being dropped, passed from server.
Return: nothing
Description:
Called when a connection to a server is arbitrarily dropped.
Usage:
Client
initialControlSet (handle)
Parameters: handle
GameConnection handle.
Return: nothing
Description:
Called when the server has set up a control object for the GameConnection.For
example, this could be an avatar model or a camera.
Usage:
Client
setLagIcon(handle, state)
Parameters: handle
GameConnection handle.
state
Boolean that indicates whether to display or hide the icon.
Return: nothing
Description:
Called when the connection state has changed, based upon the lag setting.
state
is
set to
true when the connection is considered temporarily broken or set to false
when there is no loss of connection.
Usage:
Client
Team LRN
Please purchase PDF Split-Merge on www.verypdf.com to remove this watermark.
Use this handler to manage the mission loading process and any other activity that trans-
fers datablocks.
Chapter 6
■
Network216
onDataBlocksDone(handle, sequence)
Parameters: handle
GameConnection handle.
sequence
Value that indicates which set of data blocks has been
transmitted.
Return: nothing
Description:
Called when the server has received confirmation that all data blocks have been
received.
Usage:
Server
onDataBlockObjectReceived(index, total)
Parameters: index
Index number of data block objects.
total
How many sent so far.
Return: nothing
Description:
Called when the server is ready for data blocks to be sent.
Usage:
Client
onFileChunkReceived(file, ofs, size)
Parameters: file
The name of the file being sent.
ofs
Offset of data received.
size
File size.
Return: nothing
Description:
Called when a chunk of file data from the server has arrived.
Usage:
Client
onGhostAlwaysObjectReceived()
Parameters: none
Return: nothing
Description:
Called when a ghosted object's data has been sent across from the server to the
client.
Usage:
Client
Team LRN
Please purchase PDF Split-Merge on www.verypdf.com to remove this watermark.
Finding Servers
When you offer a game with networked client/server capabilities, there needs to be some
means for players to find servers to which to connect. On the Internet, a fairly widely
implemented technique is to employ a master server. The master server's job is fairly
straightforward and simple. It keeps a list of active game servers and provides a client with
the necessary information to connect to any one of the servers if desired.
To see the utility of such a simple system, just take a look at NovaLogic, makers of the suc-
cessful Delta Force series of first-person shooters. NovaLogic still hosts master servers for
customers who bought the original Delta Force games from the late 1990s! The overhead
of such a simple system is minimal, and the benefit in customer good will is tremendous.
The Tribes series of games, upon which Torque is based, also offers such master servers, as
do many other games out there.
On a small- to medium-sized local area network, this is not too onerous a task—an extreme-
ly simple method is to have the client merely examine a specified port on all visible nodes
to see if a server is present, and that's what we're going to be doing in this chapter.
Code Changes
We are going to implement "find a server" support in our version of Emaga for this chap-
ter. We will create Emaga6 by modifying Emaga5, the game from the last chapter.
First, copy your entire C:\Emaga5 folder to a new folder, called C:\Emaga6. Then, for the
sake of clarity, rename the UltraEdit project file to chapter6.prj. Now open your new
Chapter 6 UltraEdit project. All changes will be made in the control code. In addition to
changes to the actual program code, you might want to also change any Chapter 5 com-
ment references so they refer to Chapter 6—it's your call.
Client—Initialize Module
We'll make our first change in control/client/initialize.cs. Open that module and locate
the function
InitializeClient
. Add the following statements to the very beginning of the
function:
Finding Servers 217
onGhostAlwaysStarted(count)
Parameters: count
The number of ghosted objects dealt with so far.
Return: nothing
Description:
Called when a ghosted object has been sent to the client.
Usage:
Client
Team LRN
Please purchase PDF Split-Merge on www.verypdf.com to remove this watermark.
$Client::GameTypeQuery = "3DGPAI1";
$Client::MissionTypeQuery = "Any";
When one of our servers contacts the master server, it uses the variable
$Client::GameTypeQuery
to filter out game types that we aren't interested in. For your game,
you can set any game type you like. Here we are going to go with 3DGPAI1 because there
will be at least one 3DGPAI1 server listed on the master server, and for the purpose of
illustration it is better to see one or two 3DGPAI1servers listed than nothing at all.You can
change this later at your leisure.
The variable
$Client::MissionTypeQuery
is used to filter whatever specific game play styles
are available. By specifying
Any
, we will see any types that are available. This is also some-
thing we can define in whatever way we want for our game.
Farther down will be a call to
InitCanvas
. Although it is not really important to make the
master server stuff work, change that statement to this:
InitCanvas("emaga6 - 3DGPAi1 Sample Game");
Doing so reflects the fact that we are now in Chapter 6 and not in Chapter 5 anymore.
Next, there are a series of calls to
Exec
. Find the one that loads playerinterface.gui, and put
the following line after that one:
Exec("./interfaces/serverscreen.gui");
Then find the call to
Exec
that loads screens.cs, and add the following statement after it:
Exec("./misc/serverscreen.cs");
Finally, toward the end of the function, find the
Exec
call that loads connections.cs. After
that statement, and before the call to
Canvas.SetContent
, add the following statement:
SetNetPort(0);
This statement is critical. Although we will never use port 0, it is necessary to make this
call to ensure that the TCP/IP code in Torque works correctly. Later on in other modules
the appropriate port will be set, depending on what we are doing.
New Modules
More typing! But not as much as in previous chapters, so don't fret. We have to add a new
interface module and a module to contain the code that manages its behavior.
Client—ServerScreen Interface Module
Now we have to add the
ServerScreen
interface module. This module defines buttons,
text labels, and a scroll control that will appear on the screen; we can use it to query the
Chapter 6
■
Network218
Team LRN
Please purchase PDF Split-Merge on www.verypdf.com to remove this watermark.
master server and view the results. Type in the following code and save it as
control/client/interfaces/serverscreen.gui.
//============================================================================
// control/client/interfaces/serverscreen.gui
//
// Server query interface module for 3DGPAI1 emaga6 sample game
//
// Copyright (c) 2003 by Kenneth C. Finney.
//============================================================================
new GuiChunkedBitmapCtrl(ServerScreen) {
profile = "GuiContentProfile";
horizSizing = "width";
vertSizing = "height";
position = "0 0";
extent = "640 480";
minExtent = "8 8";
visible = "1";
helpTag = "0";
bitmap = "./emaga_background";
useVariable = "0";
tile = "0";
new GuiControl() {
profile = "GuiWindowProfile";
horizSizing = "center";
vertSizing = "center";
position = "100 100";
extent = "600 300";
minExtent = "8 8";
visible = "1";
helpTag = "0";
new GuiTextCtrl() {
profile = "GuiTextProfile";
horizSizing = "right";
vertSizing = "bottom";
position = "15 40";
extent = "30 20";
minExtent = "8 8";
visible = "1";
helpTag = "0";
text = "Pass";
Finding Servers 219
Team LRN
Please purchase PDF Split-Merge on www.verypdf.com to remove this watermark.
maxLength = "255";
};
new GuiButtonCtrl(JoinServer) {
profile = "GuiButtonProfile";
horizSizing = "right";
vertSizing = "bottom";
position = "318 272";
extent = "127 23";
minExtent = "8 8";
visible = "1";
command = "Canvas.getContent().Join();";
helpTag = "0";
text = "Connect";
active = "0";
};
new GuiScrollCtrl() {
profile = "GuiScrollProfile";
horizSizing = "right";
vertSizing = "bottom";
position = "10 75";
extent = "437 186";
minExtent = "8 8";
visible = "1";
helpTag = "0";
willFirstRespond = "1";
hScrollBar = "dynamic";
vScrollBar = "alwaysOn";
constantThumbHeight = "0";
defaultLineHeight = "15";
childMargin = "0 0";
new GuiTextListCtrl(ServerList) {
profile = "GuiTextArrayProfile";
horizSizing = "right";
vertSizing = "bottom";
position = "0 0";
extent = "419 8";
minExtent = "8 8";
visible = "1";
helpTag = "0";
enumerate = "0";
resizeCell = "1";
Chapter 6
■
Network220
Team LRN
Please purchase PDF Split-Merge on www.verypdf.com to remove this watermark.
columns = "0 40 195 260 325 385";
fitParentWidth = "1";
clipColumnText = "0";
noDuplicates = "false";
};
};
new GuiTextEditCtrl() {
profile = "GuiTextEditProfile";
horizSizing = "right";
vertSizing = "bottom";
position = "98 15";
extent = "134 16";
minExtent = "8 8";
visible = "1";
variable = "Pref::Player::Name";
helpTag = "0";
maxLength = "255";
historySize = "0";
password = "0";
tabComplete = "0";
};
new GuiTextCtrl() {
profile = "GuiTextProfile";
horizSizing = "right";
vertSizing = "bottom";
position = "12 11";
extent = "79 20";
minExtent = "8 8";
visible = "1";
helpTag = "0";
text = "Player Name:";
maxLength = "255";
};
new GuiTextCtrl() {
profile = "GuiTextProfile";
horizSizing = "right";
vertSizing = "bottom";
position = "269 42";
extent = "44 20";
minExtent = "8 8";
visible = "1";
helpTag = "0";
Finding Servers 221
Team LRN
Please purchase PDF Split-Merge on www.verypdf.com to remove this watermark.
text = "Players";
maxLength = "255";
};
new GuiTextCtrl() {
profile = "GuiTextProfile";
horizSizing = "right";
vertSizing = "bottom";
position = "335 42";
extent = "44 20";
minExtent = "8 8";
visible = "1";
helpTag = "0";
text = "Version";
maxLength = "255";
};
new GuiTextCtrl() {
profile = "GuiTextProfile";
horizSizing = "right";
vertSizing = "bottom";
position = "412 42";
extent = "35 20";
minExtent = "8 8";
visible = "1";
helpTag = "0";
text = "Game";
maxLength = "255";
};
new GuiTextCtrl() {
profile = "GuiTextProfile";
horizSizing = "right";
vertSizing = "bottom";
position = "212 42";
extent = "26 20";
minExtent = "8 8";
visible = "1";
helpTag = "0";
text = "Ping";
maxLength = "255";
};
new GuiTextCtrl() {
profile = "GuiTextProfile";
horizSizing = "right";
Chapter 6
■
Network222
Team LRN
Please purchase PDF Split-Merge on www.verypdf.com to remove this watermark.
vertSizing = "bottom";
position = "72 42";
extent = "74 20";
minExtent = "8 8";
visible = "1";
helpTag = "0";
text = "Server";
maxLength = "255";
};
new GuiButtonCtrl() {
profile = "GuiButtonProfile";
horizSizing = "right";
vertSizing = "top";
position = "10 272";
extent = "127 23";
minExtent = "8 8";
visible = "1";
command = "Canvas.getContent().Close();";
helpTag = "0";
text = "Close";
};
new GuiControl(QueryStatus) {
profile = "GuiWindowProfile";
horizSizing = "center";
vertSizing = "center";
position = "72 129";
extent = "310 50";
minExtent = "8 8";
visible = "0";
helpTag = "0";
new GuiButtonCtrl(CancelQuery) {
profile = "GuiButtonProfile";
horizSizing = "right";
vertSizing = "bottom";
position = "9 15";
extent = "64 20";
minExtent = "8 8";
visible = "1";
command = "Canvas.getContent().Cancel();";
helpTag = "0";
text = "Cancel Query";
Finding Servers 223
Team LRN
Please purchase PDF Split-Merge on www.verypdf.com to remove this watermark.
};
new GuiProgressCtrl(StatusBar) {
profile = "GuiProgressProfile";
horizSizing = "right";
vertSizing = "bottom";
position = "84 15";
extent = "207 20";
minExtent = "8 8";
visible = "1";
helpTag = "0";
};
new GuiTextCtrl(StatusText) {
profile = "GuiProgressTextProfile";
horizSizing = "right";
vertSizing = "bottom";
position = "85 14";
extent = "205 20";
minExtent = "8 8";
visible = "1";
helpTag = "0";
maxLength = "255";
};
};
};
};
The first half of the module is an interface definition, defining a number of buttons, text
labels, and a scroll control that will appear on the screen. Most of the properties and con-
trol types have been covered in previous chapters; however, some of them are of particu-
lar note here.
The first item of interest is the
GuiScrollCtrl
. This control provides a scrollable vertical list
of records; in this case it will be a list of servers that satisfy the filters used in subsequent
Query
calls that we will look at a bit later.
Some of the
GuiScrollCtrl
properties of interest are explained in Table 6.3.
The next significant control to examine is the
GuiTextEditCtrl
. It has an interesting prop-
erty, shown by this statement:
variable = "Pref::Player::Name";
What this does is display the contents of the variable
Pref::Player::Name
in the control's
content. If we change that content by placing our edit cursor in the control's field while it
Chapter 6
■
Network224
Team LRN
Please purchase PDF Split-Merge on www.verypdf.com to remove this watermark.
is being displayed and typing in new text, then the contents of the variable
Pref::Player::Name
are also changed.
Also in this
GuiTextEditCtrl
control is the following statement:
historySize = "0";
This control has the ability to store a history of previous values that were held in the con-
trol's edit box. We can scroll through the list's previous values by pressing the Up Arrow
and Down Arrow keys. This property sets the maximum number of values that can be
saved in the control's history. A setting of 0 means that no history will be saved.
Now go take a look at the control of type
GuiControl
with the name
QueryStatus
. This is the
definition of a subscreen that will display the progress of the query. It contains other con-
trols that we've seen before, but I just want you to note how they are nested within this
control, which is nested within the larger
ServerScreen
.
Client—ServerScreen Code Module
Next, we will add the
ServerScreen
code module. This module defines how the
ServerScreen
interface module will behave. Type in the following code and save it as
control/client/misc/serverscreen.cs.
//============================================================================
// control/client/misc/serverscreen.cs
//
Finding Servers 225
Table 6.3 Selected GuiScrollCtrl Properties
Property Description
willFirstRespond If set to true or 1, indicates that this control will respond to user inputs first,
before passing them on to other controls.
hScrollBar Indicates how to decide whether to display the horizontal scroll bar. The
choices are:
alwaysOn: The scroll bar is always visible.
alwaysOff: The scroll bar is never visible.
dynamic: The scroll bar is not visible until the number of records in the
list exceeds the number of lines available to display them. If this happens
the scroll bar is turned on and made visible.
vScrollBar The same as hScrollBar but applies to the vertical scroll bar.
constantThumbHeight
Indicates whether the
thumb
, the small rectangular widget in the scroll bar
that moves as you scroll, will have a size that is proportional to the number of
entries in the list (the longer the list, the smaller the thumb) or will have a
constant size. Setting this property to 1 ensures a constant size; 0 ensures
proportional sizing.
Team LRN
Please purchase PDF Split-Merge on www.verypdf.com to remove this watermark.
// Server query code module for 3DGPAI1 emaga6 sample game
//
// Copyright (c) 2003 by Kenneth C. Finney.
//============================================================================
function ServerScreen::onWake()
{
JoinServer.SetActive(ServerList.rowCount() > 0);
ServerScreen.queryLan();
}
function ServerScreen::QueryLan(%this)
{
QueryLANServers(
28000, // lanPort for local queries
0, // Query flags
$Client::GameTypeQuery, // gameTypes
$Client::MissionTypeQuery, // missionType
0, // minPlayers
100, // maxPlayers
0, // maxBots
2, // regionMask
0, // maxPing
100, // minCPU
0 // filterFlags
);
}
function ServerScreen::Cancel(%this)
{
CancelServerQuery();
}
function ServerScreen::Close(%this)
{
CancelServerQuery();
Canvas.SetContent(MenuScreen);
}
function MasterScreen::Update(%this)
{
QueryStatus.SetVisible(false);
Chapter 6
■
Network226
Team LRN
Please purchase PDF Split-Merge on www.verypdf.com to remove this watermark.
ServerList.Clear();
%sc = GetServerCount();
for (%i = 0; %i < %sc; %i++)
{
SetServerInfo(%i);
ServerList.AddRow(%i,
($ServerInfo::Password? "Yes": "No") TAB
$ServerInfo::Name TAB
$ServerInfo::Ping TAB
$ServerInfo::PlayerCount @ "/" @ $ServerInfo::MaxPlayers TAB
$ServerInfo::Version TAB
$ServerInfo::GameType TAB
%i);
}
ServerList.Sort(0);
ServerList.SetSelectedRow(0);
ServerList.ScrollVisible(0);
JoinServer.SetActive(ServerList.RowCount() > 0);
}
function ServerScreen::Join(%this)
{
CancelServerQuery();
%id = ServerList.GetSelectedId();
%index = GetField(ServerList.GetRowTextById(%id),6);
if (SetServerInfo(%index)) {
%conn = new GameConnection(ServerConnection);
%conn.SetConnectArgs($pref::Player::Name);
%conn.SetJoinPassword($Client::Password);
%conn.Connect($ServerInfo::Address);
}
}
function onServerQueryStatus(%status, %msg, %value)
{
if (!QueryStatus.IsVisible())
QueryStatus.SetVisible(true);
switch$ (%status) {
case "start":
case "ping":
Finding Servers 227
Team LRN
Please purchase PDF Split-Merge on www.verypdf.com to remove this watermark.
StatusText.SetText("Ping Servers");
StatusBar.SetValue(%value);
case "query":
case "done":
QueryStatus.SetVisible(false);
Screen.Update();
}
}
This module is where we've put the code that controls how the Master Server screen
behaves.
The first function,
ServerScreen::onWake
, defines what to do when the screen is displayed.
In this case we first set the Join button to be active if there are any servers in the server list
at the moment we display the screen. Then,
MasterScreen::QueryLAN
, is called. It executes a
call to
QueryLANServers
, which reaches out across the local area network and talks to each
computer on port 28000 (you can use any available port). If it manages to contact a com-
puter with a game server running on that port, it establishes contact with the game serv-
er, obtains some information from it, and adds that server to a list. There are quite a few
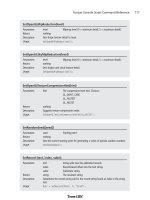
parameters to the call to
QueryLANServers
. The following syntax definition shows them in
more detail:
Chapter 6
■
Network228
QueryLANServers (port, flags,gtype,mtype,minplayers,maxplayers,maxbots,
region,ping,cpu,filters,buddycount, buddylist)
Parameters: port
The TCP/IP port where game servers are expected to
be found.
flags
Query flags. Choices:
0ϫ00 = online query
0ϫ01 = offline query
0ϫ02 = no string compression
gtype
Game type string
mtype
Mission type string
minplayers
Minimum number of players for viable game
maxplayers
Maximum allowable players
maxbots
Maximum allowable connected AI bots
region
Numeric discriminating mask
ping
Maximum ping for connecting clients; 0 means no maximum
mincpu
Minimum specified CPU capability
continued
Team LRN
Please purchase PDF Split-Merge on www.verypdf.com to remove this watermark.
The response to the
QueryLANServers
function is accessible from the
ServerList
array.
The next function,
ServerScreen::Cancel
, is called when the Cancel button is pressed while
the query is under way.
After that is the
ServerScreen::Close
function, which is called when the user presses the
Close button. It cancels any pending query and then returns to the
MenuScreen
.
ServerScreen::Update
is the function that inserts the obtained information in the
ServerList
after it is obtained from the master server. The information is found in the
$ServerInfo
array. To update the scrolling display, we find the number of servers that pass the filters on
the master by calling
GetServerCount
. Then we iterate through our displayable list, extract-
ing the fields from each
$ServerInfo
record. Take note of the call to
SetServerInfo
. Passing
an index number to this function sets the
$ServerInfo
array to point to a specific record in
the
MasterServerList
. Then we access the individual fields in the
$ServerInfo
array by refer-
encing them with the colon operator:
$ServerInfo::Name
or
$ServerInfo::Name
, to demon-
strate with two examples.
The next function,
ServerScreen::Join
, defines how we go about joining a server that has
been selected from the list. First, we cancel any outstanding queries, get the handle of the
server record that is highlighted in the interface, and then use that to obtain the index
number of the server record. We use the
SetServerInfo
to set the
$ServerInfo
array to point
to the right server record, and then we can access the values. After setting some network
parameters, we finally use
$ServerInfo::Address
to make the network connection.
The last function in the module is the message handler callback that makes the whole she-
bang go:
onServerQueryStatus
. It gets called repeatedly as the server query process unfolds.
We use the
%status
variable to determine what response we are receiving from the master
server, and then we use either the
%msg
or
%value
variable, set by the master server to
update various fields in the displayed server list. The start and query cases aren't needed
in our example.
Finding Servers 229
filterflags
Server filters. Choices:
0ϫ00 = dedicated
0ϫ01 = not password protected
0ϫ02 = Linux
0ϫ80 = current version
buddycount
Number of buddy servers in buddy list
buddylist
List of server names that are buddies to this server
Return: nothing
Team LRN
Please purchase PDF Split-Merge on www.verypdf.com to remove this watermark.
Dedicated Server
Sometimes we will want to host a game as a server without having to bother with a graph-
ical user interface. One reason we might want to do this is because we want to run the
server on a computer that doesn't have a 3D accelerated graphics adapter. Another reason
is because we might want to test our client/server connectivity and master server query
capabilities. This need arises because we can't run two instances of the Torque graphical
client at the same time. However, if we have the ability to run as a dedicated server, we can
run multiple dedicated servers, while running one instance of the graphical client, all on
the same computer. And if we have set up the dedicated servers appropriately, other play-
ers out on the network can connect to our servers.
There are a few more modules you will have to change to implement the dedicated serv-
er capabilities.
Root Main Module
In this module we'll need to add some command line switches in case we want to use the
command line interface of Windows, or we'll need to we decide to embed the switches in
a Windows shortcut. Either of these methods is how we can tell the game to run the serv-
er in dedicated mode. In the module main.cs located in the root game folder (which is the
folder where the tge.exe executable is located for your Chapter 6 version of Emaga), locate
the
ParseArgs
function, and scroll down until you find the statement containing
$switch($currentarg)
. Type the following code in directly after the
$switch
statement:
case "-dedicated":
$Server::Dedicated = true;
EnableWinConsole(true);
$argumentFlag[$i]++;
case "-map":
$argumentFlag[$i]++;
if ($nextArgExists)
{
$mapArgument = $nextArgument;
$argumentFlag[$i+1]++;
$i++;
}
else
Error("Error: Missing argument. Usage: -mission <filename>");
Both of these switches are needed to run a dedicated server. The
-dedicated
switch puts us
into the right mode, and then the
-map
switch tells us which mission map to load when
the server first starts running.
Chapter 6
■
Network230
Team LRN
Please purchase PDF Split-Merge on www.verypdf.com to remove this watermark.
The result of these changes is that we can now invoke the dedicated server mode by
launching the game with the following syntax from the command line (don't try it yet):
tge.exe -dedicated -map control/data/maps/book_ch6.mis.
The game will launch, and all you will see will be a console window. You will be able to
type in console script statements, just as you can when you use the tilde ("~") key in the
graphical client interface. However, don't try this just yet, because we still need to add the
actual dedicated server code!
You can also create a shortcut to the tge.exe executable and modify the Target box in the
shortcut properties to match the command line syntax above. Then you can launch the
server merely by double-clicking on the shortcut icon.
Control—Main Module
Next, we have a quick modification to make to control/main.cs. In the
OnStart
function,
locate the line that contains
InitializeClient
. Replace that one line with these four lines:
if ($Server::Dedicated)
InitializeDedicatedServer();
else
InitializeClient();
Now, when the program detects that the
-dedicated
switch was used, as described in the
previous section, it will fire up in dedicated mode, not in client mode.
Control—Initialize Module
Okay, the meat of the dedicated server code is contained in this module. Open up the
module control/server/initialize.cs and type in the following lines just before the
InitializeServer
function.
$pref::Master0 = "2:master.garagegames.com:28002";
$Pref::Server::ConnectionError = "You do not have the correct version of 3DGPAI1 client
or the related art needed to play on this server. This is the server for Chapter 6.
Please check that chapter for directions.";
$Pref::Server::FloodProtectionEnabled = 1;
$Pref::Server::Info = "3D Game Programming All-In-One by Kenneth C. Finney.";
$Pref::Server::MaxPlayers = 64;
$Pref::Server::Name = "3DGPAI1 Book - Chapter 6 Server";
$Pref::Server::Password = "";
$Pref::Server::Port = 28000;
$Pref::Server::RegionMask = 2;
$Pref::Server::TimeLimit = 20;
$Pref::Net::LagThreshold = "400";
Dedicated Server 231
Team LRN
Please purchase PDF Split-Merge on www.verypdf.com to remove this watermark.