Tài liệu Using User Profiles and Hardware Profiles doc
Bạn đang xem bản rút gọn của tài liệu. Xem và tải ngay bản đầy đủ của tài liệu tại đây (348.27 KB, 26 trang )
Chapter
8
Using User Profiles and
Hardware Profiles
MICROSOFT EXAM OBJECTIVES COVERED IN
THIS CHAPTER
Configure and manage user profiles.
Manage hardware profiles.
Copyright © 2000 SYBEX Inc., Alameda, CA.
www.sybex.com
U
ser profiles store users’ Desktop configurations. A user
profile can contain a user’s Desktop arrangement, program items, personal
program groups, network and printer connections, screen colors, mouse
settings, and other personal preferences.
User profiles are stored locally by default, but they can be accessed
through the network if you configure roaming profiles. If you don’t want
users to be able to change their user profiles, you can configure mandatory
profiles.
Hardware profiles store different hardware configurations for a com-
puter. Hardware profiles are useful when a single computer has multiple
hardware configurations.
This chapter covers how to create and manage user profiles and hardware
profiles. We will begin with an overview of the configuration information
stored in user profiles.
Reviewing User Profile Configuration
Options
U
ser profiles
store many of the personal configuration options for
Windows 2000 Professional. For example, say user Kevin has logged on and
customized his Desktop by changing the wallpaper, adding shortcuts, adding
items to the Startup folder, and changing the mouse pointer. All of this infor-
mation will be saved in Kevin’s user profile when he logs off. The next time
he logs on, his Desktop customizations will be restored.
Copyright © 2000 SYBEX Inc., Alameda, CA.
www.sybex.com
Reviewing User Profile Configuration Options
347
If the configuration option is a personal preference, it is most likely a part
of the user profile. Configuration options that relate to the computer are not
a part of the user profile. For example, the mouse driver is not a part of a user
profile. However, the properties of the mouse configuration—such as the
speed, pointer, and mouse button settings—reflect the user’s personal pref-
erences and are a part of a user profile.
Table 8.1 lists some of the settings that are saved by user profiles.
TABLE 8.1
User Preferences Saved in User Profiles
Settings From Items Stored in User Profile
Windows Explorer View of Windows Explorer, mapped network
drives, types of files that are displayed
Control Panel Screen appearance, accessibility options, and
mouse and keyboard preferences
Printer settings Network printer connections
Taskbar All settings, including program items and their
properties
Accessories Preference settings for programs, such as Calcula-
tor, Command Prompt, and Notepad
Online Help book-
marks
Any bookmarks that the user has set in the
Windows 2000 Help program
Windows 2000–
based applications
User configuration settings for applications that
support such settings
Copyright © 2000 SYBEX Inc., Alameda, CA.
www.sybex.com
348
Chapter 8
Using User Profiles and Hardware Profiles
Creating and Managing User Profiles
U
ser profiles are particularly useful when multiple users share the
same computer. If each user has a profile, his or her Desktop preferences will
be maintained and loaded when that user logs on to the computer.
User profiles can be used by a single user or by a group of users. If you
assign a user profile to a group of users, you can ensure that all users in the
group maintain a consistent Desktop. This makes it easier to train users and
to troubleshoot problems.
By default, user profiles are created locally on the computer that the user
account logs on to, but you can create roaming profiles that are available
from the network. Roaming profiles allow users to access their customized
Desktop from any computer they log on to within the network.
By default, users can change their own profiles, but Administrators can
create and assign mandatory, or read-only, profiles. Users cannot modify
mandatory profiles.
The following sections describe how to create local, roaming, and man-
datory user profiles.
Using Local User Profiles
Each time you log on to a Windows 2000 Professional computer, the sys-
tem checks to see if you have a
local user profile
in the Documents and Set-
tings folder, which was created on the boot partition when you installed
Windows 2000 Professional.
The first time users log on, they receive a default user profile. A folder that
matches the user’s logon name is created for the user in the Documents and
Settings folder. The user profile folder that is created holds a file called
NTUSER.DAT
, as well as subfolders that contain directory links to the
user’s Desktop items.
Microsoft
Exam
Objective
Configure and manage user profiles.
Copyright © 2000 SYBEX Inc., Alameda, CA.
www.sybex.com
Creating and Managing User Profiles
349
In Exercise 8.1, you will create new users and set up local user profiles.
EXERCISE 8.1
Using Local Profiles
1.
Using the Local Users and Groups utility, create two new users:
Liz
and
Tracy
. (See Chapter 6, “Managing Users,” for details on creating
user accounts.) Deselect the User Must Change Password at Next
Logon option for each user.
2.
Select Start
Programs
Accessories
Windows Explorer.
Expand My Computer, then Local Disk (C:), then Documents and Set-
tings. Notice that this folder does not contain user profile folders for
the new users.
3.
Log off as Administrator and log on as Liz. When the Getting Started
with Windows 2000 dialog box appears, deselect the Show This
Screen at Startup option and then click the Exit button.
4.
Right-click an open area on the Desktop and select Properties. In the
Display Properties dialog box, click the Appearance tab. Select the
color scheme Red, White, and Blue (VGA), click the Apply button,
and then click the OK button.
5.
Right-click an open area on the Desktop and select New
Shortcut.
In the Create Shortcut dialog box, type
CALC
. Accept CALC as the
name for the shortcut and click the Finish button.
6.
Log off as Liz and log on as Tracy. Notice that user Tracy sees the
Desktop configuration stored in the default user profile.
7.
Log off as Tracy and log on as Liz. Notice that Liz sees the Desktop
configuration you set up in steps 3, 4, and 5.
8.
Log off as Liz and log on as Administrator. Select Start
Programs
Accessories
Windows Explorer. Expand My Computer, then Local
Disk (C:), then Documents and Settings. Notice that this folder now
contains user profile folders for Liz and Tracy.
Copyright © 2000 SYBEX Inc., Alameda, CA.
www.sybex.com
350
Chapter 8
Using User Profiles and Hardware Profiles
The drawback of local user profiles is that they are available only on the
computer where they were created. For example, suppose that all of your
Windows 2000 Professional computers are a part of a domain and you use
only local user profiles. User Rick logs on at Computer A and creates a cus-
tomized user profile. When he logs on to Computer B for the first time, he
will receive the default user profile, rather than the customized user profile
he created on Computer A. For users to be able to access their user profile
from any computer they log on to, you need to use roaming profiles, as
described in the next section.
Using Roaming Profiles
A
roaming profile
is stored on a network server and allows users to access
their user profile, regardless of the client computer that they have logged on
to. Roaming profiles provide users who move around with a consistent
Desktop, no matter which computer they access. If the server that stores the
roaming profile is unavailable, the user can log on using a local profile.
To create a roaming profile, take the following steps:
1.
Create the profile that will be used as the roaming profile.
2.
Create a folder on a network server and share the folder. (Creating
shared folders is covered in Chapter 10, “Accessing Files and Folders.”)
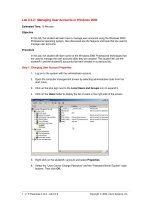
3.
Copy the profile to the network share. To copy a profile, use the Copy To
button in the User Profiles tab of the System Properties dialog box, shown
in Figure 8.1. To access this dialog box, select Control Panel
System
and click the User Profiles tab. (You can also access the System Properties
dialog box by right-clicking My Computer and selecting Properties.)
Click the Copy To button and specify the share folder and profile name
in the Copy To dialog box.
When you go through the Copy To button in the User Profiles tab of the Sys-
tem Properties dialog box, the process copies the
NTUSER.DAT
file, as well as
all of the folders associated with the profile. You should always use this
method to copy a profile to a network share, rather than using other file-copy
options.
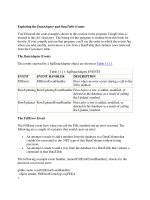
4.
Open the Local Users and Groups utility and access the properties of
the user who will be assigned the roaming profile. Click the Profile tab
in the user Properties dialog box. In the Profile Path text box, specify
Copyright © 2000 SYBEX Inc., Alameda, CA.
www.sybex.com
Creating and Managing User Profiles
351
the UNC (Universal Naming Convention) path for the roaming pro-
file, as shown in Figure 8.2.
FIGURE 8.1
The User Profiles tab of the System Properties dialog box
FIGURE 8.2
The Profile tab of the user Properties dialog box
Copyright © 2000 SYBEX Inc., Alameda, CA.
www.sybex.com
352
Chapter 8
Using User Profiles and Hardware Profiles
If you need to reapply the default user profile for a user, you can delete the
user’s profile through the System icon in Control Panel, User Profiles tab.
In Exercise 8.2, you will simulate the process of creating a roaming pro-
file. This is just a simulation because, in order for roaming profiles to work
on a Windows 2000 Professional computer, roaming profiles must be con-
figured on a Windows 2000 Server computer.
EXERCISE 8.2
Using Roaming Profiles
In this exercise, you will set up a roaming profile, which is a four-part
process. Then you will test the profile.
Creating a Profile
1.
Using the Local Users and Groups utility, create a user named
Tester
. Deselect the User Must Change Password at Next Logon
option.
2.
Log on as Tester. Right-click an open area on the Desktop and select
New
Shortcut. In the Create Shortcut dialog box, type
EXPLORER
.
Accept EXPLORER as the name for the shortcut and click the Finish
button.
3.
Right-click an open area on the Desktop and select Properties. In the
Display Properties dialog box, click the Appearance tab. Select the
color scheme Maple, click the Apply button, and then click the OK
button.
Creating a Network Share for User Profiles
1.
Log off as Tester and log on as Administrator.
2.
Select Start
Programs
Accessories
Windows Explorer.
Expand My Computer, then Local Disk (C:).
3.
Select File
New
Folder. Name the new folder
Profiles
.
4.
Right-click the Profiles folder and select Sharing. In the Sharing dia-
log box, click the Share This Folder radio button and leave all of the
other values at their default settings. Click the OK button.
Copyright © 2000 SYBEX Inc., Alameda, CA.
www.sybex.com
Creating and Managing User Profiles
353
Using Mandatory Profiles
A mandatory profile is a profile that can’t be modified by the user. Only
members of the Administrators group can manage mandatory profiles. You
might consider creating mandatory profiles for users who should maintain
consistent Desktops. For example, suppose that you have a group of 20
salespeople, who know enough about system configuration to make
changes, but not enough to fix any problems they create. For ease of support,
you could use mandatory profiles. This way, all of the salespeople will
always have the same profile and will not be able to change their profiles.
You can create mandatory profiles for a single user or a group of users.
A mandatory profile is stored in a file named NTUSER.MAN. A user
with a mandatory profile can set different Desktop preferences while
logged on, but those settings will not be saved when the user logs off.
Copying the User Profile to the Network Share Folder
1. Select Start Settings Control Panel System and click the User
Profiles tab.
2. In the User Profiles tab of the System Properties dialog box, high-
light the computername\Tester profile and click the Copy To button.
3. In the Copy To dialog box, specify C:\Profiles\Tester and click
the OK button. Click the OK button to close the System Properties
dialog box.
Configuring the User Properties to Use a Roaming Profile
1. Open the Local Users and Groups utility and expand the Users
folder.
2. Double-click user Tester to open the user Properties dialog box and
click the Profile tab.
3. In the Profile Path text box, type \\computername\Profiles\Tester,
replacing computername with the unique name of your computer.
Click the Apply button and then click the Close button.
Testing the Roaming Profile
1. Log off as Administrator and log on as Tester. You should see the
profile that was created for Tester.
2. Log off as Tester and log on as Administrator.
EXERCISE 8.2 (continued)
Copyright © 2000 SYBEX Inc., Alameda, CA.
www.sybex.com
354 Chapter 8
Using User Profiles and Hardware Profiles
To create a mandatory profile, take the following steps:
1. Rename the user profile from NTUSER.DAT to NTUSER.MAN.
2. Copy the profile to a network share. As with roaming profiles, you
should use the Copy To button in the User Profiles tab of the System
Properties dialog box to copy the appropriate files.
3. In the Local Users and Groups utility, access the properties of the user
who will be assigned the roaming profile and specify the location of
the mandatory profile. This path must be a UNC path for the manda-
tory profile to work.
Only roaming profiles can be used as mandatory profiles. Mandatory profiles
do not work for local user profiles.
In Exercise 8.3, you will simulate the process of creating a mandatory pro-
file. As with the sample roaming profile you created in Exercise 8.2, the man-
datory profile will not actually work. This is because you must first configure
roaming profiles on a Windows 2000 Server computer.
EXERCISE 8.3
Using Mandatory Profiles
In this exercise, you will set up a mandatory profile, which is a four-part
process. Then you will test the profile.
Creating a Profile
1. Using the Local Users and Groups utility, create a user named Sales
User. Deselect the User Must Change Password at Next Logon
option.
2. Log off as Administrator and log on as Sales User.
3. Select Start Settings Control Panel Mouse. Click the Pointers
tab and select Conductor from the Scheme drop-down list. Click the
Apply button, then click the OK button.
Copyright © 2000 SYBEX Inc., Alameda, CA.
www.sybex.com
Creating and Managing User Profiles 355
4. In Control Panel, select Sounds and Multimedia. In the Sounds tab,
select Utopia from the Scheme drop-down list, then click the OK
button.
5. Right-click an open area on the Desktop and select Properties. In the
Display Properties dialog box, click the Effects tab. Under Visual
Effects, select the Use Large Icons option. Click the Apply button,
then click the OK button.
Renaming the NTUSER.DAT File
1. Log off as Sales User and log on as Administrator.
2. Select Start Programs Accessories Windows Explorer.
3. In Windows Explorer, select Tools Folder Options and click the
View tab. Click the Show Hidden Files and Folders radio button and
uncheck the Hide File Extensions for Known File Types check box.
Click the Apply button, then click the OK button.
4. In Windows Explorer, expand My Computer, then Local Disk (C:),
then Documents and Settings, then Sales User.
5. Right-click the NTUSER.DAT file and rename the file to NTUSER.MAN.
Close Windows Explorer.
Copying the User Profile to the Network Share Folder
1. Select Start Settings Control Panel System and click the User
Profiles tab in the System Properties dialog box.
2. Highlight the computername\Sales User profile and click the Copy
To button.
3. In the Copy To dialog box, specify C:\Profiles\Sales User and click
the OK button. Click the OK button to close the System Properties
dialog box.
Configuring the User Properties to Use a Mandatory Profile
1. Open the Local Users and Groups utility and expand the Users
folder.
EXERCISE 8.3 (continued)
Copyright © 2000 SYBEX Inc., Alameda, CA.
www.sybex.com
356 Chapter 8
Using User Profiles and Hardware Profiles
If the client that is accessing the mandatory profile is a Windows NT 4 or Win-
dows 2000 computer, you do not need to include the user profile name in the
Profile Path setting in the user Properties dialog box. For example, you could
specify \\Server1\Profiles\Tester. However, if the client is a Windows NT 3.x
computer, you must include the user profile name in the Profile Path setting.
For example, you could specify \\Server\Profiles\Tester\NTUSER.MAN.
Creating and Managing Hardware Profiles
Hardware profiles store hardware configurations for a computer.
Using hardware profiles allows you to manage multiple hardware configu-
rations for a single computer. For example, suppose that you have a laptop
computer that can be used with a docking station that attaches to the net-
work. If the computer is configured for network connectivity and the com-
puter is not docked, you will see error messages at startup. To avoid this, you
can create hardware profiles for this laptop computer: one hardware profile
(with network settings) to load when the computer is docked and another
2. Double-click user Sales User to open the user Properties dialog box
and click the Profile tab.
3. In the Profile Path text box, type \\computername\Profiles\Sales
User, replacing computername with the unique name of your com-
puter. Click the Apply button, then click the Close button.
Testing the Mandatory Profile
1. Log off as Administrator and log on as Sales User.
2. Select Start Settings Control Panel Mouse. Click the Pointers
tab and choose Dinosaur from the Scheme drop-down list. Click the
Apply button, then click the OK button.
3. Log off as Sales User and log on again as Sales User.
4. Log off as Sales User and log on as Administrator.
EXERCISE 8.3 (continued)
Copyright © 2000 SYBEX Inc., Alameda, CA.
www.sybex.com
Creating and Managing Hardware Profiles 357
hardware profile (without network settings) to load when the computer is
undocked.
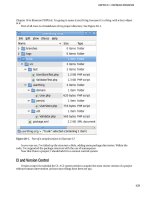
When you set up hardware profiles, you specify different hardware con-
figurations that can be accessed when Windows 2000 Professional is started.
You manage hardware profiles through the Hardware Profiles dialog box,
shown in Figure 8.3. To access this dialog box, select Start Settings Con-
trol Panel System. (You can also access the System Properties dialog box
by right-clicking My Computer and selecting Properties.) In the System
Properties dialog box, click the Hardware tab and then click the Hardware
Profiles button. The options in the Hardware Profiles dialog box are
described in Table 8.2.
FIGURE 8.3 The Hardware Profiles dialog box
Microsoft
Exam
Objective
Manage hardware profiles.
Copyright © 2000 SYBEX Inc., Alameda, CA.
www.sybex.com
358 Chapter 8
Using User Profiles and Hardware Profiles
TABLE 8.2 Hardware Profile Options
Option Description
Available Hardware
Profiles
Lists all of the hardware profiles that have been
created. If only one profile is listed, you will not
see hardware profile selection options when
Windows 2000 is started. If there is only one pro-
file, it can’t be deleted. You can change the order
of the profiles in the Available Hardware Profiles
list by selecting a profile and clicking the up or
down arrow button to the right of the list.
Properties Opens a dialog box where you can specify
whether or not the computer is portable. A porta-
ble computer usually has two profiles: one for
when the computer is docked and another
for when the computer is undocked. You can also
specify whether the profile will appear in the
hardware profile selection options when Win-
dows 2000 is started.
Copy Opens a dialog box that lets you copy an existing
hardware profile. You can then edit the copied
profile.
Rename Allows you to give your hardware profile a dif-
ferent name. For example, you might rename
Profile 1 to Docked Portable.
Delete Deletes the hardware profile that is currently
highlighted. This option is not active if only one
hardware profile is listed.
Hardware Profiles
Selection
Specifies how the hardware profile selection op-
tions should be configured for Windows 2000
startup. You can specify that the computer boot
process stop until a selection is made, or you can
configure the computer to select the first profile
that is listed (the list is in the order shown in the
Available Hardware Profiles list box) if no choice
has been made within x number of seconds.
Copyright © 2000 SYBEX Inc., Alameda, CA.
www.sybex.com
Creating and Managing Hardware Profiles 359
Every computer has at least one hardware profile. The default profile that
is created when you install Windows 2000 Professional is called Profile 1.
To configure the properties of a hardware profile, click the Properties but-
ton in the Hardware Profiles dialog box. This brings up the hardware profile
Properties dialog box, as shown in Figure 8.4. Through this dialog box, you
specify whether or not the computer is portable and if you want the hard-
ware profile to be displayed as an option when Windows 2000 Professional
starts.
FIGURE 8.4 The hardware profile Properties dialog box
In Exercise 8.4, you will configure two hardware profiles for your computer.
EXERCISE 8.4
Managing Hardware Profiles
1. Select Start Settings Control Panel System, click the Hardware
tab, and click the Hardware Profiles button.
2. Click the Copy button to copy Profile 1. Name the copy Undocked
and click the OK button.
3. Highlight Undocked and click the Properties button. Select the This
Is a Portable Computer check box and The Computer Is Undocked
radio button. Click the OK button.
Copyright © 2000 SYBEX Inc., Alameda, CA.
www.sybex.com
360 Chapter 8
Using User Profiles and Hardware Profiles
Summary
This chapter described how to create and manage user profiles and
hardware profiles. We covered the following topics:
The configurations stored in user profiles, which include most user
preference settings
How to create local user profiles, roaming profiles, and mandatory
profiles
How to configure hardware profiles, which are used to manage a single
computer that has more than one hardware configuration
Key Terms
Before taking the exam, you should be familiar with the following terms:
hardware profile
local user profile
mandatory profile
NTUSER.DAT
NTUSER.MAN
roaming profile
user profile
4. Highlight Profile 1 (Current) and click the Rename button. Rename
the profile to Docked and click the OK button.
5. Highlight Docked and click the Properties button. Select the The
Computer Is Docked radio button. Click the OK button.
6. Click the OK button to close the Hardware Profiles dialog box. Close
any other dialog boxes that are open.
7. Shut down and restart your computer. When the computer restarts,
you will see the hardware profile selection options. Select a profile
to load it.
EXERCISE 8.4 (continued)
Copyright © 2000 SYBEX Inc., Alameda, CA.
www.sybex.com
Review Questions 361
Review Questions
1. Where are user profiles stored by default on a Windows 2000 Profes-
sional computer?
A. \WINNT\Profiles
B. \Documents and Settings
C. \WINNT\User Profiles
D. \User Profiles
2. What is the default filename for user profiles in Windows 2000
Professional?
A. NTUSER.PRO
B. NTUSER.DAT
C. PROFILE.DAT
D. PROFILE.USR
3. Which of the following steps would you need to take in order to
specify that a user profile is available over the network for a Win-
dows 2000 client?
A. In Control Panel, in the User Profiles tab of the System Properties
dialog box, specify that the profile is a roaming profile.
B. Rename the user profile to NTUSER.NET.
C. Use Windows Explorer to copy the user profile to a network share.
D. In the Local Users and Groups utility, in the Profile tab of the user
Properties dialog box, specify a UNC path for the roaming profile.
Copyright © 2000 SYBEX Inc., Alameda, CA.
www.sybex.com
362 Chapter 8
Using User Profiles and Hardware Profiles
4. Which of the following options would be stored within a user profile?
Choose all that apply.
A. The mouse driver that the user will use
B. The mouse pointer that the user will use
C. The keyboard layout that the user will use
D. The screen saver that the user will use
5. What steps would you take to create a mandatory profile in Win-
dows 2000 Professional? Choose all that apply.
A. In Control Panel, in the User Profiles tab of the System Properties
dialog box, specify that the profile is a mandatory profile.
B. Rename the user profile to NTUSER.MAN.
C. Copy the profile to a network share using the User Profiles tab of
the System Properties dialog box in Control Panel.
D. In the Local Users and Groups utility, in the Profile tab of the user
Properties dialog box, specify a UNC path for the roaming profile.
6. Which of the following options can be configured when you edit hard-
ware profile properties? Choose all that apply.
A. Whether or not the computer is portable
B. Whether or not the computer uses different displays
C. Whether or not the computer uses different hot-plug devices
D. Whether or not the hardware profile is included in the hardware
profile selection options when Windows 2000 is booted
7. Which utility is used to specify that a user will use a roaming profile?
A. Local Users and Groups
B. Control Panel, System, User Profiles tab
C. User Profile Editor
D. User Manager
Copyright © 2000 SYBEX Inc., Alameda, CA.
www.sybex.com
Review Questions 363
8. When you look at the Profile tab of the Properties dialog box for user
Liz, you see the following:
What user profile will Liz use based on this information?
A. Since Liz has no user profile specified, she will access the default
profile each time she logs on.
B. The Profile Path box is blank since Liz has never logged on to the
computer.
C. Because the Profile Path box is blank, Liz will use her locally stored
profile.
D. Because the Profile Path box is blank, Liz will use a roaming profile
by default.
9. You have decided to store the roaming profile for user Rick on the
domain SALES, computer SERVER, share PROFILES, subfolder
RICK. What path should you specify for Rick’s profile path?
A. \\SALES\SERVER\PROFILES\RICK
B. \\SERVER\PROFILES\RICK
C. \\SALES\PROFILES\RICK
D. \\SERVER\PROFILES
Copyright © 2000 SYBEX Inc., Alameda, CA.
www.sybex.com
364 Chapter 8
Using User Profiles and Hardware Profiles
10. You are trying to create a mandatory profile for user Brett. When you
look in Brett’s profile folder, you see the following:
What is the most likely explanation?
A. Brett has never logged on to the computer, so his profile has not
been created.
B. You are not in the correct folder for user Brett.
C. Brett is using a roaming profile.
D. By default, the NTUSER.DAT file is hidden, and you need to config-
ure Folder Options to allow you to view hidden files.
11. Everything has been working properly on your computer. You have
just edited your hardware profiles for docked (which is on the net-
work) and undocked (which is not on the network). You reboot your
computer and take a coffee break. When you return, you realize you
can’t access any network resources. What is the most likely problem?
A. Your IP configuration is not properly set.
B. You pulled the network cable from your computer.
C. Your network card is failing.
D. The hardware profile for undocked has been set as the default profile.
Copyright © 2000 SYBEX Inc., Alameda, CA.
www.sybex.com
Review Questions 365
12. You have created two hardware profiles for your laptop, named
Docked and Undocked. How do you specify which of the hardware
profiles will be used?
A. Press F8 during the computer startup and select the profile that will
be used.
B. Press F6 during the computer startup and select the profile that will
be used.
C. Select the profile that will be used by clicking the profile icon that
appears on the Taskbar.
D. Select the profile from that menu that appears during the computer
startup by default.
13. Which of the following user profile types must be stored on a Win-
dows 2000 Server computer? Choose all that apply.
A. Local profiles
B. Roaming profiles
C. Mandatory profiles
D. Hardware profiles
14. When Kalea logs on to the Windows 2000 Professional computer
W2KSales1, she sees her normal Desktop. When Kalea logs on to the
Windows 2000 Professional computer W2KSales2, she does not see
her normal Desktop. What is the most likely cause?
A. A roaming user profile is not configured for Kalea.
B. Kalea does not have permissions to access her user profile from
W2KSales2.
C. Kalea has a mandatory profile configured in W2KSales2.
D. The computer that Kalea is logging on from is a Windows NT 4
computer.
Copyright © 2000 SYBEX Inc., Alameda, CA.
www.sybex.com
366 Chapter 8
Using User Profiles and Hardware Profiles
15. How many hardware profiles are created on a Windows 2000 Profes-
sional computer by default?
A. 0
B. 1
C. 2
D. 3
16. Which of the following computers would most likely use a hardware
profile in Windows 2000?
A. A computer that dual-boots
B. A computer that was upgraded from Windows 95
C. A computer without Plug-and-Play hardware
D. A laptop computer that uses a docking station
17. Which of the following groups are able to manage mandatory user
profiles?
A. The user who the profile is assigned to
B. The Administrators group
C. The Power Users group
D. The Server Operators group
18. Nicky and Jaime share the same Windows 2000 Professional com-
puter. Nicky has configured a Desktop that Jaime would like to use.
How can you configure Jaime’s user profile so that it will initially
match Nicky’s settings?
A. Copy the NTUSER.DAT file from Nicky’s folder to Jaime’s folder.
B. Configure a roaming profile that will be used by both users.
C. Copy Nicky’s user profile to Jaime’s folder in the Documents
and Settings folder using Control Panel, System, User Profiles
tab. Configure the profile so that Jaime is permitted to use the
copied profile.
D. Copy Nicky’s user profile to Jaime’s folder in the Profiles folder
using Control Panel, System, User Profiles tab.
Copyright © 2000 SYBEX Inc., Alameda, CA.
www.sybex.com
Review Questions 367
19. Which of the following steps is not required to configure a mandatory
profile?
A. Create the profile that will be used.
B. Rename the NTUSER.DAT file to NTUSER.MAN.
C. Specify that the user will use a mandatory profile in Control Panel,
System, User Profiles tab.
D. Configure the profile as a roaming profile.
20. Bette has completely mucked up her user profile. What is the easiest
way to restore her Desktop to the original configuration?
A. Copy the default user profile to Bette’s folder in the Documents
and Settings folder.
B. Delete Bette’s user profile through Control Panel, System, User
Profiles tab.
C. Delete user Bette and recreate user Bette.
D. Create a new user, then copy the new user’s user profile to Bette’s
folder in the Profiles folder.
Copyright © 2000 SYBEX Inc., Alameda, CA.
www.sybex.com
368 Chapter 8
Using User Profiles and Hardware Profiles
Answers to Review Questions
1. B. The default location for user profiles is the \Documents and Settings
folder in Windows 2000. In Windows NT 4, the default location for
user profiles was \WINNT\Profiles.
2. B. By default, user profiles are named NTUSER.DAT in Windows 2000
Professional. This is the same default filename that was used in Win-
dows NT 4.
3. D. After you create the profile that will be used as the roaming profile,
you create a folder and share on the network location where the roam-
ing profile will be stored. You use the User Profiles tab of the System
Properties dialog box in Control Panel to copy the local profile to the
network share. Finally, you specify that the user is using a roaming
profile by configuring the user’s properties through the Local Users
and Groups utility. In the Profile tab, you specify a UNC path for the
roaming profile.
4. B, C, D. User profiles generally contain user preference items, which
include mouse pointers, keyboard layout, and screen saver settings.
User profiles do not contain computer configuration settings such as
mouse drivers.
5. B, C, D. Creating a mandatory profile involves three main steps. First,
rename the user profile from NTUSER.DAT to NTUSER.MAN. Second,
copy the profile to a network share using the User Profiles tab of the
System Properties dialog box in Control Panel. Third, in the Local
Users and Groups utility, access the properties of the user who will be
assigned the roaming profile, and specify the location of the manda-
tory profile. This path must be a UNC path for the mandatory profile
to work.
6. A, D. The only options that can be configured when you set hardware
profile properties are whether or not the computer is portable and
whether or not the hardware profile will be included in the hardware
profile selection options when Windows 2000 Professional is booted.
Copyright © 2000 SYBEX Inc., Alameda, CA.
www.sybex.com
Answers to Review Questions 369
7. A. You specify the location of a user profile through the Local Users
and Groups utility.
8. C. If the Profile Path box is blank, then the user will use a locally
stored profile by default.
9. B. You use a UNC path to specify the location of roaming profiles.
UNC paths always start with two backslashes \\, followed by the
computer name, followed by the share name. If there are any subfold-
ers under the share, then they can be a part of the UNC path. In this
example, the correct UNC path to find Rick’s profile is
\\SERVER\PROFILES\RICK.
10. D. If Brett had never logged on to the computer, he would not have a
folder. You can assume that you are in the correct folder since the win-
dow shows the folders associated with user profiles. If Brett has a
folder, he is using a local profile, or at some point he had a local pro-
file. The most logical explanation is that since the NTUSER.DAT file is
hidden, you need to configure Folder Options to display hidden files.
11. D. When you configured your two hardware profiles, it is possible
that the undocked profile was set as the default selection if no choice
was made within a set amount of seconds.
12. D. When you have multiple hardware profiles, by default, you see a
menu during the computer startup that allows you to select the hard-
ware profile that will be used. Through this menu, you can select from
the docked or undocked profile.
13. B, C. In order to use roaming and mandatory profiles, you must store
the profiles on a Windows 2000 Server computer.
14. A. By default, profiles are only configured to be used locally. In this
case, it is likely that Kalea has not had a roaming profile configured.
15. B. By default, there is one hardware profile created, called Profile 1.
Copyright © 2000 SYBEX Inc., Alameda, CA.
www.sybex.com