Tài liệu Module 6: Administering Printer Resources ppt
Bạn đang xem bản rút gọn của tài liệu. Xem và tải ngay bản đầy đủ của tài liệu tại đây (826.53 KB, 40 trang )
Contents
Overview 1
Introduction to Administering Printers 2
Managing Printer Permissions 6
Lab A: Administering a Printer 9
Managing Printers 14
Lab B: Redirecting a Printer 20
Managing Documents in the Print Queue 23
Administering Printers by Using a Web
Browser 26
Lab C: Using a Web Browser to Administer
Printers 27
Best Practices 32
Review 33
This course is a prerelease course and is based on
Microsoft Windows 2000 Beta 3 software. Content in the
final release of the course may be different than the content
included in this prerelease version. All labs in the course
are to be completed using the Beta 3 version of
Microsoft Windows 2000 Advanced Server.
Module 6: Administering
Printer Resources
Information in this document is subject to change without notice. The names of companies,
products, people, characters, and/or data mentioned herein are fictitious and are in no way intended
to represent any real individual, company, product, or event, unless otherwise noted. Complying
with all applicable copyright laws is the responsibility of the user. No part of this document may
be reproduced or transmitted in any form or by any means, electronic or mechanical, for any
purpose, without the express written permission of Microsoft Corporation. If, however, your only
means of access is electronic, permission to print one copy is hereby granted.
Microsoft may have patents, patent applications, trademarks, copyrights, or other intellectual
property rights covering subject matter in this document. Except as expressly provided in any
written license agreement from Microsoft, the furnishing of this document does not give you any
license to these patents, trademarks, copyrights, or other intellectual property.
1999 Microsoft Corporation. All rights reserved.
Microsoft, MS-DOS, MS, Windows, Active Directory, PowerPoint, and Windows NT are either
registered trademarks or trademarks of Microsoft Corporation in the U.S.A. and/or other countries.
The names of companies, products, people, characters, and/or data mentioned herein are fictitious
and are in no way intended to represent any real individual, company, product, or event, unless
otherwise noted.
Other product and company names mentioned herein may be the trademarks of their respective
owners.
Project Lead/Senior Instructional Designer:
Red Johnston
Instructional Designers:
Tom de Rose (S&T OnSite), Meera Krishna (NIIT (USA) Inc.)
Program Manager:
Jim Cochran (Volt Computer)
Lab Simulations Developers:
David Carlile (ArtSource), Tammy Stockton (Write Stuff)
Technical Contributor:
Kim Ralls
Graphic Artist:
Julie Stone (Independent Contractor)
Editing Manager:
Tina Tsiakalis
Editors:
Wendy Cleary (S&T OnSite), Diana George (S&T OnSite)
Online Program Manager:
Nikki McCormick
Online Support:
Tammy Stockton (Write Stuff)
Compact Disc Testing:
ST Labs
Production Support:
Rob Heiret, Ismael Marrero, Mary Gutierrez (Wasser)
Manufacturing Manager:
Bo Galford
Manufacturing Support:
Mimi Dukes (S&T OnSite)
Lead Project Manager, Development Services:
Elaine Nuerenberg
Lead Product Manager:
Sandy Alto
Group Product Manager:
Robert Stewart
Module 6: Administering Printer Resources iii
Introduction
This module provides students with the knowledge and skills that are necessary
to administer printers in a Microsoft
®
Windows
®
2000 network. The module
discusses the printing components and the procedures to share a printer and
locate a printer on the network. The module also explains printer permissions
and the procedure to assign printer permissions to users and groups. It also
covers the tasks involved in managing printers, such as pausing and restarting
printers. Finally, the module discusses how to manage documents in a print
queue.There are three labs in this module. In the first lab, students locate an
existing printer, assign permissions to a printer, and share a printer on the
network. In the second lab, students pause and restart a printer and redirect print
jobs to another printer. In the third lab, students administer a print queue using
Microsoft Internet Explorer.
Materials and Preparation
This section provides you with the materials and preparation needed to teach
this module.
Materials
To teach this module, you need the following materials:
!"
Microsoft PowerPoint
®
file 1556A_06.ppt
!"
Module 6, “Administering Printer Resources”
Preparation
To prepare for this module, you should:
!"
Read all the materials for this module. Some topics have animated slides
that are indicated by an icon in the lower left corner of the slide. These
slides require you to click them to play the animation.
!"
Review the Delivery Tips, Key Points, and animations in the module.
!"
Complete the three labs.
!"
Study the review questions and prepare alternative answers for discussion.
!"
Anticipate questions that students might ask. Write out the questions and
provide answers to them.
Presentation:
60 Minutes
Labs:
45 Minutes
iv Module 6: Administering Printer Resources
Module Strategy
Use the following strategy to present this module:
!"
Introduction to Administering Printers
Provide an overview of the printing process and the key printing
components. The topic on printing components has an animated slide. The
icon on the lower left corner of the slide identifies the slide. Use the slide to
walk students through the printing process. Then explain the procedures to
share a printer on the network and locate a shared printer on the network.
!"
Managing Printer Permissions
Explain the importance of using permissions to control access to printers.
Introduce the three levels of permissions and demonstrate the procedure to
assign printer permissions.
!"
Managing Printers
Introduce the various tasks that a printer administrator will need to perform.
Then demonstrate and explain the procedures to assign forms to paper trays,
set a separator page, pause and restart printers, set the priority and printing
time for a printer, and redirect documents to a different print device.
!"
Managing Documents in the Print Queue
Explain that Windows 2000 provides the ability to manage documents in the
print queue. An administrator can pause, resume, and cancel the printing of
documents. Also, administrators can set the priority and printing time for
print jobs in the queue.
!"
Administering Printers by Using a Web Browser
Discuss the advantage of administering printers from a central location.
Then, demonstrate the procedure to access printers and manage them using
a Web browser.
!"
Best Practices
Read the best practices before you start the module, and then refer to the
appropriate practice as you teach the corresponding module section. Then,
at the end of the module, summarize all of the best practices for the module.
Module 6: Administering Printer Resources v
Customization Information
This section identifies the lab setup requirements for a module and the
configuration changes that occur on the student computers during the labs.
This information is provided to assist you in replicating or customizing
Microsoft Official Curriculum (MOC) courseware.
The labs in this module are also dependent on the classroom
configuration that is specified in the “Customization Information” section at
the end of the Classroom Setup Guide for course 1556A, Administering
Microsoft Windows 2000.
Lab Setup
The following list describes the setup requirements for the labs in this module.
Setup Requirement 1
The labs in this module require the following group accounts: Sales and
Graphics global groups.
To prepare the student computers to meet this requirement:
!"
Run the Lab061.cmd script on one of the two domain controllers in each
subdomain.
If you run the script on both domain controllers, the labs will not
function properly.
Setup Requirement 2
The labs in this module require that the printers described in the following table
be installed on the student computers.
Printer Printer name Share name Default
HP LaserJet 5Si HP LaserJet 5Si HPLaserJ Yes
HP LaserJet 5Si HP LaserJet 5Si 2 <not shared> No
HP Color LaserJet 5 HP Color LaserJet 5 HPColorL No
To prepare the student computers to meet this requirement, perform one of the
following actions:
!"
From the Trainer Materials compact disc, run the Instprint.bat script on each
domain controller in each child domain.
If you use the script to install the printers, you will have to open the
printers folder and stop sharing HP LaserJet 5Si 2.
!"
Install the printers manually on each domain controller.
Ensure that the List in directory option is selected when sharing the printers
manually.
Important
Caution
Caution
vi Module 6: Administering Printer Resources
Lab Results
Performing the labs in this module introduces the following configuration
changes:
The addition of the following shared printers: HP LaserJet 5Si, HP LaserJet
5Si 2, and HP Color LaserJet 5, which are listed in Active Directory
™
directory
service.
Module 6: Administering Printer Resources 1
Overview
!
Introduction to Administering Printers
!
Managing Printer Permissions
!
Managing Printers
!
Managing Documents in the Print Queue
!
Administering Printers by Using a Web Browser
!
Best Practices
Printers are a common resource shared by multiple users on a network. As an
administrator, you need to assign permissions to users to access the printers on
the network, as well as perform tasks such as managing the print queue, setting
printer priority, and redirecting documents to a different printer. With
Microsoft
®
Windows
®
2000, you can perform printer administration tasks by
using a Web browser. This simplifies the tasks greatly by centralizing printer
management.
At the end of this module, you will be able to:
!"
Access printers for administration.
!"
Manage printer permissions.
!"
Manage printers.
!"
Manage documents in the print queue.
!"
Administer printers by using a Web browser.
!"
Apply best practices for administering printers.
Slide Objective
To provide an overview of
the module topics and
objectives.
Lead-in
In this module, you will learn
about administering printers
that are a part of the existing
network.
2 Module 6: Administering Printer Resources
#
##
#
Introduction to Administering Printers
!
Printing Components
!
Sharing a Printer
!
Locating Printers for Administration
With Windows 2000, you can share printing resources across an entire network
and administer printing from a central location.
To administer printers, you should be familiar with the different printing
components in order to understand how they fit together. You should also be
aware of how to share printers on the network and locate them for
administration.
Slide Objective
To introduce printer
administration.
Lead-in
As part of your
responsibilities as a system
administrator, you will need
to manage the printer
resources on the network.
Delivery Tip
This is an introduction to
printer administration.
Prepare students for the
topic by providing the
following key points of
information.
Key Points
The printing components
work together to complete
the print process.
Printers can be shared
for use by a large number
of users.
To locate shared printers for
administration, use the Find
feature.
Module 6: Administering Printer Resources 3
Printing Components
Word.doc
Word.doc
Printer
Printer
Printer
Print Device
Print Device
Print Device
Print Server
Print Server
Print Server
Print Command
Print Command
Print Command
Printer Driver
Printer Driver
Printer Driver
Word.doc
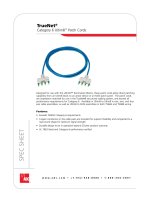
There are four important printing components in a network environment. These
are printers, printer drivers, print servers and print devices. To understand how
these components function together, let us examine the path followed by a print
command after it is issued from a computer.
On the computer on which it is issued, the print command goes to a printer. A
printer is the software interface between the print device and the operating
system of the computer. The printer defines where a print command will go to
reach the print device (the local computer, a network location, or a file), when it
will go, and various other aspects of the printing process. When users make
connections to printers, they use printer names, which can point to one or more
print devices.
From the printer, the print command is sent to a print server. A print server is
the computer that receives and processes documents from client computers.
The print server uses a printer driver that is installed on it to convert the print
command so that it is possible for a print device to print a document. A printer
driver is one or more files containing information that Windows 2000 requires
to convert print commands into a specific printer language, such as PostScript.
A printer driver is specific to each print device model.
After the printer driver converts a print command into a specific printer
language, it goes to the print device. A print device is the hardware device that
produces printed documents. Windows 2000 supports the following print
devices:
!"
Local print devices, which are connected to the local computer
!"
Network-interface print devices, which are connected to a print server
through the network
Slide Objective
To introduce the various
printing terms.
Lead-in
Before you administer the
printers in the network, you
need to understand the
different printing terms.
Delivery Tip
The slide for this topic is
animated. The icon on the
lower left corner indicates
the animated slide. Begin by
explaining to students that
the term “printer” is
commonly used to refer to
the print device. Then
proceed to explain what the
printer is, and walk students
through the print process.
4 Module 6: Administering Printer Resources
Sharing a Printer
HP LaserJet 4Si Properties
OK Cancel
A
pply
Ad
ditional Drivers
HP LaserJet 4Si
No
t shared
Shared as:
HPLaserJ
List in the Directory
Drivers for different versions of Windows
If this printer is shared with users running different versions of
Windows then you will need to install additional drivers for it.
General
Sharing
Ports Advanced Security Device Settings
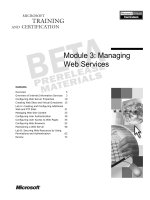
A printer is a resource that multiple users will probably need to access. To
make this possible, you need to share the printer. To share a printer, you need to
specify a share name for the printer and then assign access permissions for users
to connect to it.
To share a printer:
1. Select the printer that you need to share, right-click it, and then click
Properties.
2. In the Properties dialog box, click the Sharing tab.
3. Select the Shared as option, and then type a share name in the box.
4. Select the List in the Directory check box to ensure that the printer
displays in Active Directory
™
directory service.
5. After you specify the required information in the Printer Properties dialog
box, click OK.
If any of the computers in the network that will connect to the shared
printer are running a version of Windows other than Windows 2000, you need
to install additional drivers on the shared printer.
Slide Objective
To explain how to share a
printer.
Lead-in
Multiple users on the
network can access a
printer. To make it possible
for all users to access the
printer, you need to share it.
Delivery Tip
Demonstrate how to share a
printer.
Note
Module 6: Administering Printer Resources 5
Locating Printers for Administration
Find Printers
File Edit View Help
Find: In: nwtraders
Fi
nd Now
Stop
Stop
Clear All
B
rowse
Advanced
Printers
Printers
Na
me:
Lo
cation:
Features
M
odel:
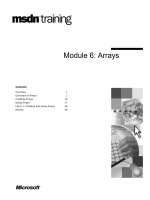
To perform administration tasks such as modifying permissions on a shared
printer, you need to locate the specific printer from the list of shared printers in
Active Directory. If Active Directory is large, locating a printer can be tedious.
To help you locate a shared printer easily, Windows 2000 provides the Find
feature.
To find a shared printer:
1. In Active Directory Users and Computers, right-click the domain name to
which the printer belongs, and then click Find.
2. In the Find list, select Printers. Add any search criteria for which you wish
to search—such as name, location, or model—or leave the search criteria
unspecified to search for all printers in the domain. When you are done,
click Find Now.
You can also use the Search For Printers option on the Start menu to access
the same Find Printers dialog box.
You will need to access some tasks that you perform with the printers directly,
either through the Printers option in Control Panel, or by clicking Printers on
the Settings menu on the Start menu.
Slide Objective
To explain how to locate a
printer in the network.
Lead-in
To administer a printer in
the network, you need to
locate it in Active Directory.
Key Point
When the size of Active
Directory becomes large,
locating a specific printer
can be very difficult. You
can simplify this task by
using the Find feature.
6 Module 6: Administering Printer Resources
#
##
#
Managing Printer Permissions
!
Introduction to Printer Permissions
!
Assigning Printer Permissions
Permissions
Permissions
Windows 2000 allows you to control printer usage and administration by
assigning permissions. By using printer permissions, you can control which
users are able to use a printer. You can also assign printer permissions to
control which users can administer a printer and set the level of administration
for managing printers and documents.
Slide Objective
To introduce managing
printer permissions.
Lead-in
You set printer permissions
to control the use and
administration of the printers
in the network.
Delivery Tip
This section explains printer
permissions. Prepare
students for the topic by
providing the following key
points of information.
Key Points
Permissions help to control
the use of a printer.
Assign printer permissions
to allow administrative
capabilities to specific
users.
Module 6: Administering Printer Resources 7
Introduction to Printer Permissions
Manage Documents
Manage Documents
Manage Printers
Manage Printers
Manage Printers
Permissions
Permissions
Permissions
Permissions
Permissions
Permissions
!
Allow or Deny Printer Permissions
You will use printer permissions to delegate responsibilities for specific printers
to users who are not administrators. You can also use permissions to limit user
access to certain printers for security reasons. Windows 2000 provides three
levels of printer permissions: Print, Manage Documents, and Manage Printers.
The following table lists the capabilities of each level of permission.
Capabilities
Manage
documents
Manage
printers
Print documents Yes No Yes
Pause, resume, restart, and cancel the
user’s own document
Yes Yes Yes
Connect to a printer Yes Yes Yes
Control job settings for all documents No Yes Yes
Pause, resume, restart, and cancel all
other users’ documents
No Yes Yes
Cancel all documents No Yes Yes
Pause and resume a printer, and take
a printer offline
No No Yes
Share a printer No No Yes
Change printer properties No No Yes
Delete a printer No No Yes
Change printer permissions No No Yes
You can allow or deny printer permissions. Denied permissions always override
allowed permissions. For example, if you select the Deny check box next to
Manage Documents for the Everyone group, no one can manage documents,
even if you granted this permission to another user account or group. This is
because all user accounts are members of the Everyone group.
Slide Objective
To explain printer
permissions.
Lead-in
You can use printer
permissions to control who
can print and the types of
administrative tasks that a
user can do.
Delivery Tip
Emphasize to students that
they should grant to users
only the minimum
permissions required to
perform their jobs.
8 Module 6: Administering Printer Resources
Assigning Printer Permissions
HP LaserJet 4Si Properties
General Sharing Ports Advanced
Security
Device Settings
OK Cancel Apply
Ad
d
R
emove
Name
P
ermissions:
Adv
anced
Manage Printers
Manage Documents
Allow Deny
Everyone
Creator Owner
Administrators (NWTRADERS\Administrators)
Server Operators (NWTRADERS\Server Operators)
Print Operators (NWTRADERS\Print Operators)
$
You can assign printer permissions to users or groups. By default, Windows
2000 assigns the Print permission for each printer to the built-in Everyone
group, allowing all users to send documents to the printer. However, you can
change these permissions if you need to restrict printer access to specific users
or groups. For example, you might need to limit the use of a color printer to
users from the Marketing department of your organization. In this case, you
would remove the default permission of the Everyone group and assign
permission only to the Marketing group.
To assign printer permissions:
1. Locate the printer by using the Find feature, and then select it.
2. In the Properties dialog box, click the Security tab. Now, you can add,
remove, or modify printer permissions for users and groups.
Slide Objective
To explain how to assign
printer permissions.
Lead-in
Remove the default Print
permission that is assigned
to the Everyone group,
unless you want anyone to
be able to print to the
printer.
Delivery Tip
Review the membership of
the Everyone group.
Demonstrate how to change
print permissions.
Key Point
All users have the Print
permission by default.
Module 6: Administering Printer Resources 9
Lab A: Administering a Printer
Objectives
After completing this lab, you will be able to:
!"
Find a printer in Active Directory
™
directory service.
!"
Share a printer.
!"
Assign permissions to a printer.
Prerequisites
Before working on this lab, you must:
!"
Be familiar with assigning permissions.
Estimated time to complete this lab: 15 minutes
For More Information
You need the following information:
Your domain name_____________________________________________
Your computer name ___________________________________________
Your partner’s computer name____________________________________
Slide Objective
To introduce the lab.
Lead-in
In this lab, you will use the
Find feature to locate a
printer, share a printer, and
modify printer permissions.
Delivery Tip
Explain the lab objectives.
Review the lab answers.
Ask students if they
encountered any problems
during the lab.
10 Module 6: Administering Printer Resources
Exercise 1
Finding a Printer and Assigning Permissions
You have a single color printer to which everyone in your organization
currently has access. Because of the high cost of color printing, you need to
limit the users who are able to use this printer. Personnel in the Sales and
Graphics departments are the only users that absolutely require the use of the
color printer. You will need to locate the printer in Active Directory, give the
Sales and Graphics groups permission to use it, and remove the capability for
others to submit jobs.
!!
To find the color printer
1. Log on to Microsoft
®
Windows
®
2000 as Administrator.
2. Click Start, click Programs, click Administrative Tools, and then click
Active Directory Users and Computers.
3. Maximize the window.
4. Right-click DomainName.nwtraders.msft (where DomainName is your
domain).
5. Click Find.
6. In the Find Users, Contacts, and Groups dialog box, in the Find list,
select Printers.
The name of the dialog box changes to Find Printers.
7. In the In box, make sure that your domain name is selected.
8. On the Features tab, select the Can print color check box.
What other information would be useful in searching for printers?
Answers will vary. Possible answers include location, paper size, and
resolution.
____________________________________________________________
____________________________________________________________
When would this information be useful?
Location—when you want to determine the proximity to a certain
department.
Paper size—when you want to specify legal size for accounting spread
sheets.
____________________________________________________________
____________________________________________________________
9. Click Find Now.
The HP Color LaserJet 5 printer for both your partner and you should
appear in the section at the bottom of the Find Printers dialog box.
When using Find, where are you actually looking for the printers?
You are searching Active Directory for the shared printers.
____________________________________________________________
____________________________________________________________
Module 6: Administering Printer Resources 11
!!
To assign permissions
1. Right-click the printer for your server, and then click Properties.
2. Click the Security tab.
Who can submit print jobs currently?
The Everyone group, Administrators, Server Operators, and Print
Operators.
3. Click Add.
4. Select the Sales group, and then click Add.
5. Select the Graphics group, and then click Add.
6. Click OK to close the Select Users, Computers, or Groups dialog box.
What are the default permissions applied to the groups?
Print.
____________________________________________________________
If the users have only print permission, will they be able to affect their own
documents in the print queue? If so, how?
Yes. When a user sends a job to the printer, the user becomes the
Creator/Owner of that job. The Creator/Owner system group has the
Manage Documents permission on documents. This permission will
allow users to manage their own documents.
____________________________________________________________
____________________________________________________________
What else must you do to prevent other users from printing to this printer?
You must remove the Everyone group.
7. Select the Everyone group, and then click Remove.
8. Click OK to close the Printer Properties dialog box.
9. Close the Find Printers dialog box.
10. Close Active Directory Users and Computers.
11. Log off Windows 2000.
12 Module 6: Administering Printer Resources
Exercise 2
Sharing a Printer
You have installed a new print device on a server and want users on the
network to be able to use it. You only want users that have been validated by a
domain controller to be able to use the printer. You will have to log on to the
server to accomplish this. You will need to share the printer and assign
permissions to allow only users that have valid accounts in the domain to use
the printer.
!!
To share a printer
1. Log on to Windows 2000 as Administrator with a password of password
2. Click Start, point to Settings, and then click Printers to open the Printers
folder.
The Printers folder opens, showing the printers that have been installed on
the server.
How can you tell which printers have been shared?
Shared printers will appear with an icon of a hand beneath them.
____________________________________________________________
____________________________________________________________
3. Right-click HP LaserJet 5SI 2, and then click Sharing.
The Properties dialog box for the HP LaserJet 5SI 2 opens with the
Sharing tab open.
4. Click Shared as.
5. Type HPLaser2
Why is it necessary to share a printer?
Sharing the printer allows others on the network to use it.
____________________________________________________________
____________________________________________________________
Make sure the List in the Directory check box is selected.
What will happen if List in the Directory is not selected?
You will not be able to use the Find feature and search Active Directory
for the printer.
____________________________________________________________
____________________________________________________________
Note
Module 6: Administering Printer Resources 13
!!
To change the permissions on a printer
1. Click the Security tab.
The default permissions appear.
2. Select the Everyone group, and then click Remove.
3. Click Add.
4. Select the Users group, and then click Add.
5. Click OK to close the Select Users, Computers, or Groups dialog box.
What are the default permissions applied to the group?
Print.
____________________________________________________________
____________________________________________________________
6. Click OK to close the Printer Properties dialog box.
7. Close the Printers folder.
8. Log off Windows 2000.
14 Module 6: Administering Printer Resources
#
##
#
Managing Printers
!
Assigning Forms to Paper Trays
!
Setting a Separator Page
!
Pausing and Restarting a Printer
!
Setting Priority and Printing Time for a Printer
!
Redirecting Documents to a Different Print Device
To ensure that the printers in the network are available when required and
provide facilities such as a choice of paper sizes and identification for different
print jobs, it is necessary to administer them. The tasks involved in printer
administration include assigning forms to paper trays and setting a separator
page. You can pause, resume, and cancel documents if a problem occurs on a
print device, and you can set priority and printing times for a print device. Also,
if a print device fails, you can redirect documents to a different print device.
Slide Objective
To present an overview of
the tasks that are involved in
administering a printer.
Lead-in
Administering printers
includes a number of
responsibilities.
Delivery Tip
This section covers
managing printers. Prepare
students for the topic by
providing the following key
points of information.
Key Points
You can assign forms to
paper trays.
You can set a separator
page.
You can pause, resume,
and cancel documents on a
faulty print device.
You can set the priority and
printing time for a print
device.
You can redirect documents
from a faulty print device to
a different print device.
Module 6: Administering Printer Resources 15
Assigning Forms to Paper Trays
HP LaserJet 4Si Properties
General Sharing Ports Advanced Security
Device Settings
OK Cancel
A
pply
A
pply
HP LaserJet 4Si Device Settings
Form To Tray Assignment
Auto Select:
Letter
Upper Paper Tray: Letter
Manual Paper Feed: Letter
Lower Paper Tray: Letter
Envelope Feeder: Letter
Font Substitution Table
Installed Font Cartridge(s)
Slot # 1: Not Available
Slot # 2: Not Available
Page Protection: Off
External Fonts…
Installable Options
Printer Memory: 2MB
Duplex Unit (for 2-Sided Printing): Installed
If a print device has multiple trays that regularly hold different paper sizes, you
can assign a form to a specific tray. A form defines a paper size. Users can then
select a paper size from within their applications. When the user issues a print
command, Windows 2000 automatically routes the print job to the paper tray
that holds the correct form.
Examples of form types are:
!"
Legal size
!"
A4
!"
Envelopes#10
!"
Letter small
To assign forms to paper trays:
1. Open the Properties dialog box for the printer, and then click the Device
Settings tab.
2. The Form To Tray Assignment option offers choices of paper sizes for
every tray. Select a paper size for each tray.
3. Click OK.
After you have set up a paper tray, users can specify the paper size from
within applications. Windows 2000 automatically detects the paper tray in
which each form is located.
Slide Objective
To explain how to assign
different forms to paper
trays.
Lead-in
When you assign forms to
paper trays, users have the
option of printing on these
forms.
Delivery Tip
Demonstrate how to assign
a legal size form to the
upper tray.
Key Point
Different forms represent
different paper sizes.
Note
16 Module 6: Administering Printer Resources
Setting a Separator Page
!
Contains Printer Commands
!
Identifies and Separates Printed Documents
!
Switches Print Modes
Separator File
Name
Separator File
Separator File
Name
Name
Function
Function
Function
Sysprint.sep
Sysprint.sep
Prints a page before each document
Prints a page before each document
Pcl.sep
Pcl.sep
Switches the printing mode to PCL
Switches the printing mode to PCL
Pscript.sep
Pscript.sep
Switches the printing mode to PostScript
Switches the printing mode to PostScript
Sysprtj.sep
Sysprtj.sep
Uses Japanese characters
Uses Japanese characters
If your printer accommodates different types of printing, such as PostScript or
another language, you will need to use a separator page to switch modes for
different print jobs. A separator page is a file that contains print device
commands that:
!"
Identify and separate printed documents.
!"
Switch the print device between print modes. Some print devices can switch
between print modes that take advantage of different device features. You
can use separator pages to specify the correct page description language. For
example, you can specify PostScript or Printer Command Language (PCL)
for a print device that can switch between different print modes but cannot
automatically detect which language a print job uses.
Windows 2000 includes four separator page files. They are located in the
systemroot\System32 folder. The following table lists the file names and
functions of each of the included separator page files.
File name Function
Sysprint.sep Prints a page before each document. Compatible with PostScript print
devices.
Pcl.sep Switches the print mode to PCL for HP-series print devices, and
prints a page before each document.
Pscript.sep Switches the print mode to PostScript for HP-series print devices, but
does not print a page before each document.
Sysprtj.sep A version of Sysprint.sep that uses Japanese characters.
To select a separator page, in the Properties dialog box for the printer, click the
Advanced tab. Click the Separator Page button, and, in the Separator Page
dialog box, type the name of the separator page file. You can also browse for
the separator page file. After you have finished, click OK.
Slide Objective
To explain how to set a
separator page.
Lead-in
A separator page is a file
that contains printer
commands to separate
documents and switch print
modes.
Delivery Tip
Demonstrate how to set up
a separator page.
Module 6: Administering Printer Resources 17
Pausing and Restarting a Printer
!
Pause Printing to Temporarily Stop All Documents
!
Clear Pause Printing to Resume Printing
!
Cancel All Documents to Delete All Documents
HP LaserJet 4Si
Printer Document View Help
Status Owner Pages Size
Set As Default Printer
Printing Preferences…
Cancel All Documents
Sharing
Use Printer Offline
Properties
Close
Set As Default Printer
Printing Preferences…
Cancel All Documents
Sharing
Use Printer Offline
Properties
Close
Pause Printing
Connect
Connect
$
As an administrator, you control all the print jobs on a printer. If a printing
problem occurs, you can pause and resume a printer, or even cancel all of the
documents on a printer. To perform these tasks, open the Printers folder in
Control Panel or on the Settings menu on the Start menu. Double-click the
printer, and then click the appropriate command on the Printer menu.
The following table describes the tasks that you might need to perform when
you manage printers. Performing any of the tasks from the Printer menu affects
all of the documents in the print queue.
Task Action Example
To pause printing Click
Pause Printing
. A
check mark appears next to the
Pause Printing
command,
which indicates that the printer
is paused.
Pause the printer until you
fix the problem with the
printer or print device.
To resume printing Click
Pause Printing
. The
check mark next to the
Pause
Printing
command
disappears, which indicates
that the printer is active.
Resume printing after you
fix a problem with the
printer or print device.
To cancel all
documents
Click
Cancel All Documents
.
All documents are then deleted
from the printer.
Cancel all documents to
clear a print queue after all
of the documents that are no
longer needed have
accumulated.
You can also pause a printer by taking the printer offline. When you take
a printer offline, documents stay in the print queue, even when you shut down
and restart the print server. To take a printer offline, open the printer window,
and, on the Printer menu, click Use Printer Offline.
Slide Objective
To explain how to pause
and resume a printer.
Lead-in
When you manage a printer,
you control all of the print
jobs that users send to the
printer.
Delivery Tip
Demonstrate pausing and
resuming a print job. While
demonstrating a task,
explain why you might do
the task.
Note
18 Module 6: Administering Printer Resources
Setting Priority and Printing Time for a Printer
HP LaserJet 4Si Properties
General Sharing Ports
Advanced
Security Device Settings
OK Cancel
A
pply
A
pply
Always Available
Availab
le from
12:00 AM 12:00 AM
Priority
: 1
Driver: HP LaserJet 4Si
New Driver
Spool print documents so program finished printing faster
St
art printing after last page is spooled
Start printing i
mmediately
Print d
irectly to printer
H
old mismatched documents
Pr
int spooled documents first
K
eep printed documents
E
nable advanced printing features
Printing Defaults Print Processor Separator Page
To
Sometimes when printers point to the same print device, you need to assign a
higher priority to one printer over another. You might also need to set a printer
to print only during off-hours. To do so, you can modify the default priority and
printing time set for the printer.
To change the priority and printing time for a printer:
1. Right-click the printer, and then click Properties.
2. Click the Advanced tab in the Properties dialog box to set the priority and
printing time.
The following table describes the tasks that you can perform when you control
print jobs, how to perform the tasks, and examples of situations in which you
can perform these tasks.
Task Action Example
Change printer priority Select the priority that you
want. The highest priority
is 99, and the lowest is 1.
Change the priority
assigned to the printer so
that a critical document
from another printer can
print before other
documents.
Set available
print times
Select the
Available from
option, and specify start
and end times to access the
print device.
Set the print time for a
specific printer so that it
will access the print device
during off-hours, such as
late at night.
Slide Objective
To explain why and how to
change priority and printing
time for a printer.
Lead-in
Now let’s look at some other
tasks that you can do to
manage individual
documents.
Delivery Tip
Demonstrate how to set
priority and printing time for
a printer.
Module 6: Administering Printer Resources 19
Redirecting Documents to a Different Print Device
HP LaserJet 4Si Properties
General Sharing
Ports
Advanced Security Device Settings
HP LaserJet 4Si
OK Cancel
A
pply
A
pply
Print to the following port(s). Documents will print to the first
free checked port.
Port Description Printer
LPT1:
LPT2:
LPT3:
COM1:
COM2:
COM3:
COM4:
Printer Port
Printer Port
Printer Port
Serial Port
Serial Port
Serial Port
Serial Port
HP LaserJet 4Si
Add Port
Delete Port Configure Port
Enable bidirectional support
Enable printer pooling
!
New Print Device Must Use the Same Printer Driver
Printer Ports
N
ew Port Type New Port Cancel
A
vailable port types:
Local Port
Standard TCP/IP Port
You can redirect documents to a different print device. For example, if a print
device fails, redirect the documents so that users do not need to resubmit them.
You must redirect all print jobs for a print device—you cannot redirect specific
documents. The new print device must use the same printer driver as the current
print device.
To redirect documents to a different print device:
1. In the Properties dialog box for the printer, click the Ports tab.
2. Click the Add Port button, and, in the Printer Ports dialog box, click
Local Port. Then click the New Port button.
3. In the Port Name dialog box, type the path to the shared printer to which
you need to redirect documents as \\servername\share
4. Click OK.
If another print device is available for the current print server, you can
continue to use the same printer and configure the printer to use the other print
device. To configure a printer to use another local or network print device that
uses the same printer driver, select the appropriate port on the print server, and
cancel selection of the current port.
Slide Objective
To explain how to redirect
documents from one print
device to another.
Lead-in
You can redirect documents
to a local print device or a
network-interface print
device.
Delivery Tip
Demonstrate how to redirect
documents over the
network.
Note